Showing posts with label embossing paste. Show all posts

Friday, July 31, 2015

Pretty in Paste: Day Five

As I've pasted for the holidays all week long, I thought I'd share a favorite of mine for summer. Following the same pasting techniques that have been featured all week, with a couple of changes...

Three stencils were used for this...the Sand Castle, the Scallop, and the Small Scales background. Each was taped to its respective panel with removable tape. Each used a dab of Pearlescent Embossing Paste on the edge of the Paste Spreader, but then...a bit of bright pink ink was swiped at the edge of the spreader using the ink pad, or a bit of reinker. So, as you spreader the paste over the stencil design, you get striations in the paste. The first pass made was over the sand castle where you see more definitive lines. The next was over the scallop design. And finally, the last was over the scales background. All three were set aside to dry. Stencils and spreader were cleaned immediately with clean water and a small nailbrush.

Once dry, the card was assembled, adding a few embellishments and a printed sentiment.


For more paste perfection, visit these links:


Thursday, July 30, 2015

Pretty in Paste: Day Four...Dreamweaver Thursday

Have you seen enough embossing paste yet? Of course not! Dreamweaver's Embossing Pastes are so versatile and high quality, that everything you create with them becomes a work of art.

My card today features the same step-by-step process as I demonstrated in my tutorial on Monday, only using different stencils.

The Dreamweaver Snowflakes background stencil was paste-embossed in Pearlescent paste on a slate blue card, sprinkled with the Stampendous Ice Blue Specialty Enamel, and heated until bubbly and set.

I used the Oval Ornaments Nesting Dies to create one ornament, which I paste-embossed the Southwest Snowflake design in Silver paste, sprinkled this with Silver Embossing Powder, and heated until bubbly and set.

Just a few rhinestone stickers, and a swirl of silver tinsel cord finished off this icy blue textural greeting card.

Check out these links from more of my pasty pals:

Stampendous Blog


Wednesday, July 29, 2015

Pretty in Paste: Day Three

k
Today's Pretty in Paste card features one of the Dreamweaver all-in-one designs...Season of Joy. The process is simple and effective:

1. Place stencil on panel of cardstock, and tape on all four sides with removable tape.
2. Place a large dab of Pearlescent Embossing Paste on edge of Paste Spreader using palette knife.
3. Place edge of spreader with paste at top of design. Hold spreader with your fingers splayed out over the curved handle, and pull the paste over the stencil in one smooth pass. If there are any gaps, dab a bit of paste in them with the tip of palette knife, and then use spreader to pass over surface once more.
4. Place excess paste back in jar. Wipe around the lip of jar with clean paper towel or rag, and seal.
5. Carefully remove tape from three sides, using the fourth as a hinge to lift the stencil up and off.
6. Immediately place stencil and tools in water to be cleaned when done.
7. Sprinkle wet paste with Stampendous Ice Blue Embossing Enamel, and heat until bubbly and set. Sprinkle a bit of Shabby White Embossing Enamel, and heat from underneath for a bit of "snow".
8. Mat the panel and adhere to card.


For more info, visit the Stampendous Blog.

Monday, July 27, 2015

Pretty in Paste: Day One

Welcome to a week of playing with paste! Embossing Paste to be exact. Since Stampendous purchased Dreamweaver Stencils at the beginning of the year, we've been trying our best to educate crafters and artists regarding one of the best products on the market.
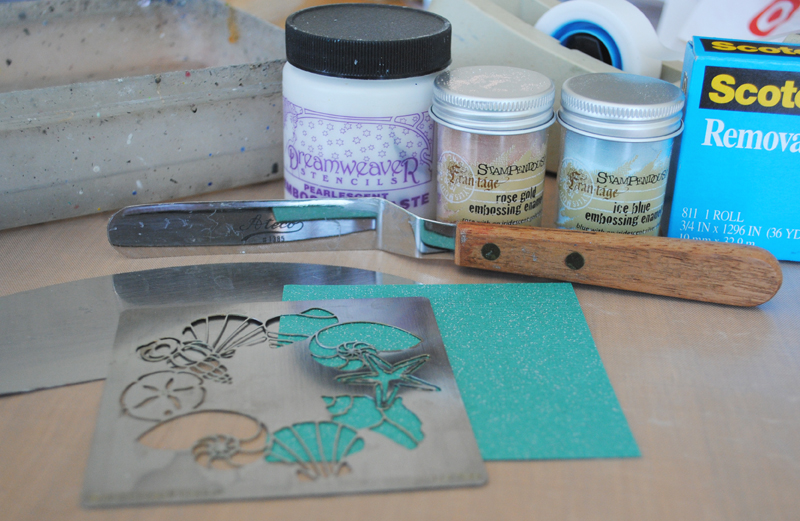
Supplies: Dreamweaver Pearlescent Paste, Shell Wreath, Stampendous Frantagé Ice Blue and Rose Gold Embossing Enamels, palette knife, Paste Spreader, removable tape, cardstock


My post today features one of the most fun ways to use embossing paste, and avoid the old "waiting for paint (paste, in this case) to dry" conundrum. The gorgeous Dreamweaver Shell Wreath lends itself quite well to this technique, and is a perfect design for a beachy Christmas theme, and for a wonderfully elegant beach-themed wedding as well. Here are the steps:

1. Tape stencil around all four sides to square panel of cardstock using removable tape.
2. Place large dab of embossing paste on edge of Paste Spreader. Lay edge of spreader at 90 angle at top of design, with your fingers spread over the curved middle, or handle.
3. Angle slightly, and spread across design with light pressure.

4. If there are any gaps that are missing paste, use the tip of your palette knife to add a small amount of paste in those areas before passing the spreader over the stencil one more time, lifting up and out at the end with all excess paste on spreader.
5. Replace paste into jar, wipe lip of jar, and seal.
6. Carefully remove tape from three sides, leaving one as a "hinge". Now you can lift the stencil up and off in one motion, and place in water to soak until time to clean.
7. Sprinkle embossing enamels over wet paste surface, and pour off excess.
8. Apply heat tool 3-4 inches from surface, heating until bubbly, textured, and shimmer. Set aside for just a few minutes to cool and completely harden.

This is a wonderful technique to use with so many of our Dreamweaver stencil designs. Play with it a bit, and let me know your thoughts on this fun use of embossing paste and embossing enamels. Then head over to the team's posts for more cool ideas!


Saturday, July 11, 2015

Woodware: Deb's Challenge...Nature Inspired

Woodware teammate, Deb Frost, has challenged us to be inspired by nature for this week. Love this challenge! The only difficulty is deciding which direction to go with it!

Obviously, I chose the sea for my inspiration. I mixed a bit of Dreamweaver Regular Embossing paste in two small batches...one with a bit of an aqua tint, and one with a terracotta tint, created by mixing in a bit of acrylic paints to the paste to get the shades that I desired.

I used the aqua paste to emboss the Dreamweaver Mosaic Swirls stencil on kraft cardstock, and when I matted in in black, and adhered it to a kraft card.

I dabbed a fairly thick portion of the terracotta paste on a scrap of cardstock, and let it dry. Once dry, the paste has a bit of give to it. This allowed me to place the Dreamweaver Nautilus stencil over the top, and carve away some of the paste using the Woodware Multi-crafting Tool set. The end result looks a bit like a fossil, which being the good geologists' daughter that I am, made me quite happy. I cut around the piece and adhered it to the card as well.

Finally, I ink-stenciled the Dreamweaver Seahorse on a piece of sea glass, and embossed it with Stampendous Sand Embossing Powder, and adhered that as well as a sentiment tag and ribbon to finish off my bit of nature.

Don't forget to check out the other nature inspired creations from the team this week. You can find all of their links on the Woodware Blog!

Wednesday, May 20, 2015

Welcome to the Stampendous Picnic!

Have you had the chance to see all of the fun summery, yummy, picnic-y images that Stampendous has released this spring? You can view them all HERE. Meanwhile, here's what I have to share with you today:

If you followed along with us last week, you'll remember that we had a fabulous collaboration with Clear Scraps. For some reason, my befuddled mind thought that it was the same week as the Picnic week, so I created with both. Um, yeah. So, I'm posting with my Clear Scraps banner card today.

The base card is Bazzill Basics Dotted Swiss in white, stamped with the Cling Picnic Ants border, using Onyx VersaFine from Tsukineko®. I paste-embossed the Dreamweaver OpArt Checkerboard in red on a small section of the clear banner, and set this aside to dry.

Meanwhile, I stamped the Cling Lunch Line in Tuxedo Black Memento, and colored with Copic Sketch Markers. I added the Cling Life is a Picnic sentiment as well. I cut this to fit a portion of the clear banner, edged it with a red marker, and adhered it to the banner. This allowed me to adhere the banner to the card with pieces of foam tape to pop it up off of the card. Some little snippets of May Arts' ribbon were tied through the holes at the top.

Just think how fun it would be to string several of these near your favorite picnic place? Clearly genius.


Just like the ants, march yourself on over to these posts for more yummy fun:


Wednesday, May 13, 2015

Stampendous and Clear Scraps: Clearly Creative


The Stampendous and Clear Scraps teams are having a transparently good time this week, and we'd love for you to visit our blogs for fun inspiration and an opportunity to win a fabulous prize package. We have three prize packages, each of which will include our Cling Jumbo Filigree Stamp Set, a Jumbo Perfectly Clear Acrylic Handle, PLUS a Clear Scraps Mixable Album and some extra acrylic accents! Comment on our blog and each designer’s blog of the day throughout this week of our hop and the winners will be announced Monday, May 18th. Please click the Official Rules for all the info on winning.

Clear Scraps are an amazing product, clearly designed for all of your favorite art media. You can read all about it on their website, as well as find locations to purchase this terrific line of products...and their blogsite is full of suggestions for incorporating these goodies along with products like Stampendous and Dreamweaver.

Here's what I've created for today's post:


This page is the perfect example of how the perfect embellishment can MAKE the project. I created this scrap page featuring pictures of my son, Matt, and his track racing that he loves so much. He also loves to fix things, change things, add things, and always has.
Therefore, using the Dreamweaver Stencils' Gears background was appropriate. This was paste-embossed in Matte Black, and sprinkled with Stampendous Aged Taupe and Aged Bronze Embossing Enamels, and then heated for plenty of texture and shine without looking blingy. The rest of the background was a few stamped images from Andy Skinner's Industrial and Steampunk Cling Sets licensed by Stampendous. Finally, the wonderful Clear Scraps Gears border which I daubed on more of the Matte Black
Embossing Paste, and sprinkled with a bit more of the enamels, and heated slightly. You have to keep the heat tool far from the surface or the acetate border will warp a bit. Once cool, I swiped a bit of Black StazOn ink around the edges. I'm really happy with how this turned out, and hope that he will be, too.

Today's link list:


Thursday, April 9, 2015

Dreamweaver Showers of Showers: Week Two

Ever use the expression, "When it rains, it pours"? This does not have to be a bad thing, does it? For the month of April, the Dream Team are featuring "Showers of Showers" as our theme. As usual, we'd love for you to play along. Just link your creation on the Dream It Up! blog for a chance to win the stencil of your choice...bonus chances for incorporating Dreamweaver and/or Stampendous in your design. Here's what I'm showering you with this week...

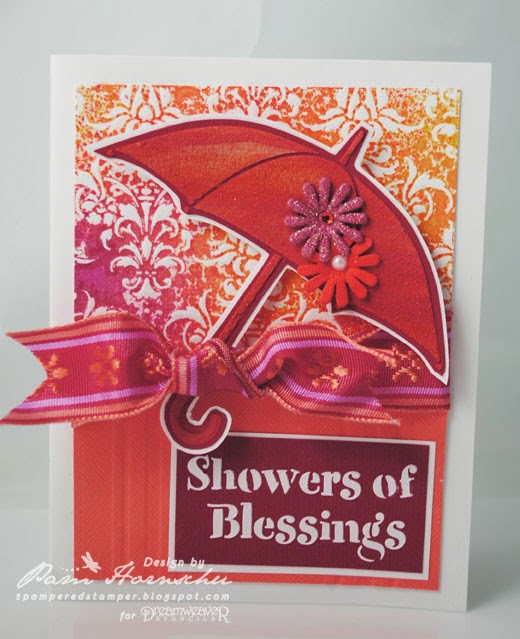
Some of you may recognize this card, as I've posted it before. I was recently in a bad car accident, so my level of strength for creating in my studio is a bit low. Though I was scared half to death, I do feel that I have "showers of blessings". I'm still alive. My son is still alive and doing better than I. My arms and legs work just fine. And I'm fortunate enough to be blessed by so many friends, family, and followers who love me, and have been concerned with my well-being through all of this.

This card was created with a Sludge Paste technique by pasting the Dreamweaver Umbrella with a mix of both yellow and red embossing pastes, achieve an almost marbled look in the paste. The umbrella was cut out and adhered over a panel of the Damask stencil with an ink-press technique. Two or three shades of spray mists (Strawberry Daiquiri, Mango Lemonade, and Pink Lemonade) were spritzed over the stencil. The cardstock was placed on the inked surface, and then run through the embossing machine to transfer the inked design and press it into the surface. Another panel of coral cardstock was run through the machine with the Stripes stencil to just add an embossed design. The finishing touches were a pasted sentiment from the Dreamweaver Rain Words, some sparkly flowers, and pretty ribbon.


For a shower of inspiration, please visit the blogs of the "B" team:


Wednesday, March 25, 2015

Texturize It With Stampendous, Dreamweaver, and Woodware UK: Day Three


We have a different sort of collaboration for you!


This week we’re going to celebrate with the awesome Woodware Design Team and the Dreamweaver Stencils Dream Team all of the the great Stampendous and Dreamweaver Stencils products that Woodware makes available to the UK market. This is good news for our crafty friends in the UK because we’ll be offering prizes and our UK friends are eligible to win!! We’ll be offering three prizes in the UK and three in the US. Each prize package will consist of Nathalie Kalbach’s terrific Grunge Mixed Media Cling Rubber Stamp Sets and the beautiful Zen Butterfly Dreamweaver Stencil! Both products are ideal for adding texture and backgrounds to your projects!
Deadline to comment is Sunday, March 29th, Pacific Time. Winners will be picked using random.org and announced Tuesday, March 31st, in the afternoon.
And that’s our theme!! Making Texture. We hope you’ll enjoy the wonderful inspiration that three talented teams will bring you this week! Be sure to visit all the blog links listed and leave your comments! Each comment will count as an entry towards one of the terrific prize packages.

Here's what I've created for today:

Yes, it's another banner today! Following pretty much the same process as the one that I posted on Monday...

The pre-gessoed side of the half sheet of canvas pad was watermark inked through the Dreamweaver Spiral Dots stencil randomly over the surface before being embossed with Stampendous White Embossing Powder. This melted EP acts as a resist against the Clearsnap Mixed Media inks (Vintage, Leather, Barn Door) that were swiped over the surface. Using a palette knife, some Dreamweaver Matte Black Embossing Paste was spread over one section and set aside to dry.

Meanwhile, a strip of Mark Richard's Linen Fabric pad was frayed around the edges, and stamped with the Leather ink and the Stampendous Cling Life is Art image, along with some random distressing.

Once the paste was dry, I swiped a bit of talcum powder over the canvas as an anti-static medium for the next step. I paste-embossed the Dreamweaver Feather stencil in Copper Embossing Paste, and sprinkled liberally with Aged Black and Aged Copper Embossing Enamel. This was heated until bubbly and textured, with lots of shimmer! Now the linen strip could be adhered, along with a couple of bits of Ribbon Tape from Woodware. A wooden dowel and been prepped with black paint, and was attached by wrapping strips of the Ribbon Tape over it and attaching it to the canvas. A bit more of the Aged Black and Copper were sprinkled over the canvas, and heated from underneath for more texture. 


Here's the links to the designers that are playing today:

Stampendous Blog


Amy Hurley-Purdie


Jamie Martin


Asia King


Wendy Price


Woodware Craft Collection Blog


Pam Hornschu


Dreamweaver Stencils Blog


Cindy Groh


Louise Healy

Tuesday, March 24, 2015

Texturize It With Stampendous, Dreamweaver, and Woodware UK: Day Two


We have a different sort of collaboration for you!


This week we’re going to celebrate with the awesome Woodware Design Team and the Dreamweaver Stencils Dream Team all of the the great Stampendous and Dreamweaver Stencils products that Woodware makes available to the UK market. This is good news for our crafty friends in the UK because we’ll be offering prizes and our UK friends are eligible to win!! We’ll be offering three prizes in the UK and three in the US. Each prize package will consist of Nathalie Kalbach’s terrific Grunge Mixed Media Cling Rubber Stamp Sets and the beautiful Zen Butterfly Dreamweaver Stencil! Both products are ideal for adding texture and backgrounds to your projects!
Deadline to comment is Sunday, March 29th, Pacific Time. Winners will be picked using random.org and announced Tuesday, March 31st, in the afternoon.
And that’s our theme!! Making Texture. We hope you’ll enjoy the wonderful inspiration that three talented teams will bring you this week! Be sure to visit all the blog links listed and leave your comments! Each comment will count as an entry towards one of the terrific prize packages.

Here's what I've created for today:

No butterflies today! Today we're going on a textural adventure under the sea...

The focal panel was created using a panel of Bazzill chipboard in white. Several tube acrylics were squeezed onto my Stampendous Creative Palette and brayered a bit to swirl at bit. The panel was placed face down on the wet ink, and pulled up immediately. Pulling up creates the wrinkly-looking lines through the paint for a very cool texture. Once the panel was dry, a few of Nathalie Kalbach's Grunge Kaffee Klatsch images from Stampendous were stamped over the surface in Colorbox Chalk inks (Deep Lagoon, Iced Jade, Aquamarine). The Dreamweaver Jellyfish stencil was ink-stenciled with black Surfacez ink. A bit of talcum powder was wiped over the surface as an anti-static medium before paste-embossing in Metallic Gold the Jellyfish again over the top. Steel Blue and Fresh Green Crushed Glass Glitter from Stampendous were sprinkled on the molten surface and lightly pressed in (CAREFUL! It will be warm!)

Now for the base of this project. I used a 12 X 12 piece of Bazzill Chipboard in black. I stamped a few of Nathalie's images again, some I embossed in Aged Gold Embossing Enamel, some embossed in black, and some stamped in white or gold ink. Extra sprinklings of the Aged Gold were tossed about, and heated from underneath. The focal panel was adhered to the base. Finally, I die cut the words from the Dreamweaver Dual Alphabet, inked them halfway with watermark ink, and embossed the portions in Aged Black or Aged Marine Embossing Enamel. These were then adhered to the "canvas".


Here's the links to the designers that are playing today:

Stampendous Blog


Pam Hornschu


Woodware Craft Collection Blog


Jane Gill


Dreamweaver Stencils Blog


Gill Wilson

Monday, March 23, 2015

Stampendous: Spellbinder's Quarterly Hop 2015 #1

We’re excited, once again, to be partnering with the folks over at Spellbinders for a Spring mini blog hop! As Spellbinders design partners this year, we’ve been blessed to use many of their exciting products, and we know their design team is enjoying the Stampendous products we sent for their use! Monday, Tuesday, and Wednesday this week our Design Team will be sharing fun projects they’ve made with the Spellbinders products we’ve received.  Wednesday we’ll be a featured company on their blog and two of our designers will be posting tutorials for you focused on the newest Spellbinders products.

PRIZES

Here at Stampendous we’ve got some mystery Spellbinders dies up for grabs along with some fantastic Stampendous cling rubber so be sure to comment on our blog posts and those of our designers for the three days. See our Official Rules for eligibility and more. Comment deadline is Thursday, March 26th, and winners will be announced Friday, March 27, 2015.
Spellbinders has fantastic prize packages from all of their partners to give away each day, so be sure to visit their blog and use their contest entry tool to enter each day (one entry per day, per person). See the Spellbinders Blog for rules and a list Product Partner companies.

Here's something fun from me:

I really wanted to create a jewelry piece for this occasion. Unfortunately, I rejoined the Stampendous team after all the wonderful base pieces from Spellbinder had been passed out to the  team. However, I did receive a handful of fun dies...

Using the "Dragon Delight" set, I die cut three of the dragonflies from chipboard, and adhered them together for more substance. I applied VersaMark ink over the surface with a fingertip dauber, and poured on some Stampendous Aged Teal Embossing Enamel. This was heated until molten, sprinkled with more and heated again...in all three or four layers of the EE. Then I inked the fishnet-patterned background image from Nathalie Kalbach's "Studio Wired" set of grunge stamps with VersaMark, reheated the surface, and pressed the stamp onto the molten surface. This was allowed to cool before removing the stamp, and the result was this awesomely textured surface. The only additions were three small teal crystals pressed into the re-warmed surface, a thin bit of gold wire wrapped around the head to create curled antennae, and a pin-back adhered to the back with Quick Grip by Beacon Adhesives. Now I wanted this to really be the focal piece, so I created a card to display it on.

I created an easel card loosely following team member, Kristine Reynolds, tutorial HERE, using Core'dinations Vintage and Essentials cardstock, both of which were sanded a bit around the edges. The flat panel on the bottom of the card, was paste-embossed with Dreamweaver Gold Embossing Paste with the Chevron stencil. More of the Aged Teal EE was poured over the wet paste, and all of this was heated until bubbly and dry...more great texture and shimmer!

I cut a square of Mark Richard's linen fabric, frayed the edges, and stamped more of Nathalie Kalbach's images with Toffee and Deep Lagoon VersaFine ink by Tsukineko over the square. This was adhered to the card front with 3L Tape Runner (a wet adhesive would just ooze through the fabric and be seen). I cut two banner strips from scrap and stamped them in black with the Stampendous Cling Grunge Happy Birthday, and adhered these to the right side of the card.

Finally, I used the Richard Garay Celebrations "Sweet Treats" Die set from Spellbinder to cut the cool tag which has a notch at the top to wrap around a bow on a package...in this case, the natural burlap ribbon from May Arts. I punched two holes for the pin-back to slip through, and attached my beautiful pin. NOW it gets the recognition that it deserves! You know you've created a successful gift if you'd love to receive it yourself!


Here are today's links for those playing:

Stampendous Blog


Pam Hornschu


Jamie Martin


Spellbinders Blog

Thursday, January 22, 2015

Dreamweaver: Birthday Challenge Got You Dragon?

Welcome to the birth of a new year...2015 to be precise! In honor of that, we've decided that our monthly challenge for January will be Birthday Wishes. We'd love for you to play along with us, and link your creations to the Inlinkz tool at the bottom of this post, or on the Dream It Up! blog, for a chance to win the stencil of your choice...and remember, using Dreamweaver products gets you bonus points towards an extra stencil!

Here's my birthday wish for this week:

I thought I'd go a bit more elaborate for this week's birthday card. Using one of my favorite techniques...Molten Magic...along with Stampendous Embossing Enamels and Micro Glitters. The end result is so much texture, dimension, and color.

The Dreamweaver Dragon was paste-embossed in Glossy Red Paste using these steps:
1) Using removable tape around all edges, tape the stencil over the top of the cardstock panel.
2) Slide palette knife into jar of paste, lifting a thick portion of it up the back of the knife. Transfer to edge of Spreader approximately the width of the stencil design you are using.
3) Spread paste across stencil at a slight angle, lifting up at the end. Use palette knife to daub paste in any areas that may have been missed. Transfer remaining paste on spreader back to jar. Apply spreader at 45˚ angle across stencil to remove excess paste, and return to jar.  Clean edge of jar and close tightly.
4) Carefully remove tape from three sides, leaving last piece as your "hinge" to help lift the stencil off of the paper before removing. Immediately place stencil and spreader in water to be cleaned with a soft brush.

Now, comes the fun part!

1) Sprinkle various Stampendous Aged Enamels (Aged Gold and Aged Black) and Glitter (Red Micro Glitter) over wet paste. Tap off excess and return to bottles.
2) Apply heat tool until surface is bubbling, melding, and molten. Let cool a few minutes.
3) TA DAH! Don't you love it? You know this will be your new favorite technique!

Obviously, the card was finished up in the usual fashion...mats and layers, a glowing red rhinestone eye, and a sentiment. This was computer generated as I was feeling a bit of whimsy, so I designed it quickly in PhotoShop, printed it, and added it. It says, "Need help with those candles?", but I had printed out a couple others..."Another birthday got you DRAGON?", and "Come on...you know you're a HOTTIE!"  Yeah, very punny, I know.


Of course, more birthday inspirations coming your way from our "B" team: