Friday, February 26, 2016

GNOME-one Does Box Dies For Stampendous Gnome Homes Like Eileen Hull!


Welcome to another day on our hop with Eileen Hull’s team using her Vintage Canister Scoreboard die with our Cottage Home and Mushroom Home sets as we take a stroll Along the Garden Path. Sit back and enjoy projects from the designers participating in today’s hop.


Three lucky winners will win their choice of Cottage Home or Mushroom Home plus precut matboard from the Sizzix Canister Scoreboard Die. Sponsored by Sizzix. Deadline to comment is February 28th. See Official Contest Rules for details.

Here's what I've created for our grand finale...


If you visited my blog yesterday, then you've seen the toadstool house with the purple roof (which is a stash spot for Hershey's Kisses!). Today I've added two additional gnome homes, along with a display for them all. Remember the one below was constructed with Eileen Hull's large matboard boxes, which I've covered in machine-embossed die cut pieces of Core'dinations® cardstock, using the Dreamweaver Chevron Stencil and the Honeycomb stencil. They were die cut and stamped with the new Stampendous Toadstool Home sets.


This tiny little house was created with a small box matboard die, with stamped accents from the Toadstool Home sets and the Cottage Home sets. For the roof I just punched small circles and layered them for shingles on the "roof". The heart "chimney" was a stamped matboard die that was generously in our design team packages from Eileen Hull for this collaborative hop.

The final house was created from a medium matboard box, covered in a golden cardstock, machine-embossed with the Dreamweaver Stone Wall stencil, and brushed with ink to highlight the raised design. Windows and doors were stamped, cut out, and adhered as with the previous two houses, and colored a bit with Sakura® Gelly Roll Flourescent pens. The die cut roof was die cut from the Cottage Home set, and machine-embossed with the Dreamweaver Large Scales stencil, and also brushed with ink.


For display purposes, I used a unfinished wooden frame from a local big box craft store, which I stained with Ranger Distress Stains by Tim Holtz. Moss was adhered on the little houses, as well as this frame, and jute cording was wrapped and adhered over the frame for a more rustic look.


I inserted a panel of cardstock and a piece of glass within the frame, and placed many of my collection of tiny pebbles and stones. I like how this display turned out as it makes a more cohesive, "I-meant-to-do-that" look, especially with coordinating colors of the cardstock. This way, tiny surprises can be added to each box, and still be something wonderful to share when the treats are gone!

For more creative ideas from Eileen Hull's amazing design team, as well as our own stupendous Stampendous team, head over to these links...

Pam Hornschu (you're here!)


Woodware and Crafty Cardmakers Celebrate That Special Woman...Mum


The Woodware team are playing with the Crafty Card Makers monthly challenge, and this month it's all about special women. In honor of the British Mother's Day coming shortly, as well as the US version in May, I thought I'd share this darling House Mouse Designs® card featuring Mum and her little sweeties. This gives you mothers the opportunity to say one of two things...either, "Thank God I don't have that many children!", or, "Piece of cake! I have more than that!" In which case...I don't know what to say! Lol.

The image was colored with pencils, and layered over gingham patterned paper, wood patterned paper, and a fence created from strips of the same paper. A few tiny paper flowers with leaves were entwined in the fence, and the tilting fence post sign features one of the Perfectly Clear sentiments to finish it off.


Hope every woman, mum or not, celebrates herself at least through this week! You deserve it! Be sure to visit the Woodware blog for more inspiration!

Thursday, February 25, 2016

A Eileen Hull Collaboration With Boxes,Toadstools, and Dreamweaver


We are excited to join with Eileen Hull and her team to bring you a great week of inspiration using our garden house stamp and die sets to add detail to Eileen’s versatile Vintage Canister Scoreboard Die by Sizzix. Sit back and enjoy the projects, comment along the way for a chance to win one of our prize packages!


Three lucky winners will win their choice of Cottage Home or Mushroom Home plus precut matboard from the Sizzix Canister Scoreboard Die. Sponsored by Sizzix. Deadline to comment is February 28th. See Official Contest Rules for details.

Here's what I've created for today's post...

 Using the Toadstool Home with its stamps and matching die set, I cut out squares of cardstock to cover the Eileen Hull medium matboard box, along with one front and three roofs. The house portions are made from Core'dinations® Vintage, which I've machine-embossed using the Dreamweaver Honeycomb stencil and sanded to reveal the design. The three roofs were machine embossed using purple Core'dinations® and the Dreamweaver Chevrons stencil. Each was sanded and distressed and all pieces were inked around the edges before adding the stamped and cut out window and door, and the fences were stamped directly on the house pieces. A bit of Sakura Gelly Roll fluorescent ink was added to these parts. The house front was popped up with foam tape, and the roof pieces were layered and adhered together. A bit of moss was adhered at the bottom with Beacon Adhesives Tacky Glue.
 

Of course, these are not just cute houses, they are also wonderful sturdy matboard boxes that are designed amazingly to be put together so easily, and hold whatever treats you might like to store in them. I'm thinking these "kisses" won't be in storage for long!
 

 Be sure to visit again tomorrow, as this cute little gnome home is only one part of a darling spring display. Check out the links of those that are playing today...

Pam Hornschu (you're here)


Saturday, February 20, 2016

Woodware: Hopping Along for Easter


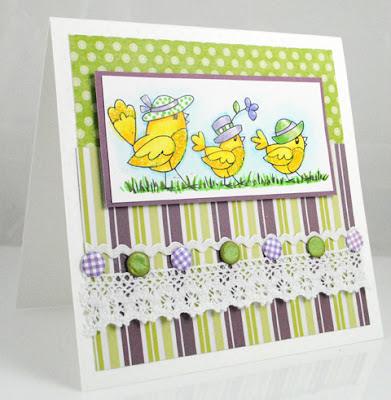
The Woodware team have been hopping along all week with sweet spring and Easter creations. I've used the Stampendous Cling Chick Parade as my focal image, colored with markers, and blinged up with yellow Micro Glitter.


They have their cute little bonnets on, and that provided the jump off point for my color combo on this card. Fun patterned paper, Woodware Self-adhesive lace, white ric rac, and yummy Card Candi brought it all together with style.


If you missed any of the Spring/Easter creations from our talented team members, head to the Woodware Witterings blog for all of the links!

Friday, February 19, 2016

The Faces of Mixed Media


Today is the finale of this week's challenge featuring the faces of Stampendous. All of this week, I've shown several ways to look at the Cling Beauty Face image. Originally, this image came packaged as a complete set with masks and templates, and blossoms, which sold out quickly and has now become simply the face image now. This provides you with the opportunity to use the wide variety of floral and mixed media images from Stampendous to enhance YOUR Beauty creation. Meanwhile, I'll share with you the process of my mixed media canvas.

I started with a pre-gessoed twelve inch square canvas, which I painted with black acrylic paint. When dry, I used a palette knife to apply Dreamweaver Crackle Paste in a fairly thin layer, and set it aside to dry.


Meanwhile, I tore a page from a dictionary, and painted a light coat of gesso over it, focusing on heavier coverage where I intended to place the face. When dry, I stamped the Cling Beauty Face with Tuxedo Black Memento ink, and smudged Tsukineko Radiant Neon Blue, Green, and Pink inks on the facial features. Using the mask/template that came with her originally, I masked off her face while stamping the blossoms in black, ink-stenciling the Dreamweaver Big Dots in Neon Yellow, and stamped and embossed in black the Cling Follow Your Art. This panel was torn around the edges, and set aside temporarily.


I stamped the Cling Seed Packet background on a section of white tissue paper. The songbird was stamped in black, and inked with Neon Green ink. This was torn around the edges as well.

I shifted gears back to the now dry and crackled canvas. Using the Neon inks and large stencil brushes, I color blocked sections of the canvas. On the green section, I paste-embossed in Glossy White the Dreamweaver Black Eyed Susans. When this was dry, I brushed Fast Finish by Beacon Adhesives® brushed over the surfaces that I would be decoupaging. The tissue panel was placed on its wet surface, and the face panel was placed on the wet surface designed for it. More Fast Finish was brushed over the tops of these panels.

Using black ink and stencil brushes, I inked the centers of the Susans, dots in the centers of the blossoms, some soft inking through the Big Dots stencil in the bottom panel, and finally inked heavily through the Dreamweaver Leafy Branch stencil. A die cut of the this same design along with layered paper flowers (which started as white, but I colored with the Neon inks) were adhered over the Susans' panel. Using a large stencil brush, areas were ink-distressed in black ink as well. The final touch was to doodle border lines using a black Pitt Pen.

Thursday, February 18, 2016

FACE It...Stampendous and Dreamweaver POP!


So, if you've been following my posts this week, you've seen this face in many modes. Today I've gone more modern and graphic...black and white with a pop of chartreuse. The Beauty face was stamped in white ink and embossed with white embossing powder.

The Dreamweaver Corner Flowers design was ink-stenciled in white ink across the top of the panel. I carefully lined up the same stencil, and ink-stenciled it in Onyx ink on the top of a white card, and a portion on the bottom right corner. I recommend applying a heat tool over the inked portions to set their ink and avoid smearing.

The face panel was cut into sections as shown, and adhered to a slightly larger chartreuse panel, leaving fine gap lines between each section. Tiny chartreuse self-adhesive chartreuse crystals were adhered across the neck and to her ear lobes. Then this panel was adhered to the card base. A super simple card to create with a very graphic look. This same look could be easily achieved as a mixed media project on a canvas...possibly with a 4 inch square black canvas, and adhered over the top of a 8 X 10 or 12 inch square white canvas.


For more of the faces of Stampendous and Dreamweaver Thursday, be sure to visit these links...


Wednesday, February 17, 2016

The Face of Polynesia...Pam-Style!


For today's post, I've taken the Blossom Beauty face to another part of the world. One with tropical breezes and warm sands. A land of exotic beauty with a unique twist. I've stamped the image on kraft cardstock with Rich Cocoa Memento ink, and added coloring and shading with a large selection of the "E" color range of Copic Sketch Markers. Using the template that comes packaged with the set to mask off the face, I then was able to ink-stencil the Dreamweaver Large Scales pattern in the background with more brown ink. The blossom image was stamped on the forehead with VersaMark ink and embossed with Shabby Pink Embossing Enamel, along with a few sprinkles over her face that were heated from underneath. I used a VersaMarker to ink her lips, and added more of the Shabby Pink to them as well. The panel was torn around the edge, adhered over a white panel which was torn as well. The card base was the Mixed Media White cardstock, ink-stenciled using large stencil brushes with the Dreamweaver Herringbone background and the Dreamweaver Quilt Square Leaves design with pink VersaColor ink.


An extra panel of the Herringbone inked cardstock was used to stamp the blossom in VersaMark ink, emboss in Bark embossing powder, and die cut. This was smudged and shaded with brown ink to give it depth, and embellished with self-adhesive pearls. An extra panel of the kraft cardstock was ink-stenciled with the Herringbone pattern, and die cut using the Dreamweaver Monstera Leaf die. All items were layered and adhered to the card.


For more of the faces of Stampendous, visit these blogs...


Monday, February 15, 2016

The Faces of Stampendous Wander the World


From the time we are first born, to the end of our days, faces are a constant source of fascination for us. Our family's, friends', and even our pets' faces are so treasured. Even the faces of complete strangers are an instant puzzle to be solved, beginning with the eyes. My post today features the Stampendous Cling Beauty Face image, and I decided from the start that I wanted this card to be all about the eyes. These are not young eyes. These eyes have seen the world. But they are serene, filled with an inner peace that we all covet.


I have so many friends that are amazing colorists, and I envy their talent, and struggle to achieve it myself. In the long run, we all just strive to do our best, and hope that something we've created will be an inspiration to others. My wandering beauty was first stamped in Desert Sand Memento ink by Tsukineko®, so that I could make an attempt at a hand-drawn and colored image, using my Copic Sketch markers for color, shading, and detail. The background of the card actually becomes her head-covering, and is created by ink-stenciling the Dreamweaver Waves with Dots design in purple and blue pigments inks. While the ink was wet, I sprinkled Stampendous Kaleidoscope embossing powder over the design, and heated it to melt. Her completed face was cut out and adhered to the card front, and iridescent beading was adhered along the edge of the head-covering, with a few purple crystals adhered as well. The veil portion in vellum also adds focus to her eyes, and has been stamped and embossed in black embossing powder with the Cling Not All Wander sentiment. Once finished, I truly believe that her eyes have become the "window" to her "soul".


Please visit the Stampendous Blog for more intriguing faces, as well as the link below...


Thursday, February 11, 2016

Embossing Your Dreams


All this week the Stampendous team are featuring techniques from the Embossing Powder Techniques from A to Z by Fran Seiford. Remember most of the techniques featured in the new book can easily be achieved with Dreamweaver Stencils as well. How about our Molten Magic technique? You can find the info in Section P, page 38.


This card features the Dreamweaver Peacock stencil paste-embossed in gold, but you'll need to get Fran's new book for more info on the next steps!

The Stampendous Cling Peacock Feather was stamped in the background with Gold Delicata ink by Tsukineko®, and a beautiful iridescent ribbon from May Arts was wrapped for highlight the color and sheen from the technique. And a few sparkly crystals.


I suggest that you get this book ASAP. You could be playing with so many embossing powder techniques with your stencils, which takes this book to beyond amazing! Did you know that there are THREE opportunities to win an AUTOGRAPHED copy of Embossing Powder Techniques from A to Z. Details can be found on the Stampendous Blog below, and more techniques will be highlighted on the team members links for the week.


Jamie Martin (DW and Embossing)
Laura Drahozal (DW and Embossing)
Pam Hornschu (DW and Embossing)
Louise Healy (DW and Embossing)

Wednesday, February 10, 2016

Leaving a Deep Impression with the New Book from Stampendous!


All this week the Stampendous team are featuring techniques from the Embossing Powder Techniques from A to Z by Fran Seiford.

My project today was partially completed for our hop with Tombow over the weekend, so you can check out that post HERE for a reminder of the process. Basically, it is very similar to the Deep Impressions technique as shown in the "Y" section of the book shown above, on pages 78-79. but with a different "base". 


Notice the bottom medallion that I created. Here's where I went with it...


Using a small 4 inch square canvas, covered in black Memento, and heat dried, I stamped the Cling Time for Love in black pigment ink, and embossed with Aged Silver Embossing Enamel. More ink was smeared around the edges, with more EE, and some Frantagé Silver Chunky Glass Glitter. Here's where I used the Encrusted Jewel Technique from the book, which you can find in section "S" on pages 42-45.

See where my medallion ended up? It was Deep Impressed from the Time for Love image, and placed perfectly in its space on my canvas. The fact that it is putty makes it easy to stick on or take off and use for something else...

Like my pendant from Sunday's post!


Of course, I had to add a few extra doodads and a chain to hang my tiny creation!

Check out the team's posts as they share these awesome techniques!


Monday, February 8, 2016

Embossing Powder Techniques...Simply RESISTIBLE


All this week the Stampendous team are featuring techniques from the Embossing Powder Techniques from A to Z by Fran Seiford. It also just so happens that the Woodware team are featuring one particular technique this week...resist. My card today shows how effective it can be to use Stampendous embossing powder as a resist against inks and watercolors. You can find info on this technique in the "K" section, pages 30-31 in the new book, along with several other irRESISTIBLE ideas!


The background panel of my card is a panel of glossy white, heat resistant cardstock*. I've used the Dreamweaver Flower Lace* design by sponging VersaMark by Tsukineko®* through the stencil, and embossing the design in Stampendous White Embossing Powder*. Once this was cool, I used various blue and purple chalk inks* over the surface, really pushing the ink down to the paper. I went over the embossed design with a damp towel, and removed most of the ink from the glossy embossed surface.


For the focal panel, I stamped the Cling Pansies* image from Stampendous in VersaMark by Tsukineko®* on the Stampendous Mixed Media White* cardstock, and once again embossed in white EP. I smeared the same inks that I used before onto my craft mat, spritzed them with water, and used them with a brush to watercolor over the design, allowing it to dry a bit between layers of color. When finished, I added tiny bits of Stampendous Micro Glitter* in Lime using a glue pen to adhere it.

The card base is a bright chartreuse, which I machine-embossed with the Dreamweaver Crusade* background. Everything was adhered in layers, along with a sentiment from the Perfectly Clear Thoughtful Wishes* set on the new Stampendous Fitted Frames dies*. Adding to the pretty factor, I adhered a bit of lavender ribbon twist* across the card as well.

For those of you in the UK who'd like to see more resist techniques, be sure to check the Woodware Witterings blog each day this week.

For those of you in the US, be sure to visit the Stampendous blog each day this week for links to our spotlight on our wonderful new book! You're sure to be inspired to break out your embossing powders, and maybe add to your collection!


*All of these items are available to retailers in the UK from Woodware. Consumers may purchase these products from stores listed HERE.

Sunday, February 7, 2016

To Stick or Not to Stick...That is the Question!


The Stampendous team received some unique products for our hop this week with Tombow USA. Nothing overtly cute and crafty and pretty, but all necessary items to make YOUR creations come to life! We received some awesome little Fastener Tabs...think thin hook and loop, for sticking and removing with no added bulk. We received a cool glue pen for adding hints of glitter to your projects. And we received XTreme Putty...a moldable, pliable, tacky product for sticking something on to a wall or other surface, but can easily be removed and reused again. This is the product that I'm featuring for today's post.

By now you know that I'm not the person who's only going to use a product as intended. I have to experiment with what else I could do with it. So...I think. And think. And think some more, until I have that "what-if" moment. You know what I'm referring to. Here's what I came up with...

I made these medallions. Gorgeous on the top. Still tacky underneath. They can be used over and over for whatever you want. For instance, I had a rather blah pendant. Now I have a pendant with medallions that I can change the look every time I wear it, and they don't come off unless you want them to! Here's how I did it...


Here's how the Xtreme Putty comes packaged, in little connecting squares to use as much or as little as you need.

I tore off about 4-5 little squares, and began warming it in my hands, and rolling into a ball.


I used an acrylic block to flatten it into my medallion shape on my non-stick craft mat.

I sprinkled the top with Frantagé Aged Embossing Enamels (Aged Copper in photo)...

And applied a heat tool over the surface to melt, adding more sprinkles over the top to build up a couple of layers...

I Inked my cling rubber stamp with pigment ink, and pressed it into the molten surface, leaving it in place until cool.

Here are a few that I did using various parts of the Cling Stamps (Time for Love...I used the zipper portion for one, and the heart from the key for another), and the lovely swirl shown before from the Cling Elegant Scroll.


Here's a close-up of all the detail and shine!

Now I have to say, that what I've posted today, is only part of something more involved that I'll be posting later this coming week as we feature our brand new Embossing Powder Techniques from A-Z book by Fran Seiford. We'll be showing these techniques all week, so check out the Stampendous blog for links!

As this week has been our Tombow hop, and there are awesome prizes as shown in the banner below, be sure to leave comments for each post from the teams from Thursday, February 4 through Sunday, February 7th (today!) for a chance to win. Rules and stipulations can be found on the Stampendous Blog. Good luck!


Head on over to the players for today...

Pam Hornschu (you're here)