Friday, April 30, 2010

Bee Trio Circles Card

This trio is my good friends, Hap-Bee, Jame-Bee, and of course, me, Pam-Bee! Aren't we cute? I used various Stampendous images over the circles and of course the bee trio which I used colored pencils instead of water-coloring this time. I like the color scheme with the black, red, white and yellow. Cute and simple. Would "bee" perfect for so many occasions including "Bee"-day!

Please "bee" my friend and "bee"come a follower and leave a comment. We "bees" need sugar (honey?) too!
Hap"Bee" stamping! (Okay...I'm done, now. You can stop groaning!)

"Bee Trio" from Stampendous
"Bee Message" from Stampendous
Prismacolor Pencils
White StazOn from Tsukineko
Onyx Versafine from Tsukineko
circle punches
double-sided foam adhesive
Bazzill Cardstock

Wednesday, April 28, 2010

Stacked Hearts Wedding card

As we head into the traditional wedding "season", I thought that I would post a wedding card. Could also be used for anniversary, and with a little imagination, could be designed around a whole wedding package: Save the Date, invite, thank yous, etc. Very simple, very elegant. Read back through directions for embossing on acetate from the "StMC2-Bee Friend" card below, and stamp and emboss the "Stacked Hearts" on an acetate panel. Stamp and emboss sentiment at bottom of brushed silver panel. Place acetate panel on top, punch through both layers and loop ribbon and tulle through. Add a silver charm if desired. Adhere all to metallic silver and lavender card. A beautiful card that will become a cherished memento. Happy stamping!
Pam

"Stacked Hearts" from Stampendous (N228)
Perfectly Clear "Merry Messages" from Stampendous (SSC114)
White embossing powder from Stampendous (EP100)
Thermo Acetate from Stampendous (PC75)
Bazzill cardstock (color name unknown)
white, brushed silver, metallic silver cardstock
"love" charm from Michael's wedding section
ribbon
tulle

Sunday, April 25, 2010

Bee and Bouquet Mother's Day card


It's that time of year again to honor the hardest working individuals on the planet...moms. Here is a truly special card for doing just that. Takes a bit of time, but still simple to do and you know she'll plop it in a place of honor in her home and brag about her creative child! Just stamp and emboss any of the great Stampendous flowers in white on yellow cardstock and cut out. Add shading with chalk, and embellish the centers with brads. Stamp and emboss the "Mom" panel from "Feminine Friends" on the front of the card and cut slits at top and bottom to insert stems through. Add shadowing with chalk once again. Stamp the background with some of the great mini stamps that come in this set using Versamark ink. Attach your blossoms and stems to each other and insert through slit. Add an extra flower along with a stamped, embossed, and cut out bee and a ribbon tie.
To all you moms out there...milk it for all it's worth!
Pam

Perfectly Clear "Feminine Friends" from Stampendous (SSC092)
Any flowers from Stampendous
Any bee from the "Bee Happy Collection" from Stampendous
White embossing powder (EP100)
Frost White Colorbox ink from Clearsnap
Versamark ink from Tsukineko
Bazzill cardstock
chalks
brads
double sided foam adhesive

Friday, April 23, 2010

STMC3-Stampendous Sketch Challenge "Thankfully Loopy"

So here is my version of my sketch design for week three. I used one of the great Cling Rubber designs from Stampendous (of course!), and stamped it over the main card using Wisteria chalk ink. You could easily use Versamark instead since the effect ends up being a slightly darker version of the color of paper. I also stamped the same image on the ribbon which is a cool way to have your ribbon match your card without buying a bizillion spools of ribbon when only a zillion will do! The image was also stamped on the soft green cardstock panel at the bottom and the panel that wraps at the top. The ribbon slips through a punch hole on that panel and wraps around to tie in front. I stamped and embossed in white the Loopy Blooms flower and the sentiment with it's cute frame. Stamping the bloom again on the lavender cardstock and cutting out the petals to adhere to focal point flower makes it "pop". I couldn't resist, I had to add one of those gorgeous velvet stickers from Stampendous at the bottom. So, you've seen what I did with my sketch this week, what are you going to do? Follow the directions in the previous post or go to the Stampendous blog now!
Happy stamping!
Pam

Perfectly Clear "Loopy Blooms" from Stampendous (SSC1069)
Cling Rubber "Dreamy Leaves" from Stampendous (CRR114)
White embossing powder from Stampendous (EP100)
Class A' Peel "Scrollwork Borders" from Stampendous in Olive Velvet (AC726VE)
Frost White ColorBox from Clearsnap
Wisteria ColorBox Chalk ink from Clearsnap
Versamark ink from Tsukineko
double-sided foam adhesive
ribbon
corner rounder

STMC3- Stampendous Sketch Challenge

Woo hoo! This week is my turn in the Stampendous weekly sketch challenge. Have any of you submitted yet? There are great prizes for those who submit and win. Just post your creation to any online site such as Two Peas in a Bucket, Split Coast Stampers, etc. and include a link to Stampendous using the sketch number for this week: STMC3. Two winners will be chosen each week, one randomly and one by the Stampendous graphics team. This one will be for the design with the best incorporation of Stampendous product. The first two weeks have given away some terrific sets of Perfectly Clear stamps. Check the links on the Stampendous Impressions blogsite as well as the links for the design team on the right side of my blog for all the great samples from the previous sketches as well as for this week. Happy stamping!
Pam

Wednesday, April 21, 2010

Peacock Beauty Card

Peacocks are such a now thing and for good reason. What bird doesn't like to flaunt their assets (yes, there was a pun there) especially when those assets include such gorgeous plumage? I stamped this peacock and brushed it with Versamark before chalking the color on it. Then I added Dimensional Magic to the "eyes" of the feathers. The peacock was cut out and adhered over the ribbon and sentiment using double-sided foam adhesive. Once again, the focal image, the sentiment, and the frame all came from the same great set of clear stamps.
Pam

Perfectly Clear "Proud Peacocks" from Stampendous (SSC1076)
White embossing powder (EP100)
Frost White Colorbox from Clearsnap
Onyx Versafine from Tsukineko
Dimensional Magic from Plaid
Bazzill cardstock
print unknown
ribbon
double-sided foam adhesive

Monday, April 19, 2010

Half Circle Mega Thanks card

Here is another card that I did for a previous catalog. I tried to put a different spin on the "Mega Thanks" stamp set from Stampendous by laying the letters out on the semi-circle. Using various inks I created a background paper. I then stamped the word on this paper and cut out each individual letter. (This sounds tedious, but the letters are large so it's easy to do.) I then used various elements in the set to stamp patterns on the individual letters before adhering them to the half circle on the square card. I added some other stamped and punched elements and the sentiment along the side. I also embellished with little Dot Sparklers stickers. As I've said before, you can never have too many thank you cards on hand, so add this one to your collection!
Pam

Perfectly Clear "Mega Thanks" from Stampendous (SSC116)
Class A' Peel "Dot Sparklers" from Stampendous (AC672HSS)
Onyx Versafine ink from Tsukineko
French Blue, Lime Pastel, and Jade ColorBox Chalk ink from Clearsnap
Bazzill cardstock
white cardstock

Sunday, April 18, 2010

STMC2 Bee Friend card

Here is my version of the 
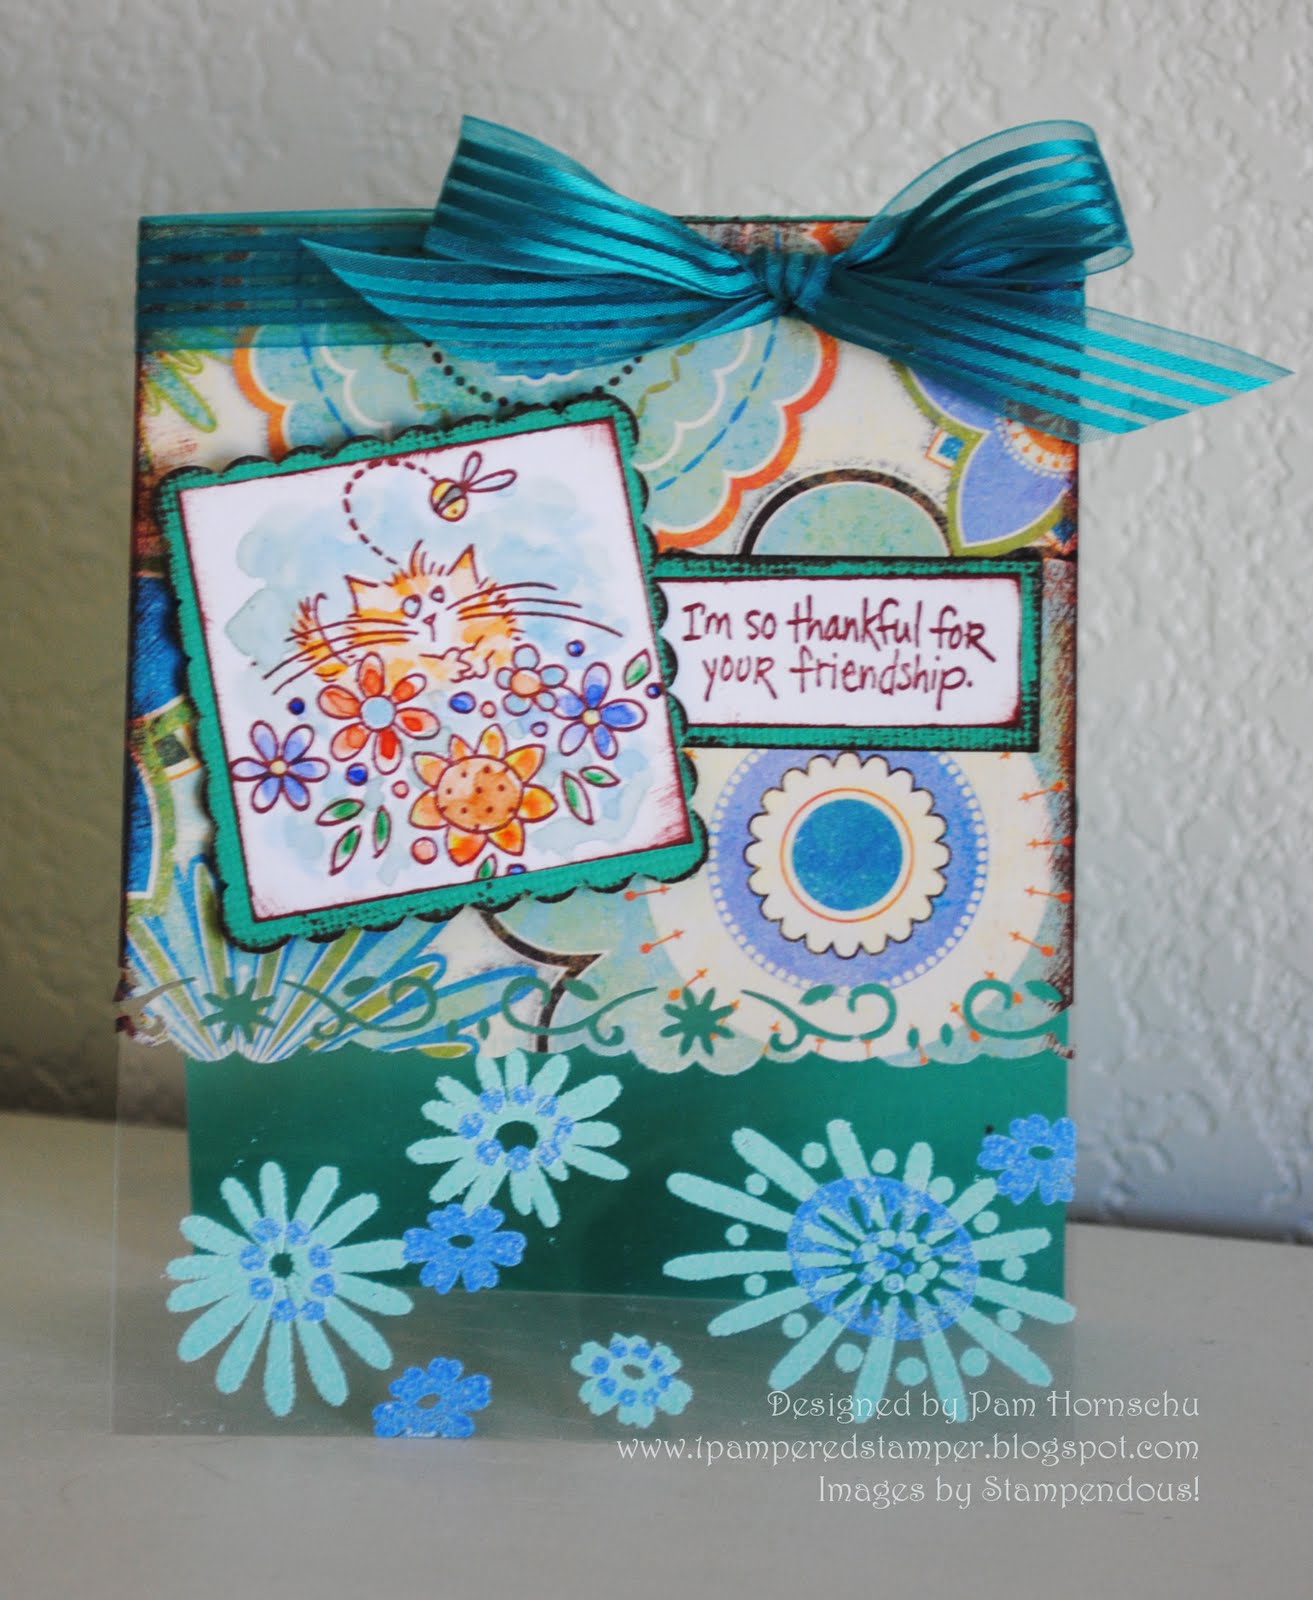
Stampendous sketch challenge of the week, STMC2. I stamped and watercolored Fluffles on a square and layered onto a scalloped square. I formed the vertical card from Bazzill cardstock and adhered a panel of a cute print I had in my stash which a punched a border at the bottom.
My transparent piece (thermo-acetate) was stamped and embossed using the Perfectly Clear "Retro Blooms" and two gorgeous colors of embossing powder, Periwinkle and Wintergreen. My trick when embossing on acetate is this: Rub baby powder over the area to be embossed, brushing off any excess. This keeps the static on the plastic from allowing the EP to cling where you don't want it. I stamped some of the images and embossed with one color. Let cool. Wipe with more baby powder. Then stamp the other images and apply the remaining color. You need to wipe with the baby powder both times. It also helps to keep the backing sheet on the acetate while you do this or that sneaky powder will end up on the back as well! The reason I use baby powder and not another anti-static medium, is that the others tend to scratch the acetate and the baby powder does not...plus it smells good! Anyway...adhere the acetate to the card. Ink around the edges, adhere the Fluffles square with double-sided foam adhesive, and add a ribbon bow. Very cute card and this great sketch design from Jennie has an extra wow factor with the transparent panel on the bottom. It's clearly cute!
Pam

Perfectly Clear "Retro Blooms" from Stampendous (SSC071)
"Bea Fluffles" from Stampendous (F151)
"So Thankful" from Stampendous (K044)
Periwinkle embossing powder (EP506)
Wintergreen embossing powder (EP161)
Thermo Acetate (PC75)
Frost White ColorBox ink from Clearsnap
Memories Artprint Brown ink
Bazzill cardstock
print unknown
ribbon
watercolors
Fiskar border punch

STMC2 Stampendous Sketch Challenge

Hey stamping friends! This week's Stampendous sketch challenge is brought to us by Jennie Dove and used transparency in the card. Be sure to check out her darling card on the Stampendous blog, as well as Jennie's own blog, . As a matter of fact, check out all the versions of this sketch from our fantastic design team!
Remember, each week we will be sharing a sketch with you and if you upload your wonderful version to a site like "Split Coast Stampers" or "Two Peas in a Bucket" or any others, connect your link to the Stampendous blogsite and you might win for the week. Two prizes are awarded each week, one at random and one that shows the best use of Stampendous products.
Make sure that your uploaded version has the challenge #STMC2 attached for this week.
Break out your acetate sheets and get stampin'!

Friday, April 16, 2010

Songbird Silhouettes card

This card was created for a previous Stampendous catalog and I thought that I'd share it with you. Using the Perfectly Clear "Silhouette Songbirds" set, I stamped and embossed the birds randomly over aqua cardstock and used Chocolate embossing powder. I love the chocolate and aqua combo so much that I even have it my bedroom and bathroom. The swirls also come from this set (yeah, yeah, there she goes on and on about how much she loves the sets!) as well as the little flowers on the bottom panel. The entire card was stamped and embossed which always impresses people until they actually become stampers and realize just how simple it really is. The scalloped stripes on the magenta panel and sentiment came from a different set called "Formal Frames" which is also a personal favorite because it is so elegant and can be used in so many ways. You could change the color scheme on this card to maybe...silver and white with a touch of lavender...and you could make a beautiful wedding/anniversary card. What color schemes would you like to try with this set?

Perfectly Clear "Silhouette Songbirds" from Stampendous (SSC196)
Perfectly Clear "Formal Frames" from Stampendous (SSC197)
Chocolate Embossing Powder (EP117)
White Embossing Powder (EP100)
Frost White ColorBox ink from Clearsnap
brown pigment ink
dimensional foam adhesive
ribbon

Tuesday, April 13, 2010

Loopy Blooms Pieced Flower Card

Yep. Here's another card using that great Stampendous "Loopy Blooms" set! This time I stamped and embossed the flower in white on the flap of the card front. I stamped the flower again on the same print paper that is on the inside and cut out the petals and adhered them to the flower. The velvety scalloped border, ribbon, hanging tag, and buttons take this card to another level. This is another great card to make and have on hand for almost any occasion. Happy spring stamping!
Pam

Perfectly Clear "Loopy Blooms" by Stampendous (SSC1069)
Class A' Peel "Dotted Scallop Border" by Stampendous (AC724VW)
White Embossing Powder by Stampendous (EP100)
Frost White ColorBox ink by Clearsnap
Bazzill cardstock
print unknown
Sizzix die cut tag
buttons, ribbon, jumpring

Sunday, April 11, 2010

Loopy Blooms Window Card

Here's another thank you card using the Stampendous "Loopy Blooms" Perfectly Clear set. Very simple...cut out a window using whatever template/cutting system works for you. Stamp and emboss in white the flower and sentiment on white panel. Use a inkpad as a stamp to ink over the top, let dry, wipe residual ink from embossed areas. If you like the effect of the bubbles, sprinkle a few grains of kosher salt on the image before stamping with pad. (Be sure to remove any grains from inkpad afterwards.) Stamp and emboss the cute scallop border on the front of card and add a Class A' Peel message. Embellish with a ribbon tie and Sparkler stickers.
The creativity with this set is limitless, so keep checking back for more inspiration!
Pam

Perfectly Clear "Loopy Blooms" by Stampendous (SSC1069)
Class A' Peel "Friendly Greetings" by Stampendous (AC961)
Class A' Peel "Dot Sparklers" by Stampendous (AC672HSS)
White Embossing Powder by Stampendous (EP100)
Frost White ColorBox ink by Clearsnap
Tangerine ColorBox Chalk ink by Clearsnap
Bazzill "Limeade" cardstock
white cardstock
ribbon

Saturday, April 10, 2010

STMC1- Poppy Chalk Card

So here is my answer to the first week of Stampendous' new sketch challenge as discussed in the previous post. I stamped and embossed in white one of Fran's great scenic designs, "Poppy Scene". Then I rubbed Versamark ink over the top and using fine-tipped cotton swabs, I colored in the image using chalks. It helps to go slightly over the lines because when you are through chalking, you will wipe over the surface with a clean paper towel to remove color from the embossed surfaces so that they will stand out. My two circles were stamped and embossed on a coral cardstock panel using the "Formal Frames" set. Punched and added two lime circles for a little extra pop, a cute swirl clip with a metal message and ribbon attached. It's amazing how you can take one sketch and come up with so many variations. Check them all out at the sites mentioned in the last post.
Pam

Cling Poppy Scene by Stampendous (CRM234)
Perfectly Clear "Formal Frames" by Stampendous (SSC197)
White Embossing Powder (EP100)
Frost White ColorBox ink by Clearsnap
Versamark ink by Tsukineko
Decorative Chalks
Bazzill and Wassau cardstock
double sided foam adhesive
swirl clip, metal message, ribbon

STMC1 Stampendous Sketch Challenge


Today is the first day of the new Stampendous Super Saturday Design/Sketch Challenge! Each Saturday, one of our great creative team will post a new challenge. It could be in sketch form, it could be a design challenge and along with it will be a great sample of how they used this challenge to create something amazing. Anyone who would like to contribute their own talents to this can upload their creation to a forum such as Splitcoaststampers.com, papercraftplanet.com, or any others. When uploading, make sure to include the Stampendous code for that week's challenge. This week the code is STMC1. More info can be found on the Stampendous blog. Each week two winners will be selected...one randomly and one chosen by the Stampendous graphics department for best use of Stampendous products in their design. This means stamps, Class A' Peel stickers, glitter, embossing powder, flock, etc. Check the website for more inspiration. Prizes will be awarded weekly!
The first sketch challenge was designed by Cyndi Bundy who did the cutest card ever using Changito the monkey playing soccer. Check her card out on the Stampendous blog as well as her own blogsite (see below). The sketch design is seen here, so break out those stamps people. No excuses! It's Saturday, you don't have anything else to do! lol
Pam

Stampendous Impressions blogsite
Stampendous website

Design Team:

Cyndi Bundy
Wendy Price
Rachel Stzonyk
Jennie Dove
Nancy Sanders

Friday, April 9, 2010

Loopy Blooms Tiled Card

You can never have too many thank you cards on hand. This one is cute and fairly easy to make multiples of. Just punch out and stamp lots of squares from solids or prints, ink the edges if desired, and adhere to a panel. Attach panel to card, embellish with rick rack, ribbon, tabs, flowers. It looks more involved than it really is. It's also helpful that all these cute flowers and messages come together along with a scalloped border and tiny garden bugs in another one of Stampendous' Perfectly Clear sets. I'll be posting more cute cards using this same set over the next week or two, so check back!
Have a sunny spring break!
Pam

Perfectly Clear "Loopy Blooms" by Stampendous (SSC1069)
"Promenade -Curly Q" by WeRMemory Keepers
Bazzill cardstock
Vintage Sepia Versafine by Tsukineko
ribbon, rick rack, flower
tab clip from Staples

Thursday, April 8, 2010

Peacock Beauty Card

Jumping over to the elegant side of stamping. Once again empha-sizing embossing. The focal image Peacock Feather by Stampendous is double embossed which is very similar to Fran's Painting with Powder technique. (Check out YouTube video on the Stampendous site!) The background on that small panel was inked with Versamark and sprinkled with various Pearlustre embossing powders before stamping the feather image and embossing on top. There is a tone on tone embossing on gold cardstock using absolute favorite Champagne Gold Pearlustre from Stampendous. This Perfectly Clear set comes with the focal image, messages, frame, and minis. Love those sets! More bang for your buck. You gotta love that!

Perfectly Clear "Proud Peacock" set from Stampendous (SSC1076)
Champagne (EP226), Emerald (EP217), and Sapphire (EP218) Pearlustre embossing powders from Stampendous
dimensional foam tape
Gold ColorBox ink from Clearsnap
ribbon
blue, metallic gold cardstock

Wednesday, April 7, 2010

Butterflies Tiled Card

I love stamps with a mostly solid image. They are so simple to create with. Just pretty colored inks, markers, or in this case, stamped and embossed. These lend themselves well to a tiled panel. Just punch out the amount of tiles you want, place them on scrap paper with a small piece of d-sided tape, stamp over all and emboss. Remove from scrap paper and adhere to larger panel leaving slight "grout" area. The background was stamped and embossed randomly with a tone-on-tone look. Add a couple of embellishments, and "voila" (say with cheesy french accent!), you have a perfect card for so many occasions. Set aside your watercolors and emboss for a change!
Pam

Perfectly Clear "Butterfly Beauties" by Stampendous (SSC195)
Perfectly Clear "Formal Frames" (message) by Stampendous (SSC197)
Class A' Peel "Flower Chain" by Stampendous (AC669HB)
White Embossing Powder by Stampendous (EP100)
Chocolate Embossing Powder by Stampendous (EP117)
Frost White ColorBox ink by Clearsnap
Versamark ink by Tsukineko
Bazzill cardstock
scalloped print

Tuesday, April 6, 2010

Birdie Birthday Card


This should be my last in birdcage series of cards. Used the wonderful velvetty Class A' Peel stickers again, only this time I stamped on them, too! Distressed around the edges for a different look.
Don't cage up your creativity, let it free! (Oooh, that was really reaching, wasn't it?!)
Pam

Perfectly Clear "Birthday Cages" by Stampendous (SSC1075)
Class A' Peels "Jumbo Damask Leaves" in Velvet Olive by Stampendous (AC990VE)
Bazzill cardstock
Melissa Frances printed paper
Olympia Green Versafine by Tsukineko
French Blue ColorBox Chalk ink by Clearsnap

Sunday, April 4, 2010

Sunflower Bouquet card

Perfect for Spring! This sunflower bouquet is another set perfect for so many occasions or no occasion at all. Stamped and water-colored, cut out with an oval template and framed with an additional oval. This set comes with a couple phrases, various groupings of flowers, a cute argyle-style border. Included is also a cute little frame to highlight your message.
Hope you have a bright, sunny day!
Pam

Perfectly Clear "Sunflower Bouquet" from Stampendous (SSC1071)
Bazzill Cardstock
Onyx Versafine ink from Tsukineko
Tangerine and Blue Lagoon ColorBox Chalk ink from Clearsnap
brad fasteners
foam adhesive

Saturday, April 3, 2010

Bright Blessing card

So maybe this is a little too late to be adding this card since no one has the time to duplicate it for this year, but I'm sure you can find other uses for it. Consider it my way of wishing you and yours a special day.
Simple to make. Stamp and emboss images in white. Watermark-stamp images on cross. Cut out stamped image, slit at ends, insert ribbons and tie. Add stamped tag attached to jumprings for swing.
Nothing says that a religious card has to be dark and depressing! Lighten up...it's Spring!

Pam

Perfectly Clear "Blessings Cross" by Stampendous (SSC1040)
White Embossing Powder by Stampendous (EP100)
Bazzill cardstock
Frost White ColorBox ink by Clearsnap
Versamark ink by Tsukineko
circle punches
jumprings
ribbon

Friday, April 2, 2010

Catbird? Card

I promised you more cards using Stampendous' new Perfectly Clear birdcages. This one is really simple and because of that, very effective. I stamped Fluffles from an oldie-but-goodie set on the white panel and used watercolor pencils and a wet brush to add color. The cage was stamped on acetate and cut out with the addition of cutting a "door" on the cage before adhering to panel using strips of foam adhesive. The bird on top and the question mark added to the message creates the irony of the situation. Put this card up against the previous one and you begin to realize how versatile these stamps can be. How tweet!
Perfectly Clear "Tweet Cages" from Stampendous (SSC1074)
Perfectly Clear "Fluffles the Cat" set from Stampendous (SSC037)
Thermo Acetate from Stampendous (PC75)
Black StazOn ink from Tsukineko
Onyx Versafine ink from Tsukineko
foam adhesive
watercolor pencils
Bazzill cardstock
white cardstock

Thursday, April 1, 2010

Garden Birdcage Card

When Stampendous first sent me their two new sets of Perfectly Clear stamps with birdcage images, I thought, "Birdcages? Seriously?", but in actuality I've had a lot of fun with them! This particular card has the cage stamped and embossed with white powder on a printed background along with other stamped elements from the set. I love sets of stamps because of their versatility. I accented with those velvety Class A' Peels again (love, love, love 'em!) and a silk flower for dimension. I sponged ink around the edges to distress and add that artsy thing that's still so popular. I'll be posting more with these sets as I've found them perfect for so many occasions and styles.

Perfectly Clear "Tweet Cages" from Stampendous (SSC1074)
Class A' Peel "Scrollwork Borders" in Velvet Olive from Stampendous (AC726VE)
White Embossing Powder from Stampendous (EP100)
Frost White ColorBox ink
Olive ColorBox Chalk ink
Bazzill cardstock
print unknown
silk flower
glitter brad fastener