Thursday, October 31, 2013

Dreamweaver Stencils: Happy Halloween!


Happy Halloween to all of my favorite ghouls out there! Today concludes our entire month of Magical and Mysterious, and your final opportunity to link your own creepy creations to the Dream It Up! blog for an opportunity to win the stencil of your choice!

My post today once again features the new "Great Pumpkin" stencil design. I have had so much fun with this new design, and obviously many of my teammates have felt the same. Today I kept it simple...just paper-piecing on top of machine-embossing, with a bit of ink distressing to make the piecing pop. The cooly creepy double-sided paper was distressed around the edges using my Picasso tool. It's perfect for that! I've added some sentiment stickers from Bazzill Basics as well. I wish that I could tell you who makes this paper, and what it is called...so if any of you know the name, please let me know in your comments below. I'd love to buy some more!

Hope your tricks become treats today, and that you and your family have a safe and fun "ghouls' night out"!

Check out the rest of the team's creations, as well as our wonderful guest designer, Alison Heikkila. Thanks so much, Alison, for joining us for Spooktober!


Wednesday, October 30, 2013

Poisons for My Pal...Bwahahahahahaha!

My good friend and graphics coordinator at Stampendous, Laura Weed, reeeeeaaaaallly gets into Halloween, and anything with witches (both good and bad). She was so excited when Stampendous released a couple of sets of tiny Halloween-inspired images (Halloween Charms and Poison Labels), and wanted someone to create something fab with these sets. Design Team Member, Asia King, did an amazing project HERE, which reminded me of what I'd originally had in mind to create.

My oldest son is diabetic, so I talked him into giving me several of his empty insulin vials. I washed them, removed the labels, and then the fun  began!

Vial #1 in the top picture, has a sprinkling of Trick or Treat, Lime, and Purple Color Fragments inserted, along with a small amount of Beacon Fast Finish. When shook up, it distributed the fragments all over the bottle. I small tattered bit of burlap wraps the vial, a bright green tag is adhered along with a Houndstooth Gem from Paper Studio. The top is a piece of May Arts web wrapped in waxed cording.

Vial #2 has a label stamped in Black StazOn ink on a piece of packaging tape. Versamark ink was smudges on various sections and Aged Black and Aged Scarlet Embossing Enamels were heated over the surface, and the cap (a large metal brad fastener). A tiny tag was tied on at the top.

Vial #3 has the Insectodeth label stamped on tissue and decoupaged onto the vial with Beacon Fast Finish. Inside are some wispy pieces of cotton for a web, and the tiny spiders stamped on acetate with StazOn, and tucked inside. A bit of a twig is the plug on the top. Jute twine is wrapped around, and Aged Green Embossing Enamel is heated at the base of the  bottle.

Finally, I covered a paper maché box with creepy papers, distressed around the edges, and plenty of Fran•táging and encrusting with more embossing enamels and Color Fragments. A small pad of black velvet was inserted in the box as the padding to protect these concoctions.

I have to say that I really enjoyed creating this project, and I'm hoping that Laura will add it to her collection of design team creations in her office. I know no one else who would love to receive a box of poison than my favorite witch, Laura:


Picture of Laura that I've had on my phone for years!


Monday, October 28, 2013

Woodware UK: Travel the Open Road

The Woodware UK team has been challenged this week to create in a "Travel" theme. I figure that not all people travel by plane, train, or boat. Living in the USA in California as I do, there are many who "Hit the Road" on their motorcycles, some as part of groups and clubs, and some just go solo. It's a great way to see the country, as long as you do it safely!

My card features the Stampendous Cling Motorcycle Elements done in monochromatic tones. The image was stamped in black dye ink. I smeared some Clearsnap Black Mixed Media ink on an acrylic block, and using a waterbrush, I picked up just the amount of ink for shading and detail that I wanted, leaving some areas white for highlights. When dry, I added a bit more water to the ink on my block, and using a sponge, I daubed this watery ink over my Dreamweaver Stencils Houndstooth background before stamping over the  top of my panel. The top was torn and adhered to the card. I used an eyelet setting tool set to insert two larger silver eyelets at the top before tying a black and white chevron ribbon through them both. The end result is very graphic and masculine. Of course, you could add pink and white ribbon for that "Motorcycle Mama" in your life! Safe travels!


Thursday, October 24, 2013

Dreamweaver Stencils: Magical Mystery...Mouse?

I suppose that you are viewing my blog, and thinking to yourself, "Hmmm. Is Pam confused (again)? This is not a Dreamweaver post. I see nothing from Dreamweaver on here!", and you'd be wrong. Bwhahahahaha.

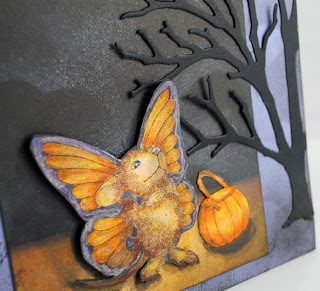
Let's face it. We all have far more craft products than we can really use, but we can justify it far better when we mix up the elements...kind of like a crafty witch with her cauldron. Eye of newt, tongue of spider, Clearsnap ink, Stampendous Mouse, aaaaaand...Dreamweaver Leafless Tree diecut and Picasso tool. You see, the best potions are a mix of more than one element, and this card is no different.

I used the Dreamweaver Picasso tool to stencil my cloudy background using a sponge dauber and Clearsnap Mixed Media Jasmine and Pewter inks. I punched a circle for the moon and inserted it behind a cloud puff. The designer paper that I used already had an amber glow at the bottom which worked nicely as the base for my Monica Mouse in her butterfly costume. She was stamped and colored with Copics before being cut out and adhered with foam tape, along with her pumpkin pail. A stencil brush with plenty of Mixed Media Noir ink, added to the spooky feel, but my die cut black Leafless Tree was the ultimate in eerie additions.

So, my pretty, remember the next time you pull out your stamps, and inks, and newts, and spiders...some Dreamweaver Stencils will fit in very nicely!

Now that I've "tricked" you a bit, be off to the land of treats, or maybe not...


Tuesday, October 22, 2013

Woodware UK: Creating in the Round

Woodware's "Circles" challenge for this week provided me with the opportunity to post one of my favorite cards. Featuring the Stampendous Cling Elephant Ascent, I created a fun tent card following a tutorial that I found on Split Coast Stampers HERE.  I used a Super Duper circle and Huge scalloped circle punch to create the opening in the front of the card. Fun polka dot papers inside and stitched outside, and plenty of colorful buttons added to the theme. Colored and shaded with markers (notice the appearance of transparency where the balloons overlap? Just think of what color the two overlapping would make!), cut out, and adhered to the front to dangle in the window, this cute elephant appears to be flying! The sentiment is one of Stampendous' Class A' Peel type Peel Off stickers from the Friendly Greetings set. Twine and ribbon bows finished off the front. This style of card is great for displaying all year round, yet folds nicely to put in the post.

Remember the whole Woodware UK team is playing with this challenge...so be sure to visit the Woodware blog each day for more circular fun!


Thursday, October 17, 2013

Dreamweaver Stencils: Mysterious and Magical and Steampunk-in!


Are you ready to be spooked, mystified and magically transported to the land of Halloween and holidays? Hop on board the Dream Team train as we journey through all things Mysterious and Magical through the month of October. Our guest "engineer" is Miss Eerie herself, Alison Heikkila. October promises to be a very bumpy ride...

Lately I've been playing with the new Great Pumpkin stencil, and I've really enjoyed the wide variety of techniques I've used. Nothing screams fall more than a pumpkin, with or without the scary face. I played around with the idea of a "semi-steampunk-in" (haha) using silver colored aluminum machine-embossed with the pumpkin design, and embellished using several Mercart metal-working tools...I scratched in texture, I traced the design, I pushed at the metal with ball tools and paper stumps, added a border with one of the wheels, and some faux "screws". Then I rubbed the entire piece with Black StazOn re-inker, let it sit for a minute, and rubbed away the excess and polished a bit...leaving that aged/industrial look that I was going for.

Since the metal panel was ornate enough on its own, I kept the rest of the card quite CAS (clean and simple) with some fun paper and sticker sentiments.

If you're having a hard time finding Dreamweaver Stencils in your local stores, remember that you can purchase any of the Dreamweaver line online at Stencil with Style. Let those local store owners know that you'd love the convenience of being able to purchase Dreamweaver from them. They won't know if you don't ask!

Meanwhile, follow the "A" team this week, along with our Guest Designer Alison for more inspiration, and come play along with us by linking your own Mysterious and Magical creation to the linkytool on the Dream It Up! blog.


Wednesday, October 16, 2013

Woodware UK: Foiling with Sketch 27

Wow! The Woodware UK team is up to the 27th sketch, which you can see at left. My version provides me with the opportunity to start stockpiling holiday cards for this year. I fully intend to create a bunch of the card that I posted last week, but it's always fun to go off in a totally different direction...in this case, vintage.

I just received a jumbo box of Woodware goodies the other day, and I was so excited to open it up and play. I love these Christmas Post papers from Craftworks Cards. They come in 8 inch square pads, and having matching punch-out elements. I substituted the oval in the sketch for a few of these elements, which I sponged brown ink around the edges to make them pop.

My Dreamweaver Poinsettia panel was paste-embossed by mixing a small amount of Dreamweaver Glossy Red Paste
with a bit of black acrylic paint to tone down the brightness for that vintage look that I was going for. Once the paste was mostly dry, I rubbed gold foil over parts for some extra glitz without being "in your face". A little bit of glue marker around the edges of the Christmas Post Elements allowed me to add a touch of foiling there as well. I finished off the card with some Mark Richards crystals, Card Candi, and a sheer ribbon bow.

If you haven't been keeping track of this week's sketch creations, and you'd like more info on how to play along, be sure to visit the Woodware UK blog.


Thursday, October 10, 2013

Woodware UK: Monochromatic Does Not Mean Boring


The Woodware team have been challenged this week to create with a monochromatic Christmas theme by the Craftrange retail store in the UK. You can see what our team has been inspired to do with this challenge on the Woodware blog.

I love the look of white on white, especially for the holidays, so that's the direction that I went with for this challenge, adding a bit of silver as well. I paste-embossed in white the Dreamweaver Line of Christmas Trees stencil. While the paste was wet, I waterfalled Stampendous Crystal Glitter and Microfine Silver Glitter over each tree, one by one, pressing slightly to ensure great glitter coverage. When almost dry (10-15 minutes) I pressed a few Mark Richards Crystals and Pearls into the top of the trees. The panel was matted with silver mirror cardstock and mounted onto the white card. A scrap of mirror card was machine embossed with Dreamweaver's new small Merry Winter, but could easily be substituted for any of the small holiday sentiments.

This card was so simple to create, and would be fabulous done in multiples. As a matter of fact, I'm kind of thinking that this will most likely be the design I send out to friends and family this year. What do you think?


Dreamweaver Stencils: Family Fun for Halloween

My post this week features two new designs from Dreamweaver, a re-release of the Bats stencil and the new Vintage Decor design, which I used last week as well. When you have a really versatile design, they can be used over and over for so many projects. This week I used these designs to create Halloween "clings" with a bare minimum of supplies and very little effort. You can find my tutorial for this project on Paper Craft Planet. With a bit of adult supervision, this project is simple enough to be done with kids. The "clings" can be used to adhere to pumpkins, windows, mirrors, lanterns, and can be peeled off when finished. Head on over to the Paper Craft Planet blog for all the details, and be sure to leave a comment there for an opportunity to win the stencil of your choice!


Don't forget to check out more mysterious and magical creations from our special guest designer and the rest of the team, and link your own creations on the Dream It Up! blog!

Friday, October 4, 2013

Woodware UK: Recycled Clamshell Packaging to Under the Sea Porthole

I love when I have opportunity to reuse, repurpose, or recycle something. My family can tell you that everywhere that I go, I pick up odds and ends, or save odds and ends that my brain wants to turn into something else. Cheap clamshell packaging is always a great find, and perfect for a shaker card or, in this case, a porthole to another world...under the sea. The plastic was inserted from behind the card front after a circle was die cut to hold it. The Stampendous Cling Mermaid Kiddo was stamped on white cardstock, colored with markers, and part of her die cut with the circle to fit within the capsule, and the rest cut and adhered to the card front. The bottom of the card features the Stampendous Cling Shell Background stamped and embossed in white, with an edge of Fresh Green Crushed Glass Glitter. A bit of the same was sprinkled within the capsule, and the sentiment stamped on the front and embossed in white as well


Thursday, October 3, 2013

Dreamweaver Stencils: A Bumpy Ride Through October

Are you ready to be spooked, mystified and magically transported to the land of Halloween and holidays? Hop on board the Dream Team train as we journey through all things Mysterious and Magical through the month of October. Our guest "engineer" is Miss Eerie herself, Alison Heikkila. October promises to be a very bumpy ride...

My project is a framed wall hanging, featuring the newly released Vintage Decor stencil. The first time that I saw it, I immediately was reminded of Cinderella's carriage as it evolved from a pumpkin to an elegant mode of transport. My version is just a bit more spooky...I've added plenty of black ink distressing, along with sponged white "smoke and fog", creating clouds of it with the use of the Picasso stencil/tool. My pumpkin was created from three Spellbinder ovals overlapping, with the Vintage Decor design pasted in Matte Black, and thoroughly covered in the Black Ultra Fine Glitter from Art Glitter. In real life, there is awesome sparkle on this, but a bit difficult to photograph. Fun papers from BoBunny, Recollections, Doodlebug Designs, and Bazzill brought the look together including the attached wagon wheels, and a jumbo corsage of May Arts ribbons and textiles added dimension. Adding a bit to the creepy element, some word stickers from Tim Holtz..."Something Wicked this Way Comes"...a great quote from Shakespeare's MacBeth.


 Your next stops can be found here: