There's nothing wrong about standing out in the crowd, and this zebra definitely stands out! Even the leaves on this card go gray-scale in his presence. A fun take on the new Stampendous Cling Zebra, rainbow-colored using Chameleon Markers...a very cool new product. Alcohol markers with a toner chamber in each marker, and a unique way of achieving the various shades desired without having to haul around hundreds of markers. The image was stamped on Stampendous Mixed Media White cardstock, colored as desired, and adhered to a black and gray base along with multiple Dreamweaver die cut Leafy Branch and Monstera leaves. The leaves were cut from the same white cardstock, and ink-stenciled with the Dreamweaver Crusade pattern and the Graduated Dot stencil with Onyx Versafine from Tsukineko®, using a large stencil brush. What was left of the ink in the brush was softly used over the leaves for a more gray look. The leaves were layered with the zebra panel, some Party Color Fragments were adhered here and there with a glue marker, and a sentiment tag was created using one of the nested frames in the Stampendous Pop Ups Dies set. The sentiment is from the Perfectly Clear Wild Sayings set (perfect with all of the new Stampendous animal images), stamped in black, and a bit of rainbow stripes for fun.
Showing posts with label birthday. Show all posts
Friday, June 19, 2015
Embrace Your Wild Side
There's nothing wrong about standing out in the crowd, and this zebra definitely stands out! Even the leaves on this card go gray-scale in his presence. A fun take on the new Stampendous Cling Zebra, rainbow-colored using Chameleon Markers...a very cool new product. Alcohol markers with a toner chamber in each marker, and a unique way of achieving the various shades desired without having to haul around hundreds of markers. The image was stamped on Stampendous Mixed Media White cardstock, colored as desired, and adhered to a black and gray base along with multiple Dreamweaver die cut Leafy Branch and Monstera leaves. The leaves were cut from the same white cardstock, and ink-stenciled with the Dreamweaver Crusade pattern and the Graduated Dot stencil with Onyx Versafine from Tsukineko®, using a large stencil brush. What was left of the ink in the brush was softly used over the leaves for a more gray look. The leaves were layered with the zebra panel, some Party Color Fragments were adhered here and there with a glue marker, and a sentiment tag was created using one of the nested frames in the Stampendous Pop Ups Dies set. The sentiment is from the Perfectly Clear Wild Sayings set (perfect with all of the new Stampendous animal images), stamped in black, and a bit of rainbow stripes for fun. Wednesday, April 22, 2015
KITTEN Around with Stampendous
I'm not kitten you, Stampendous has the cutest felines you've ever seen! Including the Cling Feline Curious featured here, wanting to join in on the lemonade party along with the Cling House Mouse Designs® Share a Sip image. A couple of the Hummingbird Dies and matching stamps flew in for the event as well. Using the Stampendous Pop Up Die set, there is so much fun dimension to highlight each cute image and the bright Authentique
papers to go with. Just in case you are low on patterned papers,
remember...you can always create your own. The light blue panels were
stamped with the Cling Floral Tapestry in VersaMark ink and embossed with White Embossing Powder. A stamped birthday sentiment and fluffy silk bow from May Arts were the finishing touches.
Remember, the team are playing with kitties all of this week, so be sure to follow the links from the Stampendous blog! Here are those that are playing today:
Wednesday, April 8, 2015
Musically Inclined with Stampendous and Dreamweaver
Acoustically speaking, the Stampendous team are really enjoying their musical creations this week. My feature card was a cooperative creation. I handed the Acoustic Sounds image and my Copic Sketch markers to my son, Bryan for him to stamp and color that particular panel. He really enjoyed mimicking the wood grain, attempting to match the color variations to his own acoustic guitar. I added some Memento Toffee ink around the edges of the panel, and sprinkled a bit of Stampendous Spoonful of Rust encrusting mix around the edges before heating to melt.
The kraft card base was ink distressed. A panel of Core'dinations Chalk Core was machine embossed with the Dreamweaver Waves and Dots stencil, sanded, and brushed with the Toffee ink for a cohesive and grungy look. A scrap of guitar music was distressed and added, along with a handcut guitar "pick" tucked into an actual wrap of guitar string wire. The sentiments added were from the Perfectly Clear Happy Greetings set. A perfect masculine card for your guitar "hero".
Remember, the rest of the team are musically inclined this week as well! Just follow them from the links on the Stampendous blog.
The kraft card base was ink distressed. A panel of Core'dinations Chalk Core was machine embossed with the Dreamweaver Waves and Dots stencil, sanded, and brushed with the Toffee ink for a cohesive and grungy look. A scrap of guitar music was distressed and added, along with a handcut guitar "pick" tucked into an actual wrap of guitar string wire. The sentiments added were from the Perfectly Clear Happy Greetings set. A perfect masculine card for your guitar "hero".
Remember, the rest of the team are musically inclined this week as well! Just follow them from the links on the Stampendous blog.
Thursday, January 29, 2015
Dreamweaver: Backgrounds for Birthdays
We are well into the beginning of a new year, and in honor of
that, our monthly challenge for January has been
Birthday Wishes. We'd love for you to play along with us, and link your
creations to the Inlinkz tool at the bottom of this post, or on the
Dream It Up! blog, for a chance to win the stencil of your choice...and
remember, using Dreamweaver products gets you bonus points towards an
extra stencil!
Here's my birthday wish for this week:
Creating your own patterned paper is so simple when you have Dreamweaver stencils! The purple panel was completed in opposite techniques...on the bottom, Memories Mists Grape was sprayed through the Dogwood Pattern stencil, and in an effort to not waste the ink sitting on the stencil, the top portion of the panel was placed on the wet stencil to transfer the ink. The Dreamweaver Apron Die was cut from the center to be used on another card, but I didn't want to waste the rest of my beautiful background. So I sprayed through the Leopard Spots stencil with Mango Lemonade Memories Mist onto a square of yellow cardstock. Once the corners were rounded, I placed the yellow panel behind the negative cut portion of the purple panel, and adhered both to my white card. I finished off this birthday card with a sentiment stamped in purple on a corrugated banner piece, added a May Arts' ribbon bow, buttons, and ric rac. What a fun card for any female...friend, mother, sister, aunt, or grandmother.
For more birthday ideas, check out the team links below:
Here's my birthday wish for this week:
Creating your own patterned paper is so simple when you have Dreamweaver stencils! The purple panel was completed in opposite techniques...on the bottom, Memories Mists Grape was sprayed through the Dogwood Pattern stencil, and in an effort to not waste the ink sitting on the stencil, the top portion of the panel was placed on the wet stencil to transfer the ink. The Dreamweaver Apron Die was cut from the center to be used on another card, but I didn't want to waste the rest of my beautiful background. So I sprayed through the Leopard Spots stencil with Mango Lemonade Memories Mist onto a square of yellow cardstock. Once the corners were rounded, I placed the yellow panel behind the negative cut portion of the purple panel, and adhered both to my white card. I finished off this birthday card with a sentiment stamped in purple on a corrugated banner piece, added a May Arts' ribbon bow, buttons, and ric rac. What a fun card for any female...friend, mother, sister, aunt, or grandmother.
For more birthday ideas, check out the team links below:
Thursday, January 22, 2015
Dreamweaver: Birthday Challenge Got You Dragon?
Welcome to the birth of a new year...2015 to be precise! In honor of
that, we've decided that our monthly challenge for January will be
Birthday Wishes. We'd love for you to play along with us, and link your
creations to the Inlinkz tool at the bottom of this post, or on the
Dream It Up! blog, for a chance to win the stencil of your choice...and
remember, using Dreamweaver products gets you bonus points towards an
extra stencil!
Here's my birthday wish for this week:
I thought I'd go a bit more elaborate for this week's birthday card. Using one of my favorite techniques...Molten Magic...along with Stampendous Embossing Enamels and Micro Glitters. The end result is so much texture, dimension, and color.
The Dreamweaver Dragon was paste-embossed in Glossy Red Paste using these steps:
1) Using removable tape around all edges, tape the stencil over the top of the cardstock panel.
2) Slide palette knife into jar of paste, lifting a thick portion of it up the back of the knife. Transfer to edge of Spreader approximately the width of the stencil design you are using.
3) Spread paste across stencil at a slight angle, lifting up at the end. Use palette knife to daub paste in any areas that may have been missed. Transfer remaining paste on spreader back to jar. Apply spreader at 45˚ angle across stencil to remove excess paste, and return to jar. Clean edge of jar and close tightly.
4) Carefully remove tape from three sides, leaving last piece as your "hinge" to help lift the stencil off of the paper before removing. Immediately place stencil and spreader in water to be cleaned with a soft brush.
Now, comes the fun part!
1) Sprinkle various Stampendous Aged Enamels (Aged Gold and Aged Black) and Glitter (Red Micro Glitter) over wet paste. Tap off excess and return to bottles.
2) Apply heat tool until surface is bubbling, melding, and molten. Let cool a few minutes.
3) TA DAH! Don't you love it? You know this will be your new favorite technique!
Obviously, the card was finished up in the usual fashion...mats and layers, a glowing red rhinestone eye, and a sentiment. This was computer generated as I was feeling a bit of whimsy, so I designed it quickly in PhotoShop, printed it, and added it. It says, "Need help with those candles?", but I had printed out a couple others..."Another birthday got you DRAGON?", and "Come on...you know you're a HOTTIE!" Yeah, very punny, I know.
Of course, more birthday inspirations coming your way from our "B" team:
Here's my birthday wish for this week:
I thought I'd go a bit more elaborate for this week's birthday card. Using one of my favorite techniques...Molten Magic...along with Stampendous Embossing Enamels and Micro Glitters. The end result is so much texture, dimension, and color.
The Dreamweaver Dragon was paste-embossed in Glossy Red Paste using these steps:
1) Using removable tape around all edges, tape the stencil over the top of the cardstock panel.
2) Slide palette knife into jar of paste, lifting a thick portion of it up the back of the knife. Transfer to edge of Spreader approximately the width of the stencil design you are using.
3) Spread paste across stencil at a slight angle, lifting up at the end. Use palette knife to daub paste in any areas that may have been missed. Transfer remaining paste on spreader back to jar. Apply spreader at 45˚ angle across stencil to remove excess paste, and return to jar. Clean edge of jar and close tightly.
4) Carefully remove tape from three sides, leaving last piece as your "hinge" to help lift the stencil off of the paper before removing. Immediately place stencil and spreader in water to be cleaned with a soft brush.
Now, comes the fun part!
1) Sprinkle various Stampendous Aged Enamels (Aged Gold and Aged Black) and Glitter (Red Micro Glitter) over wet paste. Tap off excess and return to bottles.
2) Apply heat tool until surface is bubbling, melding, and molten. Let cool a few minutes.
3) TA DAH! Don't you love it? You know this will be your new favorite technique!
Obviously, the card was finished up in the usual fashion...mats and layers, a glowing red rhinestone eye, and a sentiment. This was computer generated as I was feeling a bit of whimsy, so I designed it quickly in PhotoShop, printed it, and added it. It says, "Need help with those candles?", but I had printed out a couple others..."Another birthday got you DRAGON?", and "Come on...you know you're a HOTTIE!" Yeah, very punny, I know.
Of course, more birthday inspirations coming your way from our "B" team:
Thursday, January 15, 2015
Dreamweaver: More Birthday Fun
Welcome to the birth of a new year...2015 to be precise! In honor of
that, we've decided that our monthly challenge for January will be
Birthday Wishes. We'd love for you to play along with us, and link your
creations to the Inlinkz tool at the bottom of this post, or on the
Dream It Up! blog, for a chance to win the stencil of your choice...and
remember, using Dreamweaver products gets you bonus points towards an
extra stencil!
Here's my birthday wish for this week:
I'm going to cheat a bit here and post a previous creation, as apparently I totally forgot to create something for this week's post before I'd gone off to play at the CHA (Craft and Hobby Association) show in Anaheim. Anyhoooooo...I kind of love this card, and it's super simple to create. The large focal panel is a piece of Bazzill Basics' Dotted Swiss white cardstock, on which I'd pasted the Stylized Dahlia design in Regular Embossing Paste from Dreamweaver. Once dry, I brushed a soft pink ink over the surface with a large stencil brush, from top to bottom and left to right. The birthday sentiment, Bonne Fete (French), was pasted on a section of cotton May Arts ribbon in pink paste. No, Dreamweaver does not make a pink paste, but you can create your own...or any color you prefer. Just add a bit of ink, acrylic paint, spray mist, or even mica powders to a dab of the Regular Paste, and mix it with your palette knife.
Once the ribbon was dry, I wrapped it around the focal panel, and adhered the layers to my pink card base. A few self adhesive pearls, and the end result is a beautiful, textural, slightly Shabby Chic-style card for someone wonderful!
I do apologize if you visited this post earlier, and nothing was here to oooh and aaaah over. I hope that won't prevent you from ooohing and aaahing over this one!
Of course, more birthday inspirations coming your way from the Dream Team:
Here's my birthday wish for this week:
Once the ribbon was dry, I wrapped it around the focal panel, and adhered the layers to my pink card base. A few self adhesive pearls, and the end result is a beautiful, textural, slightly Shabby Chic-style card for someone wonderful!
I do apologize if you visited this post earlier, and nothing was here to oooh and aaaah over. I hope that won't prevent you from ooohing and aaahing over this one!
Of course, more birthday inspirations coming your way from the Dream Team:
Thursday, January 8, 2015
Dreamweaver: Dreaming of Birthday Wishes for the New Year
Welcome to the birth of a new year...2015 to be precise! In honor of
that, we've decided that our monthly challenge for January will be
Birthday Wishes. We'd love for you to play along with us, and link your
creations to the Inlinkz tool at the bottom of this post, or on the
Dream It Up! blog, for a chance to win the stencil of your choice...and
remember, using Dreamweaver products gets you bonus points towards an
extra stencil!
Here's my birthday wish for this week:
For some reason, I seem to be in a bright yellow, orange, and pink mood lately. Hmmm. Could it have something to do with being tired of doing red and green? At least for now...
This card has a pocket on the side that holds a bookmark and a gift card, but is large enough for a variety of things...maybe even a chocolate bar!
The main card is created from Bazzill Basics cardstock, and ink-stenciled with a large stencil brush and Splendor ink from Tsukineko. These inkpads are like little palettes of color, and are perfect for ink-stenciling. I used the Dreamweaver Flower Corner stencil. Once stenciled, I die cut an oval from the card using the Nested Ovals dies medium size, and then cut the small one from that piece. This small one was adhered to the bookmark strip, to slide into the pocket.
I ran a panel of acetate through my Big Shot with the Hexagons stencil, which did impress it a bit, but not quite as much as I would have liked, so it did not photograph very well. Oh, well. Live and learn! However, it provided the perfect spot to paste-emboss the sentiment from the Dreamweaver Birthday Combo stencil using Glossy White Paste. Once dry, this was slid into the pocket and adhered behind the oval opening.
The pocket was just a panel of white cardstock cut the same width as the card, and 1/2" larger in height than the size of a gift card. 1/8" folds were done on the top and bottom, and adhered to the back of the front flap of the card. This allows easier access to the gift card and bookmark, along with a semi-circle punched from the left side. A bit of ribbon and a brad become the pull tab.
I did machine-emboss a thin strip of cardstock with the Hexagons, and brushed with ink as a border for the bottom of the card.
Of course, more birthday inspirations coming your way from our "B" team:
Here's my birthday wish for this week:
For some reason, I seem to be in a bright yellow, orange, and pink mood lately. Hmmm. Could it have something to do with being tired of doing red and green? At least for now...
This card has a pocket on the side that holds a bookmark and a gift card, but is large enough for a variety of things...maybe even a chocolate bar!
The main card is created from Bazzill Basics cardstock, and ink-stenciled with a large stencil brush and Splendor ink from Tsukineko. These inkpads are like little palettes of color, and are perfect for ink-stenciling. I used the Dreamweaver Flower Corner stencil. Once stenciled, I die cut an oval from the card using the Nested Ovals dies medium size, and then cut the small one from that piece. This small one was adhered to the bookmark strip, to slide into the pocket.
I ran a panel of acetate through my Big Shot with the Hexagons stencil, which did impress it a bit, but not quite as much as I would have liked, so it did not photograph very well. Oh, well. Live and learn! However, it provided the perfect spot to paste-emboss the sentiment from the Dreamweaver Birthday Combo stencil using Glossy White Paste. Once dry, this was slid into the pocket and adhered behind the oval opening.
The pocket was just a panel of white cardstock cut the same width as the card, and 1/2" larger in height than the size of a gift card. 1/8" folds were done on the top and bottom, and adhered to the back of the front flap of the card. This allows easier access to the gift card and bookmark, along with a semi-circle punched from the left side. A bit of ribbon and a brad become the pull tab.
I did machine-emboss a thin strip of cardstock with the Hexagons, and brushed with ink as a border for the bottom of the card.
Of course, more birthday inspirations coming your way from our "B" team:
Tuesday, January 6, 2015
Stampendous: Fluttering By
How about a bright and sunny card full of butterflies and fun to scare away the winter blues? All of this week the Stampendous team have been letting our butterflies take flight. I had fun creating beautiful backgrounds with the Creative Palette, by spritzing Dreamweaver Memories Mists in Mango Lemonade, Pink Lemonade, and Iridescent colors, spraying a bit of water, and place several panels of white cardstock onto the surface to transfer the colors and patterns. As the inks began to dry a bit, I used them with the Stack Art Regal Bird cling stamps as ink pads to add patterns to these panels. Then I switched my mist color to Lavender Tea, and used this as an inkpad to stamp one of the beautiful Cling Pen Pattern Butterflies on my favorite panel. Using the medium butterfly die that matches the butterfly stamps, I cut one from the edge of the panel. This butterfly was folded up to add more dimension to the panel. I used dimensional foam tape to adhere the panel over the top of a white cardstock panel stamped with the Cling Vintage Letter Script in Tuxedo Black Memento ink. To finish off this card, I applied a glue marker to adhere a heavy sprinkling of Amethyst and Canary Color Fragments.
For more flutter-by inspiration, be sure to visit the Stampendous blog each day this week for links to the team's creations.
Want to play with the January 2015 challenge? You can find the details HERE.
For more flutter-by inspiration, be sure to visit the Stampendous blog each day this week for links to the team's creations.
Want to play with the January 2015 challenge? You can find the details HERE.
Monday, January 5, 2015
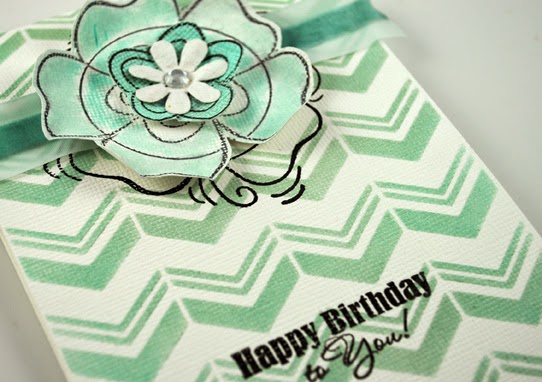
Woodware: Sketch 41...Simply Fun
Sketch 41 is a simple and fun one. Less about the layout, and more about
what you lay out! I simply created a background by ink-stenciling the
Dreamweaver Chevron background with Clearsnap Mixed Media ink in
Peridot, using a big fat stencil brush for quick coverage. I used the
same ink to "watercolor" the soon-to-be released Stampendous Cling PenPattern Petal a couple of times. These were cut out, the petals
rounded, layered, and adhered along with one small white paper flower
and a Mark Richards' Self-adhesive crystal. The line going across in the
design was perfect for a pretty ribbon, and as I don't ever have enough
birthday cards on hand, I used the Stampendous Perfectly Clear Birthday Assortment for my chosen sentiment.This sketch is great for quick cards for any occasion, so be sure to play along with this month's challenge on the Woodware blog. All the details can be found there!
Thursday, January 1, 2015
Dreamweaver: Dreaming of Birthday Wishes for 2015!
Welcome to the birth of a new year...2015 to be precise! In honor of that, we've decided that our monthly challenge for January will be Birthday Wishes. We'd love for you to play along with us, and link your creations to the Inlinkz tool at the bottom of this post, or on the Dream It Up! blog, for a chance to win the stencil of your choice...and remember, using Dreamweaver products gets you bonus points towards an extra stencil!
Here's my birthday wish for this week:
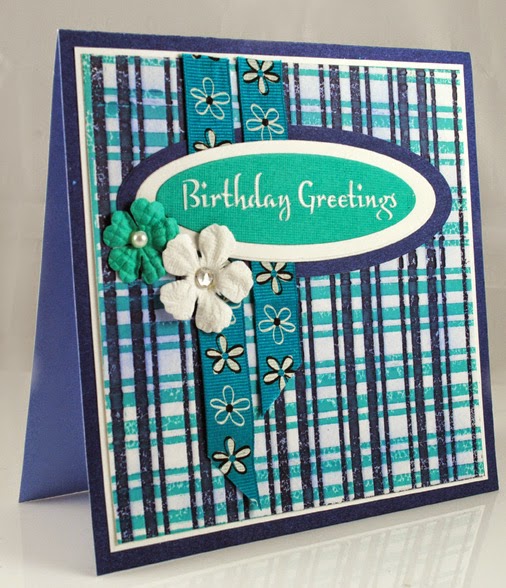
In honor of the Queen of Stencils, Lynell Harlow's birthday coming up on the fourth, the team are joining up this week to wish her the best ever. My card is done in Lynell's favorite colors...shades of blue and green...using the Dreamweaver Stripes/Plaid stencil, and one of the sentiments from the Birthday Combo stencil.
The plaid is achieved by inking the stencil with a darker blue chalk ink, and placing it face up on the base plate of my Big Shot machine. A panel of white cardstock was placed facedown on top, along with the embossing mat, and two clear plates. All of this "sandwich" were run through the machine, in an inkpress technique, where the ink is transferred, and at the same time the paper is embossed with the design. Now, the stencil is inked again with a turquoise chalk ink, and placed face up on the base plate again. This time, place the cardstock panel 1/4 turn on top so that the ink transfers in the opposite direction, creating the plaid, almost seersucker pattern. This panel was matted in white and adhered to a dark blue card. Using the Dreamweaver Nested Ovals Dies, I cut one of each size from corresponding navy, white, and turquoise cardstock. The sentiment was paste-embossed with Glossy White on the turquoise oval, and set aside to dry.
For the finishing touches, the ovals were layered, along with two ribbon strips, and a couple of paper flowers with gems in the center.
This card is really simple, and perfect for creating for men as well as women. Just a change of colors, and you've created something entirely different!
Of course, more birthday inspirations coming your way from the Dream Team:
Wednesday, October 29, 2014
Woodware: Sketch 39 For a Hoppy Birthday
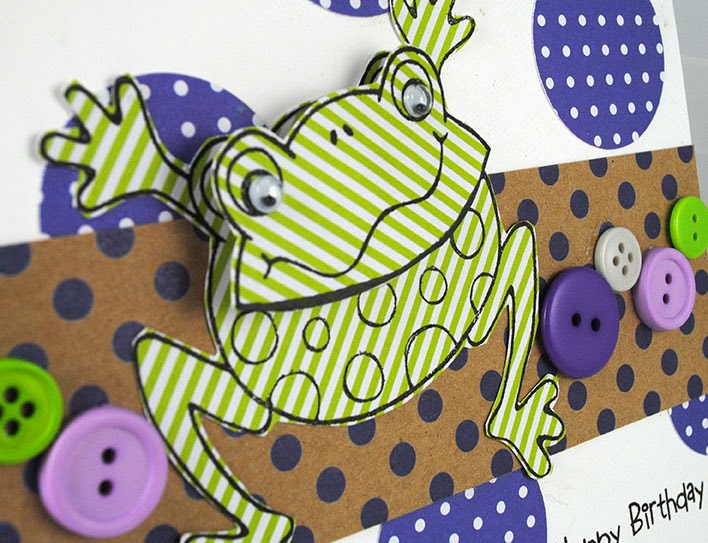
Welcome to the sketch 39 challenge for Woodware. I chose to turn it on it's side as I was determined to incorporate this cute Hoppy Frog image designed by Francoisé Read for Woodware. I think the circles in the design add to the "hoppy" effect, so I used Woodware circle punches with patterned paper and added them randomly
in the background. My band across the center was also patterned paper
(by the way, this card is a great way to use up scrap paper), and added
a border of buttons across the center, continuing the circle theme. The
frog was stamped on striped paper twice, and cut out. A whole frog was
adhered to the card, and a head portion adhered with the Action Wobble spring
between the layers. Of course, I had to add "googley" eyes, and one of
the cute sentiments from this stamp set.We hope you'll take time to play along with the challenge, and link your own creations to the Woodware blog. Head over there for more details!

Friday, June 13, 2014
Woodware: Sketch 35 for That Old Chap

I'm gearing up for fun this week with the Woodware Sketch Challenge No. 35...how about you? I've created a fun masculine birthday card featuring the Clear Magic Single "Spiffing Day" designed by Francoisé Read. So fun! I've used patterned paper from Cardworks "Time Flies" 8 X 8 pad...all gears, which goes perfectly with the Dreamweaver Stencils' Steampunk Clock design, simply ink-stenciled with a brush and grey ink. I used a softer touch with the ink over the sentiment panel. A bit of corner rounding, distressing, and a cut out pocket watch from the paper pad, and the card is done! An easy one to make in multiples...for all of the old and young chaps in your life!
Be sure to play along with the challenge, and upload your creations to the Woodware Blog for a chance to win!
Thursday, June 12, 2014
Dreamweaver Stencils and Imagine Crafts/Tsukineko: Endless Possibilites - Day Four
Welcome
to our first ever collaboration week with Imagine Crafts/Tsukineko!
We've shared all of our toys on both sides, so be prepared for Endless
Possibilities! Three prize packages are available, each containing one
set of each of these inks and stencils/dies. Just leave comments on each
post of each day this week (June 9th - June 13th) for a chance to win! Winners will be announced on Tuesday, June 17th!
Here's my creation for today:
Back to the Neons again! This time with something NEW (fits this month's challenge at Dreamweaver!) to play with...Imagine Crafts Vertigo sheets...polycarbonate holographic and translucent plastic that take the Tsukineko inks brilliantly, literally and figuratively. I used the new Dreamweaver Stylized Dahlia DIE with this, and I have to admit, it really is a bit too thick for die-cutting. I had to go back at some areas with my craft knife. Next time, I think that I'll try adding a thin shim and running it through twice. However, the end result was cool.
I had Googled this product to see what others have done with it, and noticed that some had molded it a bit using a heat tool. So, I smooshed the back side of the die-cut Dahlia with the Pink and Green Neon inks, and then began to heat it. Yikes! The stem pretty much turned into a limp noodle as it was so fragile, and I was using my Milwaukee heat tool, which is much hotter than most...but...the warmed flower and leaves were simple to maneuver and curve, and stayed that way when cool.
Of course, I had to use the Vertigo panel that I had left over from the die-cut, so I smooshed Pink, Blue, and Green Neon inks over the back of it. I heat set the ink a bit before ink-stenciling in Neon Purple the Dreamweaver Crusade Background. After heat setting this, all that was left was to adhere the panel to my card card using spray adhesive (doesn't show under translucent products), ink stencil the sentiment from the Dreamweaver Birthday Words, and adhere the now 3D flower and leaves. For these, I placed glue dots under the smooshed ink areas to hide them a bit. The end result would be difficult to mail, but worth it!
As a reminder...the Dreamweaver team are playing with their monthly challenge as well, which features "Old, New, Borrowed, Blue", so please link your appropriate creations to the inlinkz at the end of this post or on the Dream It Up! blog for a chance to win the stencil of your choice at the end of the month! Just Imagine the possibilities of what everyone else has created!
![]() |
| Imagine Crafts New StazOn Pads from Tsukineko |
![]() |
| Stencils and Dies Prize Package |
Back to the Neons again! This time with something NEW (fits this month's challenge at Dreamweaver!) to play with...Imagine Crafts Vertigo sheets...polycarbonate holographic and translucent plastic that take the Tsukineko inks brilliantly, literally and figuratively. I used the new Dreamweaver Stylized Dahlia DIE with this, and I have to admit, it really is a bit too thick for die-cutting. I had to go back at some areas with my craft knife. Next time, I think that I'll try adding a thin shim and running it through twice. However, the end result was cool.
I had Googled this product to see what others have done with it, and noticed that some had molded it a bit using a heat tool. So, I smooshed the back side of the die-cut Dahlia with the Pink and Green Neon inks, and then began to heat it. Yikes! The stem pretty much turned into a limp noodle as it was so fragile, and I was using my Milwaukee heat tool, which is much hotter than most...but...the warmed flower and leaves were simple to maneuver and curve, and stayed that way when cool.
Of course, I had to use the Vertigo panel that I had left over from the die-cut, so I smooshed Pink, Blue, and Green Neon inks over the back of it. I heat set the ink a bit before ink-stenciling in Neon Purple the Dreamweaver Crusade Background. After heat setting this, all that was left was to adhere the panel to my card card using spray adhesive (doesn't show under translucent products), ink stencil the sentiment from the Dreamweaver Birthday Words, and adhere the now 3D flower and leaves. For these, I placed glue dots under the smooshed ink areas to hide them a bit. The end result would be difficult to mail, but worth it!
As a reminder...the Dreamweaver team are playing with their monthly challenge as well, which features "Old, New, Borrowed, Blue", so please link your appropriate creations to the inlinkz at the end of this post or on the Dream It Up! blog for a chance to win the stencil of your choice at the end of the month! Just Imagine the possibilities of what everyone else has created!
Tuesday, April 8, 2014
Woodware UK: Sweet Dreams with Creativity Cards and Crafts!
The Woodware team have been challenged by a retailer once again. This time from a store in Eastbourne in England called Creativity Cards and Crafts. Their chosen challenge is, "Sweet Dreams"...something we all enjoy, literally and figuratively! I have pulled out one of my oldies but goodies, and a personal fave as a simple celebratory card to have on hand in multiples.I've stamped the Stampendous Cling Jumbo Cupcake on a selection of patterned papers, cut out the parts, and layered on the focal panel with 3D mounting pads. The cupcake wrapper portion was run through a Crimper for realistic texture. Holographic Peel Off Dots were colored with Sakura Moonlight Gelly Roll pens, and applied as "sprinkles". A small triangle of paper was stamped with a chosen sentiment from the Perfectly Clear Birthday Assortment set, and adhered to a toothpick along with a pompom, and inserted into the "icing".
The focal panel was adhered over a panel of patterned papers with borders of Ric Rac Peel Offs, highlighting the bright and happy colors for a celebration.
Remember to check out all of the team's sweet treats as linked from the Woodware Blog each day!
Sunday, January 26, 2014
Woodware UK: We're Shaking Things Up This Week!
The Woodware team is shaking things up this week...in the form of shaker cards. Though mine isn't truly a shaker "card", it makes a great little giftie.
I used a leftover clamshell package from something that I'd purchased recently, and this became the container for my shaker. However, you could easily use one of the Stampendous Mini Stuftainers that Woodware carries. I stamped and embossed in White Embossing Powder Francoisé' new Dragonfly Clear Magic Single on black cardstock, and added bright pops of color with Sakura Moonlight Gel Pens. I added a sentiment from Jane Gill's Clear Magic sets, stamped in black, and also inserted a piece of acetate to protect the stamped and colored image from whatever goodies I decided to tuck into the shaker portion. In this case, I went very girly on my treats...lip balm, bubblegum, and hair clips in bright, happy colors. I also tied some girly ribbons to the hang tag of the clamshell container.For an extra bit of bling, I applied a Dragonfly Peel Off sticker on the outside with some great Mark Richards crystals in a variety of colors. (If you don't happen to have all of the colors, you can use permanent markers to color the clear ones to match your creations!)
A larger shaker leaves plenty of room to go crazy creating these for every occasion, and for everyone on your giftie list, but if you happen to have the thinner and smaller shakers, you can have fun filling them with confetti, glitter, Card Candi, sequins, pompoms, etc.
Remember, all of this week the team will be posting their shaker creations, providing YOU with plenty of inspiration to get shakin'! Be sure to check the Woodware Blog daily!
Subscribe to:
Posts (Atom)