Friday, April 29, 2016

Are You Passionate About Coloring?


We are having a busy week on the Stampendous team! In addition to our hop with Nathalie Kalbach's new designs for Stampendous, we are sharing some of our favorite colored House Mouse Designs® critters as well. If you've never checked out the Passionate Paper Creations and Friends page on Facebook, I highly recommend that you do so immediately! So much inspiration for coloring your favorite images with your favorite mediums. Here's one of my favorites...

This image called "Bouncing Bunnies" always reminds me of the children's song about monkeys jumping on the bed. They look like they are having a wonderful time, and you know that MOM will not be happy when she catches them in the act, but meanwhile...

I've colored this image with Copic Sketch Markers, and I'd love to share the colors that I've used, but that would require more organization than I seem to handle lately.

For the background of this card, I've used the Dreamweaver I Beam stencil from Stampendous to machine emboss a deep mint cardstock panel. The card itself was created with pre-embossed patterned cardstock from Bazzill which I've sanded to reveal the pattern. I love the sentiment that I added, 'cuz you know these bunnies will remember this day forever!


Here's the link list for today:

Wearable Mixed Media with Nathalie Kalbach by Stampendous

STM_NatNfriendsHop_FBpost

How much fun have you had this week following the Stampendous team with this awesome hop featuring images designed by Nathalie Kalbach for Stampendous? If you've missed any of the days (how could you?), you can go back to day one on the Stampendous blog. And you'll really really want to as there are AMAZING prizes to be had! Here's the details...

We are mixing it up for three commenters during the hop. Each prize package includes all three of Nathalie Kalbach’s Foam, Cling Rubber and Stencil Stamp sets. But WAIT! This is open to everyone!
Comment on each blog post at Stampendous, and that of each designer’s post on the hop this week. We’ll announce winners on Monday May 2nd.


I love these images sooo much that I'll be wearing this one, created using the Elephant Sponge and Cling Stamps and Stencils set...

 
In case you're not sure what you're seeing, this is another one of my t-shirts that I've done, and I'm thinking this one is my favorite. Nathalie's new foam stamps are perfect for using fabric, and the possibilities are endless! I started with a plain black t-shirt, which I washed and dried first to remove any sizing in the fabric. Now the paint will adhere to the fabric much better. The paint that I used is a set of fabric paints in fluorescent colors by Tulip® called "Soft Fabric Paint" in the matte finish. Now this is a bit of a misnomer as there is extremely fine sparkle in this paint...not gaudy, just a hint of shimmer which works well with my use of overlapping colors. I simply used a round sponge cut into wedges. I squirted a "palette" of the paints onto a piece of foil. The t-shirt was pulled over a piece of cardboard to stretch the fabric a bit. Each section of the border hem was done sponging off until there was just a bit of paint in the sponge to prevent seepage under the wonderful stencil pattern that comes in Nathalie's set.


The stencil is easy to line up for repeat patterns as shown above, and when a portion of the stencil is masked off with packing tape, a smaller border is easily achieved around the sleeve hem as seen below.


Aren't the colors beautiful as they blend one into the other?


On the back of the shirt, I sponged the blue paint onto the flat surface of the back of the foam elephant. We're not talking "squishy" foam either. This is nice firm foam for nice crisp images. I stamped the blue solid elephant, and set it aside to dry briefly. (This paint is fast drying! No worry about smearing.) I inked the Cling Rubber Elephant with its wonderful patterning with Black VersaCraft ink by Tsukineko®, and stamped it directly over the top of the blue elephant. The result is shown above. And how did I create my elephants on parade on the front?


Using the raised pattern side of the foam elephant, I sponged the paint across as I had done with the borders, gave it a light mist of water, and stamped each one (sponging paint again for each new impression. If I'd really wanted to go all out, I could have added some Hot Fix crystals here and there, and I still might If I feel the need for some bling. Oh, I almost forgot. That little band with the border across the neckline? I had cut the sleeves for a more cap sleeve look, and the pieces that I'd removed I just stenciled and sewed a strip for a bit of added interest. Once finished and dry, I turned it inside-out and ironed it to set the ink and paint. When I wash it, it will be in a cold cycle and hung dry. I think it would be fine in the dryer, but I always hang my shirts to dry. They fade and shrink less.


The team has so many fun things to show off today, so be sure and visit their links below along with a few of Nathalie's team of designers. How exciting!


Thursday, April 28, 2016

Mixing it Up With Nathalie Kalbach by Stampendous


BLOG TEMPLATE

This week sharing the new foam stamp sets from Nathalie Kalbach 's n*Studio for Stampendous has been some awesome mixed up fun! If you've missed any of the posts from our team and Nathalie's team, head back to the Stampendous Impressions blog post from day one for all the details and links! After this week you'll definitely want to add these images to your "MUST HAVE" list (not your wish list)! Want a chance to win a prize package of them? Here's the info...

We are mixing it up for three commenters during the hop. Each prize package includes all three of Nathalie Kalbach’s Foam, Cling Rubber and Stencil Stamp sets. But WAIT! This is open to everyone!
Comment on each blog post at Stampendous and that of each designer’s post on the hop this week. We’ll announce winners on Monday May 2nd.


Here's what I'm sharing today...


Featuring the new Bird Foam Stamp, Cling Rubber, and Stencil set, I broke out a long canvas to work on (7 X 14 inch), and covered it in a mix of DecoArt Fluid Payne's Gray and Titanium White. And let it dry. Remember the lime green paint leftover from yesterday's project? Obviously it saw some use here with the leaf background stencil that comes in the set.


I used both the foam bird and the cling rubber bird, and stamped them using the Payne's Gray paint, which I'd applied to the stamps with a section of round sponge. The rubber image was a two layer process...stamping the back side of the foam stamp (which is totally smooth for a background shape) in white paint, letting it dry, and stamping in the gray paint over the top with the rubber stamp.


Portions of the foam stamp bird were highlighted with a bit of white paint, along with white dots on the bright green leaves.


I was happy with the contrast and pop of color on my canvas, but wanted a bit more texture. So, I mixed a bit of the gray paint in with a large dab of Dreamweaver Glossy White Embossing Paste. I spread this through portions of the Dreamweaver Graduated Dot stencil randomly over sections of the canvas. I love the look of the tone on tone texture that only adds to the design and detracts from nothing. To finish off this piece, I adhered twigs as if the birds were perched on branches, using Quick Grip from Beacon Adhesives in small dots under the portions of the twigs that touch the canvas. It works perfectly!


This project was simple and so much fun, that I know I'll be doing more like this, and some with the other sets designed by Nathalie. Like how about a long frame going horizontal with the Cityscape set? Hmmm. Check out who else is posting today if you haven't already!


Wednesday, April 27, 2016

Mixed Media On the Go with Nathalie Kalbach by Stampendous


BLOG TEMPLATE

All this week the Stampendous team are having a play date with our good friend and amazing designer, Nathalie Kalbach. Each year she designs some versatile and awesome stamp, templates, and stencil sets for Stampendous. Personally, I've been soooo looking forward to this week to show off what I love about her designs. But first of all, I know you'll want the prize opportunity info...

We are mixing it up for three commenters during the hop. Each prize package includes all three of Nathalie Kalbach’s Foam, Cling Rubber and Stencil Stamp sets. But WAIT! This is open to everyone! Comment on each blog post at Stampendous and that of each designer’s post on the hop this week. We’ll announce winners on Monday May 2nd. Now, here is what I've played with...


At the CHA (Craft and Hobby Association) show in Anaheim both this year and last year, I really enjoyed watching Nathalie demonstrate in the Stampendous booth with her designs. She always works with a mixed media journal at these events as it is a perfect way to take your art on-the-go! She's so relaxed with it...happy and laughing and going where the colors take her (occasionally off of the pages and all over everything else, including her, lol), you can really sense her joy in her artwork...or artPLAY! My post today was inspired by her...


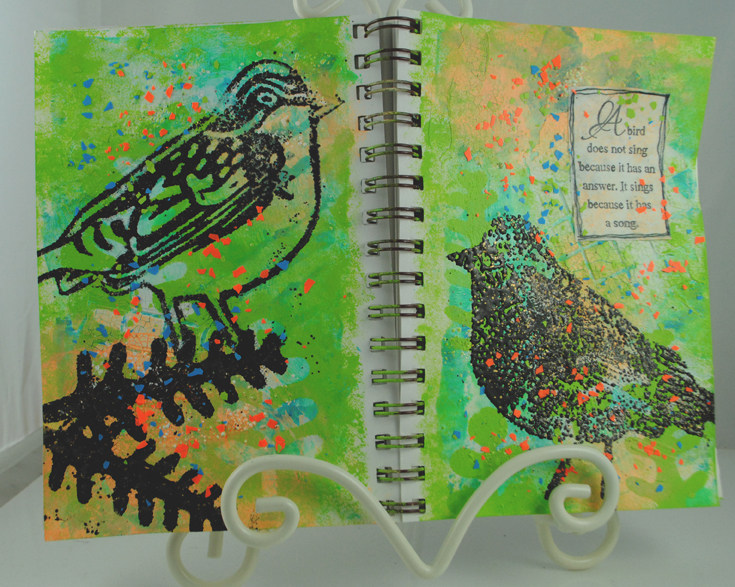
Recently, I finally purchased a mixed media journal, not a big one, but manageable for me. I've had it sitting next to my workspace, so that every time I have extra ink or paint on my craft mat or my Stampendous Creative Palette, I can transfer it onto pages of this book for future inspiration. Most of the color on these two pages came from leftover Radiant Neon Reinkers from Tsukineko. I looooove these colors. They can be super vibrant or can be toned down a bit by thinning with water or acrylic paint. When doing either, it helps the ink to dry more quickly as well. Somewhere along the line I'd had extra Dreamweaver Crackle Embossing Paste which I pasted through the Dreamweaver Tiles stencil so that I had these small patches of boxy shapes for texture. This week I had some extra lime paint from another project (you'll see it tomorrow), so on the left page I placed a few of the "leaf" templates that I removed from the stencil insert that comes in Nathalie's Bird Foam Stamp and Cling Rubber Stamp and Stencil set. I painted some of the green paint over the top, and when removed, they left the leaf shapes filled with the previous colored background. The Bird Foam Stamp was inked with Onyx VersaFine and stamped over the top, and the leaf stencil was used to ink and add a couple of leaves for a perch. Both were embossed with Stampendous Aged Black Embossing Enamel.


The page on the right follows similarly...only I used the stencil for sponging the paint through the leaf images, and the image was the Cling Rubber Bird, inked and embossed as before.


I wanted to add some sort of saying (it is a journal after all!), but didn't trust myself to hand write it and not mess up my pages, so I used this wonderful sentiment from Stampendous, stamped in black on white copy paper. I drew a loose frame around it, and used the DecoArt Decou-Page to adhere it to the page, and then brushed it over both pages. While wet, I sprinkled Color Fragments over the surface for more texture and color.


I was really happy with how both pages turned out, and look forward to creating more of them. I have a whole book to fill with happy art!


For more inspiration from Nathalie and our team, here are the links to follow today...


Tuesday, April 26, 2016

Woodware Sketch 52: Pretty Pretty, Pretty Much!

Above is our sketch challenge 52 for the month of April on the Woodware Witterings Blog. Pretty simple. My version has been tipped on end to create a vertical card instead, but the end result is pretty pretty, don't you think?


Featuring a new image from Stampendous, the "Cling Live Each Day" is an all-in-one image and sentiment, and a very pretty one at that. Especially when water-colored with Sakura Fluorescent Gel Pens and a wet paintbrush. I learned this technique from Woodware's own Francoise Read, which is no surprise as that girl LOVES color!


I've die cut the oval shape, and matted it with a larger oval. This has been popped up with foam tape over an aqua cardstock, edged with more of the teal. Finally, the layers have been adhered over a coral card.


As the sentiment was already built into the image, I added a strip of this yummy floral trim that Woodware carries. See? Pretty pretty...pretty much! Be sure to visit the Woodware blog all this week for more pretties with Sketch 52, and play along for a chance to win!

Wednesday, April 20, 2016

Woodware with Crafty Cardmakers...One, Two, Three!


Once a month the Woodware team plays along with the "Crafty Cardmakers" challenge for an extra nudge in inspiration. This month the challenge is "1, 2, 3...1 Image, 2 Papers, 3 Embellishments", so I'm posting this wild card. Ummm, I may have gone a smidge over the top on embellies...


The Stampendous Cling PenPattern Lion is my one image. He's been colored up with markers and a bit of pointilism to make him unique. He's been masked off in order to create my own patterned paper (number one of two), by ink-stenciling the Dreamweaver I Beams design using brown ink and a dauber over kraft cardstock. After stamping the sentiment and distressing the edges, I adhered this panel to my green card base (number two of two papers).

For my three embellishments, I've added...
Number 1: Dreamweaver Monstera Leaf die cuts
Number 2: Stampendous Encrusted Jewel Technique (video) with a mix of Color Fragments and Aged Embossing Enamels
Number 3: gray netting fabric


The finished project is pretty wild! What do YOU think? Come play along for this  challenge. The info can be found on the Crafty Cardmakers Blog. More inspiration from the Woodware team can be found on the Woodware Witterings blog.