Showing posts with label Clear Scraps. Show all posts

Wednesday, May 20, 2015

Welcome to the Stampendous Picnic!

Have you had the chance to see all of the fun summery, yummy, picnic-y images that Stampendous has released this spring? You can view them all HERE. Meanwhile, here's what I have to share with you today:

If you followed along with us last week, you'll remember that we had a fabulous collaboration with Clear Scraps. For some reason, my befuddled mind thought that it was the same week as the Picnic week, so I created with both. Um, yeah. So, I'm posting with my Clear Scraps banner card today.

The base card is Bazzill Basics Dotted Swiss in white, stamped with the Cling Picnic Ants border, using Onyx VersaFine from Tsukineko®. I paste-embossed the Dreamweaver OpArt Checkerboard in red on a small section of the clear banner, and set this aside to dry.

Meanwhile, I stamped the Cling Lunch Line in Tuxedo Black Memento, and colored with Copic Sketch Markers. I added the Cling Life is a Picnic sentiment as well. I cut this to fit a portion of the clear banner, edged it with a red marker, and adhered it to the banner. This allowed me to adhere the banner to the card with pieces of foam tape to pop it up off of the card. Some little snippets of May Arts' ribbon were tied through the holes at the top.

Just think how fun it would be to string several of these near your favorite picnic place? Clearly genius.


Just like the ants, march yourself on over to these posts for more yummy fun:


Friday, May 15, 2015

Stampendous and Clear Scraps: Clearly Creative Hop Day!


Welcome to the final day of the Stampendous/Clear Scraps hop week! Pour yourself a cuppa, and get ready for a clearly creative collaboration! Remember, there are three wonderful prize packages up for grabs. Just leave comments at each of the posts through the entire week for a chance to win. Prize rules can be found HERE.


I went a bit vintage for my project today...my inspiration being the Clear Scrap Deco Frame that I was given to play with. To give the frame some age, I applied Dreamweaver Color Solutions alcohol inks in Aspen Leaf and Creme Brulee to the back of the frame. The front of the frame was stamped with one of the images from the Stampendous' Natalie Kalbach Cling Studio Fiesta set and black StazOn ink. The template that comes with this stamp set is the profile of the man and woman, which I traced onto black cardstock, cut out, and ran through my Big Shot with the Dreamweaver Damask stencil. Some StazOn white ink was swiped over the embossed surface, and the silhouette was adhered to the top of an ink-distressed section of a music sheet. This was then cut to fit the opening and adhered to a piece of acetate cut slightly larger than the opening. I used Beacon Fast Finish as a decoupage medium to adhere the music section to the acetate. More was brushed over the top, and Stampendous Fran•tagĂ© Mica chips were sprinkled over the wet finish. This was set aside to dry. At this point I shifted my focus to my background.

I knew that I wanted to create a background that would make my framed couple the focal point. I started with a square piece of Bazzill BlackBoard, which I ink-stenciled with the white ink and the Dreamweaver Stripes stencil. A narrow panel of ivory cardstock was ink-stenciled with the Damask stencil again using Rich Cocoa and Peanut Brittle Memento inks from Tsukineko®. Velvet and lace ribbon from May Arts was adhered along the edges of this panel. Now I could put the rest of this together...

The acetate piece with the music and silhouette were adhered to the panel. The frame was popped up over the top using dimensional glue dots. To embellish the frame, I stamped the flower image from the Fiesta set multiple times on the scraps of music sheet, and spritzed them with Dreamweaver Memories Mists in Pale Ale and Mango Lemonade. I cut them, loosely following the line of the design, and curled and "smooshed" them  into layered flowers to adhere along the edges. Some May Arts plaid ribbon was looped and tied with a piece of twine and a vintage button to add to the frame. The same ribbon was wrapped around the handle of the wood frame. The final touch was two Dreamweaver die cut ovals layered, with the Stampendous Cling Mr. & Mrs. stamped in black ink. This too was popped up on the framed project. Oh, wait...I forgot the most important elements that I added...glued edges on the flowers with Stampendous Gold Crushed Glass Glitter for extra vintage charm.
 Here is where you leave me a charming comment before moving on the rest of the teams. If you've missed any of the previous days, start at the beginning with this post HERE.


Pam Hornschu (you're here)


Wednesday, May 13, 2015

Stampendous and Clear Scraps: Clearly Creative


The Stampendous and Clear Scraps teams are having a transparently good time this week, and we'd love for you to visit our blogs for fun inspiration and an opportunity to win a fabulous prize package. We have three prize packages, each of which will include our Cling Jumbo Filigree Stamp Set, a Jumbo Perfectly Clear Acrylic Handle, PLUS a Clear Scraps Mixable Album and some extra acrylic accents! Comment on our blog and each designer’s blog of the day throughout this week of our hop and the winners will be announced Monday, May 18th. Please click the Official Rules for all the info on winning.

Clear Scraps are an amazing product, clearly designed for all of your favorite art media. You can read all about it on their website, as well as find locations to purchase this terrific line of products...and their blogsite is full of suggestions for incorporating these goodies along with products like Stampendous and Dreamweaver.

Here's what I've created for today's post:


This page is the perfect example of how the perfect embellishment can MAKE the project. I created this scrap page featuring pictures of my son, Matt, and his track racing that he loves so much. He also loves to fix things, change things, add things, and always has.
Therefore, using the Dreamweaver Stencils' Gears background was appropriate. This was paste-embossed in Matte Black, and sprinkled with Stampendous Aged Taupe and Aged Bronze Embossing Enamels, and then heated for plenty of texture and shine without looking blingy. The rest of the background was a few stamped images from Andy Skinner's Industrial and Steampunk Cling Sets licensed by Stampendous. Finally, the wonderful Clear Scraps Gears border which I daubed on more of the Matte Black
Embossing Paste, and sprinkled with a bit more of the enamels, and heated slightly. You have to keep the heat tool far from the surface or the acetate border will warp a bit. Once cool, I swiped a bit of Black StazOn ink around the edges. I'm really happy with how this turned out, and hope that he will be, too.

Today's link list:


Friday, March 27, 2015

Texturize It With Stampendous, Dreamweaver, and Woodware UK: Grand Finale!


We have a different sort of collaboration for you!


All this week we've been celebrating with the awesome Woodware Design Team and the Dreamweaver Stencils Dream Team all of the the great Stampendous and Dreamweaver Stencils products that Woodware makes available to the UK market. This is good news for our crafty friends in the UK because we’re offering prizes and our UK friends are eligible to win!! We’re offering three prizes in the UK and three in the US. Each prize package will consist of Nathalie Kalbach’s terrific Grunge Mixed Media Cling Rubber Stamp Sets and the beautiful Zen Butterfly Dreamweaver Stencil! Both products are ideal for adding texture and backgrounds to your projects!
Deadline to comment is Sunday, March 29th, Pacific Time. Winners will be picked using random.org and announced Tuesday, March 31st, in the afternoon.
And that’s our theme!! Making Texture. We hope you’ve been enjoying the wonderful inspiration that three talented teams have brought you this week! Be sure to visit all the blog links listed and leave your comments! Each comment will count as an entry towards one of the terrific prize packages.

Here's what I've created for today:

 
No banner today, but mad frou frou! Using a Clear Scrap Frame as a base, a few Dreamweaver Alcohol Inks (Iceberg and Sugarplum) were spread on the back, and a bit of white acrylic paint swiped over the front. Stampendous flowers from the Cling Build a Bouquet set were stamped on Woodware's patterned paper pad, and cut out with the Build a Bouquet Die set. Some were left large, and others cut smaller, crumpled, and layered. A few of the Woodware white paper flowers were colored with the alcohol inks as well, and adhered with the stamped flowers on the frame. Leftover smudges from the inks all over my craft mat were thinned with isopropyl alcohol, and smeared over the butterfly garland, which was draped over the frame. An old page of poetry was ink-stenciled with the Dreamweaver Rose Tree and dye-based inks. Fast Finish from Beacon Adhesives was brushed over the back of the thin Clear Scrap panel that I inserted behind the frame, and poem was placed face down on the finish before another layer was brushed over the back. Finally, heavy sprinklings of Stampendous Color Fragments and Crushed Glass Glitter were adhered with a bit of Glossy Accents.


Here's the links to the designers that are playing today:

Stampendous Blog


Jamie Martin


Amy Hurley-Purdie


Janelle Stollfus


Pam Hornschu


Kristine Reynolds


Asia King


Wendy Price


Lea Kimmel


Woodware Craft Collection Blog


 Siobhan Fyffe


Dreamweaver Stencils Blog


Lyn Bernatovich


Cindy Groh


Gill Wilson


Laura Drahozal


Louise Healy


Lynn Mercurio


Alison Heikkila

Saturday, June 30, 2012

"Clearly" Amazing Blog Hop!


We are super excited about the fun we’re having with the folks from ClearScraps and the generous people at Tsukineko who supported our blog collaboration this week. Loving how the acrylic surfaces really lend themselves to being used with so many different ribbons, patterned papers, and, of course, stamps, stickers, and other products from Stampendous! Too much fun!


And, naturally, a huge Prize Package doesn’t hurt! You could win a fantastic load of swag just for commenting on these terrific creations! Remember that the folks over at the ClearScraps Blog have more prizes as well!! There are three ways to win our goodies! Comment on the blogs all week and we’ll enter you once for every comment! Then:
  • Go to our Stampendous Facebook Page.
  • Find the post for this Blog Hop Collaboration – It should be “pinned” as the first post on our page.
  • Click on SHARE below the post (it’s probably in blue)
  • A little box will pop up – choose On Your Wall
  • Bam – you’re entered! (PS… chances are in your favor… no one shared Monday’s post!)
Here is my creation for today's huge hop:


Using the base of the Clear Scraps "Sassy" 8 X 8 album, which is a mix of clear acrylic and chipboard pages, with a unique layer of pages and edges, a batch of Tsukineko inks, and of course, a slew of Stampendous images and goodies, I went to town on this project. I have to admit, I worked on this for several days, but I enjoyed every minute of it.

I knew that I wanted to use several pictures of darling Emily, the daughter of friends, who has pictures taken of her pretty much 24/7! And Mum (yes, she's British) does a fabulous job of photographing her daughter. I've teasingly asked her if Emily recognizes her without a camera in front of her face. But, who wouldn't want to photograph this child?

Anyway, I changed all of the pics to grayscale, and added only pink Copic coloring to tint them. I adhered her photos on mostly the chipboard pages, but made sure that she could be seen through the decorated acrylic pages. These pages start out with a protective film over them that needs to be removed before decorating them.


For the front clear page, I daubed Tsukineko's Cotton White StazOn over the back, leaving a portion blank for the photo on page two to show through. Then I stamped the Cling Blossom Spray image randomly over the front and back using the Black StazOn ink. StazOn is the perfect ink for stamping on non-porous surfaces like acrylic and acetate. Using various shades of aqua/teal and pinks, I carefully colored the back of the designs with my Copic markers. I stamped the Perfectly Clear Amore Frame as well as a title using the Altered Type Alphabet, and colored this as well. To make this framed area pop out, I painted behind it with aqua acrylic paint.


The second page is chipboard and was covered with a soft aqua paper stamped with the Cling Garden Background using Tsukineko's Turquoise Gem VersaMagic chalk ink. I stamped with VersaMark a few Butterfly Beauties over the page, and embossed them with Aged Rose Embossing Enamel. The edges and back of this page were painted with pink acrylic paint, and "white washed" with the Cotton White StazOn pad. A little ink distressing was added to the sanded edges with Angel Pink Memento. Small pockets were adhered for "Tiny Treasures".


Page three is clear once again, with a rounded edge. This time I chose to show off how pretty it is to stamp with the Cotton White on the clear for an etched appearance. Using the flexibility of the Perfectly Clear Elegant Borders, I was able to curve the border to match the curve of the page. Cool, huh? A few adhesive pink pearls highlights this as well. I stamped the Cling Daffodil Girl on tissue paper with Tuxedo Black Memento ink, and colored her from behind with Copic markers. I adhered her to the back of the clear page by brush-applying Beacon Fast Finish Decoupage on the page, placing the tissue piece on top, and brushing more over this. Then I applied an even coating of Multi Crystal glitter...amazingly this sparkle shows through the translucent tissue from the opposite side as well!


Page four shows through page three, with darling Emily in her pink tutu, sitting near her garden fairy. I embossed the Perfectly Clear Vintage Frames over this pic using Aged Rose EE once again. All of this on a soft pink polka-dotted paper adhered to the chipboard page. The edges and the back of this page have been painted in aqua and "white washed" using the Cotton White StazOn pad once again. The back of page four also has a fun pocket for "Mum's Memories".


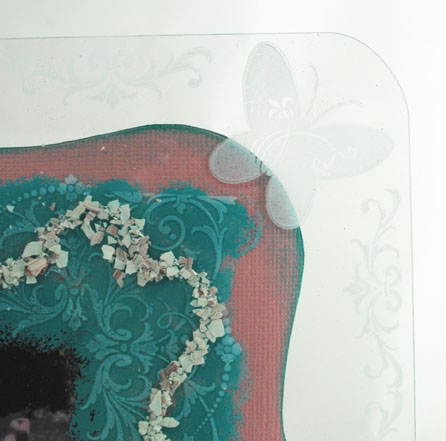
Page 5 is another clear page. I stamped the Perfectly Clear Elegant Borders and Butterfly Beauties around the edge, and a frame in the center with the Cotton White StazOn. I daubed aqua acrylic paint behind the center frame to highlight it. Since I wanted to adhere another pic from behind, I also added a distressed pink panel die cut to be several inches smaller than the page. This allows my stamped Elegant Borders and Butterfly Beauties to show off that etched look once again. For extra textural interest, I adhered a swirly design of Rose Color Fragments over the surface using Glossy Accents.

I finished up the album by inserting three "C" rings from the hardware store. These have small holes at each end which after inserting through the pages, I was able to tie off with ribbons. One jumbo scrumptious aqua ribbon bow from May Arts, along with some pink paper roses, completes the vintage garden feel that I was going for.


I realize that my post today was quite long-winded, and I totally understand if you want to leave your comment, and move on to the next in line of this fun hop, but I do hope you'll come back with your cup of tea in hand, and a couple cookies, and read through the details. Just don't leave any crumbs behind! Here are the players for the hop today:


Tuesday, June 26, 2012

Stampendous, Clear Scraps, and Tsukineko..."Clearly" a Fun Mix!


Stampendous, Clear Scraps, and Tsukineko are doing a collaborative week which started yesterday, June 25th, through Saturday, June 30th...which also happens to be a huge hop extravaganza including all of the Stampendous teams. Those that visit the Stampendous blog, as well as the hop blogs on Saturday, and leave comments, will be entered to win one of THREE prize packages similar to the one shown above.

Today also happens to be my day at the Paper Craft Planet to do the 3D Tuesday Tutorial, so I thought I'd use my Stampendous/Clear Scraps creation for this project. I have frequently looked at the Clear Scraps line of clear acrylic craft supplies...scrapbooks, cards, plaques, etc., but never could quite figure out what to do with them. This week was my opportunity to finally play with these. Each of the Stampendous team members were provided a Clear Scraps Album, a Send It Clear card set, and lots of Tsukineko goodies to use in conjunction with all of it.


Obviously, the uniquely clear quality needs to be emphasized in the design work. The StazOn  and StazOn Opaque inks are designed to use on non-porous surfaces, so will not smear or smudge once stamped on the acrylic.

I took my Clear Scraps Scallop Send It Clear kit, and after removing the protective film covering the front and back of all pieces, I stamped borders using the Tsukineko Powder Blue StazOn Opaque ink on the center panel, along with a few hearts from the Stampendous Wonderland set on both side panels. I adhered the photo of cute little Emily to the back of the center panel with Photo Mount adhesive spray, and added the titling to that panel with the Perfectly Clear Altered Typewriter Alphabet using the Black StazOn.

For the side panels, I stamped Alice and the March Hare on tissue in Tuxedo Black Memento ink,  colored with markers, and cut them out. Then I brush-applied Beacon Fast Finish to the back of the panels, carefully placed the colored tissue pieces on the surface, and brushed more over the pieces. Once dry, I sprayed adhesive on the front and back of each, and poured Stampendous Ultra Fine Multi Crystal Glitter over the tacky surface. The result is gorgeous sparkle, and yet still translucent.

There are clear round stickers that are provided for adhering your panels to the center panel, enabling them to swing open and closed. I adhered the center panel to a created tent card with foam adhesive, and added a luscious May Arts bow to be tied over the closed creation, or tied at the base when displayed open.


If you'd like to see the step-by-step tutorial of this project, please go to THIS link at Paper Craft Planet. For more "clearly" different creations, here are today's players: