Friday, April 25, 2014

Dream-Pendous Collaboration Week: Final Day and Big Hop!


Welcome to another "Dream-Pendous" week of inspiration! The Stampendous team and the Dreamweaver team are collaborating once again with all the fun toys in both team's arsenal. Of course, as usual, there will be great prizes available for those who comment throughout this week. In face there will be three prize packages available to win. Each will have a great selection of Dreamweaver Stencils and Stampendous images and dies...one of which being the new "Blossom Beauty" face image as shown on the badge above.


Here is my creation for today:

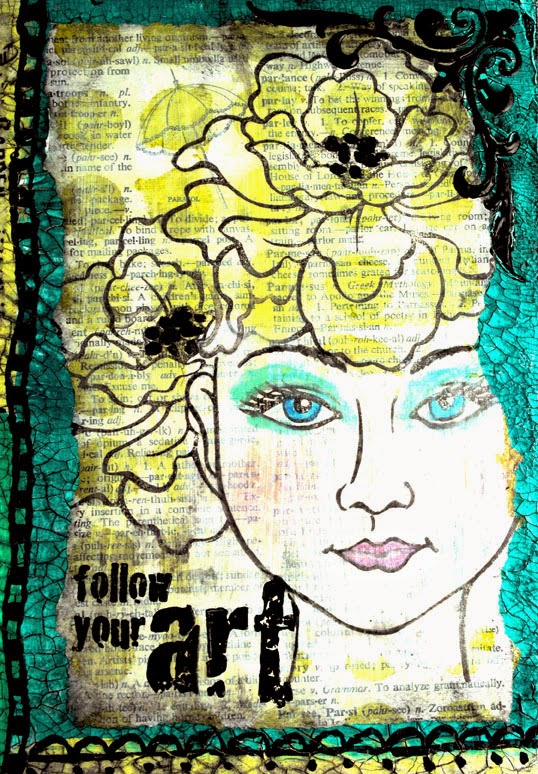
Before you ask...yes, this did take me a while to complete. Layer upon layer over the course of yesterday, but I ended up quite pleased with it. I don't play that much with Mixed Media. I enjoy what other artists do in that field, but I rarely can take the time to complete it to my satisfaction. This was a good week for it though, as I had a larger toybox to play with, filled with goodies from both Dreamweaver and Stampendous. So...this is how it came together...

First I covered my canvas in black acrylic paint and let dry. I applied a layer of Dreamweaver Crackle Embossing Paste over the surface about 1/8" thick, and let dry. I planned out loosely how I wanted to divide the space according to the products that I wanted to use. I mixed acrylic paints with a bit of water, and painted the areas. Dry time once again.

Meanwhile, I tore out a page from an old dictionary, and sprayed Dreamweaver Memories Mists Margarita through the Large Dots stencil. It was quickly dry, so I wiped Tim Holtz Distress Paint in Picket Fence over the surface to tone it down a bit...and let it dry. (See a trend here?) I added more of the white paint where I intended to stamp the Blossom Beauty face, and when both of those were dry, I swiped Tsukineko Brilliance ink over the facial details. I used the mask that comes with the stamp set to mask her off before stamping two of the Blossom that comes with the set. A bit of black paint in the centers, and the stamped message finished off this portion, so I set it aside.

On another section of the canvas, I paste-embossed the Dreamweaver Black Eyed Susans stencil with Glossy White paste and...set that aside to dry. Just a note here...you can dry the paste much more quickly if you place it on top of a warm electric griddle or toaster oven for about a half hour. However, I wasn't concerned as I still had plenty to keep my busy!

Normally, if I'm wanting to add a stamped or stenciled image on a rough or curved surface, I would apply the design on tissue paper, and then decoupage it onto the surface, but I was out of tissue paper...except leftovers from Christmas...not a good idea. So, I used a leftover napkin from a fast food chain! Stamped with Black Memento ink, the Seed Background and the Songbird designs looked perfect, not a bit of bleed! I brushed on a bit of Beacon Fast Finish Decoupage over the canvas section, placed the torn and stamped piece on top, and brushed more over the top. The napkin disappears into the surface! I added a bit of watered down paint on the bird, and let that dry. Following this same process, I applied the previous Blossom Beauty panel onto its section of the canvas, and let that dry. I finished that panel off with a Glossy Black pasted corner design.

The  bottom section was lightly ink-stenciled with the Dreamweaver Hexagons and black ink,  before more boldly ink-stenciling the Small Branch. Now, supposedly everything is dry, and I can finish this off. All sections were ink-distressed around the edges and over the embossing. A couple of distressed paper flowers, a button, and a Dreamweaver Small Branch die cut were added for dimension. Using a bit of Gem Tac, I adhered sprinkles of Stampendous Color Fragments in Teal and Chiffon. My final detail was to use my black Copic marker to add some fun separations.


Please visit the team's players for our final day, and leave comments as you go!

Thursday, April 24, 2014

Dream-Pendous Collaboration Week: Day Four


Welcome to another "Dream-Pendous" week of inspiration! The Stampendous team and the Dreamweaver team are collaborating once again with all the fun toys in both team's arsenal. Of course, as usual, there will be great prizes available for those who comment throughout this week. In face there will be three prize packages available to win. Each will have a great selection of Dreamweaver Stencils and Stampendous images and dies...one of which being the new "Blossom Beauty" face image as shown on the badge above.


Here is my creation for today:

Today I'm in the mood to give my Dreamweaver and Stampendous products the "royal" treatment, and in the bird world, what is more royal than the peacock, with its gorgeous shimmering feathers, and proud stance?

My background card was created by stamping the Stampendous Cling Peacock Feather with Versamark ink randomly over the background. Then I sprinkled a mix of Goldfinch, Saphire, Ivy Garden, and Navaho Metallic F/X powders from Dreamweaver over the surface. Using a soft brush, I swished the colors over the watermark-inked surface. The powders cling to that ink, adding a vibrant shimmer to the design. Wiping the excess off with a "Swiffer" dusting cloth works really well...great for anytime static cling is an issue in your crafting!

I wrapped a beautiful double-sided iridescent May Arts ribbon around the card base and tied inside. The focal panel features the Dreamweaver Peacock stencil which I paste-embossed in Glossy Blue on the black cardstock. While wet, I poured Stampendous Aged Marine Embossing Enamel over the surface, pouring off the excess back into the jar, and then I heated the entire panel with my heat tool. Dreamweaver has a technique that we teach called "Molten Magic", which interestingly enough, was discovered by Stampendous Team Designer, Jennifer Dove. Normally, we would sprinkle the wet paste with our Metallic F/X powders, and then heat until bubbling all over. The process speeds up the drying process of the paste, and at the same time adds shimmer and texture. But...in the case of my card today, I sprinkled with the embossing enamel and heated until bubbling, melting the embossing powder into the paste as well. The end result here was just as stunning...lots of color, shimmer, and texture, with a slightly aged-metal appearance. Very cool! Or hot, depending on how you look at it...lol.


Please visit the team's players for today, and leave comments as you go!

Wednesday, April 23, 2014

Dream-Pendous Collaboration Week: Day Three


Welcome to another "Dream-Pendous" week of inspiration! The Stampendous team and the Dreamweaver team are collaborating once again with all the fun toys in both team's arsenal. Of course, as usual, there will be great prizes available for those who comment throughout this week. In face there will be three prize packages available to win. Each will have a great selection of Dreamweaver Stencils and Stampendous images and dies...one of which being the new "Blossom Beauty" face image as shown on the badge above.


Here is my creation for today:

Today I'm back to journeying around the world with the Stampendous Blossom Beauty...this time she's a pink Polynesian princess. I stamped her in Rich Cocoa Memento ink on kraft cardstock, and added some shading with Copic markers. Then I placed the cool template/stencil/mask that comes with the stamp set as a mask over her face, and ink-stenciled the Large Scales background stencil from Dreamweaver in brown. The large flower from the Blossom Beauty set was stamped on the same panel and embossed with Shabby Pink Embossing Enamel from Stampendous, as well as her lips (just used a Versamark pen to add ink before the EP), and sprinklings of the same Shabby Pink which I heated from underneath to melt. The card base was ink-stenciled using a soft pink ink through the Dreamweaver Herringbone stencil all over the white card, and then I ink-stenciled the Large Hawaiian Leaves Square over the top with the same ink. The Blossom Beauty panel was torn around the edges and matted with a white panel before adhering to the base card. I ink-stenciled another white panel with the Herringbone design in pink with the blossom stamped in brown on top, and a kraft panel in brown, and proceeded to use these panels to die cut the Dreamweaver Monstera Leaf Die and the Dreamweaver Blossom Beauty Matching Dies set to embellish my card with...and a few adhesive pearls as well.

Please visit the team's players for today, and leave comments as you go!

Tuesday, April 22, 2014

Dream-Pendous Collaboration Week: Day Two


Welcome to another "Dream-Pendous" week of inspiration! The Stampendous team and the Dreamweaver team are collaborating once again with all the fun toys in both team's arsenal. Of course, as usual, there will be great prizes available for those who comment throughout this week. In face there will be three prize packages available to win. Each will have a great selection of Dreamweaver Stencils and Stampendous images and dies...one of which being the new "Blossom Beauty" face image as shown on the badge above.


Here is my creation for today:


I was so excited to play with this new Cling Camera Elements image from Stampendous for our collaboration. For once I'll have a Father's Day card made well in advance for my hubby, which I know he'll love. He loves photography and cameras and camera gadgets...you get the "picture"! Simply stamped in black on gray textured cardstock was enough, though I did add some inking and distressing. Actually, on the whole card! The houndstooth panel was created by running that Dreamweaver pattern stencil through my Big Shot with some Whitewashed Core'dinations cardstock, and sanding the raised surface to reveal the black core. Did you know that you can run Dreamweaver's metal stencils through your embossing machines? Yes, you can, just by following a slightly different "sandwich":
1. Place stencil face down on base plate only.
2. Cardstock face down on stencil.
3. Rubber embossing mat on cardstock.
4. TWO clear plates on top. Yes, two. This protects your stencil from the roller in the machine.
Note: For a deeper emboss, spritz the back of your cardstock with a bit of isopropyl/rubbing alcohol or water before embossing.

Back to the card...
I stenciled a beautiful Border Flourish from Dreamweaver on the red panel, and added a torn section of a dictionary page with the word "photography". (I almost placed this piece upside down until I noticed that the back side had the word "phallic" on it. Ooops. Could have been a big mistake...or a small one. *snort* Close one averted, but amusing none the less.)


Please visit the team's players for today, and leave comments as you go!

Monday, April 21, 2014

Dream-Pendous Collaboration Week: Day I


Welcome to another "Dream-Pendous" week of inspiration! The Stampendous team and the Dreamweaver team are collaborating once again with all the fun toys in both team's arsenal. Of course, as usual, there will be great prizes available for those who comment throughout this week. In face there will be three prize packages available to win. Each will have a great selection of Dreamweaver Stencils and Stampendous images and dies...one of which being the new "Blossom Beauty" face image as shown on the badge above.


Here is my creation for today:

First of all, I have to say that I had far more fun with this Blossom Beauty stamp set from Stampendous, than I imagined that I would.
I found myself more interested in creating faces from around the world...slightly exotic, beautiful, but imperfect. For my "Egyptian" face, I colored with Copics, but added a bit of age to her. What adds to the exotic feel is her headcovering created by ink-stenciling the Dreamweaver Waves and Dots stencil with purples and blues from the Tsunkineko Splendor Circus pad. To soften the edges a bit, I added a May Arts bead trim around the hairline, rhinestones for bling, and a panel of vellum over the lower portion of her beautiful face. Since I seemed to be playing "around the world", I added this great Stampendous sentiment...which you'll be seeing on a couple of other projects this week.

Please visit the team's players for today, and leave comments as you go!


Sunday, April 20, 2014

Woodware: Feeling Blue? Me too!


I never mind feeling "blue" since it's my favorite color. So this week's Woodware challenge to use blue was easy peasy! Especially when I have the opportunity to feature that color with an awesome image from Stampendous! I've always loved this Cling Songbird set as it is so beautiful and so versatile. This card came together so simply...the bird was stamped and embossed on a aqua panel with Midnight Black embossing powder. The lovely poem was stamped in black to match. After brushing select areas with a glue marker, I was able to add a light sprinkle of Ultra Fine Multi Crystal Glitter. I softly stamped around the edges in gray ink images from the Rose Branch Clear set, and distressed the edges a bit as well. The final addition was a few clear crystal drops.


Thursday, April 17, 2014

Dreamweaver Stencils: Glowing Inspirations

We're already into the third week of April, and no foolin', the Dream Team has had a spectacular month...filled with exciting news and inspiration for all of your crafting dreams! The exciting news being announced on the Dream It Up! post today. Each team member has posted what inspires them in their creative life...maybe a Pinterest pic, a magazine pic, a quote, a book, a place, an artist, a crafter friend...along with their creation. We are hoping that you will feel inspired as well, and link your projects (and inspiration) to the inlinkz tool on the Dream It Up! blog, or at the bottom of this post.

The following is a project that I intended to complete last summer. Lol. I found this pic on Pinterest of these colorful, almost stained-glass-appearing solar lights, and knew that I wanted to create something similar using Dreamweaver products. I was so excited when I was able to find solar path lights with flat sides! Perfect for stencils! And...bonus...they were on sale at Target two for $5! And then they sat in my storage closet...until recently.

http://www.pinterest.com/pin/101542166573475736/
 I have to admit that mine turned out far better than the photos suggest, so I'm posting a plethora (yes, a plethora!) of photos so that you get an idea of how fab they turned out. This first pic is in my back yard just before sunset. They aren't lit,  but you can see the light filtering through the  colors.


How did I get that beautiful, vibrant, transparent color on these? I used Dreamweaver Color Solutions Artist Grade Alcohol Inks...drop by drop, building up color, letting some dry in between. They dry fairly quickly, so I was able to layer the colors easily. I used the Mojito Green, Iceberg Blue, and Aquamarine on the first and third ones, and Winter Red, Lemoncello, and Cosmo Pink for the center one.

Using Black StazOn ink and a fingertip dauber from Tsukineko, I ink-stenciled the Dragonflies, the Peacock, and the Tall Poppies on each flat sided bases of the lights.

At this point the color was on the glass, the designs were stenciled over the stainless sides, so now I needed to add some pasted designs on the glass that would contrast against the glowing light within.

I used the Poppy Circle with Matte Black Paste on one, and the Petite Dragonfly on another in Silver Paste. I could do two sides at once before I needed to set them aside to dry. When dry, I could complete the other two sides. On the third light, I let just the pretty colors be the only decoration.

Curious as to how they'll hold up? Well, the sprinklers have watered them a few times now, and the paste is fine. The alcohol inks won't wash off, but maybe down the road the colors could fade a bit. For the price that I paid, I'm not too concerned. In fact, I think it would be great fun to decorate some of these for each season and the holidays as well!

I hope my project has inspired YOU to take a chance, and play with your Dreamweaver products on different surfaces. Let's see what the "A" team has been creating, as well as a few of our new Dream Team members that didn't want to wait until May to play!


Monday, April 14, 2014

Woodware Sketch 33: Boot-Stompin' Fun!


WW Sketch 33
The Woodware team is up to Sketch #33 this week, so come play along! Just link your creation to the Woodware blog for a chance to win.

My version features this darling "Wellie" designed by Francoisé Read for Woodware. So simple and fun to paper-piece that I just had to break out my pack of patterned papers and create some super-snazzy boots! I stamped them in Onyx Versafine over various patterns, cut, and pieced as desired. Because you've now stamped a few of them, you have the opportunity to create several of this card. No rainy day could be dreary with these bright colors! I used one of the striped papers in the background, inked and embossed in Stampendous white EP using the Dreamweaver Rain Background stencil. Dreamweaver also has a fun stencil with a variety of Rainy Day Words, of which I chose one and ink-stenciled it in Onyx Versafine, leaving the rest to stencil onto the other cards that I will be able to make in a set.

Embellishing is so much fun, as Woodware has such a great variety of goodies to add to any project. I used a strip of the Self-Adhesive White Lace, a few of the White Paper Flowers, and some Card Candi, before I thought that I needed to stop. Lol. I was considering adding some fun Heart Shaped Buttons, but then I remembered the famous quote from Coco Chanel, "When accessorizing, always take off the last thing you put on." So, those cute heart buttons will have to wait until another time! Wouldn't want to get harassed by the Fashion Police!

Be sure to visit the Woodware blog to see how the rest of the team interprets this sketch. Jane Gill, our Flower Girl, was first up this week, and she's created a gorgeous card in shades of violet! Yummmm!


Thursday, April 10, 2014

Dreamweaver Stencils: A Celtic Inspiration

We're already into April, and no foolin', the Dream Team has a spectacular month planned for you...filled with exciting news and inspiration for all of your crafting dreams! The exciting news will be announced in the Dream It Up! post on April 17th, but the "April Inspirations" challenge will run for the entire month. Each team member will post what inspires them in their creative life...maybe a Pinterest pic, a magazine pic, a quote, a book, a place, an artist, a crafter friend...along with their creation. We are hoping that you will feel inspired as well, and link your projects (and inspiration) to the inlinkz tool on the Dream It Up! blog, or at the bottom of this post.

I've always had an affinity for Celtic design, and love the design of a Celtic cross. I found this beautiful sunset pic on Pinterest, which became a reminder to use Dreamweaver's Celtic Cross:

http://www.pinterest.com/pin/101542166573430975/
I did choose softer colors for my creation, more in keeping with Spring and Easter, than the vibrant colors of the sunset in the photo. The technique that I used for the background was  Double Glitter using micro fine glitters, the trick being placing the glitter in specific areas, and if you look closely, I have not perfected that as yet. Lol. One of the best tricks is to use a plastic drinking straw, cut at an angle, to use as a scoop to spoon the glitter into the small areas. The design that I used is the new Crusade Background...a great 6" square design, perfect on it's own, or as a mixed media background, etc. I pasted the Comfort Words onto this background panel in Matte Black as I feel that a cross is a comfort.

The cross itself was pasted in Matte Black on black linen cardstock, and immediately covered in micro fine black glitter. Press this into the wet paste slightly for the best coverage, and set aside to dry. Once dry, the cross was cut out and several rhinestones were added for embellishment.

Remember, we have a wonderful guest designer playing with us this month, and the "B" team is anxious to show off their inspirational projects as well...


Tuesday, April 8, 2014

Woodware UK: Sweet Dreams with Creativity Cards and Crafts!

The Woodware team have been challenged by a retailer once again. This time from a store in Eastbourne in England called Creativity Cards and Crafts. Their chosen challenge is, "Sweet Dreams"...something we all enjoy, literally and figuratively! I have pulled out one of my oldies but goodies, and a personal fave as a simple celebratory card to have on hand in multiples.

I've stamped the Stampendous Cling Jumbo Cupcake on a selection of patterned papers, cut out the parts, and layered on the focal panel with 3D mounting pads. The cupcake wrapper portion was run through a Crimper for realistic texture. Holographic Peel Off Dots were colored with Sakura Moonlight Gelly Roll pens, and applied as "sprinkles". A small triangle of paper was stamped with a chosen sentiment from the Perfectly Clear Birthday Assortment set, and adhered to a toothpick along with a pompom, and inserted into the "icing".

The focal panel was adhered over a panel of patterned papers with borders of Ric Rac Peel Offs, highlighting the bright and happy colors for a celebration.

Remember to check out all of the team's sweet treats as linked from the Woodware Blog each day!


Thursday, April 3, 2014

Dreamweaver April Inspirations: Framed Fabulousness by a Fab Friend!

We're already into April, and no foolin', the Dream Team has a spectacular month planned for you...filled with exciting news and inspiration for all of your crafting dreams! The exciting news will be announced in the Dream It Up! post on April 17th, but the "April Inspirations" challenge will run for the entire month. Each team member will post what inspires them in their creative life...maybe a Pinterest pic, a magazine pic, a quote, a book, a place, an artist, a crafter friend...along with their creation. We are hoping that you will feel inspired as well, and link your projects (and inspiration) to the inlinkz tool on the Dream It Up! blog, or at the bottom of this post.

My inspiration picture features this fabulous creation by one of my favorite designers, and she just so happens to be on the Dream Team...Louise Healy! Check out this wonderful frame from IKEA, decorated with tiny chipboard squares of Dreamweaver designs...

http://www.pinterest.com/pin/166492517444980953/

I picked up one of these plain wood framed mirrors from IKEA, and proceeded to create my own version using Mercart colored aluminums, Dreamweaver's new leaf dies (Monstera, Petite Fern, and Small Branch) as well as several Dreamweaver background designs (Crusade, Large Scales, Small Scales, Op Art, Wavy Lines and Dots, Large Cathedral Window). I have to admit that the process took a bit of time, but I was really pleased with the end result...

Each panel was die cut with a leaf. Each leaf was embossed. And each panel was embossed and sanded. Then the parts and pieces were assembled together, and adhered to the frame with Beacon Quik Grip adhesive.

Check out what our Guest Designer and the "A" team has been inspired by for this week...