Friday, October 30, 2015

Dia de Los Muertos...a Celebration of a Crafty Life with Stampendous, Dreamweaver, and Glue Dots


We've been busy little hoppers for most of this fall, and this week is no exception. This week we're sharing our creativity with Glue Dots...an industry staple! These little clear dots come on runners for super convenience, really stick to just about everything, and there are sizes to accommodate every project. They're kind of like "hidden gems". You may not always see them, but you can be confident in them being there! And, as with every hop, we have wonderful prizes as shown in the banner below. All rules and stipulations can be found on the Stampendous blog HERE, but basically...leave a comment for each post from the team and on the two companies posts for a chance to win.
 

Here's what I have to share today...


As the Stampendous team have been challenged to "Bring Out the Dead", I thought I'd post my box that celebrates the life of the dead. As a traditional celebration in Latino communities, this is an occasion to celebrate the lives of loved ones that are no longer with them. I created this box as a way to save treasures and photos of those that are loved and missed.

The base is simply a paper maché box from the local craft store. The box portion was painted with DecoArt Americana Chalky Finish white paint. When dry, the sides were ink-stenciled in Onyx Versafine using the Dreamweaver Damask stencil. I applied my heat tool to the sides to set the ink, before swiping turquoise dye inks across the surface. Then I used the Andy Skinner Industrial "Crackle" image with brown ink around the box, and smudged black as well.
For the lid, I taped the Dreamweaver Quatrafoil stencil on all four sides, and spread Matte Black Embossing Paste smoothly over the design. The stencil was removed to be cleaned immediately, and lid set aside to dry. When dry, I replaced the cleaned and dried stencil, and spread Crackle Embossing Paste over the surface, leaving it smooth and slightly thicker for a better crackle finish. Once again, removing the stencil to be cleaned, and setting the lid to dry. The Crackle Paste dries white, so more of the turquoise ink was worked into the surface with a dauber. The outside edge of the lid was inked in browns, smudged with black, and a bit of Stampendous Fran•tagĂ© Aged Black and Aged Bronze enamels were heated on the corners, as well as the corners of the box.

Now comes the fun part. The Cling Sugar Skull image was stamped on ivory cardstock, colored with Copic markers, and cut to fit the opening of the frame, along with an extra bunch of the colored flowers. The frame itself was one of the inexpensive $1 frames from Michael's, which I daubed Matte Black Embossing Paste over the surface for texture. When dry, I daubed it with VersaMark ink and sprinkled it liberally with both of the Aged enamels, and a some broken up Teal and Caramel Color Fragments. When heated, it all melded together. I used the Glue Dots® Craft to adhere the frame to the box, and used the Glue Dots® Minis to adhere the extra flowers to the frame, and the pompom trim around the edge of the box. That was the simplest part of the whole project, and very necessary to the overall effect, don't you think?

Here is where you leave me a sweet comment, and move on to the rest of the links. Be sure to visit often...I like the company!


Thursday, October 29, 2015

The Dreamweaver Ghouls Bring Out the Dead...or the Undead


Boy, did I have fun going gory and gruesome for this challenge...or should I say, three challenges, and one hop? For starters, I'm posting for the hop with Glue Dots®, as shown in the banner above.


There are awesome prizes to be had by leaving comments on all the links. If you live in Australia, there's an opportunity for you to win as well. You can find all the rules and info HERE


Also, I'm posting this for the 31 Days of Halloween challenge on the Smeared Ink Blog. Plus, the Stampendous team are sharing all things dead and/or undead this week. Finally, it's Dreamweaver Thursday, and many of our ghouls are on a death wish as well...bwahahahahaha.


There is a lot going on here. First, the card base is Bazzill Basics  cardstock, which has been ink-sprayed through the Dreamweaver Quatrefoil stencil in the background, as well as ripped, torn, smudged, and distressed.

The second layer is a panel of gray Core'dinations cardstock, which has been run through my Big Shot Pro with the Dreamweaver Spider Web, and then sanded to reveal the design. This panel has been thoroughly smudged and distressed as well, and has dripping "goo"  created with a Martha Stewart border punch, plus a stamped word from the Perfectly Clear Tricky Words set by Stampendous.

The focal point of this card is, obviously, the "Skull Ghoul Square" image...one of the "All-in-one" Stampendous designs that can stand alone for quick card-making, or taken to crazy-town as shown here. I thought this ghoul was just a bit too cute, so I added some "blood" red on the flowers and dripping onto the skull. The panel has been adhered with Glue Dot® Craft dots to a "post" created from black cardstock with jagged edges, and a bit more ooze for the fun of it. Just a quick "zip" with the Glue Dots® runner, adds perfect adhesive for any embellishment, and the fact that they are clear means that your creation is what catches the eye, not the adhesive. Precisely the reason that I call these adhesive dots, "hidden gems".

The finishing touch is a strip of gauze soaked in Strawberry Daiquiri Memories Mists from Dreamweaver, just for the "EWWWW, ICKKKK" factor! Once dry, I placed Glue Dots Minis strategically across the card, and draped the gauze over them to adhere to the card.


Be sure to visit the rest of the ghouls posting today using the links below. If you've missed any of the other "deadly"  creations from this week, or the 31 days of Halloween posts, you can find all the links on the Stampendous blog.


Tuesday, October 27, 2015

Woodware Sketech 47 Challenge: Leafy Thanks

n
The Woodware team is back for another sketch challenge...number 47 to be precise. My card features the Dreamweaver Zen Flower machine-embossed onto the front of a side-fold horizontal blue card. Using a large stencil brush, I swiped deeper blue ink over the surface to emphasize the design.

The long strip at the top is from the Forever in Time patterned paper called "Graffiti", on which I stamped the thank you in deep blue ink using the Stampendous Perfectly Clear Vintage Alphabet set. The green panel was the negative portion of a die cut Dreamweaver Leafy Branch die, and the insert was a positive image of the same die on ivory cardstock, and inked with turquoise ink. All parts have been ink-distressed around the edges to emphasize and to coordinate with each other.

The end result is a very simple card with a unique look. Come play along with the Woodware team for this month's challenge. The rules can be found on the Woodware Blog.


Friday, October 23, 2015

Mixing It Up with Nathalie Kalbach Studio Designs and Stampendous


Welcome to the final day of the Stampendous hop featuring designs by Nathalie Kalbach. You'll want them all by the end of this day, but we're specifically highlighting the Cling Marks and Cling Fiesta sets. As with all of our hops, there will be prizes, and you could be one of the winners. Just leave comments all of this week on each post that the team has had, along with the Stampendous blog. See Official Rules.

There are also opportunities for someone in Australia and the UK to win as well. Just leave in your  comments that you are from either country for a chance to win from the Stencil Specialists in Australia or Woodware Crafts in the UK.

Here's how I got really messy with Nathalie this week:

Yep. I did another t-shirt. You may see many in the future, as I'm kind of addicted to them. A different way of playing with all of my creative toys, that I've really never tried much before. To get a basic step-by-step idea of how I'm doing these, check out my post from Monday, October 19, for the 31 Days of Halloween challenge HERE. I did mostly bleach spraying through Dreamweaver stencils for that one, and for this one it was mostly dye-ink spraying through the Dreamweaver Vintage Decor and I Beams stencils with Diet Cola (black) Memories Mists from DW. You could easily use any of the dye paints and sprays found at the fabric and craft stores near you. I stamped many of the Nathalie Kalbach Studio images from Stampendous using Onyx VersaFine ink from Tsukineko. I've found that it stays in the fabric well, and doesn't bleed. You'll see various images from Nathalie's Cling Fiesta and Cling Marks sets. Once I'd stamped and stenciled over the shirt, I realized that I'd managed to add several black smudges over the shirt as well. So, I mixed up a batch of Tulip brand Fuchsia dye with steaming water and some salt, and placed the entire shirt inside. (Btw, I worked outside with this on my patio table that I'd covered with a large plastic trash bag. I also wore clothes that I didn't care about, and gloves.) Every 10-15 minutes I'd pull out several inches of the shirt, squeeze the dye back into the bowl, and leave that portion hanging out from the bowl. When I got to the final third of the shirt, I mixed in a small amount of black dye, and used that in the same way for those last inches. The end result was an ombré look, and after adding a smattering of remaining spray ink, I had a more uniform yet freeform design.

You can really see the difference from dark to light with these two pics. The one above was designs stamped on the back of the shirt, and the pic at the left showed how the stenciled I Beams still showed through the dying process without taking over the shirt.

Just as with my previous shirt, I cut a patch from muslin, and using the stencil inside the Cling Fiesta set of the silhouette, I used a finger-tip dauber to dab Onyx Versafine around the inside edges of the stencil design, leaving the center lighter to show off the next step. This is where I inked some of the Fiesta designs and used them to add pattern where the hair, dress, hat, suit would be. Then I sponged a bit of Dreamweaver Color Solutions Alcohol Inks (Cosmo Pink, Winter Red, and Sugarplum) down the center of the patch, and around the edges. Once dry, I ironed it to set the ink. Now I added some bling by using my Walnut Hollow VersaTool to "Hot Fix" some Swarovski crystals over the patch, and a few on the t-shirt as well. The patch can take the heat better, so I pressed the tool on it for about 13-15 seconds, and only 9-10 seconds on the actual shirt. (Make sure to do this over a ceramic tile that can handle the heat, and make sure that you use this tile inside the shirt so that the glue doesn't go all the way through.)

I ironed a piece of fusible interfacing to the back of the patch, used a bit of Beacon Adhesives' GemTac to adhere it to the shirt, and then zigzag stitched it around the edges. I also sewed the fun pompom trim along the bottom edge of the patch. I felt like it added to the "fiesta" theme.

These are so much fun to create, but I really recommend that for your first ones you use an old t shirt or an inexpensive one that won't break your heart if things don't go right. However, you can shift directions if your first attempt isn't perfect. Spatter, dye, bleach, add patches and trims. Remember the crafting adage..."Mistakes are only opportunities to embellish"!
 

Leave your comments for a chance to win and then check out my messy mates here:

Thursday, October 22, 2015

Dreamweaver Thursday: Messy Mixes with Nathalie Kalbach Studio by Stampendous

Whether you love or hate to get messy, this week we have something for everyone! The Stampendous team are featuring our licensed artist, Nathalie Kalbach, and some of her amazing designs that Stampendous has created for the artist in all of us. As with any of our hops, there will be great prizes, like these...


And, yes, there are rules for those who'd love to win! You can find all of the details HERE on the Stampendous blog.

As a reminder, today is also Dreamweaver Thursday, so you'll see a bit of that mixed in has well! Here is what I have to share with you for today...


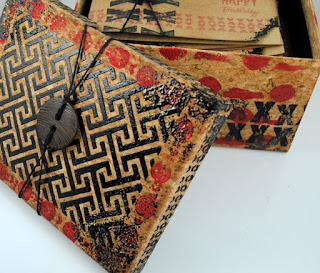
I went a bit crazy creating this cork box full of notecards, all with a mix of Nathalie's "Marks" set, Dreamweaver Stencils' I Beams and Feather stencils, plus their Glossy Black Paste, all from Stampendous, and plenty of paints, inks, cord, and Fran•tagĂ© Accessories. It looks as though it might be tricky, but actually it is quite simple, and would make an awesome gift for male or female friends.


The base for the cards are horizontal sets from Canvas Corp, which is a fun alternative to a normal note card. Each has been stamped with the "X"es the smaller borders in Onyx or Satin Red Versafine. The sentiments are from the Stampendous Perfectly Clear Happy Thoughts, and the torn corners have been brushed with VersaMark ink and embossed with Aged Black Embossing Enamel. Each card has been run through my embossing machine with the Dreamweaver Feather stencil, and the surface has been brushed back and forth with a large stencil brush and Sepia VersaFine ink to catch the edges of the design. More of my stash of Buttons Galore & More buttons were added to this project, with black cording looped, wrapped and tied.


The envelopes were stamped as well, being careful not to have the design where addressing will need to go. And now for the box itself...


The lid was paste-embossed in Dreamweaver Glossy Black using the I Beams stencil design, and set aside to dry. Meanwhile...


The sides of the box were stamped with Onyx ink for the "X"es, and the plastic stencil that comes generously in the package with Nathalie's "Marks" set, was sponged through using red acrylic paint around all four sides. When the paste on the lid was dry, the smaller circle border pattern was stamped with the same paint. (Note: I rarely put the stamps on an acrylic handle when I'm working on a project like this as I feel I can catch all of the surface better just pressing with my finger tips. It's messier, but then I don't mind getting a bit messy on occasion. Just ask the girl that does my manicures!)


Onyx and Sepia inks were daubed over the box as well, and the corners were brushed with VersaMark and sprinkled and embossed with the Aged Black Fran•tagĂ© Enamels. On each side of the lid, cutouts were created in order to wrap and tie the black cording with this awesome textured button on the lid. The end result is a unique and beautiful gift for a special friend.

Here's your opportunity to visit more of the team's blogs for our week with Nathalie...


Lea Fritts (DW)


Pam Bray (DW)


Wednesday, October 21, 2015

Woodware UK: It's Popping Up Mice in the House for Christmas!

Eek! There are mice popping up everywhere, just in time for Christmas! These are really cute ones, and they only want your Christmas candy, and apparently, like to keep their breath minty fresh!

This card features the Stampendous Pop Up Die set. The insert portion was die cut with the set, then with the edge dies, and finally, run through an embossing machine with the Dreamweaver Christmas Borders Embossing Folder. A nice swipe of pink ink emphasizes the cute designs.

The Mint Nibbler and the Carrying Mints House Mouse Designs® images are stamped on the Stampendous Mixed Media cardstock, colored with markers, cut out, and adhered to the pop up panels. Oh, and of course, they've been Micro Glittered as well!

Dreamweaver Stocking Dies were used to cut out green stockings, also embossing with the folder, and brushed with ink, too. It is hard to tell whether the Carrying Mints Mouse is filling or emptying the stockings, but he obviously is willing to share with his friend. A perfect sentiment for these mischievous critters is the "Naughty or Nice...You're on my list" from the Perfectly Clear Christmas Holiday Expressions, stamped in black ink and die cut with one of the small frames from the Pop Up Die set. More sentiments were added on the edge of the card, and the finishing touch was a ribbon bow, button, and twine set.


Remember...you can purchases these products from the Stockists in the UK listed on the Woodware Website, or in the USA from Stampendous.

Monday, October 19, 2015

31 Days of Halloween: Brewing Up Some Spookiness with Stampendous and Dreamweaver-Day19


Today I'm posting my favorite project that I've created for the Smeared Ink Blog's 31 Days of Halloween. This t-shirt was so much fun to make! Here's what I used...

Dreamweaver Stencils' Spider Web, Bats, Large Flourish, and Vintage Decor stencils; Stampendous Perfectly Clear Tricky Words stamp set; Dreamweaver Color Solutions Alcohol Inks (Pumpkin, Paprika, Winter Red); Onyx VersaFine ink by Tsukineko; Dreamweaver Memories Mists Copper Shimmer; Fingertip and Large Sponge Daubers from Imagination Crafts; Stampendous Spray Bottles (2); bleach; Small Acrylic Handle; Creative Versa-tool from Walnut Hollow; Jet Black and Red 3mm and 6mm Hot Fix Crystals; muslin fabric; fusible interfacing; craft mat; Gem-Tac by Beacon Adhesives; dark t-shirt.

Here's the steps...

Lay out clean dark colored t-shirt with cardboard tucked inside to protect. Work with plenty of ventilation. Use gloves to prevent staining of hands. (Do as I say, not as I do.)


Repeat with all of the stencils on front and back as desired. Spray more bleach to blend areas. Let dry. Wash in cold water and hang to dry. Meanwhile...


Smooth out flat, and then...


Iron patch to set ink, and to adhere fusible interfacing to back of patch. Place patch on protected heat-proof, non-stick surface. Then, carefully...


Repeat to add crystals as bat's eyes and embellishments on t-shirt. Place heat tool on holder while not in use. Keep away from children. Be sure to unplug and place in a safe location while cooling down. In other words...read and follow the instructions on the packages!

The end result close up after adhering patch to shirt with Gem Tac. If desired, feel free to add stitching around the edge of the patch.


Ta Dah! (I hate pics of myself, but I love the shirt!)

If you've missed any of the 31 days of Halloween posts from the Stampendous team, head on back to the Stampendous Blog!

Friday, October 16, 2015

Buttons Galore with Stampendous...a Jar of Fun and Fungi

bannergraphic2 

All of this week, the Stampendous team have been playing in the "button box" of wonderful, colorful, Buttons Galore & More! As today is our grande finale hop day, the team are pulling out all of the stops to mix Stampendous and our bounty of buttons. But before I share my project for today, let's cover all the hop and prize info that you need. 
prizebanner2

To be eligible, you must be a US resident, comment on our blog, and that of each Stampendous designer’s blog posts each day of the hop and tell us in what state you live. Stampendous Official Contest Rules apply. Deadline to comment for our prizes is Sunday, October 18, 2015. Winners will be selected by random.org and we’ll announce sometime on Monday, October 19th. Wait! There is even more! Be sure to comment and tell us where you’re from, because our Australian Distributor The Stencil Specialists are sponsoring a prize for one friend “down under” to win a Stampendous Stamp, a Dreamweaver Stencil and a surprise goodie from their terrific stock of Stampendous merchandise!

Now, check it out...
How fun is this darling canning jar "terrarium", featuring the (sneak peek alert!) new Stampendous Perfectly Clear Terrarium set. And what a perfect topper for this jar using an elasticized string of great Buttons Galore & More over a puffy-filled lid covered in cute fabric! There are almost as many darling creatures in our Spring line of stamps to fill this jar with as there are buttons on the lid...like the cute bunny, toadstools, signs, ladybugs, frogs, fairies, and plants, etcetera.

Bits of moss, and Stampendous Color Fragments add more visual dimension and texture, and each creation can be decorated for the various seasons, and become uniquely YOURS!

Terrarium Perfectly Clear Stamps Set
Stampendous Perfectly Clear Terrarium
Garden Hare Rubber Stamp
Cling Garden Hare stamp

Remember to leave a comment before heading over to my teammates blogs for Stampendous and Buttons Galore & More...