Monday, June 29, 2015

Woodware: Friendship

This week the Woodware Team is all about celebrating friendship. The card I'm posting is in honor of my good friend, Dorothy Adam, who lives in Scotland, works for Woodware UK, is in  charge of our blog team, and an awesome person. So much fun and funny packed into one person. Her favorite color is purple, and this card has plenty of purple!

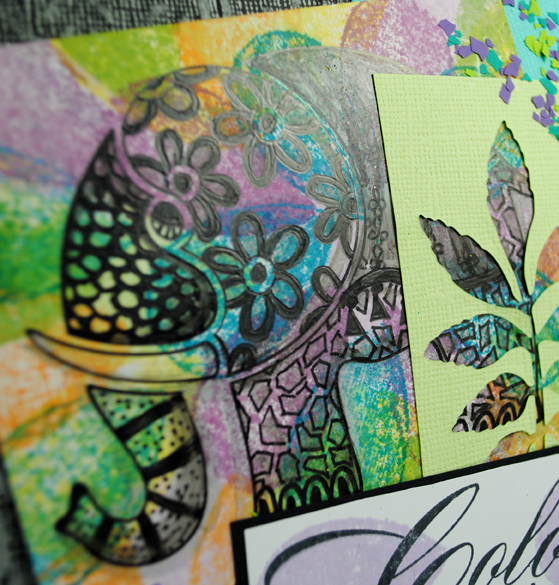
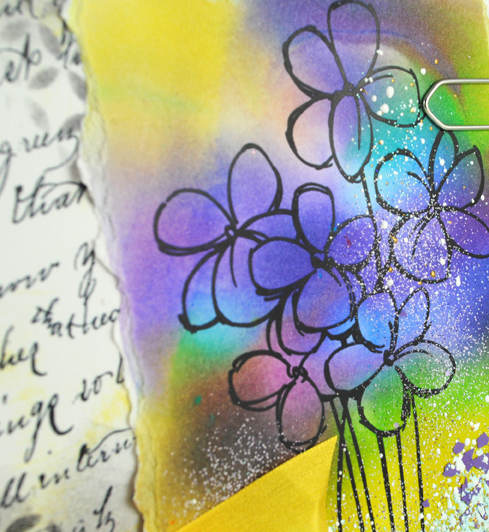
The base card is a deep muted purple, ink-stenciled with the Dreamweaver Small Cathedral Window stencil. Two panels have been added...one has been stamped using the Stampendous Cling Vintage Note, and a bit more of the Cathedral Window stenciled on its corner. The second panel was created using the Stampendous Creative Palette. Various drops of Dreamweaver Color Solutions Alcohol Inks were dropped on the surface of the palette, and thinned with the blending solution, which encourages the inks to swirl and combine a bit. The colors that I used for this were Iceberg, Lemoncello, Sugarplum, Mojito Green, and Cosmo Pink. I placed a panel of white cardstock over the surface to transfer the beautiful colors, and set it aside to dry. I sopped up a bit of the yellow onto the previous panel so that the rolled corner would be bright and sunny. Once dry, I stamped the Stampendous Cling Blossom Bunch in black ink over the surface of the focal panel. I Fran•tagéd it a bit by sprinkling Stampendous Shabby Blue Embossing Enamel and Amethyst Color Fragments together, and heated from underneath for unique texture.

I have these fun colored file clips from a local office supply store that I used to add the "Life is better with friends" sentiment from the Perfectly Clear Life Words set. A beautiful yellow silk bow was my final touch!


Thursday, June 25, 2015

Dreamweaver Thursday: Fairy Fun

I'm feeling fairy fabulous presenting this post today. I was really pleased with how this turned out. I traced and colored the Dreamweaver Fairy stencil onto Stampendous Mixed Media White cardstock, and colored and shaded her with Derwent Inktense pencils, keeping the look extra wispy for a more ethereal appearance. I used a wet paintbrush to pull the wisps out further, and then used a glue pen to adhere Stampendous Micro Glitter.

The card base was created with Bazzill Dotted Swiss in a teal color, with an acetate insert on which I stamped and embossed in black one of the Perfectly Clear Life Words sentiments. (Hint: When embossing on acetate, I like to wipe both sides with a small amount of talcum powder as an anti-static medium. This keeps the EP from sticking anymore besides where intended. Just wipe off the residue after melting the EP, and you'll clearly see a difference!) I stamped and embossed two Stampendous butterflies on acetate from the Perfectly Clear Butterflies set (an all time fave), cut them out, and adhered them to the card with just a bit of Zip Dry glue behind the black embossing. The finishing touch was a black die cut of the Dreamweaver Petite Fern. Isn't she magical?

Now, here's your opportunity to visit the rest of our fairy fabulous Dreamweaver posters for today:

Pam Hornschu (you're here)
Kristine Reynolds


Tuesday, June 23, 2015

Woodware: House Mouse Mice Wishes

This week's challenge over on the Woodware blog is to play with the House Mouse Designs® from Stampendous. What a tough job!

Obviously these House Mouse Designs® critters are enjoying their grapes, and they're not even turned to wine yet! It was fun to color this image with markers, adding grape stains, and drops of Ink-Essentials Glossy Accents for it's wet appearance. I built up layers of colored papers, stamped a sentiment from the Stampendous Perfectly Clear Beary Mice set, and a fun gingham ribbon.

Friday, June 19, 2015

Embrace Your Wild Side

There's nothing wrong about standing out in the crowd, and this zebra definitely stands out! Even the leaves on this card go gray-scale in his presence. A fun take on the new Stampendous Cling Zebra, rainbow-colored using Chameleon Markers...a very cool new product. Alcohol markers with a toner chamber in each marker, and a unique way of achieving the various shades desired without having to haul around hundreds of markers. The image was stamped on Stampendous Mixed Media White cardstock, colored as desired, and adhered to a black and gray base along with multiple Dreamweaver die cut Leafy Branch and Monstera leaves. The leaves were  cut from the same white cardstock, and ink-stenciled with the Dreamweaver Crusade pattern and the Graduated Dot stencil with Onyx Versafine from Tsukineko®, using a large stencil brush. What was left of the ink in the brush was softly used over the leaves for a more gray look. The leaves were layered with the zebra panel, some Party Color Fragments were adhered here and there with a glue marker, and a sentiment tag was created using one of the nested frames in the Stampendous Pop Ups Dies set. The sentiment is from the Perfectly Clear Wild Sayings set (perfect with all of the new Stampendous animal images), stamped in black, and a bit of rainbow stripes for fun.
Here are links to the rest of our "wild" bunch:

Thursday, June 18, 2015

Dreamweaver Thursday: Wild and Wonderful

The Stampendous team have been traveling all over the wild world this week, posting our creations using the newly released from the "zoo" animal images. I've loved how easy it has been to mix in several Dreamweaver designs for a more uniquely wild project.

The card base was brown Core'dinations Essentials, partially machine-embossed with the Dreameaver Zebra pattern, and partially with the Leopard Spots backgrounds. Then these were sanded to reveal the design and rough things up a bit. The following layers were an orange panel machine-embossed with the Quatrafoil design, and brushed over the surface with Rich Cocoa Memento ink, and a stamped panel of Mixed Media Cardstock with the new Cling Pen Pattern Giraffe image which I'd colored and shaded with Copic Sketch Markers. The giraffe was stamped again on a sticky note, and cut out to create a mask. This was used to protect the colored image while I stamped the Cling Old World Map in Rich Cocoa twice over the panel. The edges were ink-distressed, and the panel was added to the layers. Finally, a die cut of the Dreamweaver Leafless Tree was inked and adhered, along with a die cut Leafy Branch, and a Nested Frame stamped with the Cling Better to Travel sentiment.


Grab your safari gear, and head over to those posting with the Dreamweaver Thursday lineup:

Stampendous Blog

To check out the other "Let's Go Wild" posts for today, start at the Stampendous blog HERE.


Wednesday, June 17, 2015

Woodware: Flitting Around with Sketch 43

I've done a fun and simple card for this month's sketch challenge #43 over on the Woodware Blog. So easy to complete several to have on hand for all of those everyday occasions...thank you, get well, happy birthday, and even sympathy. All that's necessary is to change up the sentiment! Also easy to accomplish using the Stampendous Tiny Messages Class A' Peels, which has a variety of kind thoughts.

The base is a mauve shade of canvas cardstock, with coordinating pieces of Forever in Time "Elderberry" papers. My focal point is simply the black Dragonfly Peel Off. I added a bit of shading with gray markers for more pop, and a bit of bling with Mark Richards Crystals. The final part of the sketch required a small circle...simply punched from the same papers to highlight just one small dragonfly.

I hope you'll come play along with us for this month's sketch challenge. All the info can be found on the Woodware blog.

Monday, June 15, 2015

Putting a Fine Point on It...I'm Wild About You!

The Stampendous team are wildly enthusiastic about our new animal images introduced in April. They just are begging to be layered with plenty of wild ingredients...Fran•tagé Essentials like Color Fragments, Aged Embossing Enamels, Micas, etc. Add in some Dreamweaver layers of ink-stenciled I-Beams and die cut Monstera leaves, all that is left is to highlight the focal point...the new Cling Pen Pattern Lion. He's been stamped in the center of that background panel, colored with Copic Sketch Markers, and then a bit of "pointillism" added for a more "wild" feel. The perfect sentiment comes from the new Perfectly Clear Wild Sayings set.


Hop in your Jeep and head out for more wild fun:

Pam Hornschu (you're here)


Friday, June 12, 2015

Fun with Faber-Castell Finale!


Have you had as much fun as we have this week? What a great hop it's been, with so many fabulous ideas, and wonderful products! Remember, you could win a package of the products shown above, just by leaving comments for each of the players for this week. Here's what I'm showing off for today:


When you have oodles of fun stuff to play with, there is no better way to show it off than by creating a mixed media canvas...even if it is only 6 inches square! Here's how I layered mine:

1) I spread Dreamweaver White Embossing Paste over the surface of the canvas, unevenly for texture, and set it aside to dry overnight.
2) I used a large stencil brush to apply the Faber-Castell Black Chalk Paint through the Dreamweaver by Stampendous Corner Flowers stencil, and let that dry.
3) I colored the surface of the flower petals with F/C Chalk Pastel Pencils, which provided a nice pop of color off of the black paint.
4) I stamped the crackle image from the Andy Skinner Stampendous Cling Industrial set by inking it with the Faber-Castell PITT Black Brush Pen randomly over the canvas.
5) I used the circle stamps from the Stampendous Round Creative Palette set to add some mint paint, and daubed more around the edges and over the canvas.
6) I switched to lavender acrylic paint and daubed more color, and used it to stamp the Cling Motif image.
7) The Cling Color Outside sentiment was inked with the PITT black marker as well, and stamped onto the canvas.
8) Finally, sprinkles of Fran•tagé Color Fragments in Teal and Amethyst were adhered with Faber-Castell Texture Gems.
Leave me a comment, and head on over to these blogs for our grand finale of inspiration:

Pam Hornschu (you're here!)

Note: If a Blog Hop Post isn’t visible when you get to the link, try clicking on the blog header or home button to be taken to the latest post.

Thursday, June 11, 2015

Dreamweaver Thursday: Perfect Pets and Perfect Pencils

https://rainpuddlesdesign.files.wordpress.com/2015/06/stm_fc_prizerc2_4501.jpg 

We have another busy and exciting week going on from the Stampendous blog and team. We have the "Perfect Pets" theme all week, today we also have Dreamweaver Thursday, and all week we've been hopping with the team from Design Memory Craft Blog using products from Faber-Castell...specifically their huge selection of art pencils.

I threw all three challenges onto my workspace to create this beautiful card:

First, I have to say that it's been a long time since I've used the F/C Aquarelle Pencils, but it was like coming back to an old friend! And bonus! Now they have this great grip feature on them, which makes them so easy to work with, especially if you like working tip-to-tip with your watercolor pencils and a wet brush. I knew that I wanted to work with the beautiful Dreamweaver Heron stencil from Stampendous, but I wanted to create a yummy background for it first. Working on a panel of watercolor paper, I created washes of color by mixing a bit of concentrated color on my my craft mat, and watering it down a bit before brushing it over the panel...in sunset colors at the top, and watery colors toward the bottom. Since these Aquarelle's are sold in color sets, it is so easy to work in this manner.

When dry, I paste-embossed the Heron in Matte Black Embossing Paste over the surface of the panel, and set it aside to dry near a small fan in my studio. Once dry, I went back in tip-to-tip to add more vibrant color with much less water, in certain areas, including a bit of a "reflection" from the sun on the water, and some green around the leaves, and once again, set it aside to dry. Just to add some fun texture, I added smears of the Faber-Castell Texture Gems over the water, and sprinkled elements from the Stampendous Fran•tagé Encrusted Jewel Kit in Teal...including mica and glitter. I added a scrap of May Arts net ribbon twisted and tied along the bottom of my card, and placed a few more drops on its surface. What fun products to work with, and a great mix along with my Dreamweaver and Stampendous products. Go get this stuff and have some fun!


Be sure to leave comments along the way each day of the hop, for a chance to win one of the greawt prizes in the picture at the top. Three Lucky Winners this week will get three sets of the PITT Pastel Pencils (red/yellow, blue/green, neutrals), a jar of Faber-Castell Chalkboard Paint, and $20 Stampendous reward card to choose their favorite images to color! WOW… these winners must have a U.S. mailing address (official rules here!)… BUT WAIT- Aussie Fans – The Stencil Specialist has you covered again this time!! One Australian Fan will win a Stampendous Stamp, a Dreamweaver Stencil (LJ size customer choice), and one Dreamweaver Stencils Regular Embossing Paste. Wow!!

Check out today's inspiration from the teams' designers for the FABER-CASTELL HOP:


Check out today's inspiration for the Dreamweaver Thursday posts:

Woodware: Itty Bitty Shadow Box House

http://www.woodware.co.uk/blog/wp-content/uploads/2015/02/FB-Logo.jpg

Once again, the Woodware Team are playing along with the challenge over on the Mirror Crack’d blog. This time the theme is shadow boxes. Finally, I have the perfect time to use one of my hoarded wooden embelly boxes from Woodware. You know, the ones that tiny safety pins, or bells, or brad fasteners come in?

I painted mine with black acrylic paint, measured the "window" panes, and marked it out on a piece of Crafty Cardworks Time Flies 8" square paper pad. I inked in black and stamped the Stampendous Perfectly Clear Family Home image and sentiment, colored it with markers, and cut out to fit my little openings.

After adhering them inside, I used a ZIG Glue Pen to adhere Stampendous Color Fragments in Fresh Green, Powder Blue, and Canary. I used one of the flower pop outs from the Time Flies Essentials pack as a sun by coloring it yellow, bending the petals up, and adhering it inside. More Color Fragments were added inside of my little "sun". 

I happened to have one of the old Stampendous chipboard/clipboards which was the perfect size for my project, and provided the perfect way to give it more of a solid base. The clip was covered in Black StazOn ink, and heated to set the ink more permanently on the slick surface. A small Woodware Key Brad Fastener was also covered in  black ink, and adhered inside the shadow box.

The chipboard was covered in more of the Time Flies papers, with a matting of black cardstock. The shadow box was adhered on top, with little pop out flags tucked underneath. Finally, a scrap of the yummy cotton ribbon from Woodware was tied to the clip as the finishing touch. I just love the tiny cuteness of it! I still have three more of these little boxes saved for more tiny cuteness, or something more artsy-fartsy!

Remember to visit the rest of the Woodware team as we each play with this challenge, and head over to the Mirror Crack'd blog for more great ideas!


Friday, June 5, 2015

Woodware: Windows on Cuteness!


Here's my fun take on this week's Woodware challenge suggested by Kim Reygate...Window Cards. I used my Dreamweaver Nesting Frames to die cut the window to frame the cute Stampendous Cling House Mouse Designs® Bride and Groom. These cuties were stamped in black ink on kraft cardstock, and colored with markers. Then using a VersaMarker, I played with Fran Seiford's "Painting with Powder" technique. Just use the marker to apply embossing ink in specific places, and add the  color with embossing powders...in this case, predominantly Stampendous Shabby White Embossing Enamel. A few extra sprinkles were added to mimic rice/confetti/rose petals. The Stampendous Perfectly Clear Beary Mice sentiments were added to the frame to finish it off in typically cute House Mouse Designs® style.

Thursday, June 4, 2015

Dreamweaver Thursday: STENtangling...Doodling with Stencils!

This week, the Stampendous/Dreamweaver team are all about tangling and doodling with our images or stencil designs. The Dreamweaver open designs are perfect for STENtangling, as they give you a shape, that is divided into sections, for you to create your own patterns, or follow the patterns of others, including Dreamweaver's Zentangle master, Wayne Harlow, CZT.

For my post today, I started out with the Open Elephant design, and doodled away inside the spaces using my Faber-Castell Pitt Pens. I love the look of Zentangle, and am in awe of those who do it well (like Wayne, and our own Louise Healy), but I'm really not good at it. My hand shakes a bit, so I can't get the patterns as precise as I would like. So, I doodle. My elephant went a bit hippy-dippy with my doodling, so I sort of "tie-dyed" him by using my teardrop shaped Memento ink pads to add happy colors over the surface, which makes the black doodling really pop.

The base of the card was Core'dinations Vintage gray cardstock, machine-embossed with the Dreamweaver Crusade background, and sanded to reveal the design. Layers were added with an aqua circle, a lime negative die cut using the DW Leafy Branch die, and finally an inked and colored sentiment from Stampendous...Cling Color Outside. Using a glue marker, I added sprinkles of my favorite Color Fragments in Hot Lime, Amethyst, and Teal.


Now let's go see what my fellow doodlers and tanglers are showing off today:

Pam Hornschu (you're here!)

Wednesday, June 3, 2015

Do You Doodle or Try to Tangle?

Ssssh. Don't tell anyone, but I'm really not a ZENtangler, but I've been doodling for years. So...that's what you get from me. So much less pressure. I'm not big on precision, and more into free flowing creativity.

For my post today, I'm sharing this card that I created with the Stampendous Cling Pen Pattern Angel Fish. There are a few simple lines in the design, which makes it simple to add your own doodlicious touches. I created the background using Imagine Crafts® Fingertip Daubers and various colors of chalk inks. I've added a panel of acetate over the top with the Cling Coral Tree stamped a few times on each side using Black StazOn ink. I added strips of Hot Lime Color Fragments as seaweed on the back of the acetate. The design of the card is a modified easel card where the front edge is folded up to hold the focal panel and acetate panel in place. I added a stamped Cling Near the Sea sentiment along this fold, along with a Dreamweaver Sand Dollar which was machine-embossed, brushed with inks, and cut out as an embellishment along with the scrap of May Arts web ribbon.


Check out the rest of today's doodlers...