Monday, May 27, 2013

A Day of Respect and Remembrance...and Some Family Fun!


In the USA, we honor the service men and women who have given their lives for our country in protection of our freedom and democracy, this time every year with Memorial Day. It's a time where families and friends get together for a relaxing celebration, and between bites of barbeque, fruit salad, and a couple of beers, we try to remember what this day is all about. Because others gave of themselves in the ultimate acts of bravery, we have the opportunity to enjoy the pleasures of picnics and parties. To some this may seem frivolous, but as the Bible tells us, "There's a time for laughter and a time for tears...", and Memorial Day is a mix of both.

I created a card in memory of these Americans, as a giant Thank You to them all. Featuring Dreamweaver's Bold Thank You and Star Swirl stencils, I did a marbled pasting of both, with a Joseph's Coat technique on the background panel. Something new which I only learned recently in conjunction with the Dreamweaver Teacher Certification* workshops that were taught last week in the Chicago, Illinois area.

I laid down inked stripes of Ladybug Red and Danube Blue Memento on glossy cardstock. Then I pasted the Star Swirls over the top in Translucent paste. When dry, I applied Galaxy Gold Brilliance ink over the entire surface, before using a damp paper towel to remove the ink from the pasted portions. These previously pasted portions resisted the ink, making it simple to wipe away. I used my heat tool to "set" the ink afterwards. The Thank You was marble pasted, allowed to dry, and cut out to pop up off of the card.

Happy Memorial Day to everyone! May all of us remember those who came before us, and work still to provide us with the opportunity for every celebration we have. This is a day of respect and remembrance.

*If you are interested in becoming a Certified Teacher for Dreamweaver Stencils, please contact Louise Healy at louisehealy@sbcglobal.net, or Lynell Harlow at lynell@dreamweaverstencils.com for more an application, and more info.

Thursday, May 23, 2013

Dreamweaver Stencils: The Steampunk Clock is Ticking Towards Father's Day!


It's almost time for Father's Day, and if you're looking for a quick and fun project to show the dads in your life just how talented you are, how about trying something like this?


Once again, I used the Sizzix ScoreBoards Die Box with Scallops, and though it has a more feminine style with the scallops, I think that I succeeded in making this more masculine (or even appealing to the Steampunk crowd! I machine embossed the top flap with the Dreamweaver Steampunk Clock, and the main portion of the box with the Houndstooth pattern. Then I went a bit crazy distressing with ink...Tuxedo Black and Rich Cocoa Memento. For more dimension, I embossed a piece of the Mercart colored aluminum with the clock, sanded off the colored a  bit, and used some Black StazOn reinker over the surface. I spritzed a small amount of rubbing alcohol (isopropyl) on a soft cloth and rubbed away some of the black ink, leaving the clock looking distressed. With layers of Tim Holtz Gears and chipboard gears, and brad fasteners, and a snippet of May Arts Cotton twill tape (also distressed), I had the look that I was going for. I added a matching gift card pocket to tuck inside with a gift of a cup of Joe (or two). 

This was my creation for the Tiny Treats challenge at the Dream It Up! blog. How about playing along with us? Link your own creation to the linkytool on the Dream It Up! blog, or email pics to lynell@dreamweaverstencils, for a random chance at winning your favorite stencil design! Until then, check out what our "B" team has been up to this week, and leave them some love. Oh, and me, too!


Sunday, May 19, 2013

Woodware UK: The Earth Laughs in Flowers!


Our Woodware UK team guru, Dorothy Adam, sometimes has just a little too much fun coming up with our weekly challenges. On the face of it, "Earth" doesn't seem like it should be a problem, but I was a bit confused as to her original intention. Considering Dorothy's quirky sense of humor, it was entirely possible that she could been begging for aliens landing on earth, so I thought that I'd better ask first. Her reply? Earth colors! Yep. Just that simple. Of course, she's pretty exhausted as she and three others of the Woodware UK group  completed the "Moonwalk", of over 26 miles all through the night in "support" of breast cancer warriors, survivors, and researchers. How awe-inspiring!

Back to earth...I thought that I'd post this card that I created a couple of years ago for the Stampendous catalog. Ralph Waldo Emerson once remarked that "The earth laughs in flowers", and I think that is fitting for this challenge...and it's in earth colors!

The focal stamp is from the Perfectly Clear Daisy Thanks set, which includes the daisies, the swirl image, the butterfly, and the "thanks a bunch" sentiment that I repeated across the bottom using colors from the Stampendous Coastal Express Embossing Powder Kit. I used markers for all of my color and shading on the flowers, added some ink-distressing around all of the edges, and then for a bit of glitz and glam...I covered the focal panel with Versamark ink, and embossed the entire panel with Stampendous Crystal Embossing Powder. You can still see clearly all the gorgeous color and detail of the design, with the addition of clear shine and transparent sparkle. Yum!


Remember that the entire Woodware UK team are posting with their "earthy" creations this week, so check back daily for more inspiration!

Thursday, May 16, 2013

Dreamweaver Stencils: A Cameo Appearance!


This week I'm multi-tasking once again, and mixing both my Dream Team challenge (Tiny Treats) with my tutorial on Paper Craft Planet. I'm not going to provide many details in this post, because I really want you to go over to the Planet Blog and check out the tutorial. Bonus...those that go over there have the opportunity to win a Dreamweaver stencil just by following the directions on that post. Of course, those of you that play with the Dreamweaver monthly challenge and link their own creations on the Dream It Up! blog, or email pics of their "Tiny Treats" to lynell@dreamweaverstencils.com, have yet another opportunity to win, as well as be featured on the Dream It Up! blog and the Dreamweaver Stencils Facebook Page!

Below this post is a picture of all the supplies used for this project, which looks like quite a lot, but seriously...you probably have most of these items in your craft bins now, and if you haven't, I highly recommend that you purchase them all. These are all products that I personally use all the time and LOVE!

Obviously, I've used the Dreamweaver Cameo stencil, and the Damask stencil as well. I've also used some tiny charm size images from Stampendous, luscious ribbon from May Arts, some Mercart colored aluminum and tools, and lots and lots of products from Beacon Adhesives!

What qualifies this project as a "Tiny Treat", is that the focal point is actually a brooch that can be removed from the card and worn, or even turned into an ornament for the holiday season.

Hop around and check out Dream Team "A" for some amazingly bright and fabulous ideas, play along with us this month, oh...and don't forget to check out my tutorial for this project on the Paper Craft Planet!


Monday, May 13, 2013

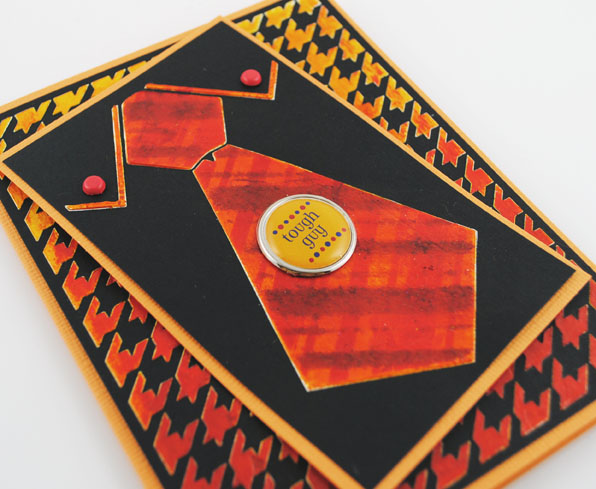
Woodware UK: It's OMBRÉ, Hombre! For the Tough Guy!

This is a great time of year to have a stash of masculine cards on hand...for graduations, birthdays, and in the USA, Father's Day in June. This is a great card for each of those occasions, and demonstrates a very trendy look...ombré. The definition of ombré in the Merriam-Webster Dictionary is, "Having colors or tones that shade into each other —used especially of fabrics in which the color is graduated from light to dark".

I was able to achieve the look in the background by first using Dreamweaver's Glossy White Paste with the Houndstooth stencil over a black panel, and setting aside to dry. I also used the same paste with the Men's Tie stencil, and set that aside to dry as well.

Now's the time that I broke out my Dreamweaver Color Solutions Alcohol Inks, the blending solution, and the clever applicator that has a dual purpose of storing the felt discs. Each end of the applicator has a hook fastener to apply the disc to. On one end I placed a few drops of Lemoncello with a few drops of the blending solution. Then I tapped this color over the houndstooth panel on the top to the bottom, covering all the white areas. I flipped the applicator over, and added a few drops of Paprika red with some blending solution, and tapped this over the panel from the bottom and up about halfway. Flipped again, and blended slightly between the colors to create the graduated color effect.

On the tie panel, I taped the Stripes/ Plaid stencil over the tie, and applied the same inks through the stencil one way with the Lemoncello, the other way with the Paprika, and a slight shift of the stencil to tap what's left. Each panel was matted with a contrasting cardstock, two brad fasteners were added for the buttoned down collar, a fun "tie tac" brad sentiment finished it off. This is a fun technique, turns out unique each time, and a simple way to produce cards quickly. No more excuses to not have a masculine card on hand when you need it. Oh, and just a hint...you could easily apply this technique to a feminine card as well!

Be sure to check out the rest of the Woodware team this week as they inspire you with some great masculine ideas. Leave them some love as you go! Here's the link to the Woodware UK blog.


Thursday, May 9, 2013

Dreamweaver Stencils Tiny Treats: A Fun Gift Card Holder for Mum

Yesterday I had this light bulb go on over my head, and not necessarily the earth friendly type, just a cute one flashing pink and lime green and telling me, "It. Could. Work." So I grabbed that light bulb and ran with it.

All of May, the Dream Team are being challenged to create "Tiny Treats" for all the various occasions that come up this time of the year...weddings, showers, graduations, and in the case of this Sunday...Mother's Day. I picked up a Starbucks gift card (because, hey, pretty much everyone loves Starbucks, right?), that could be tucked into a cute gift card holder. This was created with the help of a Sizzix box die that I had bought a couple of years ago and never broke out of the package. How sad is that?

My initial thought was to create the little pouch/box out of cardstock or cute paper, or paper with a stenciled background, or maybe the Mercart colored aluminum, and hey...why not one out of kraft cardstock all distressed and perfect for Father's Day, and...you get the idea. I kind of went wild, and yes, I did all of the above. And then I thought of my stash of crafting felt.

It cut like a dream with my Big Shot Pro, but it needed more substance. So, I ran a second color through to layer with. And then I ran a piece of Dreamweaver Stencils' Double Sided Mounting Paper through, and this became the lining between the two colors. I punched some holes through the scalloped edge to show off the pretty lime green interior, and I die cut a scalloped circle from a scrap of felt and pasted in Glossy White the cute tea pot from the Dreamweaver Tea Set stencil. Once dry, I placed the stencil back on and added the rose and vine with Memento inks. I used these same inks to stencil the tea set on a tri-fold insert for my gift card pouch from Bazzill Dotted Swiss cardstock. (Love that stuff!) Once I finished gluing the sides with Beacon Fabri-Tac adhesive, and adding Velcro closures, I added the final touch...some beautiful plaid May Arts taffeta ribbon. These little pouches were so simple to cut out and put together, that it is easy to run wild with anything fairly flat that can be run through your die cutting machine, and have so much fun doing it!

Now's your opportunity to visit the "B" team's blogs, and the Dream It Up! blog as well, for more "lightbulb moments", before you head off to create your own "Tiny Treats" for the month of May. Don't forget to link them on the Dream It Up! blog, or email pics to lynell@dreamweaverstencils.com, for a chance to win this months prize, and to have your art featured on the blog and/or our Facebook page. Have you "liked" us yet on Facebook? If you haven't, you are missing out on a lot of fun!


Tuesday, May 7, 2013

Woodware UK Sketch 23: Hogging the Bed!


It's sketch time again with the Woodware UK team, and we're at number 23 for the month of May! Remember to play along and link your creation on the Woodware blog, or email pics to Dorothy@woodware.co.uk. for an opportunity to win the prize for May!

The sketch design to the left was our jumping off point, so I grabbed an image that suited the squares, along with the perfect papers to go with.

I love paper-piecing (in case you didn't already know that), and the g•c•d studios "Cloisonne" is a pad that I continually go to, especially if I'm in "pink-mode". I stamped Francoise's "Hog Rest" Clear Magic image with black ink on one plain panel, and several scraps from the paper pad. Those were cut out and adhered on top of the plain panel. I added some shading detail with Tombow markers before cutting it out to pop up over the top of the other layers. The reason that I cut her out, was to show off the pretty square design paper that otherwise would have been covered up by the panel.

Just for fun, I added a Self Adhesive Cream Lace strip for a "dust ruffle", a button nose, and a Woodware Fancy Twine bow for her tail! After all, she may be snoozing, but she's fashionable!