Thursday, February 7, 2013

A Manly Ruffled Heart?


 I have been soooo busy preparing for my trip to the UK beginning next week, that I almost forgot to make the hubby his Valentine card! So, in the Pampered Stamper's usual fashion...I'm going to kill two birds with one stone (what a ghastly expression!).

Fortunately for me, this month's challenge on the Dream It Up! blog is "Love and Friendship", and since most cards are for those reasons, there should be no excuses for YOU not to play along this month. Hint, hint...there are prizes involved!

I chose to play with the newly-released Ruffled Heart, and for that manly touch, I added an ink-distressed and machine-embossed Houndstooth background.

For the center of the heart, I pieced in a section of Woodware UK's new background design by Jane Gill...Men We Love. Stamped with Jasmine Mixed Media ink from Clearsnap on black cardstock, it has that oh-so-trendy chalkboard look for added punch.

Now go hop around to the Dream Team blogs today, and be prepared to feel the "love and friendship". Then go off to your crafty space and create something full of love and hearts and mush for all of your sweet someones...and then link your creations to the linky tool on the Dream It Up! blog. Or, email your pics to lynell@dreamweaverstencils.com for a chance to win a fab stencil prize of your own. Here's the team list:


Big announcement! If you haven't noticed the post at the top of the page, then go and check it out. The Dream Team is looking to add to our team. Read through the info linked there, or email me at phornschu@yahoo.com for complete info. You have until February 28, 2013 to submit your samples and details for consideration. 


Wednesday, February 6, 2013

Laughing in My Sleep


It's sketch week time again on the Woodware UK team...number twenty to be exact, which you can view at left. A nice simple layout.

My post features a newly-released image from Woodware's own line of Clear Magic stamps, and designed by the Flower Lady, Jane Gill. Amazingly enough, there are no flowers on this card.

However, there is a great sentiment, perfect for cheering up a friend, a get well card, or just as a fun note (without inking the bottom portion of the expression).

I used Bazzill Dotted Swiss cardstock, which I highlighted the dots by running my dark yellow dye ink pad over the surface. This same color was used to stamp the final portion of the focal image. The main portion was stamped with teal dye ink to match the scrap of beautiful paper on the side. As an added highlight, I added a strip of Mark Richards Nailheads on the right side.

The team would love for you to play along with the sketch challenge. Just add the links to your creations on the linky tool HERE. While you are there, check on the latest daily creations from the rest of the Woodware UK girls.

Thursday, January 31, 2013

Look Who's New!


There must have been a wee bit of confusion with the Woodware UK schedule for this week...on one schedule the theme is Baby, and on another the theme was "A Little Birdie Told Me". Fortunately for me, I think I covered both bases (baseball term) on this one!

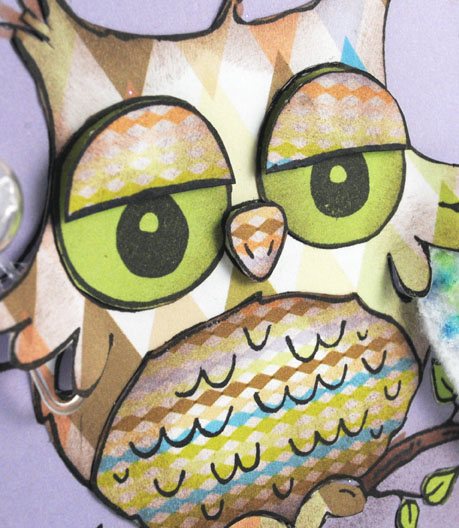
Ever since I received this new, soon-to-be-released Clear Magic set from Dorothy, I've been excited to play with this darling owl designed by Francoise Read. I loved playing cut-and-paste by paper-piecing this cutie using the "Daydream Ensemble" paper pack from GCD Studios. Each print has a solid color on the back, so everything that I needed was right there. I did add a couple touches of my own...a piece of felt colored with markers for a "blankie", and a tiny plastic baby rattle that I've had in my stash forever. I also added half lids over his eyes for a sleepy effect, and created my own sentiment with the Stampendous Perfectly Clear Retro Alphabet.

This card is a perfect example of taking another look at your crafting collection. Many times you can create a card for an occasion that the product was not obviously designed for. It just takes a bit of stretching the creativity!

Be sure to visit the Woodware UK blog on a regular basis for daily craftiness from the team! Remember, these products can be found at your local stamp and/or craft store as listed on the Woodware UK website.


Each Layer is a New Beginning

I always believe that winter leads to a fresh start with spring, but there is a freshness in winter that is quiet and beautiful all on its own. I think this card that I created captures that feeling rather well. Featuring the new "Leafless Tree" stencil design from Dreamweaver, this card sort of grew organically. Lol. It began as a simply machine-embossed tree and bird on a panel of off-white cardstock. Hmmm. Then it needed something else. I started by using my Copic markers in a couple shades of gray to just add some shading. Hmmm. Still not enough, so I added more background color, some textural accents with a white gel pen, a contrast with the red bird. This is the point where I realized that I should have used more appropriate cardstock for coloring with Copics, as the blending was not as smooth as I would have liked. Hmmm. I covered the entire panel with Versamark ink, and embossed all in Stampendous Crystal Embossing Powder. Ooooh...nice and sparkly. Me likey! Now, how do I add a sentiment? Stamping on glitter never looks as crisp and clean as I'd like. But, I could stamp with StazOn on an acetate panel. So, I used the Stampendous Perfectly Clear Friendship Assortment for the perfect message. Of course, to adhere it over the top can be tricky as most adhesives will show through, and will not adhere to the glitter either. I chose to use a couple small pieces of super-sticky double-sided tape. Before applying, I scratched off the glitter where the adhesive would go, and applied the tape, and then the acetate panel.

The lesson learned? Never give up on your project! It may not come together like the vision in your mind, but something just as beautiful can appear, with just a bit of extra creativity!

We'd love to see YOUR creations for our monthly challenges. Please link them to the Dream It Up! blog, or email your creations to lynell@dreamweaverstencils.com, for a chance to win a fabulous prize of Dreamweaver product. Meanwhile, make the rounds to see what our clever girls have been up to this week:

Tuesday, January 29, 2013

Tutu Much Fun


This week I was on the calendar to provide a project tutorial for 3D Tuesday on Paper Craft Planet. I used this opportunity to finally play with one of my new Stampendous faves...Cling Tutu Toad. Isn't she toadally darling? I had some other fun ingredients to add to the mix, provided by some fab companies...Beacon Adhesives, Ranger, DIY Bangles, etc. I chose to use my wood bangle in a more unique way, and created a hanging nightlight for the little ballerina in all of us. A small flameless tea light was inserted through a hole drilled in the bottom (thanks, Hubs!), so she could be "in the spotlight". For more details on this project, with step-by-step instructions and pics, please visit the Planet Blog.

Have a toadally awesome day!

Friday, January 25, 2013

Bubblegum, Bubbles, and Bling

Dorothy Adam thought she was being pretty sneaky for this week's team challenge on the Woodware UK blog. She requested bubblegum pink and bubbles. Yikes!! I really had to put my mojo cap on for this one...and I think I did really well with it.

For this card, I used Francoisé Read's soon-to-be-released 21st Birthday clear set, stamped on a bubblegum pink card, and on a piece of GCD Studios Cloisonné patterned paper. I love their papers...double-sided patterns, perfect weight, and gorgeous colors and prints. I cut out the patterned 21, removed part of the top, and punched holes for bubbles.

The Mark Richards' Crystal Clusters perfectly mimicked bubbles and added some necessary bling for a 21st birthday. I'm not sure if it's the same in the UK, but here in the States, a 21st birthday is a big occasion, as you are now legally allowed to drink alcoholic beverages...in moderation...and not before getting behind the wheel of a car...or just before calling your ex-boyfriend...or your boss.

The card itself was punched (or punchy?) a few times to mimic more bubbles, and a few escaped to the inside of the card as well. So, what do you think? Did I follow the guidelines for the challenge? Let's go check the Woodware UK blog to see what bubbly creations the rest of the team came up with this week...


Remember, you can find these products at your local stamp store listed on the Woodware UK site. Keep a close watch to see when these new designs will hit the market!


Thursday, January 24, 2013

For An Elegant New Beginning


 Last week I posted a wedding card featuring the newly released "Bride" stencil from Dreamweavers. I'm still going with weddings as a fresh start theme with this week's post as well...in an understated, elegant way.

This card features the Tall Lilies design, with the double-glitter technique, which is a favorite with everyone who picks up Dreamweaver stencils. So simple, yet so...wow!

Step 1: Rub soap over the back of the stencil.
Step 2: Adhere panel of Double-sided Mounting Paper on a cardstock panel. Remove top sheet of liner.
Step 3: Place soaped stencil face up on adhesive panel.
Step 4: Apply silver glitter over open design, rub in with finger for good coverage. Brush away all excess.
Step 5: Carefully pull panel away from stencil.
Step 6: Apply crystal glitter all over remaining areas.

So gorgeous, that the rest of the card can be kept very basic and simple. Perfect card for a wedding invite, wedding gift card holder, an entire set of matching cards for all aspects of an upcoming wedding, or for other occasions that require an elegant statement.

The Dream Team hope to inspire you to create your own versions of a "Fresh Start", and link them on the Dream It Up! blog, or email pics to lynell@dreamweaverstencils.com, for an opportunity to win $25 of your favorite Dreamweaver product (including some of the newest designs!). For more inspiration, please visit the rest of our creative group: