Showing posts with label Jan '13 challenge. Show all posts

Thursday, February 21, 2013

A Good Friend Can "Crack" You Up!


 I am still across the "pond" this week, and my hubby has joined me in the UK as well.

Writing this a couple weeks in advance is a bit surreal, but I wanted to make sure that plenty of "Love and Friendship" is plastered over my blog while I'm gone. Lol. Remember, it is the Dreamweaver monthly challenge, and we want YOU to play along! Just link your creations to the Dream It Up! blog, or email pics to louisehealy@sbc.net (Louise is taking over this duty while Lynell is away).

My card features the Tall Poppy stencil, introduced last year. I have pasted it on the card front with Matte Black Embossing Paste. When this was dry (approx. 30 minutes), I pasted again with Crackle Embossing Paste. This leaves a cracked (duh) and white finish, with the black showing through the cracks. Then I replaced the stencil on top, and using Splendor inks, I added color and shading with stencil brushes. You can leave it at that, or you can cover the whole piece with large granulated clear embossing powder, and heat until melted. This provides a more ceramic look.

Along with the bright colored papers, I also added a shrink plastic sentiment with the Long Friend stencil. So, you've seen what I can do, now show us what YOU can do! Not sure yet? Visit the rest of the team for more inspiration:


Think you can do better? Prove it! Submit samples and info for the Dream Team designer call. We want some new blood on the team. New ideas. New inspiration. And a new opportunity for YOU! All the info can be found HERE.
 

Thursday, February 14, 2013

Valentine Friends

Happy Valentine's Day! My good friend, Lynell, and I are in the UK, most likely having a blast in London. Hopefully, not fighting our way through snow and rain, but hey...it is London, so damp is not an option.

Meanwhile, back at the blog, the Dream Team are playing with the "Love and Friendship" theme for February. How many Valentine's have you created this month? Link them up on the Dream It Up! blog for a chance to win this month's prize.

My post this week once again features the newly-released Ruffled Heart, with some super-fun papers from My Minds Eye's "Dwell" collection. I traced the hearts on the papers and cut them out (stack and cut...less time!), scored them through the center, layered and adhered them on top of one machine embossed heart. (Need a reminder on this process? Click HERE.) To make the design on that heart stand out more, I inked the stencil with a shade of ink just darker than the paper. This deeper color become letter-pressed into the paper. I used the same trick with the Forever Friends strip as well. A flower and rhinestone finish off this fun friend card.

So, do the blog run-around and visit the rest of the team for more Love and Friendship:


By the way, did you know that we are having a call for new Dream Team designers? All the info is on page two of my blog HERE. If you love Dreamweavers, and it shows, then we want YOU!


Thursday, January 31, 2013

Each Layer is a New Beginning

I always believe that winter leads to a fresh start with spring, but there is a freshness in winter that is quiet and beautiful all on its own. I think this card that I created captures that feeling rather well. Featuring the new "Leafless Tree" stencil design from Dreamweaver, this card sort of grew organically. Lol. It began as a simply machine-embossed tree and bird on a panel of off-white cardstock. Hmmm. Then it needed something else. I started by using my Copic markers in a couple shades of gray to just add some shading. Hmmm. Still not enough, so I added more background color, some textural accents with a white gel pen, a contrast with the red bird. This is the point where I realized that I should have used more appropriate cardstock for coloring with Copics, as the blending was not as smooth as I would have liked. Hmmm. I covered the entire panel with Versamark ink, and embossed all in Stampendous Crystal Embossing Powder. Ooooh...nice and sparkly. Me likey! Now, how do I add a sentiment? Stamping on glitter never looks as crisp and clean as I'd like. But, I could stamp with StazOn on an acetate panel. So, I used the Stampendous Perfectly Clear Friendship Assortment for the perfect message. Of course, to adhere it over the top can be tricky as most adhesives will show through, and will not adhere to the glitter either. I chose to use a couple small pieces of super-sticky double-sided tape. Before applying, I scratched off the glitter where the adhesive would go, and applied the tape, and then the acetate panel.

The lesson learned? Never give up on your project! It may not come together like the vision in your mind, but something just as beautiful can appear, with just a bit of extra creativity!

We'd love to see YOUR creations for our monthly challenges. Please link them to the Dream It Up! blog, or email your creations to lynell@dreamweaverstencils.com, for a chance to win a fabulous prize of Dreamweaver product. Meanwhile, make the rounds to see what our clever girls have been up to this week:

Friday, January 25, 2013

Bubblegum, Bubbles, and Bling

Dorothy Adam thought she was being pretty sneaky for this week's team challenge on the Woodware UK blog. She requested bubblegum pink and bubbles. Yikes!! I really had to put my mojo cap on for this one...and I think I did really well with it.

For this card, I used Francoisé Read's soon-to-be-released 21st Birthday clear set, stamped on a bubblegum pink card, and on a piece of GCD Studios Cloisonné patterned paper. I love their papers...double-sided patterns, perfect weight, and gorgeous colors and prints. I cut out the patterned 21, removed part of the top, and punched holes for bubbles.

The Mark Richards' Crystal Clusters perfectly mimicked bubbles and added some necessary bling for a 21st birthday. I'm not sure if it's the same in the UK, but here in the States, a 21st birthday is a big occasion, as you are now legally allowed to drink alcoholic beverages...in moderation...and not before getting behind the wheel of a car...or just before calling your ex-boyfriend...or your boss.

The card itself was punched (or punchy?) a few times to mimic more bubbles, and a few escaped to the inside of the card as well. So, what do you think? Did I follow the guidelines for the challenge? Let's go check the Woodware UK blog to see what bubbly creations the rest of the team came up with this week...


Remember, you can find these products at your local stamp store listed on the Woodware UK site. Keep a close watch to see when these new designs will hit the market!


Thursday, January 24, 2013

For An Elegant New Beginning


 Last week I posted a wedding card featuring the newly released "Bride" stencil from Dreamweavers. I'm still going with weddings as a fresh start theme with this week's post as well...in an understated, elegant way.

This card features the Tall Lilies design, with the double-glitter technique, which is a favorite with everyone who picks up Dreamweaver stencils. So simple, yet so...wow!

Step 1: Rub soap over the back of the stencil.
Step 2: Adhere panel of Double-sided Mounting Paper on a cardstock panel. Remove top sheet of liner.
Step 3: Place soaped stencil face up on adhesive panel.
Step 4: Apply silver glitter over open design, rub in with finger for good coverage. Brush away all excess.
Step 5: Carefully pull panel away from stencil.
Step 6: Apply crystal glitter all over remaining areas.

So gorgeous, that the rest of the card can be kept very basic and simple. Perfect card for a wedding invite, wedding gift card holder, an entire set of matching cards for all aspects of an upcoming wedding, or for other occasions that require an elegant statement.

The Dream Team hope to inspire you to create your own versions of a "Fresh Start", and link them on the Dream It Up! blog, or email pics to lynell@dreamweaverstencils.com, for an opportunity to win $25 of your favorite Dreamweaver product (including some of the newest designs!). For more inspiration, please visit the rest of our creative group:

Thursday, January 17, 2013

A Fresh New Vision


Just returned yesterday from the Craft and Hobby Association international show in Anaheim, California, and I am the most amazing combination of exhausted and creatively stoked! So many wonderful new ideas whirling around in my head. So many cool products to incorporate into my own creations. Since I was at the show for Dreamweaver Stencils, I have to say that we have the most gorgeous stencils out there, with so many wonderful techniques to use with them. I wish that every one of you could have been there to see the Dream Team's booth samples in person. Hopefully, over the next few weeks, you'll have the chance to see them online.

My post today features the new Bride stencil. She is so sweetly elegant, that your mind whirls with all the ways to show her off. I kept mine simple today, using the Ink Transfer technique (or Letterpress). Very similar to the technique from the baby card that I posted last week. For the bride, I spritzed the stencil with Sparkling Silver Memories Mists and placed it face up on the base plate of my embossing machine. Next layer was my cardstock, then the rubber embossing mat, and two clear plates. When this pile is run through the machine, it does two things...it transfers the shimmery ink to the cardstock, and embosses the stencil design into the paper! The small strip on the card base was done with the same technique, but using the Damask stencil. I added a Stampendous stamped sentiment, some pearl swirls, and a few tiny rhinestones. So elegant, and perfect for a wedding card, bridal shower, etc.

If you'd like to see all the new designs, please visit the Stencil with Style site. Any of Dreamweaver products can be purchased there, or at the local stores listed on the Dreamweaver Stencils web site HERE.

For more visual inspiration with Dreamweaver products, follow the Dream It Up! blog, Dreamweaver Tutorial Thursdays on Paper Craft Planet, and like us on Facebook. Now, check out what the rest of our uber-talented team members have been creating this week:

Thursday, January 10, 2013

Preparing for a New Bundle...of Stencils, That Is!


 This week has been an absolute whirlwind! This weekend begins CHA 2013 in Anaheim, California, and boy has the Dream Team been busy preparing for this how. Several new stencil designs will be introduced, as well as new techniques for playing with them. If you are one of the fortunate few who have the opportunity to go to this show, be sure to come by the Dreamweaver Stencils' booth and say, "Hi"! We'd love to meet you, and show you what amazing new ideas we've been creating with. This is not a retail show, it is for trade only, so it provides us with an exciting view of the crafting world as we head toward spring.

Anyway, back to my post for today. No, this is not one of the new stencils, this is actually a card that I posted a couple of years ago, but I think it is perfect for the team challenge this month..."A Fresh Start"! Both the background card, and the focal panel were done with an ink transfer technique. The Leopard Skin stencil was inked with ColorBox Cadmium Yellow Chalk ink, placed face up on the base of my Big Shot. A soft yellow card was placed face down on top of the inked stencil. The rubber embossing mat was the next layer, followed by two clear plates, and then run through the machine. The ink transfers to the card like a stamp would, but bonus...it also embosses or debosses into the cardstock (depending whether you use it up or down). The Baby Bib panel was done the same way, and matted on a Nestie die cut scalloped square in a contrasting color. An epoxy sentiment as well as some bright buttons and the card is complete. Ready to welcome that new little bundle into your world.
Be sure to play along with the team, and link your own Fresh Start creation to the Dream It Up! blog, or email pics to lynell@dreamweaverstencils.com, for an opportunity to win a wonderful prize package at the end of January. For more inspiration, check out the team:

Thursday, January 3, 2013

Celebrating a Fresh Start


Welcome to another great year with the Dream Team! Yes, we are still playing with our monthly challenges, but we're planning on throwing some surprises in along the way. Check the Dream It Up! blog for more info on that, and a teaser for those creative dreamers out there. Hmmm, what could that mean? You'll just have to follow along for yourself. 
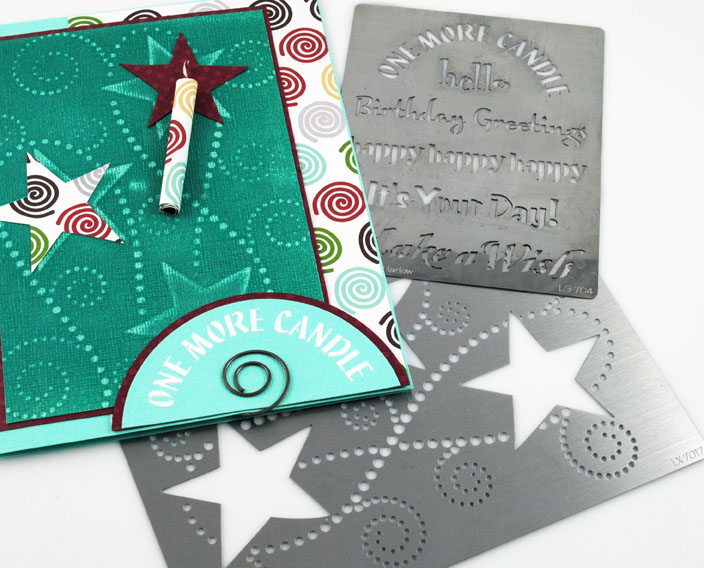
As for today's post, our challenge for January is "A Fresh Start". With the new year obviously in mind, it is a great time for some big changes, or small changes.  How about something less obvious? My card was created with the Stars stencil and the Birthday Words combo stencil. I machine-embossed the Stars on Core'dinations cardstock and sanded the surface to reveal the design. A few cutout stars, fun paper, a "candle", and the perfect sentiment complete this card. 

I think birthdays are also a great time for a fresh start.This is the perfect time to take the wisdom you've learned along the way (willingly or unwillingly), and look at life with new eyes. Where did you expect to be at this point? Do you still need to be there? Then make a few changes to get there. Remember, it's not the miles. It's the journey! Make it spectacular!

A spectacular journey is precisely my birthday wish for my bestie, Lynell Harlow, the Queen of Stencils! Her birthday is tomorrow, and the Dream Team are partying in her honor today. Want to help us make her day? Create your own version of a "fresh start", and provide the link to your creation on the mr. linky on the Dream It Up! blog, or email pics to lynell@dreamweaverstencils.com. There is an extra special prize waiting for the winner of this month's challenge. Will it be YOU?


Hop on the party train and make your stops through the Dream Team blogs: