Showing posts with label baby. Show all posts

Wednesday, April 15, 2015

A Widdle Dream with Dreamweavers


The Stampendous team are really "Dreaming with a Little Dreamweaver" this week...showing off just how perfect Dreamweaver stencils are with Stampendous images...

One. Two. Three. AWWWWWWWWWW. Isn't this widdle House Mouse Designs® Bottle Bunny the cutest? Cute enough to not pile too much frou frou on top. Just stamped in Tuxedo Black Memento ink, colored with Copic Sketch Markers, wrapped in yummy pink silk ribbon from May Arts, with a tied on tag of the perfect sentiment. The perfect background was created by machine-embossing the Dreamweaver Large Scales stencil on Core'dinations Vintage cardstock, sanding the embossed areas, and swiping over them with Sea Breeze VersaMagic ink from Tsukineko.


Wednesday, May 14, 2014

Woodware's Sketch Challenge #34: Keeping It Not-So-Simple!

Ever have a challenge in your life that you are determined to make more of a challenge than necessary? Well...that was me this week! See the very simple sketch from Woodware to the left. Could I just leave it simple? Noooooo. I just had to let my mind wander off on a more creative tangent. The end result is cute, and really wouldn't take anyone else any amount of time to create, but for some reason I had to remake it three times!

I started with a basic yellow card, which I stenciled the Dreamweaver Leopard Spots with ink. I did the letterpress technique with the Baby Bib stencil...inking the stencil with ColorBox Chalk ink in Ice Jade, and running it through my embossing machine with a panel of aqua cardstock to emboss and transfer the ink. Here is where I started to ramp things up...

The bib needs yellow of course! So I ink-stenciled yellow ink over the cute giraffe design, and embossed it in Pastel Yellow Embossing Enamel from Stampendous. Then the sentiment die cut had to be embossed in the yellow as well, with the Woodware Clear Baby Shower.

Then...hmmmm...wouldn't it be cool to turn the card into a pocket
for a slider invite? Oh, and the bib, could be the pull tab for the slider! So...remake the card into a pocket...three times, due to off measurements, messy stenciling, and....a....general pickiness. Know what I mean?

The slider needed some color, so I used the two previous inks to create a plaid by ink-stenciling the Stripes stencil in opposite directions. Another Woodware Clear Words (Welcome Baby) was stamped to be hidden under the bib. The bib was cut out and attached with one brad, so that it could swivel around and display the party info. Since I
don't seem to have an invite stamp or stencil at this time, I have an additional picture here of how it could be done...hand-made, or computer generated.

A ribbon bow and tiny yellow safety pins embellished the invite, and finally,  I was done. I think the end result was worth the extra effort, but keeping this sketch CAS would have worked just as well! Maybe next time????

Don't forget to check out the rest of the crew's creations this week, and play along with the sketch challenge this month for a chance to win a great prize. All the info can be found on the Woodware blog.

Thursday, January 31, 2013

Look Who's New!


There must have been a wee bit of confusion with the Woodware UK schedule for this week...on one schedule the theme is Baby, and on another the theme was "A Little Birdie Told Me". Fortunately for me, I think I covered both bases (baseball term) on this one!

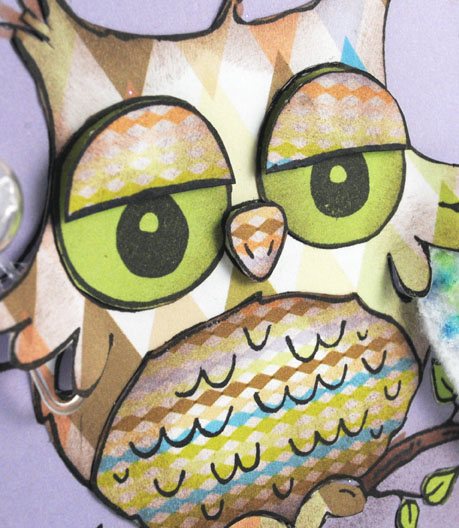
Ever since I received this new, soon-to-be-released Clear Magic set from Dorothy, I've been excited to play with this darling owl designed by Francoise Read. I loved playing cut-and-paste by paper-piecing this cutie using the "Daydream Ensemble" paper pack from GCD Studios. Each print has a solid color on the back, so everything that I needed was right there. I did add a couple touches of my own...a piece of felt colored with markers for a "blankie", and a tiny plastic baby rattle that I've had in my stash forever. I also added half lids over his eyes for a sleepy effect, and created my own sentiment with the Stampendous Perfectly Clear Retro Alphabet.

This card is a perfect example of taking another look at your crafting collection. Many times you can create a card for an occasion that the product was not obviously designed for. It just takes a bit of stretching the creativity!

Be sure to visit the Woodware UK blog on a regular basis for daily craftiness from the team! Remember, these products can be found at your local stamp and/or craft store as listed on the Woodware UK website.


Thursday, January 10, 2013

Preparing for a New Bundle...of Stencils, That Is!


 This week has been an absolute whirlwind! This weekend begins CHA 2013 in Anaheim, California, and boy has the Dream Team been busy preparing for this how. Several new stencil designs will be introduced, as well as new techniques for playing with them. If you are one of the fortunate few who have the opportunity to go to this show, be sure to come by the Dreamweaver Stencils' booth and say, "Hi"! We'd love to meet you, and show you what amazing new ideas we've been creating with. This is not a retail show, it is for trade only, so it provides us with an exciting view of the crafting world as we head toward spring.

Anyway, back to my post for today. No, this is not one of the new stencils, this is actually a card that I posted a couple of years ago, but I think it is perfect for the team challenge this month..."A Fresh Start"! Both the background card, and the focal panel were done with an ink transfer technique. The Leopard Skin stencil was inked with ColorBox Cadmium Yellow Chalk ink, placed face up on the base of my Big Shot. A soft yellow card was placed face down on top of the inked stencil. The rubber embossing mat was the next layer, followed by two clear plates, and then run through the machine. The ink transfers to the card like a stamp would, but bonus...it also embosses or debosses into the cardstock (depending whether you use it up or down). The Baby Bib panel was done the same way, and matted on a Nestie die cut scalloped square in a contrasting color. An epoxy sentiment as well as some bright buttons and the card is complete. Ready to welcome that new little bundle into your world.
Be sure to play along with the team, and link your own Fresh Start creation to the Dream It Up! blog, or email pics to lynell@dreamweaverstencils.com, for an opportunity to win a wonderful prize package at the end of January. For more inspiration, check out the team: