Showing posts with label Halloween. Show all posts

Thursday, October 8, 2015

Dreamweaver Thursday: If You Can Haunt It...Flaunt It!

One of my favorite things to do is to create a mood in my designwork. I was going for "Dead men tell no tales" with this card. Everything is edgy and distressed, with a stormy feel to it, and this is how it was done...

The base of the card is Core'dinations black with a gray core, which has been run through my Big Shot machine with the Dreamweaver I Beams stencil. Using the Core'dinations sanding block, I went over the embossed areas to reveal the design, and sanded more areas and around the edges as well...particularly where I wanted to stamp the sentiment from the Perfectly Clear Tricky Words set.

I stamped the Cling Raven Skull image with Versamark ink on the card base, and embossed it with Aged Black Embossing Enamel. I used a white paint marker to color in the skull, and then went to work on the focal panel.

I used the Tombow Zero Drawing technique and Mono products to cover a panel of Canson textured paper with graphite. I placed the Dreamweaver Clipper Ship over the surface, and erased the areas within the design. I also erased areas around the scalloped edge of the Picasso tool to create my cloudy sky. After this, I replaced the stencil, and using the Tombow Recycled Colored Pencils, I added color to the frigate, the waves, and a bit the guiding light of the moon through the clouds. I daubed Tuxedo Black Memento ink around the edges, and tore two sides. Once again, I stamped the Raven Skull off the edge of the focal panel, and embossed with Aged Black, and colored the skull cap white, so that the parts would match up.

Using Translucent Embossing Paste, I paste-embossed the DW Rain stencil across the panel, and set it aside to dry. Once dry, more Aged Black was sprinkled and heated from underneath to add texture. The panel was then adhered to an ink-distressed and torn yellow panel, and then to the card base. Beacon Adhesives Tacky Glue was applied to add sprinkles of Marine Blue and Trick or Treat Color Fragments to bring the whole design together.


For more "happy hauntings", visit my teammates here:

Pam Hornschu (you're here)

Wednesday, September 30, 2015

Smashing Pumpkins with Stampendous

It's a big week for pumpkins on the Stampendous Blog, and I'm sharing a very small pumpkin...but, it's a very cute pumpkin! With a bit of spooky thrown in. This is the "Monica Butterfly" image from House Mouse Designs®, and she's found herself in a spooky situation...all alone, under a "Leafless Tree" (Dreamweaver Die Cut!), on a partly cloudy (created with the scalloped edge of the Dreamweaver Picasso tool) Halloween night. But, she's not afraid, 'cuz she knows that the man in the moon is there to wish her a "Haunty Halloween", and fill her pumpkin bucket with moonbeams that will turn into oodles of yummy treats, plus one toothbrush with toothpaste of course (Monica is big on dental hygiene!). Liberal swipes of Tuxedo Black Memento and Cloud White VersaMagic inks add to the eerie feel, and Monica has been colored with Copic Sketch Markers to capture the moon glow and shadows.
 For more "smashing pumpkins", check out the links below...

Pam Hornschu (you're here)


Friday, September 4, 2015

All in One...It's in the Bag!


Hasn't this week been so much fun? Don't you just LOVE the new "All in One" designs from Stampendous? Perfect for simplifying your cardmaking and giftgiving through the fall and winter holidays!

Here's a cute idea that will have your Halloween treat-giving/party-goodie-bag "in the bag". The Eek a Boo square image was simply stamped on our Mixed Media White cardstock, colored with my Chameleon* markers, cut out, adhered to a black square, and all of it distressed with a mix of white and gray inks.

A panel of black/kraft Chalk Core cardstock from Core'dinations was run through my embossing machine with my Dreamweaver Spider Web stencil, and sanded to reveal the design, before adhering to the kraft bag. At this point, I adhered the All in One square to the bag around the bottom and sides only, leaving it open at the top for a pocket. I stenciled black Stripes on a strip of purple cardstock, stamped some Halloween images from the Tricky Words Perfectly Clear set, created two folds for the strip to be adhered to the back of the bag, and slipped the other end into the pocket. 

Of course, I HAD to add a cute gingham taffeta bow and an orange stringy pompom from May Arts to finish it off...oh, and wiggle eyes. Hee hee.


There's more fun to be found with All in Ones on these team links:


*Be sure to check out the Chameleon Pens on their website HERE! And their Facebook page HERE.


Monday, August 31, 2015

All in One Fall Harvest


As we head into the fall and holiday seasons, we suddenly seem to be crunched for time. All those fabulous ideas that we've "pinned", and copied, now need time to create. This is the reason that Stampendous has released several new designs for fall and holiday card and craftmaking that are "All in Ones", meaning that they have a background, a focal point, and a sentiment all in one. They can  be simply stamped onto a card, tag, or gift bag...add a little color...and you're done! So simple that you could do this as a family night project, involving the kids, and the designs are so cute that everyone will love them.

One of these designs is this cute Harvest Owl. I just love his menswear-look plaid background, the fun shape, the doodles on him/her and the simple saying for Halloween, Thanksgiving, and fall harvest.

For this card I went a bit further than CAS (clean and simple), and added a stenciled I Beams  background on the golden yellow card. I sanded a panel of Core'dinations Vintage cardstock, and stamped the Stampendous Ornate Border in black, and adhered it as a pocket on the front. The stamped, colored (with Chameleon markers), and cut out image was tucked in the top, and the ribbon was added to finish it off.

We have several team members posting with these fun new designs today...check them out!

Pam Hornschu (you're here)


Friday, May 1, 2015

KLIK, KLIK, KLIK...BOOOO!


Welcome to the final day of the Stampendous/Klik collaboration! If you've missed any of the details, you can read them below. Be sure to check out any of the days that you may have missed this week! More chances to win!

Klik Interchangeable Jewelry from Metal Complex is a fantastic new line of DIY accessory options. With two snap sizes and dozens of settings to snap your creations into, this terrific product is fun to play with for every level of crafter. There are tons of pre-made snaps so you can just “klik and go” to change up your look. But this week we’re playing with the Metal Complex Snap Bezel Blanks so we can craft our own masterpieces of wearable art. Along with this collaboration, we are working with Envirotex Jewelry Resin...an amazing product to easily make the jewelry of your creative dreams! 

Yes, there will be prizes...three random winners will receive a prize package that includes Klik Snap Bezel Blanks and jewelry components, a package of ETI Resin and a Stampendous Eclectic Perfectly Clear Stamp Set. To win one of these awesome prize packages, you need to comment on the Stampendous blog and that of each Stampendous designer in the list provided below. Eligible winners are those comments that provide a valid email and indicate a U.S. Mailing address. Here are the Stampendous Official Rules for all contests. Commenting will close Sunday, May 3rd and winners will be announced the afternoon of May 4th.

Here's what I've created for today:


I was channeling my inner "Alison" for this one, Alison being my good friend and teammate, Alison Heikkila, who loves to think outside the "pretty bonbon box". This first version features the Stampendous Cling Skull Roses, stamped in black StazOn on a 2 1/2" circle of white polyshrink. A bit of talcum was wiped over the front and back before heating to prevent it from sticking to itself, and then flattened with an acrylic block. This was the perfect size to fit inside the large Klik bezel. Using a glue marker, I applied a bit of glue on the flower and sprinkled this with Stampendous Micro Glitter in purple. Two tiny glowing green rhinestones were adhered over the eyes. Now to mix the Envirotex Jewelry Resin...follow the package directions, avoid a really humid day, and pour a small amount into the bezel until it domes. Let it cure 12-24 hours. I placed mine between two pencils since the snap on the back of the bezel prevents it from laying flat. Any tiny bubbles can be softly blown away. Two of the smaller bezels were filled with a mix of Fran•tagé Color Fragments in Trick or Treat mix, and Hot Lime, and Amethyst. More resin was poured over these. If the pieces float to the surface, just poke them back down with the tip of a needle or wire. Once cured, the finishing touches were an attached chain, and black leather cording. The cross and the "jewels" were colored with Copic Sketch Markers. I inked, and glittered a paper flower, and attached a portion of it to the underside of this bezel piece. 


My second interchangeable bezel, was created with the same process as above, but using the Stampendous Cling Tomb Elements image. More of the Color Fragments were added before the addition of the resin, and just as the others, was set aside to cure 12-24 hours.

I have to say that I really enjoyed working with both the Klik products as well as the Jewelry Resin...so simple to create some wonderful jewelry pieces! Now it's time for you to visit the rest of the line up for this final day!


Thursday, October 30, 2014

Dreamweaver: A Final Happy HallowThanksMas to You!


With five Thursdays this October, the Dream Team have enjoyed playing with our "Happy HallowThanksMas" challenge.  I thought that I'd squeeze one more Halloween card in for this year...

This card features our "Great Pumpkin" stencil, which I've paper-pieced from scraps left over from some of my favorite paper (not even sure that it's still available) over a machine-embossed panel. Everything has been distressed, and a very simple sentiment of Idea-ology Chit Chat from Tim Holtz completed this very simple card.

Remember to visit the entire Dream Team for more inspiration:

Friday, October 10, 2014

Stampendous: WITCH Do You Love...the Raven or the Rose?

I think that I've enjoyed playing with Halloween in my paper-crafting more this year than any other. Partly, because my Dreamweaver team has been posting with Smeared and Smudged's 31 Days of Halloween for the entire month, which has challenged me to think more outside the "pretty" box. The other reason is that being with the Stampendous team once again, I've had the opportunity to play with creepy and fun images for this holiday. The card that I'm posting today is a mix of both...

The background of the card base has been ink-stenciled with the Dreamweaver Fleur de Lis in Versafine Purple ink, and smudged of course. The focal panel is a mix of medias...the Stone Wall background and Glossy Black-pasted Nouveau Rose from Dreamweaver, the "witchy" Raven embossed in black and the soon-to-be-released-Classic Rose from Stampendous, colored with Copics following the "no line" technique. All of this smeared and smudged, distressed and torn, before layering over a strip of May Arts Jumbo Ric Rac, adding a Stampendous sentiment, and plenty of Fran•tagé-y elements in the way of Color Fragments and Aged Gold Embossing Enamel.

If you haven't  been already, I highly suggest follow the Stampendous team this week by heading to the Stampendous Impressions blog each day to find out WITCH team member(s) is posting their creepy creation(s).

Tuesday, September 23, 2014

Stampendous: Shaking It Up With Skulls and Skeletons

Blogging is very confusing this time of the year! One post is Christmas. The next is Thanksgiving! Yet another is Halloween! This is one of those...obviously! This week, the Stampendous team are being challenged to feature skulls and skeletons. My card has both, 'cuz I'm an over-achiever.

I created a shaker card first, by stamping the Tomb Elements in Versamark and embossing him (Or her? Is that a gravestone, or are you just glad to see me?) in white on black cardstock. I used a Sakura Fluorescent Gelly Roll pen to  color just the skeleton. I ink-stenciled the Dreamweaver Stone Wall on a long orange panel, scored in the center 1/8" space between the two lines, and folded. Now, I used a Spellbinder Nestabilities die to cut a window opening, and adhered acetate behind it. I placed long, thin strips of foam taped on the inside, to completely cover the perimeter of the window. Before adhering to the other side, I sprinkled some Stampendous Trick or Treat, Lime, and Purple Color Fragments inside, and sealed it up.

This piece was then adhered over a card created from Core'dinations cardstock, along with strips of patterned paper, and a layered bow of May Arts Polka Dot and Chevron ribbons, with jute twine.


My final addition was the Stampendous Skull Roses, stamped and embossed in black on lime green mirror cardstock, and in embossed in white on black cardstock. The rose was cut from the last one, and adhered over the entire skull, after having cut it out. These were layered and adhered to the card with foam tape.


Friday, September 19, 2014

Stampendous: A Dazzling Finale!

Blog_header_add_a_little_dazzle


Hope you're enjoying all the inspiration featuring Add a Little Dazzle Craft Metal Sheets and Stampendous Stamps and Essentials this week! We know you'd love to win some goodies to try yourself! If you missed the earlier posts, here are the links for you. MONDAY, TUESDAY, WEDNESDAY, THURSDAY The team over at Add a Little Dazzle has created a special featuring the metals from this blog hop for those of you who have already realized you're going to need these products. You can find it here - Add A Little Dazzle Stampendous Hop Special

Of course you might win some, too! We're giving away three prize packages this week for comments on the blogs. A nice package of Metal Sheets, Stamps and Cutting Dies!

Prize Package from Add a Little Dazzle


Here's my creation for today:


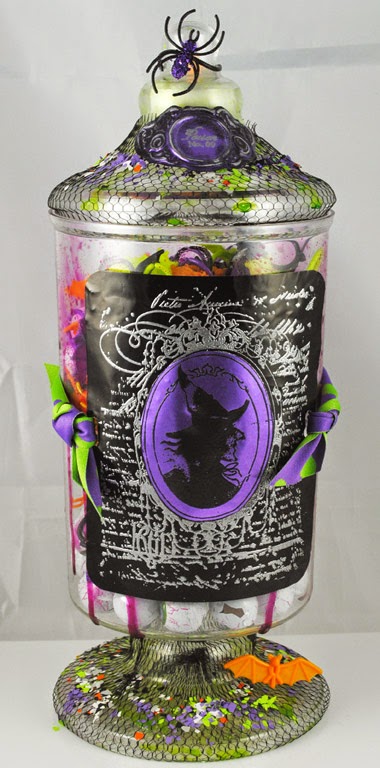
I had soooo much fun creating this apothecary jar! I have five of these jars that are on my shelf in my studio to display buttons, pompoms, rhinestones, flowers, etc., but I just had to steal one from the set. So now my flowers are in a Ziploc bag, lol. But it was worth it!

I originally started to make a card featuring Stampendous and the metal from Add A Little Dazzle. I cut a panel of the black aluminum, and wiped the surface with talcum powder (Johnson & Johnson to be exact). This acts as an anti-static medium before working with embossing powder or glitter on a staticky surface. I stamped and embossed in silver the Stampendous Mirror Mirror Cling Stamp, and stamped and embossed her in black on a purple metal panel. I cut out that oval, and used a tool to smooth the metal out, which caused it to curve a bit. When I did it to the other panel, I realized this would be cool curved over a jar...so the mad experiment continued! Bwhahahahaha!

I prepped the jar by spritzing the outside with irRESISTable Spray from Tsukineko in Lilac and New Sprout. It dripped down the sides and  base, looking a bit gory...heeheehee. When dry, I cut slits in the sides of my Witch panel, and tied it around the jar with wonderful May Arts reversible polka dot ribbon. I used foam tape to attach the purple witch oval. I wanted a label for the jar, so I used the Poison Labels Perfectly Clear set, and stamped one of the ornate designs on the back of the purple metal scrap. I used some of my metalworking tools to manipulate the metal and emboss the stamped design into the front. I sanded and inked it a bit to age it before stamping and embossing in silver the label...Poison No. 9.

I wanted to fill the jar with creepy stuff, and all I could find at my local Target store was some black net bags of spider and bat rings, and some bags of foil-wrapped chocolate balls that were printed to look like eyeballs. All of this was dumped into my jar, and then my eyes fell upon the black net bags! They were perfect to wrap around the lid and the base of the jar, giving it a webby feel. I dribbled some Gem Tac from Beacon Adhesives over both, and sprinkled heavily with Lime, Purple, and Trick or Treat Color Fragments. Oh, and I almost forgot, I adhered a flameless tealite inside the knob of the lid with Quik Grip from Beacon Adhesives to create a candle-lit effect, as well as the metal-worked label on the outside. A bat and a spider made it onto the netting as well...they're tricky that way!
Remember to visit and leave a comment at each of the teams' links below:

 
P.S. If you click on a blog link and receive a notice that says, "this post is not here", or something similar, just click on the blog header or look for a link that says Home. That should take you to the home page of that blog and the correct post should be near the top. Thanks for your patience. Happy hopping!

Wednesday, September 10, 2014

Stampendous: Sweet Treats for the Mouse in the House!

Welcome to a haunting week with House-Mouse Designs® and Stampendous! My card features the Monica and Amanda "Dino Treats" duo sharing their sweets. The focal image was colored with a multitude of Copics (C1,3,5,7; BV0000,00,23; RV00; Y06,15,17; YR04,07; B00,05,06,99; YG11; G14), with a sponged cloudy background created with a Tsukineko dauber, London Fog Memento, and the Dreamweaver Picasso tool's scallop edge, as well as a dauber swiped bit of Tsukineko Dandelion Memento
ink for the moon glow. Mounted on a background of Authentique paper from the Latest & Greatest 6 X 6 square pad, and to a Bazzill cardstock base, with the addition of a Dreamweaver Leafless Tree die cut, a sprinkling of Stampendous Trick or Treat Color Fragments, and finally, embossed in black the new Halloween Wish sentiment! I just love coloring these little critters. House-Mouse Designs® have been a favorite of mine for at least fifteen years! I promise they'll be a favorite of yours as well! Look for them at your local stamp store, or online at Stampendous.com.

Tuesday, September 9, 2014

Stampendous: Forget Dum Dum Pops, I Want Cheese for Halloween!

If you've been following the Stampendous team this week, you are probably convinced that you NEED to adopt a whole bunch of mice this Halloween...from House-Mouse Designs® of course! Don't you just love this little Mudpie (Trick or Cheese)? All dressed up disguised as CHEESE of all things, and the cutest hunk of cheese ever! Colored with Copics, and waiting just inside the doorway to the tree house (Authentique Paper). Going along are little bat friends from the Perfectly Clear Tricky Words ready for trick-or-treating as the banner above says. I do have to say, though, that dressed as cheese, I wouldn't want to smell those feet! I'd just hand over the treats quick-like! Hmmm. Are those candy wrappers on the floor already? Nope! Just a sprinkling of Trick or Treat Color Fragments!

Thursday, October 31, 2013

Dreamweaver Stencils: Happy Halloween!


Happy Halloween to all of my favorite ghouls out there! Today concludes our entire month of Magical and Mysterious, and your final opportunity to link your own creepy creations to the Dream It Up! blog for an opportunity to win the stencil of your choice!

My post today once again features the new "Great Pumpkin" stencil design. I have had so much fun with this new design, and obviously many of my teammates have felt the same. Today I kept it simple...just paper-piecing on top of machine-embossing, with a bit of ink distressing to make the piecing pop. The cooly creepy double-sided paper was distressed around the edges using my Picasso tool. It's perfect for that! I've added some sentiment stickers from Bazzill Basics as well. I wish that I could tell you who makes this paper, and what it is called...so if any of you know the name, please let me know in your comments below. I'd love to buy some more!

Hope your tricks become treats today, and that you and your family have a safe and fun "ghouls' night out"!

Check out the rest of the team's creations, as well as our wonderful guest designer, Alison Heikkila. Thanks so much, Alison, for joining us for Spooktober!


Thursday, October 24, 2013

Dreamweaver Stencils: Magical Mystery...Mouse?

I suppose that you are viewing my blog, and thinking to yourself, "Hmmm. Is Pam confused (again)? This is not a Dreamweaver post. I see nothing from Dreamweaver on here!", and you'd be wrong. Bwhahahahaha.

Let's face it. We all have far more craft products than we can really use, but we can justify it far better when we mix up the elements...kind of like a crafty witch with her cauldron. Eye of newt, tongue of spider, Clearsnap ink, Stampendous Mouse, aaaaaand...Dreamweaver Leafless Tree diecut and Picasso tool. You see, the best potions are a mix of more than one element, and this card is no different.

I used the Dreamweaver Picasso tool to stencil my cloudy background using a sponge dauber and Clearsnap Mixed Media Jasmine and Pewter inks. I punched a circle for the moon and inserted it behind a cloud puff. The designer paper that I used already had an amber glow at the bottom which worked nicely as the base for my Monica Mouse in her butterfly costume. She was stamped and colored with Copics before being cut out and adhered with foam tape, along with her pumpkin pail. A stencil brush with plenty of Mixed Media Noir ink, added to the spooky feel, but my die cut black Leafless Tree was the ultimate in eerie additions.

So, my pretty, remember the next time you pull out your stamps, and inks, and newts, and spiders...some Dreamweaver Stencils will fit in very nicely!

Now that I've "tricked" you a bit, be off to the land of treats, or maybe not...