Showing posts with label #cre8time #stampendous #DWStencils. Show all posts

Friday, June 12, 2015

Fun with Faber-Castell Finale!


Have you had as much fun as we have this week? What a great hop it's been, with so many fabulous ideas, and wonderful products! Remember, you could win a package of the products shown above, just by leaving comments for each of the players for this week. Here's what I'm showing off for today:


When you have oodles of fun stuff to play with, there is no better way to show it off than by creating a mixed media canvas...even if it is only 6 inches square! Here's how I layered mine:

1) I spread Dreamweaver White Embossing Paste over the surface of the canvas, unevenly for texture, and set it aside to dry overnight.
2) I used a large stencil brush to apply the Faber-Castell Black Chalk Paint through the Dreamweaver by Stampendous Corner Flowers stencil, and let that dry.
3) I colored the surface of the flower petals with F/C Chalk Pastel Pencils, which provided a nice pop of color off of the black paint.
4) I stamped the crackle image from the Andy Skinner Stampendous Cling Industrial set by inking it with the Faber-Castell PITT Black Brush Pen randomly over the canvas.
5) I used the circle stamps from the Stampendous Round Creative Palette set to add some mint paint, and daubed more around the edges and over the canvas.
6) I switched to lavender acrylic paint and daubed more color, and used it to stamp the Cling Motif image.
7) The Cling Color Outside sentiment was inked with the PITT black marker as well, and stamped onto the canvas.
8) Finally, sprinkles of Fran•tagĂ© Color Fragments in Teal and Amethyst were adhered with Faber-Castell Texture Gems.
Leave me a comment, and head on over to these blogs for our grand finale of inspiration:

Pam Hornschu (you're here!)

Note: If a Blog Hop Post isn’t visible when you get to the link, try clicking on the blog header or home button to be taken to the latest post.

Thursday, June 4, 2015

Dreamweaver Thursday: STENtangling...Doodling with Stencils!

This week, the Stampendous/Dreamweaver team are all about tangling and doodling with our images or stencil designs. The Dreamweaver open designs are perfect for STENtangling, as they give you a shape, that is divided into sections, for you to create your own patterns, or follow the patterns of others, including Dreamweaver's Zentangle master, Wayne Harlow, CZT.

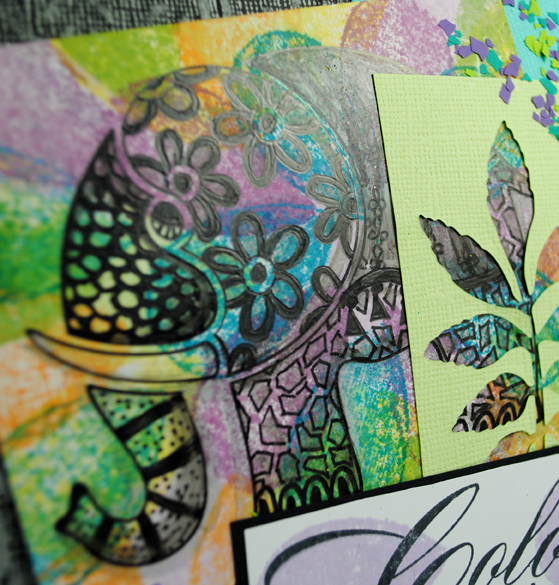
For my post today, I started out with the Open Elephant design, and doodled away inside the spaces using my Faber-Castell Pitt Pens. I love the look of Zentangle, and am in awe of those who do it well (like Wayne, and our own Louise Healy), but I'm really not good at it. My hand shakes a bit, so I can't get the patterns as precise as I would like. So, I doodle. My elephant went a bit hippy-dippy with my doodling, so I sort of "tie-dyed" him by using my teardrop shaped Memento ink pads to add happy colors over the surface, which makes the black doodling really pop.

The base of the card was Core'dinations Vintage gray cardstock, machine-embossed with the Dreamweaver Crusade background, and sanded to reveal the design. Layers were added with an aqua circle, a lime negative die cut using the DW Leafy Branch die, and finally an inked and colored sentiment from Stampendous...Cling Color Outside. Using a glue marker, I added sprinkles of my favorite Color Fragments in Hot Lime, Amethyst, and Teal.


Now let's go see what my fellow doodlers and tanglers are showing off today:

Pam Hornschu (you're here!)

Friday, May 29, 2015

BLOOMIN' with Linnie Blooms Part Two


Welcome to the final hop day of our collaboration with Linnie Blooms! Have you had as much fun as we have? I doubt it...but you could! By the end of today's posts you should be hightailing it out to your nearest craft store or online store and buying up every bit of Linnie Blooms, Stampendous, and Dreamweaver product you've seen this week! Or maybe, just maybe...

YES!  There are prizes!! Three lucky winners will each win a set of Linnie Blooms Fabric Mini File Folders just like they provide for our team. Plus, you'll receive a Dreamweaver Stencil background, and our Vintage Press Perfectly Clear Stamps™ Set. You'll be creating Mixed Media fabric accents in no time! These winners have to have a U.S. mailing address (official rules here), but Aussie Fans - good news! The Stencil Specialists are sponsoring one Australian prize for this collaboration! You could win a Stampendous stamp, an LL sized Dreamweaver Stencil of your choice, a silicone buttons mould, and a Stampendous Embossing Powder (your color choice)... Wow!! Be sure to let us know you're from Australia in your comments!!

Here's what I've created for this fun hop:


Remember how on an earlier post of mine this week, I mentioned how many cool uses you can think of with these Linnie Blooms Canvas File Folders? This week I've done a greeting card, a portable doodling journal, and today...a gift card holder. The outside was painted with black acrylic paint, and when dry, was pasted in Dreamweaver Regular Embossing Paste with the little Bird on a Branch, and the Large Scales. When dry, the clean and dry stencils were replaced over the pasted surface, and inked with the Tsukineko® Splendor Circus palette and large and small stencil brushes. For the large scales section, I left the stencil on still, and stamped the Stampendous Cling Seed Background in Onyx VersaFine ink over the top. A die cut frame was cut from canvas, inked in green, and stamped with a sentiment from the Perfectly Clear Royal Heart Quotes. The back was stenciled with the same designs, but kept lighter and brighter.

 The inside was ink-stenciled with the Dreamweaver Zen Butterfly in deep periwinkle with the Bird on a Branch stenciled on one wing in black, and along the border with the Large Scales again. I created a mask for the butterfly with a sticky note in order to stamp the Seeds Background over the canvas, and the Cling Cosmos image. the petals were colored a bit, I added some doodling with my .7 Copic Black Multiliner. I cut a slit through the canvas, and adhered strips of May Arts ribbon over the edges to prevent fraying. This became a cute pocket for a giftcard. As before, I sewed another large heart  button on the tab to act as a closure, and added a couple of buttons inside for fun. I really think that this folder was my favorite for this week, but all were fun to create. What do you think? Don't forget to leave your comment below before visiting the rest of the team's bloomin' posts!