Showing posts with label #mixedmedia. Show all posts

Thursday, June 23, 2016

By the Seaside Mini Canvases


Three mini canvases to brighten up your decor for the summer! All created using Dreamweaver stencils by Stampendous (Sea Turtle, Sandcastle, and OiOi Fish) with Matte Black Embossing Paste, and Aged Spice and Golden Sand embossing enamels.


The base of each canvas was painted with a mixture of Dreamweaver Pearlescent Paste and Translucent Paste and sprinkled with Color Fragments.


I love the chunky sides on these canvases!


Each canvas also features one of the sentiments from the new Perfectly Clear Ocean Wisdom stamp set, which has been doodled around for more substance.


A bit of Beacon® Fast Finish was brushed over the surface and sprinkled with Stampendous Teal Micro Glitter.


Make these as gifts, or as a fun addition to the beach cottage in your dreams! But wait, there's more. Visit my teammates posts on the link list from the Stampendous Impressions blog.

Friday, May 20, 2016

A Sunshine Sentiment from Stampendous


If you weren't sentimental before, you have to be now! The Stampendous team have provided oodles of ideas using the new Sentimental all-in-one images. My post today features the new Cling "Create Sunshine" image. The perfect combo of a floral and sentiment that works for so many occasions, or none at all! I used an inexpensive bare wood frame from the big box craft store near me, and gave it a wash of pale yellow paint. I wiped a bit of distress stain over the surface, removing the excess for an antiqued look.


Using the Dreamweaver Black Eyed Susans stencil, I used a sponge dauber to ink the design with Walnut Distress ink. I used the Diagonal Panes stencil and a second dauber to ink with Vintage Photo in a few areas. When dry once again, I lightly sanded over the surface around the edges to distress it further.


The focal point on the inside was a rounded corner panel of kraft cardstock. The image was stamped in the Walnut Distress ink, and the design was painted with DecoArt Media Fluid paints. After I'd painted the "banner" portion of the design with white paint, I'd lost the stamped image of the sentiment. So, I re-inked the image and carefully stamped over the first image. The image was sprinkled with Chunky White Embossing Enamel and heated from underneath for little speckles of white texture. The panel was inked around the edges and adhered over a yellow cardstock mat, and adhered to the front of the glass panel of the frame. The back of the glass was adhered over a piece of designer paper.


We hope that you've enjoyed our "sentimental journey" this week, and here's a few more...

Friday, April 29, 2016

Wearable Mixed Media with Nathalie Kalbach by Stampendous

STM_NatNfriendsHop_FBpost

How much fun have you had this week following the Stampendous team with this awesome hop featuring images designed by Nathalie Kalbach for Stampendous? If you've missed any of the days (how could you?), you can go back to day one on the Stampendous blog. And you'll really really want to as there are AMAZING prizes to be had! Here's the details...

We are mixing it up for three commenters during the hop. Each prize package includes all three of Nathalie Kalbach’s Foam, Cling Rubber and Stencil Stamp sets. But WAIT! This is open to everyone!
Comment on each blog post at Stampendous, and that of each designer’s post on the hop this week. We’ll announce winners on Monday May 2nd.


I love these images sooo much that I'll be wearing this one, created using the Elephant Sponge and Cling Stamps and Stencils set...

 
In case you're not sure what you're seeing, this is another one of my t-shirts that I've done, and I'm thinking this one is my favorite. Nathalie's new foam stamps are perfect for using fabric, and the possibilities are endless! I started with a plain black t-shirt, which I washed and dried first to remove any sizing in the fabric. Now the paint will adhere to the fabric much better. The paint that I used is a set of fabric paints in fluorescent colors by Tulip® called "Soft Fabric Paint" in the matte finish. Now this is a bit of a misnomer as there is extremely fine sparkle in this paint...not gaudy, just a hint of shimmer which works well with my use of overlapping colors. I simply used a round sponge cut into wedges. I squirted a "palette" of the paints onto a piece of foil. The t-shirt was pulled over a piece of cardboard to stretch the fabric a bit. Each section of the border hem was done sponging off until there was just a bit of paint in the sponge to prevent seepage under the wonderful stencil pattern that comes in Nathalie's set.


The stencil is easy to line up for repeat patterns as shown above, and when a portion of the stencil is masked off with packing tape, a smaller border is easily achieved around the sleeve hem as seen below.


Aren't the colors beautiful as they blend one into the other?


On the back of the shirt, I sponged the blue paint onto the flat surface of the back of the foam elephant. We're not talking "squishy" foam either. This is nice firm foam for nice crisp images. I stamped the blue solid elephant, and set it aside to dry briefly. (This paint is fast drying! No worry about smearing.) I inked the Cling Rubber Elephant with its wonderful patterning with Black VersaCraft ink by Tsukineko®, and stamped it directly over the top of the blue elephant. The result is shown above. And how did I create my elephants on parade on the front?


Using the raised pattern side of the foam elephant, I sponged the paint across as I had done with the borders, gave it a light mist of water, and stamped each one (sponging paint again for each new impression. If I'd really wanted to go all out, I could have added some Hot Fix crystals here and there, and I still might If I feel the need for some bling. Oh, I almost forgot. That little band with the border across the neckline? I had cut the sleeves for a more cap sleeve look, and the pieces that I'd removed I just stenciled and sewed a strip for a bit of added interest. Once finished and dry, I turned it inside-out and ironed it to set the ink and paint. When I wash it, it will be in a cold cycle and hung dry. I think it would be fine in the dryer, but I always hang my shirts to dry. They fade and shrink less.


The team has so many fun things to show off today, so be sure and visit their links below along with a few of Nathalie's team of designers. How exciting!


Wednesday, April 27, 2016

Mixed Media On the Go with Nathalie Kalbach by Stampendous


BLOG TEMPLATE

All this week the Stampendous team are having a play date with our good friend and amazing designer, Nathalie Kalbach. Each year she designs some versatile and awesome stamp, templates, and stencil sets for Stampendous. Personally, I've been soooo looking forward to this week to show off what I love about her designs. But first of all, I know you'll want the prize opportunity info...

We are mixing it up for three commenters during the hop. Each prize package includes all three of Nathalie Kalbach’s Foam, Cling Rubber and Stencil Stamp sets. But WAIT! This is open to everyone! Comment on each blog post at Stampendous and that of each designer’s post on the hop this week. We’ll announce winners on Monday May 2nd. Now, here is what I've played with...


At the CHA (Craft and Hobby Association) show in Anaheim both this year and last year, I really enjoyed watching Nathalie demonstrate in the Stampendous booth with her designs. She always works with a mixed media journal at these events as it is a perfect way to take your art on-the-go! She's so relaxed with it...happy and laughing and going where the colors take her (occasionally off of the pages and all over everything else, including her, lol), you can really sense her joy in her artwork...or artPLAY! My post today was inspired by her...


Recently, I finally purchased a mixed media journal, not a big one, but manageable for me. I've had it sitting next to my workspace, so that every time I have extra ink or paint on my craft mat or my Stampendous Creative Palette, I can transfer it onto pages of this book for future inspiration. Most of the color on these two pages came from leftover Radiant Neon Reinkers from Tsukineko. I looooove these colors. They can be super vibrant or can be toned down a bit by thinning with water or acrylic paint. When doing either, it helps the ink to dry more quickly as well. Somewhere along the line I'd had extra Dreamweaver Crackle Embossing Paste which I pasted through the Dreamweaver Tiles stencil so that I had these small patches of boxy shapes for texture. This week I had some extra lime paint from another project (you'll see it tomorrow), so on the left page I placed a few of the "leaf" templates that I removed from the stencil insert that comes in Nathalie's Bird Foam Stamp and Cling Rubber Stamp and Stencil set. I painted some of the green paint over the top, and when removed, they left the leaf shapes filled with the previous colored background. The Bird Foam Stamp was inked with Onyx VersaFine and stamped over the top, and the leaf stencil was used to ink and add a couple of leaves for a perch. Both were embossed with Stampendous Aged Black Embossing Enamel.


The page on the right follows similarly...only I used the stencil for sponging the paint through the leaf images, and the image was the Cling Rubber Bird, inked and embossed as before.


I wanted to add some sort of saying (it is a journal after all!), but didn't trust myself to hand write it and not mess up my pages, so I used this wonderful sentiment from Stampendous, stamped in black on white copy paper. I drew a loose frame around it, and used the DecoArt Decou-Page to adhere it to the page, and then brushed it over both pages. While wet, I sprinkled Color Fragments over the surface for more texture and color.


I was really happy with how both pages turned out, and look forward to creating more of them. I have a whole book to fill with happy art!


For more inspiration from Nathalie and our team, here are the links to follow today...


Friday, March 11, 2016

A Bibelot Box of Andy Skinner Designs and Ephemera

Stampendous and Media March 2016 Blog Hop-01


All of this week we've been playing with our friends at DecoArt. Mixed Media Artist and DecoArt International Education Coordinator Andy Skinner has designed some fantastic stamps for Stampendous, and our design team are eager to share what they've been creating with these mixed with the DecoArt® line of Media products. Andy will join us along with his team of international mixed media artists including Julia Stratford-Wright, Mark Gould, Mel Hookham, and Jools Robertson. Plus there have been posts this week on the DecoArt blog as well. Naturally the Stampendous Design Team will be checking in as well.

How about amazing prizes? Jaw-droppingly amazing? Each comment on a post this week will enter you to win a fabulous prize package! (one comment per post, per person)  Contest open to everyone!!
We have three packages and each has a Fluid Media Starter Kit, all three of Andy Skinner’s new Stampendous Stamp sets, and a Jumbo Acrylic Handle. Look at this great prize!

blog-prize-package 

Here's my "bibelot" for today...


What is a "bibelot", you say? Here's what Merriam-Webster has to say:

bibelot

noun bi·be·lot \ˈbē-bə-ˌlō\
Definition of bibelot
plural bibelots play \-ˌlō(z)\
  1. :  a small household ornament or decorative object :  trinket
In the crafting world there seems to be a plethora of artists referring to their creations as "curiosities". Being the slight rebel that I am (lol), I chose to use a different word, but with pretty much the same meaning. And no, there won't be a quiz.


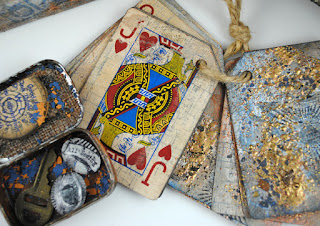
My bibelot box has treasures within treasures, all of which have been decorated with stamp images designed by Andy Skinner for Stampendous, and mixed media products by DecoArt®.

The lid has been given a bit of Andy's "rust" technique as he demonstrates in this video HERE. What started out as a simple, inexpensive paper maché box from a local big box craft store, has been transformed into a beat up, rusty, and odd-looking box, filled with weird stuff. And it was soooo much fun to make! The sides of the box and lid have been brushed with a mix of DecoArt® Media Fluid Acrylics and mediums. Once dry, several of the images from Andy Skinner's Cling Toxic and Cling Curiosity (see? I told you it was popular!) were stamped in Tuxedo Black, Rich Cocoa, and Paris Dusk Memento inks. The Dreamweaver Hexagons stencil were inked here and there. A bit of Crackle Paste was spread in small areas, and allowed to dry before brushing more paints and inks over the surface, and fake "crackle" was added using the image from Andy's set.


A torn rectangle of corrugated cardboard was given the same treatment, and adhered onto the top of the lid, along with a chipboard piece stamped and embossed in white embossing powder with the Antique and Open signs from the Curiosity set.


The inside of the box was given the same paint, ink, and stamp treatment. (Tip: it helps to stamp inside the box by using the Cling stamps without the acrylic handles.) I created two corrugated cardboard dividers and adhered them inside the box with Beacon Adhesives' Quick Grip. I had two small mint tins in my stash (who doesn't?), which were rusted up as well, with stamped burlap adhered in the lid, Stampendous Color Fragments for color and texture, pieces of "ephemera" such as flat glass marbles, old keys, tiny plastic bottles of silly craft supplies, the glass bottom from a soda bottle, and even a wooden nickel. I had glued words from Andy's stamp sets to the bottom of a couple of the flat glass marbles, which become magnified by the curved glass. An old set of poker cards from Vegas were aged, inked, stamped, and texturized with Stampendous Frantagé Aged Embossing Enamels, Crushed Glass Glitter, and more Color Fragments. Holes were punched in the corners in order to string them together.


All of these tinier "bibelots" fit inside, to be brought out and displayed or inspected as desired.

Thursday, March 10, 2016

Steampunking with Dreamweaver and Andy Skinner Designs

Stampendous and Media March 2016 Blog Hop-01


All of this week we're playing with Mixed Media from DecoArt®, along with our Stampendous images designed by Mixed Media Artist and DecoArt International Education Coordinator Andy Skinner. As today is also Dreamweaver Thursday, we'll be inspiring you to use our line of Dreamweaver Stencils as well. Andy will join us along with his team of international mixed media artists including Julia Stratford-Wright, Mark Gould, Mel Hookham, and Jools Robertson.

We have three prize packages, each containing a Fluid Media Starter Kit, all three of Andy Skinner’s new Stampendous Stamp sets, and a Jumbo Acrylic Handle. Look at this great prize!

blog-prize-package 
For an opportunity to be one of the winners, you need to leave a comment on each post from both teams, each day for the length of the collaboration. Also...ANYONE can win for this international event!

Here's what I have to share today...

I've created a steampunk-style portfolio, in which the main flap has been painted using Andy's great "rust" technique using various Media Fluid Paints from DecoArt®. For a video of this technique, check this link HERE. The bottom of the folder has been ink-stenciled with the Dreamweaver I-Beams design, using black ink and a large stencil brush, and with more of the paints brushed over the surface.


On the inside of this accordion folder, I've stamped a green panel of cardstock with various images from Andy's line of Stampendous stamps, including the Cling Industrial set and the Cling Steampunk set using brown and black inks. Over the top of the surface, I've dry-brushed many of the same paints as used on the front flap, but still allowing the designs to peek through.


This close-up shows more detail on that front flap, as I had also paste-embossed using Dreamweaver Metallic Gold Embossing paste the Dreamweaver Clockworks design. I'd also used my palette knife to apply dabs of the paste here and there for more texture. While the paste was wet, I sprinkled a variety of the Stampendous Aged Embossing Enamels from the Fran•tagé line in Aged Gold, Aged Copper, and Aged Hunter. I applied my heat tool over the surface to melt the enamels, and cause the paste to bubble up for even more texture. When cool, I brushed more of those Fluid Acrylics over the top, covering all of the beautiful embossing, but that was okay as I used a damp cloth to wipe paint partially from the embossed surface to let the color and shine show through.


For a bit more metal, I cut a circle out of the flap, and used a large copper grommet to frame it. Under the flap, I had punched a circle of the stamped and painted green cardstock to fit just inside the opening of the grommet. An aged gear and brad fastener was added as well.


Then I had stamped and embossed with the aged enamel, the butterfly key image from the Steampunk set on acetate, and cut them out. Some key-shaped embellies were aged with ink and stamped with partial sayings from the Steampunk set as well, using Black StazOn ink. These were adhered to the butterfly keys, and using a bead chain and closure, was left to dangle through the opening from the flap.


Final touches were additional aging from the DecoArt® paints, and Tsukineko® inks, and scraps of stained dictionary pages, old stamps, and a panel stamped from the Steampunk set as well.


Built in to the accordion folder is an elastic band that wraps around and holds this portfolio closed until treasures are ready to be added. How about a really old map to the underground tunnels of London? Andy...have you got one handy?


Here's the crew to visit today...

Friday, February 19, 2016

The Faces of Mixed Media


Today is the finale of this week's challenge featuring the faces of Stampendous. All of this week, I've shown several ways to look at the Cling Beauty Face image. Originally, this image came packaged as a complete set with masks and templates, and blossoms, which sold out quickly and has now become simply the face image now. This provides you with the opportunity to use the wide variety of floral and mixed media images from Stampendous to enhance YOUR Beauty creation. Meanwhile, I'll share with you the process of my mixed media canvas.

I started with a pre-gessoed twelve inch square canvas, which I painted with black acrylic paint. When dry, I used a palette knife to apply Dreamweaver Crackle Paste in a fairly thin layer, and set it aside to dry.


Meanwhile, I tore a page from a dictionary, and painted a light coat of gesso over it, focusing on heavier coverage where I intended to place the face. When dry, I stamped the Cling Beauty Face with Tuxedo Black Memento ink, and smudged Tsukineko Radiant Neon Blue, Green, and Pink inks on the facial features. Using the mask/template that came with her originally, I masked off her face while stamping the blossoms in black, ink-stenciling the Dreamweaver Big Dots in Neon Yellow, and stamped and embossed in black the Cling Follow Your Art. This panel was torn around the edges, and set aside temporarily.


I stamped the Cling Seed Packet background on a section of white tissue paper. The songbird was stamped in black, and inked with Neon Green ink. This was torn around the edges as well.

I shifted gears back to the now dry and crackled canvas. Using the Neon inks and large stencil brushes, I color blocked sections of the canvas. On the green section, I paste-embossed in Glossy White the Dreamweaver Black Eyed Susans. When this was dry, I brushed Fast Finish by Beacon Adhesives® brushed over the surfaces that I would be decoupaging. The tissue panel was placed on its wet surface, and the face panel was placed on the wet surface designed for it. More Fast Finish was brushed over the tops of these panels.

Using black ink and stencil brushes, I inked the centers of the Susans, dots in the centers of the blossoms, some soft inking through the Big Dots stencil in the bottom panel, and finally inked heavily through the Dreamweaver Leafy Branch stencil. A die cut of the this same design along with layered paper flowers (which started as white, but I colored with the Neon inks) were adhered over the Susans' panel. Using a large stencil brush, areas were ink-distressed in black ink as well. The final touch was to doodle border lines using a black Pitt Pen.