Thursday, March 7, 2013

My Bloomin' Bits and Pieces!

The Dream Team is all abloom for the month of March, and who could blame us? Haven't we all seen enough gray, dreary, rainy/snowy days of winter? It's impossible to be depressed when flowers are in abundance, even if it's just a hint sprouting through the snow.

My card today screams warm and tropical sunny days, and was created with leftover bits and pieces from my trip to the UK for the Stitches craft show in Birmingham, England.

Lynell and I were demonstrating stencil techniques, and teaching mini classes in the huge Woodware booth, which also provided the opportunity to play a bit with new or forgotten techniques. Judith had handed us a box of Sakura Cray-Pas...an oily/waxy form of pastels to experiment with. Kind of like crayons for grown-ups. We were creating backgrounds on cardstock by blending various colors of the pastels. Lynell tried to paste-emboss on top of one of these backgrounds, but when she tried to use the Molten Magic technique on it, heating the pasted item just made it want to peel off. In the process, it left a "ghost" image of the design, which was very cool, but kind of a waste of the pasting effort. I played around until I could mimic the ghosting by using a cotton swab with rubbing alcohol to remove color through the Dragonfly stencil design. The result looks very much like batik. To add more interest, I paste-embossed the Daisy Background in Translucent paste over the surface which was very subtle, but you can see in the above pictures how cool it looks.

The Daisy background was also stenciled using the same Cray-Pas over the machine-embossed panel of the Daisies. I rubbed a few colors of the pastel on my Ranger craft mat, and using the Dreamweaver stencil brushes in a rouging manner, applied the color over the surface of the raised design. With the addition of a couple of Prima flowers and a fun new canvas-covered button, my blooming card was complete.

This is the perfect example of why you should always save the bits and pieces that are great on their own, but didn't work for some other project that you were working on. You never know when those pieces will become the jumping off point for a whole new spurt of creativity!

Be sure to visit the rest of the team's blogs for more inspiration, and play along with the team for this month's challenge. Just link your own "bloomin'" creation(s) to the link on the Dream It Up! blog, or email pics of your creations to lynell@dreamweaverstencils.com, for an opportunity to be this month's randomly selected prize winner.


Thursday, February 28, 2013

A Flight of Fancy...

I admit it. Yes, you probably have seen this card before. Time got away from me as I was doing some last minute packing for the UK. So, I pulled out a not-very-oldie-but-a-goodie. I created this for the challenge with Art Glitter. Using their super ultra fine glitters in yummy colors, I did the double-glitter technique on this triptych of the Heart Whimsey stencil from Dreamweavers. Such a pretty stencil, and perfect for a variety of occasions...Valentine's Day, birthdays, wedding, anniversary, friendship.

I'm leaving for the airport in twenty minutes, so here's the list of the rest of the team. They've had more time, so you should see some incredible creations:


Have you played with this month's challenge yet? What are you waiting for? An engraved invitation? Here it is...create...link...hopefully win. Got it? Good.


Sunday, February 24, 2013

A Wild Fantasy (Not that kind!)

Do you believe in unicorns? Do you think they are wild? Well, either way, they are being featured today in my post for Woodware UK. Our challenge was Animals...Wild or Not. I am using this as the perfect opportunity to post a card that I created for the Stampendous catalog over a year ago using the Cling Medieval Unicorn with the Calligraphy Sampler. Using a tone on tone look for the focal panel, I added color and shading with a range of gray markers.  There is an Elegant Border embossed in Shabby Pink Embossing Enamel at the bottom of the card, as well as a Damask sticker, coated in Versamark ink, and embossed in Shabby Pink to match. A few Mark Richards crystals adorn the unicorn's elegant collar for a bit of added bling.

Don't forget...the rest of the team will be posting their wild and not so wild creations on the Woodware UK blog all of this week!

Thursday, February 21, 2013

A Good Friend Can "Crack" You Up!


 I am still across the "pond" this week, and my hubby has joined me in the UK as well.

Writing this a couple weeks in advance is a bit surreal, but I wanted to make sure that plenty of "Love and Friendship" is plastered over my blog while I'm gone. Lol. Remember, it is the Dreamweaver monthly challenge, and we want YOU to play along! Just link your creations to the Dream It Up! blog, or email pics to louisehealy@sbc.net (Louise is taking over this duty while Lynell is away).

My card features the Tall Poppy stencil, introduced last year. I have pasted it on the card front with Matte Black Embossing Paste. When this was dry (approx. 30 minutes), I pasted again with Crackle Embossing Paste. This leaves a cracked (duh) and white finish, with the black showing through the cracks. Then I replaced the stencil on top, and using Splendor inks, I added color and shading with stencil brushes. You can leave it at that, or you can cover the whole piece with large granulated clear embossing powder, and heat until melted. This provides a more ceramic look.

Along with the bright colored papers, I also added a shrink plastic sentiment with the Long Friend stencil. So, you've seen what I can do, now show us what YOU can do! Not sure yet? Visit the rest of the team for more inspiration:


Think you can do better? Prove it! Submit samples and info for the Dream Team designer call. We want some new blood on the team. New ideas. New inspiration. And a new opportunity for YOU! All the info can be found HERE.
 

Monday, February 18, 2013

Get Your Shine On with the Woodware UK Team!


 I should be about to the end of my first week in the UK, and I'm assuming, having a fabulous time! I know that I did last year, and I feel so fortunate that I get to go again. This time my hubby is coming over for the second half of my trip for a little sightseeing, some history, and a lot of amazing food!

Meanwhile, back on my blog, I'm posting this creation for the Shining Silver challenge. I created this using the Dreamweaver Double-glitter technique for the focal point, some misting on the background, and a machine embossed sentiment. Here's the basics:

Double Glitter:

1. Cut piece of double-sided mounting paper to fit card panel. Remove film on one side and adhere to card. Remove film on top, and set aside.
2. Rub soap on the back of the Love Bird Hearts stencil. Brush off excess, and place soap side down on top of adhesive.
3. Pour first glitter color (Stampendous Western Blue) over surface, and rub into the adhesive for complete coverage. Pour off excess and save. Brush and flick off all extra remaining glitter due to static.
4. Turn panel over, and pull panel from stencil.
5. Pour second color of glitter (Stampendous Silver) over remaining adhesive, and rub into surface. Brush off excess and you're done!

Place white cardstock panel in a cardboard box. Place Damask stencil over the top, and mist with Dreamweaver Memories Mists in Silver for the background panel.  The remainder of the card is just assemblage...a few crystals, a machine embossed sentiment (Dreamweaver Bless You), sheer ribbon, and a beautiful pearl corsage pin.

Don't forget to check the Woodware UK blog all this week for shining silver surprises!


Thursday, February 14, 2013

Valentine Friends

Happy Valentine's Day! My good friend, Lynell, and I are in the UK, most likely having a blast in London. Hopefully, not fighting our way through snow and rain, but hey...it is London, so damp is not an option.

Meanwhile, back at the blog, the Dream Team are playing with the "Love and Friendship" theme for February. How many Valentine's have you created this month? Link them up on the Dream It Up! blog for a chance to win this month's prize.

My post this week once again features the newly-released Ruffled Heart, with some super-fun papers from My Minds Eye's "Dwell" collection. I traced the hearts on the papers and cut them out (stack and cut...less time!), scored them through the center, layered and adhered them on top of one machine embossed heart. (Need a reminder on this process? Click HERE.) To make the design on that heart stand out more, I inked the stencil with a shade of ink just darker than the paper. This deeper color become letter-pressed into the paper. I used the same trick with the Forever Friends strip as well. A flower and rhinestone finish off this fun friend card.

So, do the blog run-around and visit the rest of the team for more Love and Friendship:


By the way, did you know that we are having a call for new Dream Team designers? All the info is on page two of my blog HERE. If you love Dreamweavers, and it shows, then we want YOU!


Tuesday, February 12, 2013

Wedding Stationery with the Woodware UK Team


This week I will actually be in the UK and playing in person with the Woodware UK team! So, I'm writing this before my trip, trying to stay ahead of all of my responsibilities. Such a heavy word for something that can be so enjoyable and rewarding!

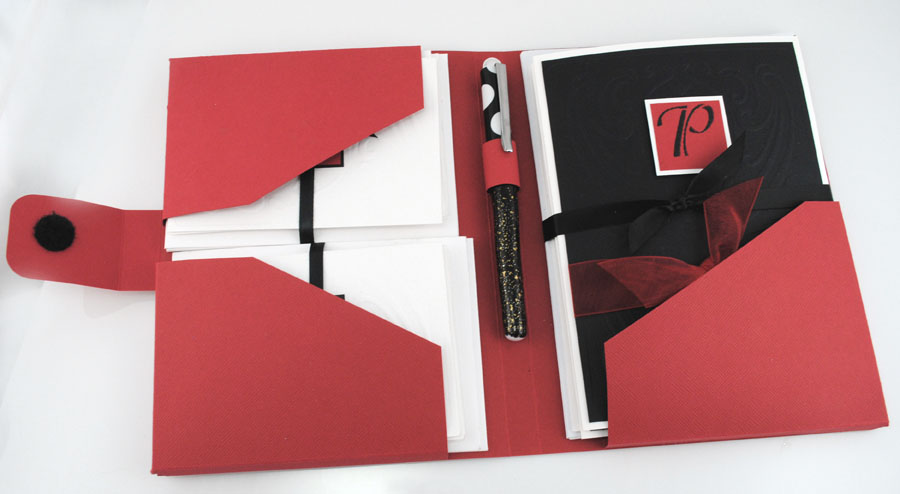
Our challenge for this week was to create wedding stationery. For most people, this would be a whole lot of white, on top of more white, but not for me. Weddings have changed so much over the years. So many are "themed", so many are "destination", and so many use mixes of color that our grandparents would have been horrified by. Thus...red,  black, and gray!

This portfolio would make a wonderful gift for a bride, or a terrific addition to a complete wedding look...Save the Dates, Invites, RSVPs, Thank Yous, etc. In this case, it is simply a set of notes with envelopes, tucked into little pockets, with the bride's new monogram. With Dreamweaver Stencils' individual monograms, or using their Calligraphy Alphabet, these can be easily personalized. You could even have both the bride and the grooms initial with the last name initial.

The process for creating this is predominantly machine-embossing, which is easy-peasy. Just run several panels through your embossing machine with the correct sandwich technique:

1. Place the Art Nouveau Background or monogram stencil face down on base plate.
2. Place card panel face down on stencil.
3. Place embossing mat on top.
4. Place TWO clear plates on top.
5. Run through machine. Do not force it!

For the gray panels, I placed the stencil over the embossed surface, and daubed Versamark ink over the design, removed the stencil, and embossed with Stampendous Aged Black Embossing Enamel. A few of the monograms were done the same way, but with either Silver or Black embossing enamel. The monogram on the cover was actually a piece of Mercart colored aluminum, machine embossed, and the color sanded off of the raised letter.
Of course, you could create the entire portfolio in all white, maybe with various textures and sheens, and that would be beautiful as well. As for me, I like a little color in my life. That's why I created this for ME! No wedding necessary for this project. A charming gift for any occasion! Even just because!

Have you seen what the rest of the team have created for this challenge? Each day a different one of the girls posts something fabulous, so don't miss out! Make your visit to the Woodware UK Blog one of your morning priorities!

 Curious to know where you can purchase these fabulous products? Check out your local stores as listed on the Woodware UK website.