Thursday, December 15, 2011

Dreamweaver Stencils' Sketch #13-Vintage Poinsettia


 Here we are at the final Dream Team sketch challenge for the year! This one was my design (as seen at left), so I know that I had plenty of time to think of how I would work this. Apparently not, as it was only a couple of days ago that I finally broke out the stencils, etc. to complete this. Lol. First, I needed to find a stencil that works well when either repeated three times in long thin strips, or can be cut into three sections like a triptych. I went with the latter concept, and chose to use the Poinsettia stencil. Following the technique for the "Double Glitter" Technique, I went with a slightly different approach:

1) Cut panel of cardstock. Cut panel of Double-Sided Adhesive to fit. Remove backing and adhere to panel.
2) Rub back of Poinsettia stencil with coconut soap. Brush away excess. Place stencil on adhesive panel.
3) Here's where I went a little different...instead of filling the stencil design with glitter, I filled it with some new Shabby White Embossing Enamel from Stampendous. I rubbed it into the adhesive thoroughly, brushed away all excess, removed the stencil carefully, and heated the powder to melt.
4) Once the image was cool, I poured Stampendous Copper Jewel Glitter over all the bare areas, rubbing into the adhesive thoroughly. Use a brush to remove all the excess.

The basic technique can be used with a variety of materials...glitter, embossing powder, flock, etc.

Once the panel was completed, I cut it into three strips, matted them, and adhered them to an embossed (with the Damask stencil) card. The sentiment was embossed on a partial Nestability die. Some Pebbles Glitter Candy Dots that happened to match the Mahogany Tinsel Embossing Powder melted on the 3" corsage pin attached to the Creative Impressions crinkle ribbon bow. Since this was my sketch design, I'm really curious to see what the rest of the Dream Team have created with the challenge. Why don't you play along as well? Link it on the Dream It Up!  blog while you visit over there for more inspiration. Oh, by the way, get ready for a big announcement coming from Dreamweaver Stencils in the very near future! Lots of exciting new happenings in our future! Come along for the ride!


Wednesday, December 14, 2011

Woodware UK...Look What I Did With My Tins!

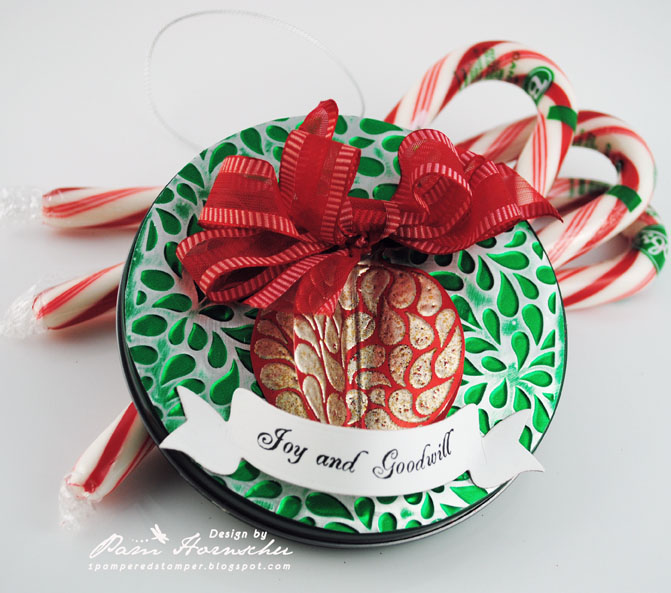
 The challenge for this week at Woodware UK, was to create something fabulous with a tin...and I love a challenge! For my first tin, I covered the lid with a circle of the Mercart Green Aluminum which I embossed with the Petals Background stencil from Dreamweaver Stencils. Normally, you would place the metal on top of the stencil color side down, but in this case I reversed it. This way I was able to sand away the colored background and leave the design in color. The reason that I chose this particular background stencil, is because it matches so well with the Woodware Teardrop Christmas Clear Magic stamps. I stamped the ornament image on Mercart Red Aluminum twice, and embossed them in Stampendous Aged Silver Embossing Enamel. Both were cut out, one was adhered flat on the tin, the other was folded and adhered over the top for added dimension. A fluffy ribbon bow was added, along with a Nestabilities Ribbon Banner die cut with the stamped sentiment. A loop of silver tinsel cording allows this gift tin to hang on the Christmas tree as a nice surprise.
 For the second tin, I paste embossed the Petals Background stencil with Glossy Red Paste, and poured Stampendous Red Jewel glitter over the surface. While this was drying, I stamped the Teardrop tree twice on the Mercart Green Aluminum, and embossed with Stampendous Aged Gold Embossing Enamel. These, too, were cut out and layered as before. A fun plaid ribbon bow and sentiment banner completed the tin, along with a gold tinsel cord loop for hanging.
 This final picture shows the inside of the tins. They have a velvet covered insert to hold a gift card for the recipient. The candy canes are just for the photo...lol. Hope that you are being truly inspired by the team's tins this week. Haven't seen them yet? The links can be found on the Woodware UK Blog.

Tuesday, December 13, 2011

3D Challenge Tuesday...Stenciling Elegance for the Holidays


Looking for some last minute hand-made gift ideas still? How about a fun treat jar, beautifully stenciled? As my first posting as a Paper Craft Planet Supernova, I thought I'd share a fun stenciling technique with definite WOW appeal!

The supplies needed are shown above and include: metal stencils (Dreamweaver Stencils' Swirl Tree and Antler Snowflake), Translucent Embossing Paste (Dreamweaver Stencils), palette knife/spreader, glitter (Stampendous Multi Crystal), removable tape, and a candy jar (with flat sides).

Step 1: Tape stencil onto flat surface on all four sides using removable tape.

Step 2: Spread Translucent Embossing Paste over surface of stencil with palette knife at slight angle.
Step 3: Holding palette knife at 90 degree angle, scrape off excess paste and return to container.
Step 4: Remove tape from three sides of stencil. Using fourth side as hinge, lift and remove the stencil. Clean stencil and palette knife immediately in warm, soapy water with a soft scrub brush. Dry with soft towel.

Step 5: Pour glitter over surface. Pour off excess and return to container. Set aside jar to dry for 20 minutes.
Step 6: Repeat on other three sides.

Step 7: Follow the same steps to stencil the snowflake on the lid as well.

Since you are probably now thinking, "I'd hardly call this a quick and easy project!", that would probably be the case if you were only creating one. However, if you were to follow the same instructions to create several projects at the same time (gift bags, cards, tags, ornaments, etc.), then you can complete quite a few in the same crafting session. While one is drying and waiting for the next step, you can be working on the next...sort of a round robin of creative fun!
For more creative stenciling ideas, please visit the Dream It Up! blog for Dreamweaver Stencils.

Fifty is Nifty for Laura!


                                                      It's the big five-o for one of my bestest friends, Laura Weed! We've been friends for over six years now, ever since I moved away from the Orange County, CA area, and up to the High Desert of CA. Laura was hired to take over my position as the in-house designer, we worked together still at Stampendous, and we've been buds ever since. Over the years we've both celebrated a few birthdays, including my own big five-o three years ago. Of course, she's been rubbing that in my face ever since, that I am older than her. However, since she has been taking on more and more responsibilities at Stampendous (including fearless leader of the design teams), I kind of think that that should have evened things out by now. Lol. Therefore my card that I am posting is a gentle dig at her, featuring the Cling Cupcake image, the Perfectly Clear Simply Safari, and the Perfectly Clear Counting Birthdays set. I went with purple and black as purple is her fave color, and I like the contrast of the Black Embossing Powder against it. For a little additional drama, I added fifty (count them!) candles, and lit them up on the ends with a little Tigerlily and Sunflower glitter. The inside of the card celebrates not only her birthday, but the fact that she has lost over eighty pounds this year! Woo hoo! As I'm not the only one who loves this wild woman, the Stampendous Design Team girls, have all planned a surprise for her by posting lots of birthday wishes just for her on all our blogs. Check them out:

Sunday, December 11, 2011

Pining for the Holidays!

 Quickie post here with an oldie by goodie card. This card was created for the Stampendous holiday catalog 2009, but somehow I never posted it. Kind of sad, since it's pretty cute, even if I do say so myself! The background panel is a piece of MME paper randomly stamped and embossed in white with the Ponderosa Pine image. I stamped and embossed the Swirl Tag image, added the Family Season sentiment, and cut it out. Both the tag and panel were matted in red, and a few red buttons add the extra pop that was needed. I love the soft blue gray and bright red combo for a holiday card.

Saturday, December 10, 2011

Pretty in Pink...and Cream...and Brown...


December seems to be flying by as usual. It's already the second Saturday of the month, and the Stampendous Teams are once again posting with the latest challenge...a colorway of pink, cream, gold, and/or brown. So, I  cheated a bit...again. This card was created for the Stampendous Holiday 2011 catalog, and features this Cling Postcard Pretty image, along with the Cling Season's Post. I stamped the tag, cut it out, and layered the other images over it, before coloring the focal image with Copic markers. Since I was going for the Fran'tage look, I spritzed some coffee over it, and distressed the edges. I even shriveled the ribbon with a flash of the heat tool. The background has several of the same images, stamped in Rich Cocoa Memento ink, plus the Cling Poinsettia Silhouette in soft Angel Pink Memento, and arranged so that the tag could be placed on the card and appear to fit right in with the other images. The pink card and cream panel was also distressed with a sanding block and ink. The end result has the pink, brown, and cream...with a hint of blue and yellow in my coloring.
How about playing along with us this week with the color challenge, and link your own creation on the Stampendous Impressions blog? You can enter as many times as you like, and this is the stamp set that you'll have the opportunity (US winners only) to win...the Perfectly Clear Amore Frame:


Need a little more inspiration? Okay, you asked for it! Here's the list of players for this week:


This week several of the team members are offering blog candy. This is what I am offering...the Jumbo Cling Snowflakes set:

Just leave me a comment (AND YOUR EMAIL ADDRESS!), telling me three things you would love to create with this set of fun images! USA winners only...sorry. 


Friday, December 9, 2011

Playing With the Woodware USA Sketch Challenge

Using the same sketch for the Woodware USA team as was posted for the Woodware UK team (seen at left), I played with these darling Woodware Polar Bears. Such a darling set of clear images, and simple to work with. All I did was stamp the polar two-some with Bahama Blue Memento ink on Mohawk white cardstock, and color with Copic markers...really just a hint of color. Then using a glue pen, I applied a mixture of Stampendous Cotton Ball Fun Flock and Multi Crystal Glitter, for a fluffy winter coat that sparkles! The sentiment was stamped on the DCWV card, a border of punched EK Edgers was adhered along with a cute baker's twine tie, over the fun
Echo Park papers. I highly recommend that you put on your cyber sneakers and race over to purchase these fun images...and while you're there, check out what else the Woodware USA site has in store for you.