Showing posts with label Dreamweaver Stampendous Halloween hop. Show all posts

Tuesday, December 13, 2011

3D Challenge Tuesday...Stenciling Elegance for the Holidays


Looking for some last minute hand-made gift ideas still? How about a fun treat jar, beautifully stenciled? As my first posting as a Paper Craft Planet Supernova, I thought I'd share a fun stenciling technique with definite WOW appeal!

The supplies needed are shown above and include: metal stencils (Dreamweaver Stencils' Swirl Tree and Antler Snowflake), Translucent Embossing Paste (Dreamweaver Stencils), palette knife/spreader, glitter (Stampendous Multi Crystal), removable tape, and a candy jar (with flat sides).

Step 1: Tape stencil onto flat surface on all four sides using removable tape.

Step 2: Spread Translucent Embossing Paste over surface of stencil with palette knife at slight angle.
Step 3: Holding palette knife at 90 degree angle, scrape off excess paste and return to container.
Step 4: Remove tape from three sides of stencil. Using fourth side as hinge, lift and remove the stencil. Clean stencil and palette knife immediately in warm, soapy water with a soft scrub brush. Dry with soft towel.

Step 5: Pour glitter over surface. Pour off excess and return to container. Set aside jar to dry for 20 minutes.
Step 6: Repeat on other three sides.

Step 7: Follow the same steps to stencil the snowflake on the lid as well.

Since you are probably now thinking, "I'd hardly call this a quick and easy project!", that would probably be the case if you were only creating one. However, if you were to follow the same instructions to create several projects at the same time (gift bags, cards, tags, ornaments, etc.), then you can complete quite a few in the same crafting session. While one is drying and waiting for the next step, you can be working on the next...sort of a round robin of creative fun!
For more creative stenciling ideas, please visit the Dream It Up! blog for Dreamweaver Stencils.

Sunday, December 11, 2011

Pining for the Holidays!

 Quickie post here with an oldie by goodie card. This card was created for the Stampendous holiday catalog 2009, but somehow I never posted it. Kind of sad, since it's pretty cute, even if I do say so myself! The background panel is a piece of MME paper randomly stamped and embossed in white with the Ponderosa Pine image. I stamped and embossed the Swirl Tag image, added the Family Season sentiment, and cut it out. Both the tag and panel were matted in red, and a few red buttons add the extra pop that was needed. I love the soft blue gray and bright red combo for a holiday card.

Saturday, October 22, 2011

Caught in My Web! Haunty Halloween Hop


Welcome to the Blog Hop Friends first ever Haunty Halloween Hop! If you've arrived here from the spectacularly spooky Cyndi's blog, you are in the right place...and I've caught you in my web! If you got here by happy accident, head back to Cyndi's blog and start from the beginning. Webs seem to be the theme I am running with for this post. Three projects which all feature webs. This is the only time of the year when spiders are fun!


My first project features a large variety of Stampendous products...the Cling Graveyard image embossed on Thermo Acetate with Midnight Black Embossing Powder, the Velvet White Phuzzy Phantoms Class A' Peels, Jumbo Bats, and the Scary Spiders Class A' Peels.  I love creating these lanterns using the Stampendous pails, so simple and so fun, especially since they are far safer with the use of flameless tea lites. What a great invention! I think my fave part of this lantern, is draping the web sticker from the handle down to the edge of the pail. I wiped talcum powder over the back after it was in place to remove the excess stickiness.


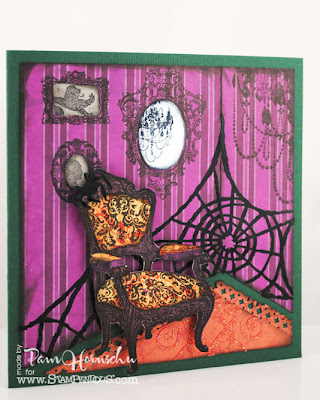
My second project is a card that I created for the Stampendous July 2011 Holiday catalog, and was so much fun to create. Like creating a creepy doll house! Lol. I paper-pieced the new Perfectly Clear Damask Chair, wallpapered the walls and carpeted the floors with fun papers from Graphic 45 and Best Creation. Then I decorated my haunted parlor with images from the new Perfectly Clear Chandelier and Charm Collection sets. An oval piece of mirror cardstock "reflects" the gorgeously creepy chandelier. To perfect the haunted look, I added more of those great webs from the Class A' Peels Scary Spiders once again.


My final creepy creation features the Dreamweaver Stencils Spider Web paste-embossed in Matte Black Paste on the Parakeet Bazzill card and this fun little dancing ghostie from the 70's! This image was also paste embossed, but in Glossy White, and sprinkled liberally with Sea Green, Tiger Lily, Violet, and Multi Crystal Glitters from Stampendous. Love the chunky orange rick rack from Creative Impressions for some extra pizazz and the glowing green rhinestone "eyes" of my creepy companion.


 I guess now I have to release you from my web, and allow you to go on to your next stop on the trick or treat trail...Suzi. Be sure to leave some treats (or tricks) in the comment sections as you go, as there are some fabulous prizes available from some wonderful sponsors, including Stampendous and Dreamweaver Stencils! Check out the list.

 ( 5 winners... 1 Halloween bg cling stamp each winner..Crowscape, Graveyard, Beware Gate, Castle Gate, Pumpkin Fence)

2 digis to one winner

Halloweenie set

 (5 single digis...1 each to 5 winners? or 5 to 1 winner?)

1 set of choice (except Zombies)

(5 images to one winner)

($10 Gift Certificate)

($10 Gift Certificate)

(3 prizes: each is 4 holiday stencils, 2 brushes, with 3 technique sheets each)