Thursday, June 2, 2011

Dreaming in Lavender and Gray


The challenge this week at Dreamweaver Stencils' Dream Schemes Thursday, is a colorway, and happens to be my color choice...lavender and gray. This card is deceptive...it appears to be very elaborate, but in actuality, is very simple and takes very little time to complete. The card base is lavender cardstock with a metallic silver cardstock over the top. A strip of the same metallic silver and a panel of white are run through my Big Shot with the Damask stencil to emboss them, and adhered across the card. Then a lavender panel was run through the Big Shot again with the Damask stencil to emboss it. A ribbon bow is wrapped around the card and a charm with jumpring added. Now comes the Piece de Resistance,  the focal point of this gorgeous card created using the Heart Lock stencil. Actually, this was created sort of accidentally in that I had used this stencil for another project and stenciled with black StazOn ink which left the entire stencil covered in the ink. Just for curiosity's sake, I decided to spritz it with rubbing alcohol and run it through the Big Shot with a white cardstock panel. Because StazOn is a solvent-based ink, the alcohol mixed with it and beaded on the surface in a unique way, and for some reason turned more lavender than black. The end result of the transferred ink with the embossed areas gorgeously highlights this stencil design which is one of my absolute favorites. I added adhesive backed pearls to embellish this beautiful wedding card. The inside has a simple strip of ribbon and the sentiment embossed on the silver cardstock. Now I'm so in love with this card that I don't want to give it away...but I will. We have friends who were married at the beach and are now throwing a reception for friends and family, so this card will go to them. Fortunately, the bride is a papercrafter so I'm sure she will appreciate this unique card.


Dreamweaver Stencils:
LX7001 Large Damask
LG672 Heart Lock
LS90 Celebrate Script

Plus:
Tsukineko Black StazOn ink
Bazzill and Mohawk cardstocks
Recollections Pearls
rubbing alcohol
Big Shot
satin ribbon
love charm and jumpring (Michael's)

Wednesday, June 1, 2011

Lizzie Anne Designs June Singles Release!

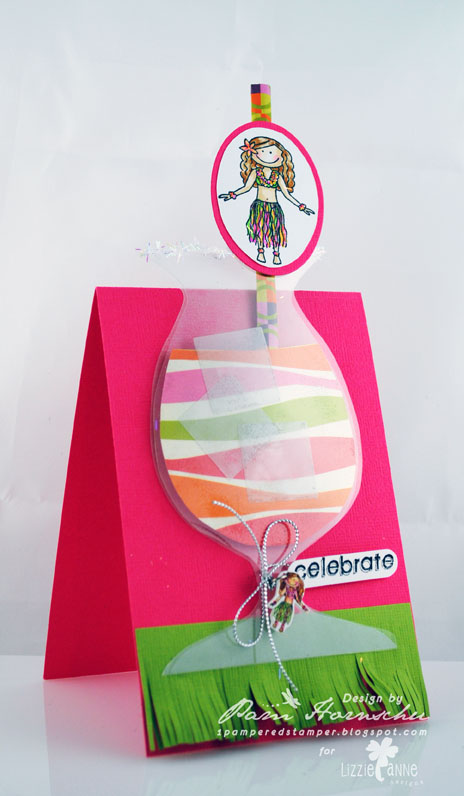
So excited to reveal the latest new releases of Lizzie Anne Designs singles, "Hula Girl" and "Surfer Dude". Aren't they just soooooo cute? Living in California, we are very proud of our surf culture, and yes, I was a surfer once upon a time, when I was muuuuuch younger! LOL. Like so many others, my hubby and I love Hawaii, and to do a trip to Hawaii right, you have to take a hula lesson. Yep. I've done that, too. There's my explanation for why I'm so in love with these new images. For the Hula Girl, I created a fun party drink (alcoholic or non-alcoholic...it's up to you!), with a shrink plastic stem marker and a straw or swizzle stick accent. I used both vellum and acetate to create the glass and ice cubes, and fun paper for the drink. I added a tag sentiment from the "Everyday Sayings" Little Bits set. Wouldn't this make a fun party invite? Plus, it would be fun to create all the party accessories to match!


 My second card features the "Surfer Dude". I created a surfboard-shaped card for this with some fun paper from American Crafts. I stamped a couple images from "Wonderful World" and the sentiment from "Tweens and Teens" sets. The Surfer Dude was stamped on a white circle, colored and shaded with Copic Sketch Markers. I added a few dots to represent sand and water, and paper-pieced the surfboard. Personally, I can hardly wait to see what the rest of our amazing team comes up with on this release, and you'll want to check them out for yourself before dashing over to the Lizzie Anne Designs website to buy your own!
Lizzie Anne Designs:
Hula Girl Single
Surfer Dude Single
Wonderful World Sixlets set
Everyday Sayings Little Bits set
Tweens and Teens Little Bits set

Plus:
American Crafts, Ann Griffin patterned papers
Bazzill and Mohawk cardstock
Tuxedo Black Memento ink
Copic Sketch Markers
Thermo Acetate
Vellum
shrink plastic
Nestabilities squares and ovals
jumpring, tinsel twine
sparkle fibers
double-sided foam adhesive

Monday, May 30, 2011

LIzzie Anne Designs' Weekly Sketch Challenge #167!

This week, I was in charge of the Lizzie Anne Designs' weekly sketch challenge. You can see the sketch design at left, and my version above. Actually a very simple design needing just one focal image and one sentiment. The focal images is repeated three times. I used the "Tweens and Teens" set for this card, repeating the guitar on the panels, and stamping and embossing the sentiment on the circle at the bottom. Come play along with us this week and post your own creation to the Lizzie Anne Designs Facebook page HERE using the LAD-WC167 tag.


Lizzie Anne Designs "Tweens and Teens"
Rich Cocoa Memento ink
Versamark ink
Stampendous Baby Blue Pastel Embossing Powder
MME patterned paper
light blue cardstock
foam adhesive
circle punch

Thursday, May 26, 2011

Oops...I Collaged it Again!

Since this is a free week for the Dreamweaver Stencils' Dream Team, I chose to post this card that is the perfect example of how to cover up errors. While Lynell, Lee, and I were at the NAMTA show in Phoenix in April, I was demo-ing various techniques with the stencils (in other words...playing the whole time!), and this card was the result of some experimentation. I wanted to play with the Copic "denim" technique with the Apron stencil, so I airbrushed the apron on the white panel with various shades of blue. To get the texture, you are supposed to use a scrap of denim fabric, which I did NOT have with me. However, I did have this piece of plastic that Lee had and was throwing out. It had a cool texture to it, so I thought that I could spritz it with the Colorless Blender solution and press it on the blue apron. The problem is that on denim it will soak in slightly, whereas on the plastic
  it just sits on the surface, so as I pressed it on the surface and it "noodged" the ink, it picked it up and smeared it as well. Not what I was going for, but the texture on the apron actually did look pretty cool. Rather than toss it, I went into collage-mode. I deliberately smeared some more around the edges. I used the Stripes/Plaid stencil to create a blue border around the side and top. Then I paste-embossed in Matte Yellow the Tall Daisies and the Summer stencils. Here was another error to fix. The paste seeped under the edge of one portion of the daisies. I waited until it was dry, and covered that area with a couple of Prima flowers with a glittery brad center. I added a doily border along the left edge. A Glossy Blue paste-embossed Hello (from Birthday Words) on a tab/clip was tucked in the side with a ribbon tie. I highlighted all the yellow embossed areas with dots of white ink. The whole effect is bright and summery, and you'd never guessed that it started from an "oops"! The next time you have an "oops", set it aside. You never know when you can use a portion of it for something else, or collage over the mistake to create something totally unique. Speaking of unique, be sure to visit the blogs of the rest of the team (as listed at right), leave all of us some love, create your own bit of fun and link it to the Dream It Up! blog with Mr. Linky.
Dreamweaver Stencils:
LG736 Apron
LL549 Tall Daisies
LM294 Summer
LG704 Birthday Words
LX702 Stripes/Plaid
DMYP Matte Yellow Embossing Paste
DGBP Glossy Blue Embossing Paste
DPK Palette Knife

Plus:
Copic Air-brush System
Copic Sketch Markers
Copic White Ink
Copic Colorless Blender Solution
Prima flowers
Bazzill and Mohawk White cardstock
brad fastener
some type of textured fabric, preferably denim
Staples Tab/Clip
ribbon

Tuesday, May 24, 2011

This Card is a Crack Up!


Another quickie post. This time featuring the Stampendous Perfectly Clear Vases set again. What a  versatile set! To create the "cracked vase" effect, I stamped and embossed in various shades of embossing powders from the Razzleberry Kit the vase. I stamped and embossed it again in Bark on textured brown cardstock. I cut this one in several pieces and adhered them to the original one slightly separating the pieces to reveal the colors beneath. The rest of the card is fairly self-explanatory. To look back at other creations I've posted using this same set, click HERE and HERE.

Sunday, May 22, 2011

Painting with Powder and Proud as a Peacock!


Quickie post today featuring the Blockart Peacock image from Stampendous. I used the "Painting with Powder" technique for this card in that I covered the main panel in Wild Plum Embossing Powder, stamped and embossed in black the focal image over the top, and using a Versamarker and the other three colors in the Stampendous Razzleberry Embossing Kit (my fave!), I filled in and added more color to the image. The end result is sort of a faux cloissone look. The border at the bottom is one of the Class A' Peel Scrollwork Border velvet stickers in Olive, highlighted with a sprinkling of the Dot Sparklers in Holographic black. These same bits of sparkle are also added to the "eyes" of the peacock feathers. Pull out all of your fun Stampendous colors of embossing powders and play with this technique. The results are unique and gorgeous! Happy Monday!

Friday, May 20, 2011

MIxin' It Up with Lizzie Anne Designs Sketch #165!

Quickie post today featuring my version of Lizzie's sketch for Lizzie Anne Designs this week. I've been dying to break out this "In the Kitchen" set, so here was my opportunity! I love the mixer...just like my Kitchen Aid that my hubby bought for me over twenty years ago and is still going strong, mixing up cookies, and cakes, and muffins, and bread. I have the cutest pictures of my kids helping mom mix batches of goodies and licking the beater or the spoon. Of course, my mixer is the traditional white version rather than a wild red patterned one with a yellow bowl. Artistic license...and too much cute paper from October Afternoon and American Crafts to play with! I added little buttons on the top of my muffins and used the fun "Love Muffin" saying to finish it off. I can hardly wait to play with this set again! Now is your opportunity to play along with this week's challenge and post your creation to the Lizzie Anne Designs' Facebook page HERE.