Sunday, April 17, 2011
Stampendous Easter "Hunted" House!
This slightly over-the-top creation was published in the Stampendous October 2010 catalog, and also featured on one of the daily banners for the Stampendous website during National Craft Month in March. It was one of those occasions when you get so wrapped up in playing, that you forget how much time is going into a project. I guess I can't really say that it just "snowballed"...more like just kept "hatching" and "multiplying"! I wove strips of pale yellow cardstock over the surface of the card front for the Easter "basket" appearance. The roof was snipped strips of parakeet cardstock. Little bits of edger punched white for trim on the roof and tiny curtains in the windows. The bunnies and eggs from the Perfectly Clear "Busy Bunnies" were Copic-colored and tucked here and there. A slide out surprise bunny was added with a fun sentiment from the same set. A "sprinkle" of water was created from Multi Crystal Glitter and Dot Sparklers on acetate as seen in the closeup pic at left. I have to admit that a lot of time went into this, and would probably not be something I would be sending to all my friends no matter how much I love them, but I had soooo much fun
creating it. What can YOU do with the "Busy Bunnies"? For more Easter inspiration, please check out the projects on the Stampendous website, blog, design team members, and Facebook page.
Stampendous:
Perfectly Clear "Busy Bunnies" (SSC1103)
Multi Ultra-fine Crystal Glitter (GM220U)
Class A' Peel "Dot Sparklers" (AC672HSS)
Thermo Acetate (PC75)
Tuxedo Black Memento ink
Copic Sketch Markers
Bazzill cardstock
white cardstock
Fiskar Edger Punch
Prima Flowers
brad fasteners and turnmounts
Friday, April 15, 2011
Break Out Your Chocolate Bunnies...It's Lizzie Anne Designs Team Challenge Time!
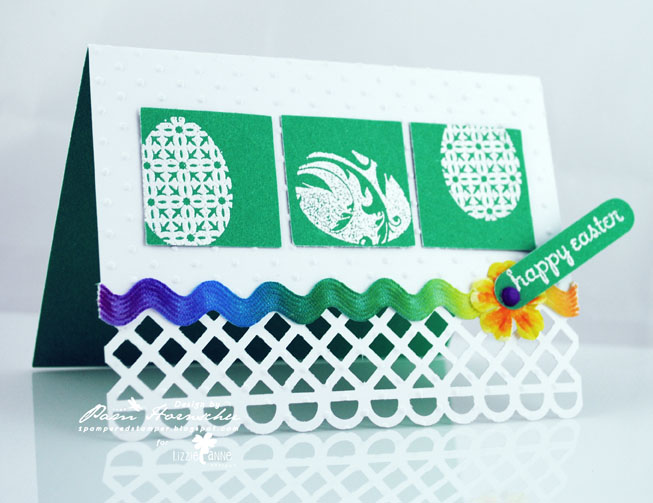
Today is Lizzie Anne Designs team challenge day, and in case you hadn't guessed...our challenge is to create Easter cards! I did two in the same color schemes 'cuz, hey, the stuff was already there and I still wanted to play with it. The first card holds a little treat wrapped in tulle with a cute ribbon bow. The background was stamped with one of the sweet egg images from the Spring Mix, "Follow Your Dreams". The sentiment at the bottom is from the same set. Lots of stencils, borders, and dies were used for added texture and interest. The next card has a Martha Stewart border which is perfect for spring. Two egg images were stamped and embossed in white over the three squares, along with the same sentiment on a tag. I love the rick rack on this. I found it in with my MIL's stash of old sewing supplies.
Be sure to visit all of the team blogs. You will be amazed! Then take your newly inspired self over to the Lizzie Anne site and get your own fun Easter images.
Lizzie Anne Designs "Follow Your Dreams"
Dreamweaver Stencils Large Dots stencil
white and jade cardstock
Cuttlebug dots embossing folder
Martha Stewart edger punch, tag punch
Nestabilities Labels Four
rainbow rick rack, Prima flower
brad fastener
gingham ribbon (Maya Road)
double sided foam adhesive
button, twine
Thursday, April 14, 2011
Simple Dream Schemes
Free challenge week at Dreamweaver Stencils. My post is a super simple beginner basic card for spring. The Bazzill cardstock card is run through the Big Shot with the Sunflowers stencil. (Tip: Spritz back of cardstock with rubbing alcohol for a deep emboss!) I sludge-pasted* the Nestie lacy scallop circle with a mix of Matte Yellow and Orange pastes and only one portion of the Sunflowers stencil. I stamped a tiny bee and appropriate sentiment, added ribbons and you're done! This same card could be created using a wide variety of Dreamweaver Stencils in the same way. For instance, for the holidays...use the Snowflakes stencil to emboss the background with just one snowflake paste embossed (sprinkle glitter on the wet paste). Or emboss the background with any of the wonderful jumbo stencils, and use one of the fun small images for your focal piece. Hurry on over to the rest of the team's blogs as listed at right for more dreamy ideas, create your own, and link to the Dream It Up! blog's Mr. Linky.
Dreamweaver Stencils:
LJ902 Sunflowers
DMYP Matte Yellow Paste
DMOP Matte Orange Paste
DPK Palette Knife
Stampendous Perfectly Clear "Buzzin' Blooms" (SSC1070)
Bazzill Parakeet and Sunbeam Cardstock
white cardstock
October Afternoon paper
Onyx Versafine ink
Nestabilities Lacy Circle die
EK Edger punch, Big Shot
ribbon
*For directions on sludge pasting, click HERE.
Tuesday, April 12, 2011
Simply in Stitches
Looks complicated, but it's not. The Beauty Within image from Lizzie Anne Designs "Follow Your Dreams", was simply stamped and loosely colored with chalks. Four panels of patterned paper were the background for this great image, and the stitching around the outside mimics the sketchy outline of the image and frames it for more impact. I recently saw this great tutorial on creating flowers from patterned paper using a Nestabilities circle or scalloped circle die. So easy and so fun! The centers have pearl stickers. A fab sentiment from the "Follow Your Dreams" set was stamped on the side. Really fun, huh? Be sure to visit the Lizzie Anne Designs blog, Sketchbook, Team blogs, and Facebook page for more inspiration. Hope you have a very creative week!
Lizzie Anne Designs "Follow Your Dreams" Mix Set
Rich Cocoa Memento ink
Decorator Chalks
MME patterned papers
kraft and off white cardstock
Nestabilities Scalloped circles dies
pearl stickers
sewing machine
Monday, April 11, 2011
CROSSing Pretty with Distressed
Quickie post as I'm heading out of town to the NAMTA show in Phoenix, Arizona, with Lynell from Dreamweaver Stencils. Road trip! Lol. Anyway, I'm planning in advance for my blog as I have some challenges and some fun stuff I've wanted to show you. This card was created for the Stampendous October 2010 catalog, which featured Valentine's through Easter and spring. Ordinarily I'm not wild about crosses, but Dreamweaver's has a Celtic styled one that I love, and this one from Stampendous I love. It has a great shape and the flowers just make it more spring-like. I paper-pieced the flowers using the background paper and added Dot Sparklers in the centers. A little distressing takes it from being too "pretty" which pleased me. I know a lot of people are "over" the whole distressed look, but I still like it. I like things that appear to have a history. Be sure to visit the Stampendous web site, their blog, their Facebook page, and the rest of our team of fabulousness as listed at right, for more inspiration. We've all be working like insane people creating for the July catalog. Can hardly wait for you to see all of the amazing samples these girls are creating! You'll just have to wait... ;)
Stampendous Perfectly Clear "Flower Cross" (SSC1087)
Class A' Peel "Dot Sparklers" (AC672HSS)
Rich Cocoa Memento ink
Bazzill Parakeet and Petunia cardstock
patterned paper
circle punches
double-sided foam adhesive
Stampendous Perfectly Clear "Flower Cross" (SSC1087)
Class A' Peel "Dot Sparklers" (AC672HSS)
Rich Cocoa Memento ink
Bazzill Parakeet and Petunia cardstock
patterned paper
circle punches
double-sided foam adhesive
Thursday, April 7, 2011
Bonjour to Friday!

A quickie post for Friday. So busy right now with various creative deadlines, so am posting previous creations. This card features Lizzie Anne Designs "Bonjour" set. I love the old world feel of these images, so I added to the image with shades of distressing inks that mimic age and patina. I originally created this for a sketch challenge for a magazine submission call. I thought it was an interesting sketch, and worked well for highlighting the medallion images in this set. Hope you have a creative Friday and a wonderful weekend.
Lizzie Anne Designs "Bonjour" set
Rich Cocoa Memento ink
Teal Memories Mists
WRMK "Dippity Dots" paper
tan cardstock
Queen & Co. Brads
twine
Dream Schemes Colorway: Teal & Yellow
This week the Dream Schemes Team was challenged to a teal and yellow colorway by our own Kristi. I chose to play with the Hot Air Balloon stencil which had been calling to me for awhile now. First I stenciled Versamark ink through the image twice over the teal cardstock and embossed with pastel yellow embossing powder. Then I paste-embossed the image once and set it aside to dry. Meanwhile, I covered a strip of cardstock with double-sided adhesive, rubbed soap over the back of the stencil (preventing the stencil from being stuck permanently), and glittered the portion of Bird Words stencil that I wanted to use with teal glitter. After I removed the stencil, I filled in the rest of the strip with pastel yellow glitter. By now the paste-embossed piece was dry, so I was able to place the stencil back over the surface. Using a large dauber, I applied Palette Glue over the surface in sections and covered these in the teal and yellow glitters, respectively. I think this card would be great for anyone taking the next step in their lives...a graduate, new employee, or even a retiree! Now is your opportunity to play along. Pull out your teal and yellow crafty goodness, and link your creation to Mr. Linky on the Dream It Up! blog. For some incredible inspiration, visit the blogs of the rest of the team as listed at right.
Dreamweaver Stencils:
LL3003 Hot Air Balloon
LG734 Bird Words
DEP Embossing Paste
MPDS Double-sided Mounting Paper
DPK Palette Knife
KD02http://www.stencilwithstyle.com/access1.htm Jumbo Dauber
GSP Palette Glue Pad
DHHS Hawaiian Soap
Stampendous:
Pastel Yellow Embossing Powder
Pastel Yellow Ultra Fine Glitter
Ocean Spray Ultra fine Glitter
Versamark ink
Bazzill and Coredinations cardstock
Dreamweaver Stencils:
LL3003 Hot Air Balloon
LG734 Bird Words
DEP Embossing Paste
MPDS Double-sided Mounting Paper
DPK Palette Knife
KD02http://www.stencilwithstyle.com/access1.htm Jumbo Dauber
GSP Palette Glue Pad
DHHS Hawaiian Soap
Stampendous:
Pastel Yellow Embossing Powder
Pastel Yellow Ultra Fine Glitter
Ocean Spray Ultra fine Glitter
Versamark ink
Bazzill and Coredinations cardstock
Subscribe to:
Posts (Atom)