Showing posts with label House Mouse. Show all posts

Wednesday, February 25, 2015

More House Mouse Designs® Squee!

I'm not sure if this little guy is "Singing in the Rain" or not, but he should be 'cuz this cute card was super fun to make!

The House Mouse Designs® "Rain Flower" image was stamped and water-colored with Derwent Watercolor Inktense Pencils and a wet paintbrush. Using similar colors, only with acrylic paints instead, I created a Creative Palette print. I brayered some cyan and pthalo green over the palette, allowing to mix slightly, before squirting a bit of Tsukineko® Neon Reinkers in Orange and Yellow into the mix. I laid the Dreamweaver "Rain" stencil on top of the mix, then picked it up and placed it on a panel of the Mixed Media White cardstock to transfer the paint and design. Now the raindrops are a cohesive addition to the previous focal panel. While the paint is wet, I sprinkled a variety of Stampendous Party Fragments over the surface. While this was drying, the base card was Jewel Encrusted with a mix of Color Fragments, Micro Glitter, and Clear Embossing Powder, and a strip of May Arts web was adhered with more goodies. Once everything was dry, the card was assembled, with the final addition being a cute sentiment from the Beary Mice Wishes Perfectly Clear set along with layers of paper flowers, a button, and some twine.


Here's the list to follow to be inspired by the team's mice creations, including the list from Tuesday's creations as well:

Tuesday, February 24th

Pam Hornschu

Amy Hurley-Purdie

Rhea Weigand

Wednesday, February 25th

Stampendous Blog

Pam Hornschu
(you're here)

Kristine Reynolds


Tuesday, February 3, 2015

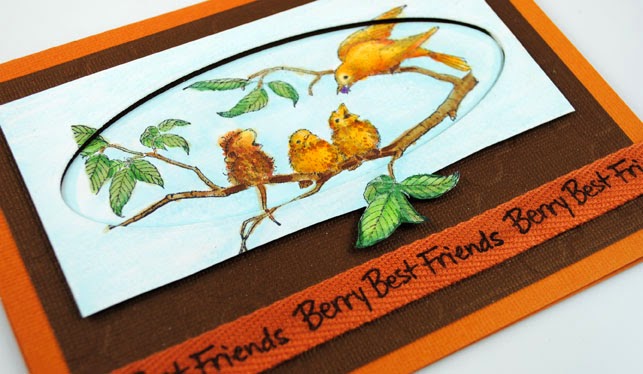
Stampendous: The Berry Besties!

The Stampendous team is celebrating love and friendship this week, and the selection from the catalog is astounding! I felt like playing with the House Mouse Designs® for this.

The Feeding Time image was colored with Copics. The panel was die cut using one of the Dreamweaver Oval Dies. The focal point oval was adhered to the brown cardstock panel that had been machine embossed with the Dreamweaver Quatrafoil background. The remainder of the die cut panel was popped up to add an additional frame to highlight the image. One of the sentiments from the Stampendous Perfectly Clear Beary Mice set was stamped with Onyx Versafine over a length of May Arts Twill ribbon, and adhered as a border.


If you are in the mood for creating Valentine cards, or simply love and friendship, you'll find more inspiration all of this week on the Stampendous Impressions blog. For today, you can visit the list below:

Stampendous Blog

Jamie Martin

Pam Hornschu

Debbie Cole

Jennifer Dove

Amy Hurley-Purdie

Lea Kimmel


Friday, November 21, 2014

Stampendous and Tombow: A Colorful Holiday


The Stampendous gals have really been hopping lately! Yesterday we hopped along with Spellbinders to create some wonderful holiday creations, and today through the 23rd (please ignore dates on banners) we are doing the same with Tombow markers. "Why so much hopping?", you might ask. Because Stampendous products are awesome with everything! Just see what I've created for today:


Those House Mouse Designs® critters are so darn cute, but with some simple coloring of the Rockin' Ride scene with Tombow's beautiful array of colors in wonderful Dual Tip Marker sets, along with their blender pen, you can only increase the fabulosity! And...just 'cuz I can't leave it without some sprinkles...I've added some Stampendous Shabby White Embossing Enamel. You just sprinkle it, and heat from underneath. The larger chunks make the perfect snowfall (even if technically you're not outside, and getting nowhere fast. You have to admit, though, that mouse is really rockin' that reindeer!). I had one spare vellum snowflake left from a previous project that I had die-cut with the new Stampendous Flakes Die set, so I cut it in half and adhered both to the card with spray adhesive.


I hope you've had fun visiting at the Pampered Stamper, and that you'll continue to enjoy the other team members as they play with this great mix of Stampendous and Tombow. The prize package is the Stampendous Cling Jumbo Top Hat Snowman (cute, cute, cute!), a jumbo acrylic handle (need), and a set of Tombow Dual Tip Markers including their Blender Pen (awesome!).


Now is your opportunity to visit the members of our team who are posting for this occasion. Don't forget to leave a comment with each for a chance to win the prize!

Stampendous Blog

Tenia Nelson

Kristine Reynolds

Debbie Fisher

Amy Hurley-Purdie

Melissa Cash

Pam Hornschu

Tombow Blog

Stampendous has a new challenge for the month,  So Thankful! We would love to see your next project in the gallery.


Saturday, August 17, 2013

Dreamweaver and Woodware UK: Christmas in August...the Tradition Continues, Day Six


Welcome to the grand finale of the annual Dreamweaver and Woodware Christmas in August extravaganza week! Monday through Saturday we've been knocking your Christmas stockings off with fun and inspirational ideas for the upcoming holidays. All that you need to do is hop back and forth across the "pond" on each day, oohing and aaahhhing as you go, and leaving us plenty of holiday love. In return, you'll be entered to randomly win one prize package for a UK commenter, and a second prize package for a US commenter, featuring products distributed in the UK by Woodware...including Dreamweaver and Stampendous!

Prize includes four stencils, one die, and two stamps, selection may vary.


Here's what I've created for today:


No cheating today! I made sure that I had the time to create this cutie! I've always loved House Mouse images, and I'm so excited that Stampendous is the manufacturer on these little guys, and that Woodware UK will be carrying them as well!

Once again I've had the opportunity to combine two of my favorite companies, Dreamweaver and Stampendous. This House Mouse image is "Berrying Gifts", which I've stamped in black, and colored and blended with markers. Then I placed the Dreamweaver Snow Splatter stencil over the top, and paste-embossed with Regular White Embossing Paste, and sprinkled Stampendous Fine Crystal glitter over the wet paste and set it aside to dry.

Meanwhile, I also paste-embossed in white the Dreamweaver Pine Cones stencil on clear acetate, and heaped more crystal glitter over the surface. While both pasted items were drying, I worked on the card base...a large square white card, with a layer of created plaid over the top. I actually had this panel sitting in my "kibbles and bits" basket...where I save the pieces that were too good to throw away. The panel was created by inking the Plaid/Stripes stencil with Blue Lagoon ColorBox Chalk Ink and running it through my Big Shot with the cardstock panel. (Warning! Do not EVER run the Plaid/Stripes stencil through any machine with the "stripes" going crossways, they should always enter the machine parallel with the sides of the platform!) After the blue bands were created, I cleaned the stencil, and inked once again with Yellow Cadmium ColorBox Chalk Ink. Remember...the stencil goes in parallel, so it is the paper that must turn 90° before being placed on the stencil, and running it through the machine to create the plaid. By the way...you do know how to do the proper sandwich for stencils in these machines, don't you? Just in case...

     1) base platform, 2) stencil, 3) paper, 4) rubber embossing mat, 5) TWO clear plates!

When the pasted sections were dry, everything was layered, and the acetate sheet folded over the top of the card, and held in place with bright red brad fasteners. For a little more dimension, I added a drop of Glossy Accents on each berry.


Now's the time for you to leave a comment and move on to the next designer for today: