Showing posts with label #StencilDuos. Show all posts

Thursday, February 4, 2016

Stencil Duos, Dreamweaver, and Tombow Sticky Stuff


Yes, once again we're mixing it up this week, and fortunately, it is all product that is perfect together! Yay! Here's what we've got going:

1. Dreamweaver Thursday. 2. New Release Stencil Duos. 3. Tombow's adhesive products.
Obviously, the first and second are a given together, and the third is pretty much a necessity in papercrafting, and the products that they carry work well for the heavier projects as well!

The card that I've created for today's post features the new Butterfly Duo set, and as you can see by the picture below, it comes with TWO stencils, a doodling pen, and a set of small cards. Perfect as a grab and go for a vacation or business trip where you might want to do a bit of creative fun, but don't want to haul EVERYTHING with you!

One of the stencil designs is an open shape, and the other is a pattern. They're awesome together or apart, and as you can tell by the packaging, you can add doodling to both! Here's what I've done...

c
Beginning with a My Colors Cardstock by MME Charcoal base, I've created a six-inch square, top-fold card. I've place the Dreamweaver Quatrefoil stencil over the surface, and taped in place with removable tape before using a large stencil brush to rouge Tuxedo Black Memento ink over the design for a tone-one-tone look.

Next, I used one of two panels of Rose Chintz canvas cardstock from MCC to ink stencil the pattern stencil from the Duo set over the panel using a large stencil brush and a mix of Lady Bug, Rose Red, and Tangelo Memento inks over the surface. I stamped one of the curved sentiments from the Perfectly Clear Thoughtful Wishes set in black ink toward the right in preparation for the butterfly wings. The panel was then adhered to the card front.


The first step of the butterfly was to paste-emboss the pattern design on the second panel of rose chintz  cardstock using Dreamweaver Matte Black Embossing Paste. The stencil was removed  carefully to be cleaned and dried, and the panel set aside to dry approximately 15-20 minutes. When dry, the pattern stencil was placed back over the surface, and VersaMark ink was daubed over the pasted area, and then sprinkled with Stampendous Kaleidoscope Embossing Powder. This was heated to melt the powder.

The butterfly design was placed over the panel, and traced with a black marker. The wings were cut out, and adhered to the card as shown using Tombow Foam Tape. Two strips of black ric rac were adhered across the bottom using the Tombow Glue Pen.
   

Remember...we have a hop going on today through Sunday, the 7th, so leave a comment for each post from the hop for your chance to win one of these prize packages...


Looking for more sticky stenciled duos? Check out the links here...


Pam Bray (DW)


Kristine Reynolds (DW and Tombow)

Pam Hornschu (DW and Tombow) You're here!

Tenia Nelson (DW and Tombow)

Laura Drahozal (DW and Tombow)

Wednesday, February 3, 2016

Up, Up, and Away with New Stampendous Stencil Duos!


Stampendous has just released in January a new line of stencil designs by our own Fran Seiford! Six sets of "Stencil Duos", each with two stencils (as the name implies), one of which is an open design, and the other is a patterned design. Designed to work together in layers, or apart, they provide a huge variety of applications to everyday use. Even better, they come with a fine-line black doodling pen, to create your own designs inside the open stencil or the pattern, and with a set of cards to immediately begin your creativity as soon as you pop these out of the package!

The set that I'm featuring for today is the "Balloon Duo", and I simply LOVE the pattern that goes with it.
I created a tent-fold card using My Colors Cardstock in Madras Blue. I ink-stenciled the front of the card by repeating the pattern design over the front using a large stencil brush with Electric Blue Radiant Neon ink from Tsukineko®.

I placed the open balloon stencil over the top, and traced inside of it with a pencil. Using a craft knife and mat, I carefully cut along the lines to remove the balloon, leaving an open window. I stamped the sentiment in black ink from the Perfectly Clear Birthday Assortment set.

Now the real fun starts...

Using a wet Creative Palette Rectangle, I squirted on a few drops of Radiant Neon re-inkers in the Electric Blue and Green. I used a brayer to mix the colors slightly. I had some precut panels of Mixed Media White cardstock at the ready, which I swiped across the inky surface, getting as many panels as possible, spritzing with water in between, and even brayering the ink onto some of the cards. They were all set aside to dry, and the brayer and palette were cleaned in mild soapy water and rinsed.

I selected one of the dry panels, and placed the pattern stencil on top, taping on all four sides with removable tape. I placed a large dab of Dreamweaver Glossy Black Paste on the edge of my Paste Spreader with my palette knife, and proceeded to spread it across the prepared stencil at a 45˚ angle. If necessary, you can swipe across again to remove all of the excess paste, which you'll use your palette knife to place back into your jar. Clean the edge of the jar, and put the lid on tightly. Carefully remove the tape from three sides, using the fourth as a hinge to protect your pasting as you lift away the stencil to be cleaned immediately. Set the panel aside to dry approximately 30-50 minutes.

Once dry, the panel was adhered inside the card to be seen through the "window". A May Arts Chevron ribbon and black cord were tied and adhered to the card with a bit of Zip Dry from Beacon Adhesives®.

Can't get enough of these new "Stencil Duos"? Either can we! Check out whose playing today:

Pam Hornschu (you're here)

Wednesday, January 27, 2016

New Stampendous Stencil Duos with May Arts YUM!

2016_STM_MayArtsbanner

In my opinion, anytime that you want to take a project to the next level, anything May Arts is the line to go with! Both Stampendous and Dreamweaver Stencils have been "Partners in Craft" with May Arts for the past few years, and the reason is simple...WE LOVE MAY ARTS! We're hopping all of this week, and we've got some super prize packages up for grabs...take a look!

See Stampendous Official Contest Rules for details.

2016_STM_MayArts_prize2

My post today features another one of the new Stencil Duo sets designed by Fran Seiford. This one is "Balloon Duo", and as with the other sets, includes one "open" stencil (balloon), and one pattern stencil. Both can be layered and used together, or separately. The sets include a doodling pen, and a small set of notecards.

Beginning with my Creative Palette Rectangle, I placed several drops of Radiant Neon Reinkers in Electric Blue and Electric Green from Tsukineko®, and sprayed with water to mingle the colors. A square panel of the Stampendous Mixed Media White Cardstock was placed on the surface to transfer the swirled ink.

When dry, the same panel was used with the pattern stencil over the surface, and the same ink colors (in inkpad form) were ink-stenciled randomly over the surface, rotating the stencil.

The Balloon stencil was placed over the panel, and I lightly rouged the blue ink around the inside edge of the design, before pasting the balloon design with Translucent Embossing Paste. While wet, the paste was sprinkled with Stampendous Micro Crystal Glitter, and set aside to dry.

Corners were rounded on the panel, before layering it onto a white Fitted Frame Set A, matted with a teal frame. The pretty May Arts Sheer Satin Band ribbon in Seafoam was added to the balloon. The panel was adhered to short flap card created from My Colors Cardstock with Spearmint on the outside, and Caribbean Sea adhered on the inside to match the mat on the square.

A strip of May Arts Adhesive Scallop Border in Robin's Egg Blue was adhered along the flap edge, for feminine detail, and the front of the card was stamped with the Cling Birthday Gorgeous sentiment in Teal Zeal Memento ink from Tsukineko®.


Be sure to leave a comment before moving on to these other talented teammies...

Pam Hornschu (You're here)

Wednesday, January 20, 2016

Doodles and Hearts and Duos = LOVE!


 I really LOVE how this card turned out! It features just one of the new Stencil Duo sets designed by Fran Seiford. Each set provides two stencils (one open design, and one pattern design), along with a doodling pen and a set of small white notecards. This set is called "Heart Duos".

My card base is a soft purple, stamped and embossed in black using the "Cling Penned Love" sentiment. A green panel has been run through my Big Shot Pro to emboss the pattern design, and a green ink has been brushed over the raised surface to highlight the design. The corners have been rounded, and the square panel has been matted in white  before being adhered to the card using Zip Dry adhesive.

The focal point is this beautiful heart, layered with the pattern stencil on the bottom, and the open heart over the top, taped to the Mixed Media cardstock. The design has been traced using the included pen. The patterned stencil has been removed, and the heart traced around the design. Doodles have been added with the pen as well, and the pattern has been colored with markers.

With the open heart back over the surface and taped on all four sides with removable tape, and using the Dreamweaver Paste Spreader, Translucent Paste has been swiped over the surface. The stencil has been carefully removed to be cleaned with water and a soft nail brush. The panel has been set aside to dry. Once dry, the heart was cut out, and popped up over the patterned green square with foam tape.

Want some more LOVE? Head over to these talented teammies!

Jamie Martin (Monday link)

Jamie Martin (Tuesday link)

Jamie Martin

Tenia Nelson

Kristine Reynolds

Amy Hurley-Purdie

Pam Hornschu

Wednesday, January 6, 2016

NEWLY RELEASED and Radiant!

STM_IC_blog banner

Does your stamping and stenciling "Go to eleven"*? After this week it sure will! All this week the Stampendous/Dreamweaver team are "amping" up their projects with products from Imagine Crafts®...specifically the new Radiant Neon Amplify inks, and their Radiant Neon counterparts. Wonderful colors that soften and grow when heated, adding incredible dimension to all your creations! You can learn about them HERE.

As usual there will be fantastic prizes as shown below. All you need to do is visit the Stampendous Blog each day this week, following the links, and leaving comments about what YOU love best! 
See Official Contest Rules for details.


My project today does not feature the Amplify inks, but you'll see an awesome project that I created with those tomorrow (no brag, just fact!), so be sure to visit again! The card below shows off the Radiant Neon inks in all their bright and happy color, and are perfect to use with the Stampendous Newly Released Stencil Duos designed by Fran Seiford. These come in sets that include two square metal stencils (same material as the Dreamweaver ones are made with), with one of them being an open design, and the other a pattern design, to be used separately or together. They also come with a black liner pen for adding your own tangles and doodles to the designs.

k
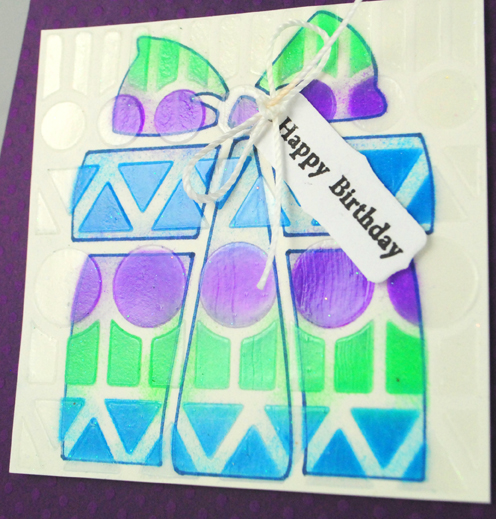
Electric Blue, Purple, and Green have been used to ink stencil Fran's NEWLY RELEASED Stencil Duo Gift on just the package portion on a white square panel. Here's how...

1. Place the pattern stencil over the white panel, and adhere with removable tape.
2. Place the open shape over the pattern, and tape as above. (This will mask off the area of the pattern that you won't want showing, but still color the design where you do want it.)
3. Use small stencil brushes to "rouge" (circular motion) the inks into the design. Use a Picasso tool to keep color out of the sections that will be different.


4. Remove stencils. Replace just the open stencil and trace around inside edges with the black lining pen included in the set. Remove stencil to clean.
5. Replace pattern stencil only over square, and tape all sides. Spread Translucent Embossing Paste over surface, so that the colored pattern is shiny, and rest of the pattern is clear and shiny. Remove stencil to clean immediately, and set square aside to dry.
6. Adhere panel to card, and embellish as desired.


 For more radiantly bright ideas, check out our players for today...

Pam Hornschu (you're here)

*References a quote from "This is Spinal Tap: The Movie".