Thursday, April 14, 2016

A Stampendous, Dreamweaver, and Graphic 45 Voyage

STM_G45_banner 

I hope you've hopped aboard our Voyage Beneath the Sea each day this week! We've had a whale of a good time playing with all of our Stampendous and Dreamweaver ocean-themed products mixed with Graphic 45's wonderful collection of papers. Remember to leave comments on all posts this week for the chance to win one of three whopping prize packages. Details can be found on the Stampendous Impressions blog.

Here's what I'm sharing for today...


I've created a window on the world beneath the sea, which includes a bit of unexpected ocean delights like mermaids and steampunk octopi! There are two sides to this sea world...the first featuring a large worded image and teal paper from Graphic 45, along with stamped, colored, and die cut shells from the Stampendous Cling Seashells collection.


On this panel is also a Matte Black Embossing-pasted "Oi Oi" fish, which has been covered in Stampendous Aged Teal Embossing Enamel, and the same paste for the Dreamweaver "Under the Sea" stencil design.


There is also an acetate insert on which the sea weed stencil/template from the stamp set was used to paste-emboss the design with a mix of Dreamweaver Pearlescent Paste with Tsukineko® Radiant Neon green and blue re-inkers. Once pasted, these panels were covered in clear glass tiny beads.


On the second side, I've used the panel of paper featuring the Graphic 45 mermaid, on which I've paste-embossed in black the Dreamweaver Jellyfish and Sea Turtle. These have been covered in Aged Teal and Aged Hunter EE and heated as well, along with a sprinkle of Aged Black speckles.

 
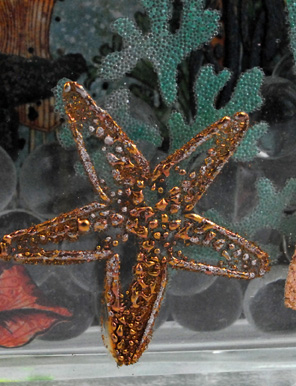
This side also has a panel of the same pasted seaweed, and the glass on the outside has been paste-embossed with the Dreamweaver Starfish, Small Scallop, and the Nautilus design. All of these used Metallic Gold Embossing Paste, and Aged Ochre EE on the first two, and a bit of Aged Gold and Rose Gold Embossing Enamel on the nautilus.

 
 
I used Beacon Adhesives' Dazzle Tac to adhere the double-sided panel to the center of the glass block (Pittsburgh Corning®). On either side of the panel, clear glass marbles were added for the bubble effect, and to keep everything in place.


Here's the rest of the crew on board for today...


Woodware: Vintage and Lace


I love to create a vintage look, and this post is no exception...my inspiration being the Clear Scrap Deco Frame. To give the frame some age, I applied Dreamweaver Color Solutions alcohol inks in Aspen Leaf and Creme Brulee to the back of the frame. The front of the frame was stamped with one of the images from the Stampendous' Natalie Kalbach Cling Studio Fiesta set and black StazOn ink. The template that comes with this stamp set is the profile of the man and woman, which I traced onto black cardstock, cut out, and ran through my Big Shot with the Dreamweaver Damask stencil. Some Clearsnap Crafter's Snow ink was swiped over the embossed surface, and the silhouette was adhered to the top of an ink-distressed section of a music sheet. This was then cut to fit the opening and adhered to a piece of acetate cut slightly larger than the opening. I used a decoupage medium to adhere the music section to the acetate. More was brushed over the top, and Stampendous Fran•tagĂ© Mica chips were sprinkled over the wet finish. This was set aside to dry. At this point I shifted my focus to my background.

I knew that I wanted to create a background that would make my framed couple the focal point. I started with a square piece of black chipboard, which I ink-stenciled with the white ink and the Dreamweaver Stripes stencil. A narrow panel of ivory cardstock was ink-stenciled with the Damask stencil again using Dark Cashmere and Venetian Lace die inks from Clearsnap® . Velvet and lace ribbon from was adhered along the edges of this panel. Now I could put the rest of this together...

The acetate piece with the music and silhouette were adhered to the panel. The frame was popped up over the top using dimensional glue dots. To embellish the frame, I stamped the flower image from the Fiesta set multiple times on the scraps of music sheet, and spritzed them with Clearsnap Premium Dye Ink Sprays in Banana and Chocolate. I cut them, loosely following the line of the design, and curled and "smooshed" them  into layered flowers to adhere along the edges. Some plaid ribbon was looped and tied with a piece of twine and a vintage button to add to the frame. The same ribbon was wrapped around the handle of the wood frame. The final touch was two Dreamweaver die cut ovals layered, with the Stampendous Cling Mr. & Mrs. stamped in black ink. This too was popped up on the framed project. Oh, wait...I forgot the most important elements that I added...glue on the edges on the flowers with Stampendous Gold Crushed Glass Glitter for extra vintage charm.

Wednesday, April 13, 2016

Under the Sea? With Graphic45 and Stampendous!

STM_G45_banner

All of this week, in addition to introducing our new designs from the April catalog, we are also showing off projects where Graphic 45's Voyage Beneath the Sea collection has been part of the inspiration. And yes, there are prize opportunities by visiting and commenting on all of our team's blogs this week. All the info can be found on the Stampendous Impressions blog. Here's what I'm sharing for today...


Though maybe not "beneath the sea", this card has a fish, and is under water. And though it may only have a small strip of the Graphic 45 paper, it was the perfect addition to this design as it brings out the color of the goldfish, and the fan/shell pattern mimics the scales and tails of our fishy friend below.


Just adhering my colored (Copic Sketch Markers) House Mouse Designs® "Fishy Kiss" to the card would be fine, but I really wanted to give it a bit more of the "fish bowl" look. So I CASEd a technique from my good buddy, Louise Healy, as shown in this post HERE. Using the new Stampendous Fitted Frames "A" set, I placed three nested sizes of frames together (taping them with removable tape helps keep them together), and cut out the sections highlighting the fish and the mouse lips (do mice have lips?). When adhering them to my card, each section used thin strips of foam tape in graduated thicknesses or layers, with the center coming out the most. Btw, using the same Fitted Frames set, I die cut the long strip of the Graphic 45 paper, stamped the cute sentiment from the Perfectly Clear House Mouse Designs® "Hoppy Wishes" at the top, to raise higher than the top of the card.


Just in case you're not ready to come up for air, here are the links for more fun "beneath the sea":

Friday, April 8, 2016

Sprinkles of House Mouse Designs® with Friends


This week and next, we're having a different kind of blog hop, including friends on the other side of the world and across the pond. this will include the Woodware UK team, the Stencil Specialists in Australia, the House Mouse and Friends team, and of course...the Stampendous team. All of us will be playing along with the team on the House Mouse and Friends Blog. Everyone will be challenged to use a stencil with their House Mouse Designs® by Stampendous. What makes this hop really different is, in order to win one of the amazing prize packages available, YOU need to play along with the challenge as well! Just submit your own creations HERE using the Linky tool for the HMFMC #215 challenge. There will be three prize packages available, each including ONE House Mouse Designs® Cling Rubber Stamp, plus ONE Large Dreamweaver stencil, and ONE jar of Dreamweaver Embossing Paste.

Here is what I've created for this challenge...


Did you ever think you'd have an opportunity to break out your Stampendous Creative Palette* to use along with House Mouse Designs®*? I did just that to create this card featuring the Cling "Rain Flower"* stamp image. Various shades of neon re-inkers were dropped onto a slightly wet Creative Palette* before using a brayer to blend the colors slightly. Panels of Mixed Media White* cardstock were placed over the wet ink, and swirled a bit, transferring the ink to the panels. (Keep wetting the ink a bit with water to get more panels until you've run out of ink. This makes it easier to clean your CP, plus provide you with cool backgrounds for future use.) On this particular panel, I sprinkled the wet ink in patches with Stampendous' "Spoonful of Confetti" Essentials mix*, and heated until melted and shimmery.


The little cutie was stamped in black ink, and colored with markers in bright colors.


Follow the link list below for more inspiration. We'd love for you to leave comments as you go, but that will NOT be how you could win a prize. You must link your creations following the House Mouse and Friends Blog stipulations! Oh, I forgot to mention, EVERYONE is eligible to win!


*Items with an asterisk can be purchased online at Stampendous, or through stores listed HERE in the USA, or through the Stencil Specialists in Australia HERE. Links in blog post are for those shopping through Woodware UK's Stockists.

Thursday, April 7, 2016

"So Big" with House Mouse and Friends Challenge and Dreamweaver by Stampendous


This week and next, we're having a different kind of blog hop, including friends on the other side of the world and across the pond. this will include the Woodware UK team, the Stencil Specialists in Australia, the House Mouse and Friends team, and of course...the Stampendous team. All of us will be playing along with the team on the House Mouse and Friends Blog. Everyone will be challenged to use a stencil with their House Mouse Designs® by Stampendous. What makes this hop really different is, in order to win one of the amazing prize packages available, YOU need to play along with the challenge as well! Just submit your own creations HERE using the Linky tool for the HMFMC #215 challenge. There will be three prize packages available, each including ONE House Mouse Designs® Cling Rubber Stamp, plus ONE Large Dreamweaver stencil, and ONE jar of Dreamweaver Embossing Paste.

Here is what I've created for this challenge...


Has the House Mouse and Friends hop "measured up" these last two weeks? We hope so! How about this darling House Mouse Designs® Cling "Measuring Up" image, stamped in black Memento ink, and colored with Copic Sketch markers? The colored image has been die cut with the Dreamweaver Nested Frames die set, and inked around the edges. A sentiment from the Stampendous Perfectly Clear House Mouse Designs® "Hoppy Moments" set.

The background was created using the Dreamweaver I Beams stencil machine-embossed on the Core'dinations' Chalk Core cardstock in the soft golden color. I used a sanding block to reveal the color from the embossed surface. The completed panel was adhered to a kraft card along with the focal panel. A couple strips of "measuring tape" trim was adhered to mimic the ruler in the image.


Follow the link list below for more inspiration. We'd love for you to leave comments as you go, but that will NOT be how you could win a prize. You must link your creations following the House Mouse and Friends Blog stipulations! Oh, I forgot to mention, EVERYONE is eligible to win!

Saturday, April 2, 2016

House Mouse Designs® with Friends Across the "Pond"


This week and next, we're having a different kind of blog hop, including friends on the other side of the world and across the pond. this will include the Woodware UK team, the Stencil Specialists in Australia, the House Mouse and Friends team, and of course...the Stampendous team. All of us will be playing along with the team on the House Mouse and Friends Blog. Everyone will be challenged to use a stencil with their House Mouse Designs® by Stampendous. What makes this hop really different is, in order to win one of the amazing prize packages available, YOU need to play along with the challenge as well! Just submit your own creations HERE using the Linky tool for the HMFMC #215 challenge. There will be three prize packages available, each including ONE House Mouse Designs® Cling Rubber Stamp, plus ONE Large Dreamweaver stencil, and ONE jar of Dreamweaver Embossing Paste.

Here is what I've created for this challenge...


Those rascally mice are at it again! This time they're stealing all of the cookies in a well-executed plan of thievery in the House Mouse Designs® "Cling Cookie Bandits"*. Somewhere, I'm sure, is a wanted bulletin, because who wouldn't want these critters?


The image has been stamped in black ink, and colored with markers, and in an attempt to mimic the green of depression glass, the jar has been colored and shaded in greens, brushed over the surface with Translucent Embossing Paste*, and is casting a reflection through the "glass" onto the delightful wallpaper. The wallpaper has been achieved by masking off the image before placing the Dreamweaver Pattern Background* stencil over the panel, and ink-stenciling in brown using a large stencil brush. Sprinkles of Stampendous "Spoonful of Rust"* were added to the completed card and heated to "encrust" them all together, suggesting a mess of cookie crumbs left behind with footprints to be collected as evidence by the crime lab.


Follow the link list below for more inspiration. We'd love for you to leave comments as you go, but that will NOT be how you could win a prize. You must link your creations following the House Mouse and Friends Blog stipulations! Oh, I forgot to mention, EVERYONE is eligible to win!

Please note...my post will go live on Saturday, April 2nd, for the Woodware Witterings blog; but the rest on this list will not go live until Monday, April 4th.

*Items with an asterisk can be purchased online at Stampendous, or through stores listed HERE in the USA, or through the Stencil Specialists in Australia HERE. Links in blog post are for those shopping through Woodware UK's Stockists.


Friday, April 1, 2016

Resting with House Mouse and Friends with a Touch of Dreamweaver


This week and next, we're having a different kind of blog hop, including friends on the other side of the world and across the pond. this will include the Woodware UK team, the Stencil Specialists in Australia, the House Mouse and Friends team, and of course...the Stampendous team. All of us will be playing along with the team on the House Mouse and Friends Blog. Everyone will be challenged to use a stencil with their House Mouse Designs® by Stampendous. What makes this hop really different is, in order to win one of the amazing prize packages available, YOU need to play along with the challenge as well! Just submit your own creations HERE using the Linky tool for the HMFMC #215 challenge. There will be three prize packages available, each including ONE House Mouse Designs® Cling Rubber Stamp, plus ONE Large Dreamweaver stencil, and ONE jar of Dreamweaver Embossing Paste.

Here is what I've created for this challenge...


Featuring the Cling House Mouse Designs® "Sunflower Smile", which I've stamped in Rich Cocoa Memento ink on kraft cardstock and colored with Copic Markers, this card is full of warm fuzzies.


I've ink-stenciled a portion of the Dreamweaver Honeycomb design in the backgrouond, and added the sweet Cling Moment's Rest sentiment. The focal panel has been layered on green cardstock, and adhered onto a card created from Canvas Corp dotted cardstock, embellished with a strip of May Arts web ribbon, and sprinkles of Stampendous Color Fragments in Caramel.


Follow the link list below for more inspiration. We'd love for you to leave comments as you go, but that will NOT be how you could win a prize. You must link your creations following the House Mouse and Friends Blog stipulations! Oh, I forgot to mention, EVERYONE is eligible to win!