


 If you are here for the Dreamweaver Stencils' Colorway challenge this week, click HERE or scroll through this post. This post features a card that I did for the Split Coast Stampers sketch challenge #354 based on this sketch at left. I've been having fun with this Four Seasons stencil from Dreamweaver Stencils lately, so chose to "sludge" paste just the fall image of the stencil. "Sludge" pasting means to use a slight mix of various colors...in this case red, orange, and yellow embossing pastes from Dreamweaver. I placed a small amount of each in a little disposable plastic cup, and stirred the colors together a little before spreading the paste over the stencil. I had only mixed about one tablespoon of the paste mix, but was still able to stencil about four panels with this technique. When the paste was dry, it was layered on the card over Bazzill Dotted Swiss kraft and smooth kraft cardstocks, plus this perfect for fall paper from Reminisce. I used my favorite new edger punch from EK on the dotted band across the card. The sentiment is a wonderful one from Lizzie Anne Designs, which is now a line featured at Gourmet Rubber Stamps. I really loved this sketch design, and was quite pleased with the end result. Think I just may have to create another card with this sketch...how about joining me?


 This week the Dream Schemers are playing with a new colorway...pink and black, suggested to us by team leader, Deborah March! Since I am desperately trying to accumulate a pile of holiday cards for my list of friends and family, I thought I'd see about creating a Christmas card in pink and black. Definitely not traditional! This may look like a rather involved card, but actually it's fairly easy to create in multiples, as you are embossing this Christmas Tree in Core'dinations cardstock and sheets of the Mercart Colored Aluminum (available through Dreamweaver Stencils). Both of which can be sanded, once embossed in the Big Shot (or whatever die-cutting/embossing machine you might have). To coordinate the two colors better, I replaced the stencil over the embossed and sanded panels and sponge inked the raised areas with Black StazOn ink. The trees were cut out and cut into sections that are adhered to the card front...varying the strips of metal and cardstock, and occasionally turning a strip of metal over and using the silver aluminum side (I did age these strips a bit with the black ink). I placed a Cloud 9 Epoxy Sentiment over a scrap piece of the pink metal, cut it out, and adhered to front of the card. I used a piercing tool around the edges of the tree, a ribbon bow, pompom (of course!), and one of the three inch corsage pins available through Dreamweaver Stencils as well. You can see how easy it would be to create a few of these at a time as you have multiples of the strips of embossed pieces to use. I'm guessing that the rest of the team has been having fun with this pink and black colorway as well...go check them out! Want to play along? Create your own and link it to the Dream It Up! blog! We'd love to see what you do with pink and black, too!


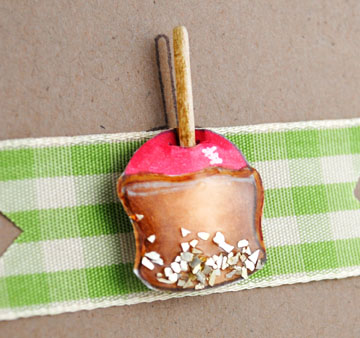 I created this "Caramel Apple Kit" based on this one little cute image from the new "Tart & Spice" set from Gourmet Rubber Stamps (Lizzie Anne Designs' line). I colored the tiny caramel apple with Copics and coated it in Ranger's Glossy Accents before sprinkling the very bottom with a few of Stampendous' new Fran-tage Elements Glass Glitters. Granted, no one would want to eat glass glitter...chopped nuts would be sooo much better, but I was going for the "feel", not exact. The apple was cut out and attached to half of a toothpick. A layered border, a strip of gingham ribbon, and the fall sentiment were perfect for the simple look I was going for. Tucked in with this galvanized tin, which has a stamped fabric decoupaged border and lace, filled with apples, caramels, and sticks...this is the perfect quick fall gift for family and friends.


 It's Saturday once again (just in case you weren't sure), which means it's time for a Stampendous post again. For the month of October, our challenge is to create CAS (clean and simple) holiday cards, in other words...something you wouldn't mind making in mass quantities. Personally, I create a large variety of cards to mail for the holidays, but I do tend to do in groups of five or ten of each style. In this case, I created a set of three, complete with envelopes to match. It just happens that the stamp images that I used for this set, the Stampendous Jumbo Cling Sparkle Joy set, is the prize YOU could win by playing along with us this month. Just link your CAS creation to the Linky on the Stampendous Impressions blog. You can submit as many times as you would like up until November 3rd, 11:59 EST, and using the Stampendous images is not a requirement...but we love it when you do! :)
 My set uses these pretty pastel tall cards from DCWV that I've had sitting around forever, and kept forgetting that I had. I stamped and embossed the Joy image with Versamark ink and Winter Wonderfland embossing powder (white with glitter in it...perfect for winter!). Then I cut panels of this cute MME paper and stamped and embossed the Snowflakes image from the same set. The addition of half of a Jumbo Class A' Peel Velvet Snowflake, and one Pink Dot Sparkler were the only embellies. I used coordinating Memento inks to stamp the snowflakes on the matching envelopes. Super simple! Check out the rest of the team blogs:


