Tuesday, July 19, 2016

Summertime Birthdays Can Be So Cool!


The Woodware team are celebrating summertime birthdays this week. Since my own birthday is the 24th of June, I qualify. I never liked having a summer birthday growing up, as school was over, leaving me with no chance to treat my class to cupcakes, or to feel like a "big deal" to my classmates. On the other hand, our family vacations were usually right after school was out in June, so my birthday was celebrated on one of our holidays. On one of these, we met up with both sets of grandparents in Montana. My grandmother on my father's side somehow had baked me a chocolate cake, but there were no candles for the top. So my Gran (mother's side) used pink nail polish to paint some matches to stick on top of the cake. I had to blow them out really quick! It was one of my best birthday memories!

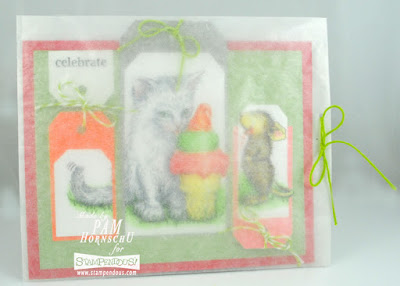
Now that I've reminisced, I'll share with you this sweet House Mouse Designs' card that is perfect for a summertime birthday. No chocolate cake here, but there is plenty of icy cold ice cream to be shared! The image is the House Mouse Ice Cream Kitty, and has been colored with markers in yummy sherbet colors, that also happen to match some very bright tags and cording.


For the fun of it, I placed the card in a translucent envelope so that the recipient gets a "sneak peek" at their lovely card. I happened to have the envelope on hand, but you can easily create your own with the Artemio Envelope Template and Vellum Paper.


Yummy! I just had to add a few ice cream drips off the mouse, because...hey! Ice cream can be messy, especially in the summer! I added a very simple sentiment from the Stampendous Birthday Assortment clear stamps on a small part of tag for a unique styling to this card.


Be sure to check the Woodware Witterings blog each day this week for more summertime fun!

Wednesday, July 13, 2016

With a Little Bit of Luck


Graduations aplenty have been swarming this season, and I wish every single one of the graduates, "a little bit of luck", as navigating this world is never easy.  It also happens to be the weekly challenge for the Woodware team. Sometimes with luck, the stars need to be aligned just perfectly, for all of that hard work to pay off. And speaking of stars...don't you love the Star Swirls stencil from Dreamweaver? For this card, I've pasted it in silver, and sprinkled it with Stampendous Aged Black Embossing Enamel. When heated all of these items melt and bubble for beautiful shine and texture. This panel was popped up above the card base with the Dreamweaver Dot Spiral pasted in Glossy Black for a cool black on black effect. A strip of the negative portion of die-cut letters from the Dreamweaver Alphabet set was adhered over mirror cardstock to finish the card. If you've missed the rest of the team posts this week, head on over to the Woodware Witterings blog.


Thursday, July 7, 2016

Color Blocking with Woodware


This week on this side of the "pond", the USA have been celebrating our "Independence" from YOUR side of the "pond". Lol. Good naturedly, of course. Our theme this week on the Woodware blog is "Colorblocking", which is always an effective way to highlight an image in a different way. For my Fourth of July/Independence Day card, I used three colors of core paper, designed to be embossed and then sanded to reveal the design. The design that I chose was the Dreamweaver Fireworks Embossing Folder, but can easily be done with the stencil version as well. I had one large panel of each color to run through my embossing machine with the folder. Once embossed, they were sanded lightly to reveal the design, and cut into thirds to be adhered on three cards.


The sentiment uses images from a few Stampendous Perfectly Clear sets, including the Vintage Alphabet set. This same design would work well for several occasions, including Christmas, as it's a quick way to complete three cards at once! For more color-blocking ideas, visit the Woodware Witterings blog.


Friday, July 1, 2016

Woodware/Crafty Cardmakers Challenge

The Woodware team are playing along with the challenge at Crafty Cardmakers once again. This time the theme is "Shabby Chic". I thought this canvas would be perfect for this.


Featuring the Stampendous Birds with Blossoms Stamp set and matching set of dies, along with Andy Skinner's crackle background stamp from the Stampendous Industrial set, the Vintage Decor stencil from Dreamweaver, a bit of embossing paste, a bit of acrylic paint, a sprinkling of Stampendous Color Fragments, patterned paper, and a large 12 inch square canvas, this was layers of shabby chic fun!


Shown here, the Vintage Decor stencil is pasted in Glossy White, and when dry, given a wash of light blue thinned paint. The Dreamweaver Faux Cross Stitch screen was used with a dauber and ink to add textural interest over the various sections of the canvas.


Here, the Vintage Decor was stenciled with Frisket, a resist medium, and when a wash of pink went over the top, the frisket could be rubbed off having resisted the paint.


The matching die set for the Birds with Blossoms stamp set makes it easy to add additional shapes for more interest. Finally, the washed panel was torn to reveal a pretty paper underneath.


The canvas itself had been washed with blue paint, and stamped with the crackle design using black ink.

Monday, June 27, 2016

Hip, Hip, Hooray! It's Janelle's Birthday!

The Stampendous team is having a surprise party today! It's Janelle Stollfus' birthday, and we want her to have an extra-special one...filled with lots of friends, family, food and fun as the sentiment on my card suggests. Janelle is the team "wrangler", "cat herder", and uber-patient assistant to Laura Weed (who is our Grand Pooh-bah). She deals with most of the social media (Facebook, Twitter, Instagram, and Pinterest), writes the blog posts for the Stampendous Impressions blog, gathers all of our links for each weekly challenge as well as the plethora of blog hops that we have with our crafting buddies. Oh, and so many little things, that most of us are unaware of, to promote the Stampendous team and products. She is one really busy girl. And all of this while planning fabulous birthday parties for her kids, family fun, and the ho-hum-everyday-household-stuff as well! She's pretty amazing! Please wish her a happy birthday in your comments! Head over to the Stampendous blog for more birthday links!


The card above features the Stampendous Balloon Duo stencil set and the Perfectly Clear Birthday Assortment set, plus Glossy Black Embossing Paste, and a background inside created with the Creative Palette. All items can be found on the Stampendous website HERE.

Saturday, June 25, 2016

Woodware: A Flower Free-for-all!


Over on the Woodware Witterings blog, the team has been challenge this week to a "Flower Free-for-all". Can I just say that I have hundreds of stamps, stencils, and paper that qualify? It was really hard to narrow it down to just one card. I love this one. 


This card features the Dreamweaver Large Orchids stencil design, pasted first in Matte Black, and then in Crackle Paste. The Crackle Paste dries white, so I replaced the cleaned stencil over the design, and proceeded to stencil on pigment ink. With the ink still wet, I sprinkled on Stampendous Crystal Embossing Powder for added sparkle. I ink-stenciled a soft background on the focal panel and the purple panel using the Dreamweaver Quatrefoil stencil, and added a sweet sentiment from Stampendous.


Be sure to visit the Woodware blog for more floral inspiration!

Friday, June 24, 2016

Gifts from the Sea


Today is my birthday, and there is no place I'd rather be for it than the seaside, which I fully plan to be (as I'm writing this post). I love all of the treasures of the sea, so I created this mixed media bottle of shells and sand using oodles of fun products from Stampendous and their crafty partners.

First of all, I mixed a bit of Dreamweaver Pearlescent and Translucent Pastes on my craft mat, and brushed the surface of the bottle with this, leaving space for the seahorse to be added. A heavy sprinkling (more like coating) of Teal Micro Glitter was added over the wet paste, and the bottle was set aside to dry.


I taped the Seahorse stencil to the bottle, and pasted it in Metallic Gold. While wet, the paste was sprinkled with Stampendous' Golden Sand Embossing Enamel, and heated it until puffy and set. I followed a similar process on the sides of the bottle with the Waves and Dots stencil, and embossed with Aged Teal Embossing Enamel. Little bits of sprinkles were added to the warmed bottle and melted to mimic bubbles, etc. A bit of Regular Embossing Paste was added to the bottom edge of the bottle, sprinkled with more Golden Sand, and heated for more dimension.


Now comes the really fun part! I adhered some May Arts® webby ribbon, an Aged Teal embossed starfish, some gold tinsel, shells which I embossed in gold, around the neck of the bottle with Beacon Quick Grip adhesive.


I brushed a bit of Beacon® Fast Finish™ over the surface, and sprinkled it with Teal Color Fragments, and adhered a flat glass marble using the Quick Grip again.


To "top this off", I used an interesting wine cork which I inked a bit on, and embossed partly in the Aged Teal EE. I had a cool shanked button for the top, so I dug a small indentation in the cork, and Quick Gripped that frosted button onto the top. This was just the kind of project that I loooooove to make! How about some more seaside inspiration? Here you go...
You can find all the details on the Stampendous! Impressions blog.