Tuesday, August 4, 2015

Woodware: A New Nest

Everyone deserves the perfect "nest", the place where all your dreams come true, life lessons are learned, children are raised, grandchildren are spoiled, and two people can grow old together. For those moving into their first, and possibly last, new home, the emotions run rampant. This is the perfect occasion to share your creativity with them. Show them you understand by sending them a beautiful hand-made wish for a happy new home.

I chose to post this card, as it's one of my favorites, and it speaks to that cozy, comfy nest of contentment. The image is the Stampendous Cling Nestled Bird, stamped in black ink on kraft cardstock, and colored with Tombow markers. Bright white highlights were added using a Sakura White Gel Pen, and texture was added using a glue pen to adhere bits of Stampendous Color Fragments in Chiffon, Ochre, Hunter, and Sage Green.

I'd love to hear what you think of as the perfect home in your comments below!


Saturday, August 1, 2015

Woodware Heads to the Seaside for a Holiday!

Using my favorite color combo once again to create this fun sea inspiration for the Woodware "By the Sea" challenge this week.

I created a modified tent-fold card, with a small pocket at the front that the focal panel can be set inside. This panel's background was created with ColorBox Chalk inks, and finger tip daubers. A couple of stamped impressions of the Stampendous Coral Tree were added as well, and of course, the PenPattern Angel Fish was stamped and doodled on.

A panel of acetate was stamped with the Coral Tree using black StazOn ink on the front and back. A couple lines from a glue marker were added to the back to adhere Stampendous Color Fragments in Hot Lime. This was adhered over the top of the previous panel using foam tape at the very bottom before tucking it into the pocket. This provided a more dimensional look, along with a machine embossed and ink-brushed Dreamweaver Sand Dollar, and a scrap of webbed ribbon. To finish the card, I stamped the Cling Near the Sea sentiment on the pocket in teal ink.


Friday, July 31, 2015

Pretty in Paste: Day Five

As I've pasted for the holidays all week long, I thought I'd share a favorite of mine for summer. Following the same pasting techniques that have been featured all week, with a couple of changes...

Three stencils were used for this...the Sand Castle, the Scallop, and the Small Scales background. Each was taped to its respective panel with removable tape. Each used a dab of Pearlescent Embossing Paste on the edge of the Paste Spreader, but then...a bit of bright pink ink was swiped at the edge of the spreader using the ink pad, or a bit of reinker. So, as you spreader the paste over the stencil design, you get striations in the paste. The first pass made was over the sand castle where you see more definitive lines. The next was over the scallop design. And finally, the last was over the scales background. All three were set aside to dry. Stencils and spreader were cleaned immediately with clean water and a small nailbrush.

Once dry, the card was assembled, adding a few embellishments and a printed sentiment.


For more paste perfection, visit these links:


Thursday, July 30, 2015

Pretty in Paste: Day Four...Dreamweaver Thursday

Have you seen enough embossing paste yet? Of course not! Dreamweaver's Embossing Pastes are so versatile and high quality, that everything you create with them becomes a work of art.

My card today features the same step-by-step process as I demonstrated in my tutorial on Monday, only using different stencils.

The Dreamweaver Snowflakes background stencil was paste-embossed in Pearlescent paste on a slate blue card, sprinkled with the Stampendous Ice Blue Specialty Enamel, and heated until bubbly and set.

I used the Oval Ornaments Nesting Dies to create one ornament, which I paste-embossed the Southwest Snowflake design in Silver paste, sprinkled this with Silver Embossing Powder, and heated until bubbly and set.

Just a few rhinestone stickers, and a swirl of silver tinsel cord finished off this icy blue textural greeting card.

Check out these links from more of my pasty pals:

Stampendous Blog


Wednesday, July 29, 2015

Pretty in Paste: Day Three

k
Today's Pretty in Paste card features one of the Dreamweaver all-in-one designs...Season of Joy. The process is simple and effective:

1. Place stencil on panel of cardstock, and tape on all four sides with removable tape.
2. Place a large dab of Pearlescent Embossing Paste on edge of Paste Spreader using palette knife.
3. Place edge of spreader with paste at top of design. Hold spreader with your fingers splayed out over the curved handle, and pull the paste over the stencil in one smooth pass. If there are any gaps, dab a bit of paste in them with the tip of palette knife, and then use spreader to pass over surface once more.
4. Place excess paste back in jar. Wipe around the lip of jar with clean paper towel or rag, and seal.
5. Carefully remove tape from three sides, using the fourth as a hinge to lift the stencil up and off.
6. Immediately place stencil and tools in water to be cleaned when done.
7. Sprinkle wet paste with Stampendous Ice Blue Embossing Enamel, and heat until bubbly and set. Sprinkle a bit of Shabby White Embossing Enamel, and heat from underneath for a bit of "snow".
8. Mat the panel and adhere to card.


For more info, visit the Stampendous Blog.

Tuesday, July 28, 2015

Pretty in Paste: Day Two


I still love the look of this crackle-pasted stocking card for the holidays! Here's how it was made:

1) Tape down the Stocking stencil on black cardstock, and paste it with Matte Black Embossing Paste. Set aside to dry.
2) Meanwhile, fold Bazzill Dotted Swiss red cardstock to create card. Layer a black and light blue panel of cardstock together, and adhere to the card.
3) Paste over the top of dried black paste with Crackle Embossing Paste. Let dry.
4) Meanwhile, ink-stencil in black the Happy Holidays stencil on a scrap of light blue, and round corners.
5) When surface is dry and crackled, tape the stencil back over the top, and using the Tsukineko Splendor inkpad as your palette, along with medium and large stencil brushes, ink color over the background, the cuff, and the heel and toes areas. Heat set ink a bit.
6) Continue to ink your design elements (Antler Snowflake and Christmas Borders), and heat set these as well.
7) Use the large Stocking Die to cut out your stocking, and adhere it to the black panel on your card, except at the top. Insert sentiment into the top of stocking.
8) Embellish with May Arts polka dot ribbon, velvet ric rac, and a sparkle pompom (trim a bit off of the back to help adhere to the flat surface.
Here's a link to a step-by-step tutorial on this technique by previous Stampendous/Dreamweaver team member, Cyndi Bundi, from the Paper Craft Planet blog.
For more inspiration, here's the lineup for today:


Monday, July 27, 2015

Pretty in Paste: Day One

Welcome to a week of playing with paste! Embossing Paste to be exact. Since Stampendous purchased Dreamweaver Stencils at the beginning of the year, we've been trying our best to educate crafters and artists regarding one of the best products on the market.
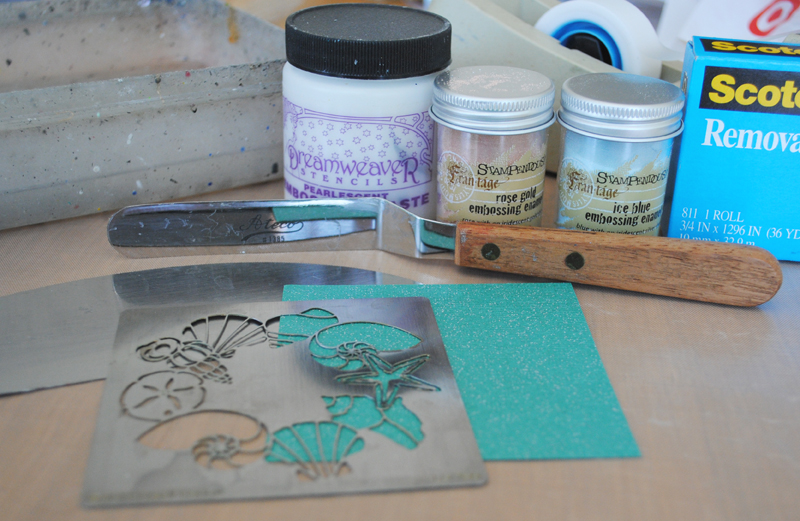
Supplies: Dreamweaver Pearlescent Paste, Shell Wreath, Stampendous Frantagé Ice Blue and Rose Gold Embossing Enamels, palette knife, Paste Spreader, removable tape, cardstock


My post today features one of the most fun ways to use embossing paste, and avoid the old "waiting for paint (paste, in this case) to dry" conundrum. The gorgeous Dreamweaver Shell Wreath lends itself quite well to this technique, and is a perfect design for a beachy Christmas theme, and for a wonderfully elegant beach-themed wedding as well. Here are the steps:

1. Tape stencil around all four sides to square panel of cardstock using removable tape.
2. Place large dab of embossing paste on edge of Paste Spreader. Lay edge of spreader at 90 angle at top of design, with your fingers spread over the curved middle, or handle.
3. Angle slightly, and spread across design with light pressure.

4. If there are any gaps that are missing paste, use the tip of your palette knife to add a small amount of paste in those areas before passing the spreader over the stencil one more time, lifting up and out at the end with all excess paste on spreader.
5. Replace paste into jar, wipe lip of jar, and seal.
6. Carefully remove tape from three sides, leaving one as a "hinge". Now you can lift the stencil up and off in one motion, and place in water to soak until time to clean.
7. Sprinkle embossing enamels over wet paste surface, and pour off excess.
8. Apply heat tool 3-4 inches from surface, heating until bubbly, textured, and shimmer. Set aside for just a few minutes to cool and completely harden.

This is a wonderful technique to use with so many of our Dreamweaver stencil designs. Play with it a bit, and let me know your thoughts on this fun use of embossing paste and embossing enamels. Then head over to the team's posts for more cool ideas!