Friday, May 27, 2016

Showers of Summer Fun with House Mouse Designs®


All this week the Stampendous team has been preparing to keep cool this summer along with the House Mouse Designs® friends. You, too? Jump on in...the water's fine! Look how much fun Monica is having under the downspout! Almost like, "Singing in the rain"! 


The Cling "Spigot Soak" image was colored with Copic markers, and then I fussy cut our little mouse friend and the spigot so that I could make her stand out from the rock wall. To highlight the water spray, I added drops of DecoArt® Liquid Glass. It is hard to photograph, but trust me...those droplets look REAL!


For this House Mouse Designs® card, we have a squirrel helping the mice to cool off with a watering can shower. Everybody say, "Awwwwwwwwwww"! So cute!


The Cling Squirrel Showers image was colored with Faber-Castell® Aquarelle pencils. Some parts I brushed with water, and others I left with the sketchy color pencil look. The panel was layered and adhered to a piece of gorgeous Oceanside by MyColorsCardstock. I added a banner piece with a sentiment from the Perfectly Clear House Mouse Designs® "Beary Mice" set, and a button with a bit of twine.


More summer fun can be found at these links...

Lea Fritts (Thursday Post)

Thursday, May 26, 2016

Catnaps Can Be a Hobby!

I really had to put my "thinking cap" on for the Hobby challenge this week on the Woodware Witterings Blog. When you are fortunate enough to "work" with your hobby as I do, then it's a tough decision. I have other "hobbies", certainly. I love to bake. I love to birdwatch. I love to walk and hike with our 4 1/2 month-old puppy. I like to shop (a lot). But really, to be perfectly honest, if I'm not working/crafting or being the amazing domestic engineer that I am (cough cough), I love a good catnap. Usually with one of my cats.

Hence my choice of stamp image for this post...Francoise Read's design for Woodware, "Your New Home". Yes, this image is great for a house-warming card, but I just love the coziness of this room. Especially once I paper-pieced all of the elements using the Forever In Time "Elderberry Perfect Prints Stack Pad". So much fun to decorate this room with these yummy papers! Some parts have been popped up with double-sided mounting squares. I've added a bit of shading with Tombow Dual Brush pens, and the cardstock for the focal image was die cut using the new Stampendous Fitted Frames.


Friday, May 20, 2016

A Sunshine Sentiment from Stampendous


If you weren't sentimental before, you have to be now! The Stampendous team have provided oodles of ideas using the new Sentimental all-in-one images. My post today features the new Cling "Create Sunshine" image. The perfect combo of a floral and sentiment that works for so many occasions, or none at all! I used an inexpensive bare wood frame from the big box craft store near me, and gave it a wash of pale yellow paint. I wiped a bit of distress stain over the surface, removing the excess for an antiqued look.


Using the Dreamweaver Black Eyed Susans stencil, I used a sponge dauber to ink the design with Walnut Distress ink. I used the Diagonal Panes stencil and a second dauber to ink with Vintage Photo in a few areas. When dry once again, I lightly sanded over the surface around the edges to distress it further.


The focal point on the inside was a rounded corner panel of kraft cardstock. The image was stamped in the Walnut Distress ink, and the design was painted with DecoArt Media Fluid paints. After I'd painted the "banner" portion of the design with white paint, I'd lost the stamped image of the sentiment. So, I re-inked the image and carefully stamped over the first image. The image was sprinkled with Chunky White Embossing Enamel and heated from underneath for little speckles of white texture. The panel was inked around the edges and adhered over a yellow cardstock mat, and adhered to the front of the glass panel of the frame. The back of the glass was adhered over a piece of designer paper.


We hope that you've enjoyed our "sentimental journey" this week, and here's a few more...

Woodware: Let's Hear it for the Boys!


I know that the last time the Woodware team had a challenge regarding boys/men, I posted the Stampendous "Motorcycle Elements" card that I'd made for my younger son's 25th birthday...because he loves track-racing on his motorcycles. (I know you mums are cringing at the thought, but let's face it, we can't make every decision for them. We can just hope they'll be safe while doing it. At least on a track he's wearing really heavy duty safety gear...leather suit, racing helmet, etc. Much better than the idiots who zip through cars on the freeways here in California, wearing nothing more than a t-shirt, shorts, and flip-flops!)

Getting back on track now (haha...I made a punny!). My post for today features a card that I created for my son, Bryan, who actually helped me to make it, though he didn't know it at the time. I had this Stampendous "Acoustic Sounds" image stamped and ready to color with markers. He was bored (no...he's not eight. At the time he was twenty-eight!) so I handed it to him and told him to color it for me. This young man is very creative and artistic (wonder who he gets THAT from?), so this was no punishment for him. He worked hard trying to color the guitar PERFECTLY to match a guitar of his. (Did I mention that he's just a bit of a perfectionist? So much that if he can't do something perfectly, he won't do it at all...which is a huge list all on it's own.) It took him quite a long time to finish it, before I was able to use it to complete my catalog sample (sssshhh) birthday card for him.


The background of the card was ChalkCore cardstock from Core'dinations, which I machine-embossed with the Dreamweaver Waves and Dots stencil, and sanded to reveal the pattern. I added a scrap of guitar music which I'd stamped one of the Perfectly Clear "Happy Greetings". The focal panel was also sprinkled with Stampendous' Fran•tagĂ© "Spoonful of Rust" and heated. All parts of the card were distressed with ink. I had an old guitar string of his which I wrapped around the card, and added a "guitar pick" stamped with "#1" from the same sentiment set.


So you see that this card was a work of love and inspiration from my gifted son, of whom I'm very proud of...most of the time!

Thursday, May 19, 2016

A Sentimental Birthday with Stampendous


Has the Stampendous team got you feeling sentimental this week? It's super easy to do with our newly released all-in-one image-and-sentiment designs. Just stamp color and you're done...or, take it a step further. For this card I just did a colorwash over the balloons in the Cling Birthday Balloons image. When dry, I ran the panel through my Big Shot with the Dreamweaver Flourishes design (also on the card base), and swiped Cantaloupe Memento ink over the embossed surface to highlight the design.


To add more dimension, I turned over the colored panel a top a piece of soft suede, and used a couple of my metalworking tools (a paper stump and large ball stylus) to "puff" out the blue balloon a bit. Edges were distressed. The panel was adhered askew, and a strip of rainbow rick rack finishes this birthday celebration!


Head on over to the team links here...

Wednesday, May 18, 2016

Happy Daisy Sentiments by Stampendous


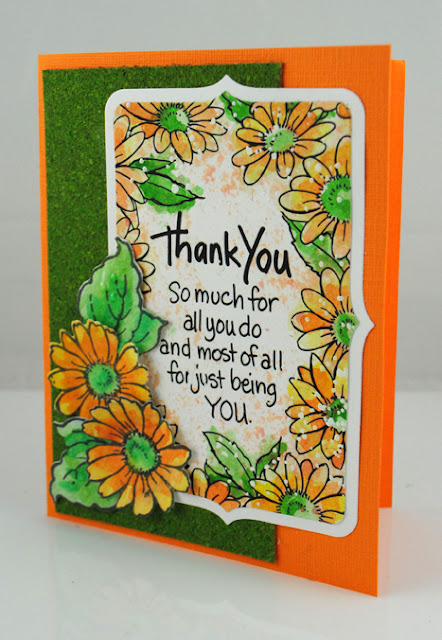
Today's post is a happy one! Featuring the new Stampendous Cling Thank You Daisies image, stamped in black Memento ink, and colored with Copic® Sketch Markers, the panel has been die cut using the Fitted Frames "B" set, with a white mat to frame it. A sprinkling of Chunky White Embossing Enamel was heated from underneath for extra texture.


The card base was created from MyColorsCardstock™ in Sweet Potato, with an additional panel of grass green cork, making all of the colors pop! I stamped and die cut a few daisies from the Stampendous "Build a Bouquet" sets, with DecoArt® Liquid Glass in the centers of the flowers.


Need more inspiration? Here you go...

Monday, May 16, 2016

Feeling Sentimental with Stampendous


Don't you just love to have a stamp that has it all? That says it all? Stampendous has just released several fantastic images for several occasions. Each one can be kept clean and simple (CAS) by simply stamping the image on the card front and adding a bit of color, or taking it a bit further with layers and embellishments. Today's post features the Cling "Anniversary Wish", and became the perfect card to send to my brother and his wife this month.


I've stamped the image on Mixed Media White cardstock, and colored it with Copic markers, adding tiny dots of white Sakura® Gelly Roll ink. The image and it's matted frame of designer paper, were die cut using the Stampendous Fitted Frames "B" set. With a bit of ribbon, the card becomes truly special.


Check out who else is feeling sentimental today...

Friday, May 13, 2016

A Woodware Window on the World


The Woodware team are taking a look at dies and punches in a different way, you might say as a window to creativity. The team have been sharing projects where the negative space from a die or punch cut is used as a window for something special. In my case, I've used the Stampendous Jumbo Bird set of stamps and its matching dies.

I started with a brown base card, which I've ink-stenciled the Dreamweaver I Beams background in black ink with a large sponge dauber. I've stamped and die cut the bird from an old music sheet, aged it with ink, and adhered it to the card base.

Finally, I've die cut the bird from this light blue panel. I stamped the branch and the wonderful Stampendous sentiment by Emily Dickinson. A stamped and die cut leaf was added for more dimension. This panel was popped up off of the card over the stamped bird for more depth using foam tape.


If you've missed any of our "window" posts this week, head back over to the Woodware Witterings blog for previous links.

Wednesday, May 4, 2016

Stampendous and Whisker Graphics...the Cat that Got the Cream

STM_WG_banner_2

In preparation for the Stampendous April 2016 catalog, Whisker Graphics was kind enough to send each of our team members a wonderful package of product to stamp and/or stencil on, to package things in, and to tie it all up with yummy baker's twine. With all the fabulous inspiration that we will be sharing from both design teams we thought some of you would like to play along with these great products too, so there are PRIZES! Just comment along the hops each day and leave a thoughtful comment for the designers. Winners will be announced Monday, May 9th.


This fun card fits perfectly inside one of the larger Glassine Bitty Bags for a sheer hint of the fun inside!


For my project today, I've used several of their yummy, sherbet-colored tags, and made sure to incorporate them in my Copic-coloring of the House Mouse Designs® "Ice Cream Kitty" image.


The image was cut into three sections, each being adhered onto a colorful tag before being adhered to my card (MyColorsCardstock by MME).


One more tag was cut to fit, and stamped with a sentiment to rock this ice cream party theme. All of the holes on the tags were decorated with the solid and striped bright green twine that Whisker Graphics is known for.


For more ideas that are the cat's WHISKERs, visit these links for today...


Monday, May 2, 2016

Woodware: Feeling Bubbly for Spring?


The Woodware team are featuring Jane Gill's Bubble Blooms images all of this week. Each image is filled with circular "bubble" shapes, to be highlighted as desired. They are perfect for using with "Card Candi", adhesive crystals and pearls, and in this case...Stickles™ from Ranger Ink®!


I had stamped this Bubble Bloom Julie Clear Magic set image in embossing ink, and embossed it with Stampendous White Embossing Powder. Then I smudged three shades (Denim, Peridot, and Mossy) of Clearsnap® Mixed Media inks over the surface, and used a paper towel to wipe the excess off of the embossing. I added some shading with markers, and filled in the "bubbles" with four shades of Stickles (Mystic Green, Firefly, Lagoon, and Midnight Blue). When dry, the panel was layered over a light green machine-embossed panel using Dreamweaver Spiral Dots stencil, onto a blue card base, and a bright sheer green dotty ribbon. Tied to this was a tag stamped with the accompanying sentiment for the clear stamp set, made from the new Stampendous Fitted Frames "A" set available through Woodware in the UK, and from Stampendous in the USA.


Be sure to visit the Woodware Witterings blog for 'bubbly" inspiration all week!