Showing posts with label #Woodware. Show all posts

Tuesday, July 19, 2016

Summertime Birthdays Can Be So Cool!


The Woodware team are celebrating summertime birthdays this week. Since my own birthday is the 24th of June, I qualify. I never liked having a summer birthday growing up, as school was over, leaving me with no chance to treat my class to cupcakes, or to feel like a "big deal" to my classmates. On the other hand, our family vacations were usually right after school was out in June, so my birthday was celebrated on one of our holidays. On one of these, we met up with both sets of grandparents in Montana. My grandmother on my father's side somehow had baked me a chocolate cake, but there were no candles for the top. So my Gran (mother's side) used pink nail polish to paint some matches to stick on top of the cake. I had to blow them out really quick! It was one of my best birthday memories!

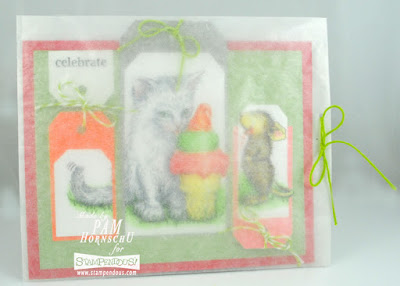
Now that I've reminisced, I'll share with you this sweet House Mouse Designs' card that is perfect for a summertime birthday. No chocolate cake here, but there is plenty of icy cold ice cream to be shared! The image is the House Mouse Ice Cream Kitty, and has been colored with markers in yummy sherbet colors, that also happen to match some very bright tags and cording.


For the fun of it, I placed the card in a translucent envelope so that the recipient gets a "sneak peek" at their lovely card. I happened to have the envelope on hand, but you can easily create your own with the Artemio Envelope Template and Vellum Paper.


Yummy! I just had to add a few ice cream drips off the mouse, because...hey! Ice cream can be messy, especially in the summer! I added a very simple sentiment from the Stampendous Birthday Assortment clear stamps on a small part of tag for a unique styling to this card.


Be sure to check the Woodware Witterings blog each day this week for more summertime fun!

Wednesday, July 13, 2016

With a Little Bit of Luck


Graduations aplenty have been swarming this season, and I wish every single one of the graduates, "a little bit of luck", as navigating this world is never easy.  It also happens to be the weekly challenge for the Woodware team. Sometimes with luck, the stars need to be aligned just perfectly, for all of that hard work to pay off. And speaking of stars...don't you love the Star Swirls stencil from Dreamweaver? For this card, I've pasted it in silver, and sprinkled it with Stampendous Aged Black Embossing Enamel. When heated all of these items melt and bubble for beautiful shine and texture. This panel was popped up above the card base with the Dreamweaver Dot Spiral pasted in Glossy Black for a cool black on black effect. A strip of the negative portion of die-cut letters from the Dreamweaver Alphabet set was adhered over mirror cardstock to finish the card. If you've missed the rest of the team posts this week, head on over to the Woodware Witterings blog.


Thursday, July 7, 2016

Color Blocking with Woodware


This week on this side of the "pond", the USA have been celebrating our "Independence" from YOUR side of the "pond". Lol. Good naturedly, of course. Our theme this week on the Woodware blog is "Colorblocking", which is always an effective way to highlight an image in a different way. For my Fourth of July/Independence Day card, I used three colors of core paper, designed to be embossed and then sanded to reveal the design. The design that I chose was the Dreamweaver Fireworks Embossing Folder, but can easily be done with the stencil version as well. I had one large panel of each color to run through my embossing machine with the folder. Once embossed, they were sanded lightly to reveal the design, and cut into thirds to be adhered on three cards.


The sentiment uses images from a few Stampendous Perfectly Clear sets, including the Vintage Alphabet set. This same design would work well for several occasions, including Christmas, as it's a quick way to complete three cards at once! For more color-blocking ideas, visit the Woodware Witterings blog.


Friday, July 1, 2016

Woodware/Crafty Cardmakers Challenge

The Woodware team are playing along with the challenge at Crafty Cardmakers once again. This time the theme is "Shabby Chic". I thought this canvas would be perfect for this.


Featuring the Stampendous Birds with Blossoms Stamp set and matching set of dies, along with Andy Skinner's crackle background stamp from the Stampendous Industrial set, the Vintage Decor stencil from Dreamweaver, a bit of embossing paste, a bit of acrylic paint, a sprinkling of Stampendous Color Fragments, patterned paper, and a large 12 inch square canvas, this was layers of shabby chic fun!


Shown here, the Vintage Decor stencil is pasted in Glossy White, and when dry, given a wash of light blue thinned paint. The Dreamweaver Faux Cross Stitch screen was used with a dauber and ink to add textural interest over the various sections of the canvas.


Here, the Vintage Decor was stenciled with Frisket, a resist medium, and when a wash of pink went over the top, the frisket could be rubbed off having resisted the paint.


The matching die set for the Birds with Blossoms stamp set makes it easy to add additional shapes for more interest. Finally, the washed panel was torn to reveal a pretty paper underneath.


The canvas itself had been washed with blue paint, and stamped with the crackle design using black ink.

Saturday, June 25, 2016

Woodware: A Flower Free-for-all!


Over on the Woodware Witterings blog, the team has been challenge this week to a "Flower Free-for-all". Can I just say that I have hundreds of stamps, stencils, and paper that qualify? It was really hard to narrow it down to just one card. I love this one. 


This card features the Dreamweaver Large Orchids stencil design, pasted first in Matte Black, and then in Crackle Paste. The Crackle Paste dries white, so I replaced the cleaned stencil over the design, and proceeded to stencil on pigment ink. With the ink still wet, I sprinkled on Stampendous Crystal Embossing Powder for added sparkle. I ink-stenciled a soft background on the focal panel and the purple panel using the Dreamweaver Quatrefoil stencil, and added a sweet sentiment from Stampendous.


Be sure to visit the Woodware blog for more floral inspiration!

Monday, June 13, 2016

It's Raining Cats and Dogs (and Hummingbirds and Frogs)!

Rebel that I am, when challenged to a theme of "Raining Cats and Dogs", I took the raining literally, but skipped the cats and dogs and went with "Hummingbirds and Frogs". Mainly, I just wanted to post this fun card. Using the Stampendous Pop Up Die Set, I cut the insert from their Mixed Media White cardstock, and proceeded to Dreamweaver it up! I used the "Rain" stencil and the scalloped edge of the Picasso tool to ink-stencil a cloudy and rainy background using a light blue ink. The foreground was inked in lime green before ink-stenciling the "Petals" Background over it in teal blue. This was folded and adhered inside the card base.


I paper-pieced from turquoise pre-embossed paper the Umbrella stencil onto a cutout of the umbrella in black. Bright pink pompoms were added along the edge and top before curving it, and adhering it to an inked bamboo "skewer", which was inserted into the center pop-up slit. I stamped, colored, and cut out the Stampendous "Pen Pattern Frog" and "Pen Pattern Hummingbird". These were adhered to the base bump-out and one of the upper die cut flaps. To complete the card, I die cut blue and white "Nested Frames" (also ink-stenciled with the Petals background), stamped a sentiment from the Stampendous Perfectly Clear "Life Words" set (and its tiny border additions), and adhered this to the bottom of the card. A strip of web ribbon from May Arts with some sprinkles of Stampendous Color Fragments, was adhered for more textural interest.


If you'd rather go back to "Raining Cats and Dogs" now, I totally understand. I love cats and dogs. We have two floofy freeloaders, and a new puppy ( 5 months) that has stolen our hearts! 

Be sure to check out the C & D creations over on the Woodware Witterings blog.

Tuesday, June 7, 2016

Be Happy! Life is a Picnic!


The Woodware team are celebrating "happy days" this week. There are so many to choose from! Birthdays, weddings, baby showers, anniversaries, etc. My card celebrates the happy times of summer...especially picnics! I have great memories of picnics with family and friends.


This card features the Stampendous Cling "Life Picnic" sentiment, the Cling "Lunch Line" (yum), and the Cling "Picnic Ants". This last was stamped as a border along the bottom of the white card. The food bandits were stamped on white cardstock and colored with markers, edged with red ink, and adhered to a ClearScraps® acrylic banner. The checkerboard pattern was done with Glossy Red Embossing Paste using the Dreamweaver OpArt Checkerboard. This piece was adhered to the card with Foam Mounting Tape, and ribbons were attached for fun.


Hope your days are filled with happy!


Wednesday, June 1, 2016

Shaking Things Up with the Woodware Challenge


Over the years I've done a few "shaker cards", all with the element of FUN. Birthday fun. Kid fun. Goofy and silly fun. This time I went for PRETTY. Using the "Time Flies" paper pad, I started with a panel adhered to the front of my purple card. I carefully selected a panel from another paper with a purple and blue butterfly that would show through the opening on top. I matted this panel with lavender cardstock, and set it aside.


I die cut a lavender frame using the Stampendous Fitted Frames die set, and stamped a sentiment from the Clear Magic "Tiny Phrases" set from Woodware. I had the negative portion of a piece of vellum which I had die cut one of the Stampendous Butterflies. I sprayed the back with spray adhesive and adhered it to a panel of clear acetate. Now I adhered the lavender frame over the front.


All the way around the back of this panel I adhered foam tape with no gaps. (Mind the gap!) Using some Stampendous Color Fragments, I added sprinkles to the inside of the taped panel. I removed the carrier from the tape and adhered the matted panel from earlier, sealing in the "pretty" sprinkles. The entire shaker panel was then adhered to the card. The result? A very PRETTY shaker card!


Thursday, May 26, 2016

Catnaps Can Be a Hobby!

I really had to put my "thinking cap" on for the Hobby challenge this week on the Woodware Witterings Blog. When you are fortunate enough to "work" with your hobby as I do, then it's a tough decision. I have other "hobbies", certainly. I love to bake. I love to birdwatch. I love to walk and hike with our 4 1/2 month-old puppy. I like to shop (a lot). But really, to be perfectly honest, if I'm not working/crafting or being the amazing domestic engineer that I am (cough cough), I love a good catnap. Usually with one of my cats.

Hence my choice of stamp image for this post...Francoise Read's design for Woodware, "Your New Home". Yes, this image is great for a house-warming card, but I just love the coziness of this room. Especially once I paper-pieced all of the elements using the Forever In Time "Elderberry Perfect Prints Stack Pad". So much fun to decorate this room with these yummy papers! Some parts have been popped up with double-sided mounting squares. I've added a bit of shading with Tombow Dual Brush pens, and the cardstock for the focal image was die cut using the new Stampendous Fitted Frames.


Friday, May 20, 2016

Woodware: Let's Hear it for the Boys!


I know that the last time the Woodware team had a challenge regarding boys/men, I posted the Stampendous "Motorcycle Elements" card that I'd made for my younger son's 25th birthday...because he loves track-racing on his motorcycles. (I know you mums are cringing at the thought, but let's face it, we can't make every decision for them. We can just hope they'll be safe while doing it. At least on a track he's wearing really heavy duty safety gear...leather suit, racing helmet, etc. Much better than the idiots who zip through cars on the freeways here in California, wearing nothing more than a t-shirt, shorts, and flip-flops!)

Getting back on track now (haha...I made a punny!). My post for today features a card that I created for my son, Bryan, who actually helped me to make it, though he didn't know it at the time. I had this Stampendous "Acoustic Sounds" image stamped and ready to color with markers. He was bored (no...he's not eight. At the time he was twenty-eight!) so I handed it to him and told him to color it for me. This young man is very creative and artistic (wonder who he gets THAT from?), so this was no punishment for him. He worked hard trying to color the guitar PERFECTLY to match a guitar of his. (Did I mention that he's just a bit of a perfectionist? So much that if he can't do something perfectly, he won't do it at all...which is a huge list all on it's own.) It took him quite a long time to finish it, before I was able to use it to complete my catalog sample (sssshhh) birthday card for him.


The background of the card was ChalkCore cardstock from Core'dinations, which I machine-embossed with the Dreamweaver Waves and Dots stencil, and sanded to reveal the pattern. I added a scrap of guitar music which I'd stamped one of the Perfectly Clear "Happy Greetings". The focal panel was also sprinkled with Stampendous' Fran•tagé "Spoonful of Rust" and heated. All parts of the card were distressed with ink. I had an old guitar string of his which I wrapped around the card, and added a "guitar pick" stamped with "#1" from the same sentiment set.


So you see that this card was a work of love and inspiration from my gifted son, of whom I'm very proud of...most of the time!

Friday, May 13, 2016

A Woodware Window on the World


The Woodware team are taking a look at dies and punches in a different way, you might say as a window to creativity. The team have been sharing projects where the negative space from a die or punch cut is used as a window for something special. In my case, I've used the Stampendous Jumbo Bird set of stamps and its matching dies.

I started with a brown base card, which I've ink-stenciled the Dreamweaver I Beams background in black ink with a large sponge dauber. I've stamped and die cut the bird from an old music sheet, aged it with ink, and adhered it to the card base.

Finally, I've die cut the bird from this light blue panel. I stamped the branch and the wonderful Stampendous sentiment by Emily Dickinson. A stamped and die cut leaf was added for more dimension. This panel was popped up off of the card over the stamped bird for more depth using foam tape.


If you've missed any of our "window" posts this week, head back over to the Woodware Witterings blog for previous links.

Monday, May 2, 2016

Woodware: Feeling Bubbly for Spring?


The Woodware team are featuring Jane Gill's Bubble Blooms images all of this week. Each image is filled with circular "bubble" shapes, to be highlighted as desired. They are perfect for using with "Card Candi", adhesive crystals and pearls, and in this case...Stickles™ from Ranger Ink®!


I had stamped this Bubble Bloom Julie Clear Magic set image in embossing ink, and embossed it with Stampendous White Embossing Powder. Then I smudged three shades (Denim, Peridot, and Mossy) of Clearsnap® Mixed Media inks over the surface, and used a paper towel to wipe the excess off of the embossing. I added some shading with markers, and filled in the "bubbles" with four shades of Stickles (Mystic Green, Firefly, Lagoon, and Midnight Blue). When dry, the panel was layered over a light green machine-embossed panel using Dreamweaver Spiral Dots stencil, onto a blue card base, and a bright sheer green dotty ribbon. Tied to this was a tag stamped with the accompanying sentiment for the clear stamp set, made from the new Stampendous Fitted Frames "A" set available through Woodware in the UK, and from Stampendous in the USA.


Be sure to visit the Woodware Witterings blog for 'bubbly" inspiration all week!

Tuesday, April 26, 2016

Woodware Sketch 52: Pretty Pretty, Pretty Much!

Above is our sketch challenge 52 for the month of April on the Woodware Witterings Blog. Pretty simple. My version has been tipped on end to create a vertical card instead, but the end result is pretty pretty, don't you think?


Featuring a new image from Stampendous, the "Cling Live Each Day" is an all-in-one image and sentiment, and a very pretty one at that. Especially when water-colored with Sakura Fluorescent Gel Pens and a wet paintbrush. I learned this technique from Woodware's own Francoise Read, which is no surprise as that girl LOVES color!


I've die cut the oval shape, and matted it with a larger oval. This has been popped up with foam tape over an aqua cardstock, edged with more of the teal. Finally, the layers have been adhered over a coral card.


As the sentiment was already built into the image, I added a strip of this yummy floral trim that Woodware carries. See? Pretty pretty...pretty much! Be sure to visit the Woodware blog all this week for more pretties with Sketch 52, and play along for a chance to win!

Wednesday, April 20, 2016

Woodware with Crafty Cardmakers...One, Two, Three!


Once a month the Woodware team plays along with the "Crafty Cardmakers" challenge for an extra nudge in inspiration. This month the challenge is "1, 2, 3...1 Image, 2 Papers, 3 Embellishments", so I'm posting this wild card. Ummm, I may have gone a smidge over the top on embellies...


The Stampendous Cling PenPattern Lion is my one image. He's been colored up with markers and a bit of pointilism to make him unique. He's been masked off in order to create my own patterned paper (number one of two), by ink-stenciling the Dreamweaver I Beams design using brown ink and a dauber over kraft cardstock. After stamping the sentiment and distressing the edges, I adhered this panel to my green card base (number two of two papers).

For my three embellishments, I've added...
Number 1: Dreamweaver Monstera Leaf die cuts
Number 2: Stampendous Encrusted Jewel Technique (video) with a mix of Color Fragments and Aged Embossing Enamels
Number 3: gray netting fabric


The finished project is pretty wild! What do YOU think? Come play along for this  challenge. The info can be found on the Crafty Cardmakers Blog. More inspiration from the Woodware team can be found on the Woodware Witterings blog.