Thursday, November 28, 2013

Dreamweaver Stencils: Creating a Holiday Celebration


Our final week of the Dreamweaver November challenge...Holiday Celebrations, also know as, Anything But A Card! I have had so much fun creating projects for the Dream It Up! Blog as well as my own (except today...Lynell created her own this week!). I love to make cards, but I really enjoy making dimensional items for the home and for gifts.

Today's project is one of my favorites, and one of the most simple. I had purchased this rusted tin star hanging for 75% off at JoAnn's last year after Christmas, and still had it stashed away waiting the perfect project. I created a template of the triangular sections of the star, and used that to cut out portions of Tim Holtz's Kraft Core cardstock from Core'dinations. I had run each panel through my Big Shot machine with a selection of Dreamweaver stencils...Snowflake Background, Damask, Stripes/Plaid, and the Christmas Borders. I went over each panel with a sanding block to reveal the "core" color of the embossed areas. All of these pieces were adhered to the star with Beacon Zip Dry adhesive (my go-to-glue for most projects involving paper).

I also die cut Spellbinder Label dies from the panels, and paste embossed in copper the Noel stencil, each letter having it's own die piece. While the paste dried, I used Ranger Adirondack Copper Dabber and Distress Walnut Stain to color the plaque before adhering a strip of frayed burlap with Beacon FabriTac, and finally each letter segment.

Per usual, some yummy May Arts ribbon provided the finishing touch! The Dream Team hopes that you've been inspired to create your own Holiday Celebrations projects, and link pictures to the linkytool on the Dream It Up! blog for a chance to win the stencil of your choice. You have until the 30th to post your creation! Click on "comments" below and leave some love before moving on to the rest of our very creative ladies, and our uber-talented guest designer:


Wednesday, November 27, 2013

Woodware UK: A Quick Peek at Some Quick Cards

Looking for some quick and fun cards to create for the holidays? This week is precisely the week to "peek" in over on the Woodware blog, as this week is dedicated to quick cards.

My card features the Stampendous Perfectly Clear Snowy Short Stack...a fun set of mix and match parts and pieces of holiday icons. All that I did was stamp their heads and their feet and color them with markers. A fun plaid paper is adhered only on the edges to provide a punched pocket for a gift card, and simply decorated with rick rack and a sweet sentiment.

Have fun creating your own quick cards, and share them with the Woodware blog.


Thursday, November 21, 2013

Dreamweaver Stencils: A "Beacon" of Light Using Beacon Adhesives!


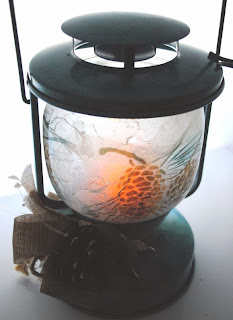
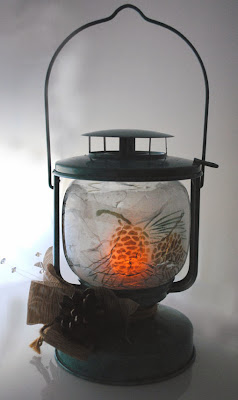
Last week, Louise Healy's post made me smile. With the two of us, our minds are always thinking alike! She had created this awesome lantern where she'd paste-embossed the Pine Cone stencil on the sides. I had to smile as I'd finished this lantern recently using the same stencil, and a totally different technique. So...if you'd love to create a lantern as decor for the holidays, or a wonderful gift, you now have two suggestions to go with.

I used a small lantern from IKEA (under $5) which stands about 8" tall. The lid comes off so that you can remove the glass globe on the inside. Using various Dreamweaver Color Solutions Alcohol Inks (Noble Fir, Aquarius, and Iceberg) and felt applicator pads (and gloves on my hands!), I applied layers of color so that the end result was a polished stone look.

I stenciled the Pine Cones on tissue paper using Memento inks, and tore out the images. I brushed Beacon Fast Finish Decoupage medium over the inside of the globe, and layered in pieces of the tissue, trying to keep the designed portions as smooth as possible. I brushed another coat over the tissue surface, and set it aside to dry (the name of the product tells you how long you'll wait). The tissue creates a soft glow inside with the addition of a flameless tea light.

The whole project comes together with the addition of a jute wrapping around the base, and a double bow created from textured May Arts ribbon. Oh, and a real pine cone adhered with Beacon FabriTac!

 I have been so excited each week to see the Dream Team's creations this month, as well as our amazingly talented home decor expert and guest designer, Linda Neff. What have they done this week?

Friday, November 15, 2013

Woodware UK: Paper Piecing a Perfect Present!


We're paper-piecing for our Woodware challenge this week! Anyone who follows my blog, knows that I love to do paper-piecing, especially with my Dreamweaver Stencils. Their more open designs lend themselves perfectly to this technique, and the large Open Owl is perfect for this. I created a small gifty for teachers, students, kids, friends. By folding a long strip of border punched cardstock, and creating a hill and valley fold in the center, it is easy to tuck a small treat bag inside, staple both at the top, and cover with a folded topper.

For the owl, I machine embossed the image onto white cardstock. Then I traced all of the pieces onto patterned paper, cut them out, and adhered them over the embossed areas. I used a circle cutter for most of the opening, and a craft knife for the rest. A little ink distressing, some fun buttons for eyes, and textured ribbon were all the embellishment needed. The topper was stamped using the Stampendous Retro Alphabet set, but really any sentiment could be added for the occasion, or personalize using the alphabet to create the name.

For more fun paper-piecing projects, visit the Woodware blog, and our very creative team!


Thursday, November 14, 2013

Dreamweaver Holiday Celebrations...Want Something to WINE About?

The Dream Team have been getting sticky lately...sticky with great products from Beacon Adhesives! As a thank you to them, we're featuring their products all of the month of November, along with our Holiday Celebrations challenge and our Guest Designer, Linda Neff!

I've created a fun gift basket for wine, sparkling cider, olive oil, gourmet vinegars, etc. My hubby and I have several good friends that enjoy sharing a great bottle of wine...or two! I purchased the basket at a Home Goods store (love shopping there!) for $2.99! I had some burlap on a roll from the local craft store, so I used the Dreamweaver Grape Cluster by paste-embossing in regular paste in two sections to cover the front and back. I pasted each twice, allowing the first to dry before slightly overlapping the first pasting to increase the size of the clusters. When dry, I replaced the clean stencil over the design, and using stencil brushes I added color with Tsukineko Memento
inks. For an additional bit of shading, I added some touches of Copic marker. When dry, I brushed over the surface with a light coating of Beacon Fast Finish to set the color. Then I added some highlights of a few grapes with drops of Glossy Accents from Ranger. I applied Beacon FabriTac to the basket staves and wrapped and adhered my burlap cover.

Using the same inks, I stenciled the design on a matching tag, adding the sentiment "Merci" over the top. Some wonderful May Arts ribbon in this luscious two color iridescent makes the perfect bow.


I wonder what my fellow designers have been up to this week? Hmmm, let's go check on the "B" team and our wonderful guest designer:


Thursday, November 7, 2013

Dreamweaver Stencils: Festively Distressed with Ranger Hop!


Ready to be festively distressed once again? The Dream Team have been playing with Ranger's Distress Paints, and are ready to inspire you to be distressed as well...paint distressed that is! Dreamweaver Stencils are the perfect choice to mix with all things festively distressed, as nothing shows off color and texture better than great designs. By following our hop and leaving love along the way, you have the opportunity to win a great prize package including five Ranger Distress Paints and five Dreamweaver Stencils! Here's the lineup for today, including our November Guest Designer:


This is also our first posting day featuring our new monthly challenge, "Holiday Celebrations", and for the entire month we will be demonstrating ways to use Beacon Adhesives' entire line of products with Dreamweaver to create special projects in home decor and gifts of love. Here's mine:


I purchased a plaque made from a slice of black slate at a local craft store, and adhered a torn sheet of music with Beacon Fast Finish over the surface. When dry, I used the dabber bottle of Ranger's Tim Holtz Distress Paint in Broken China over the surface as a wash, with some softer swipes of Frayed Burlap around the edges to soften them. When dry, I paste-embossed the Dreamweaver Season of Joy in white and covered it with ultra fine crystal glitter. Once dry, I added a sculpted paste "snowbank" at the bottom and covered it with chunkier glitter. I had purchased a small tree, and applied Picket Fence Distress Paint over the branches, and sprinkled more glitter. (Notice a sparkly theme going here?) I trimmed the back of the tree to make it fit against the plaque better. A skinny strip of music was distressed with more paint and wrapped around the tree before adhering to the plaque with Beacon FabriTac. A few crystals on the star, a luscious bow from May Arts was almost the finale...but no, I had to add paste to a pine cone with, yes, more glitter!


Monday, November 4, 2013

Woodware UK: Treasuring My Memories

The Woodware Team has been challenged by Christina from A Maze of Memories (retail store selling product from Woodware UK), to create with "Treasured Memories". A few of you may have seen portions of this book that I created a couple of months back to treasure some of my personal memories...mainly regarding my mother, grandmother, great-grandmother, and great aunt. All of them females of strength and determination, with warm hearts and a wonderful sense of humor. I think it was probably pretty much impossible to have survived the Great Depression and World Wars I and II, without all of these attributes, and I'd like to think that at least a portion of them has been passed down through me as well.

My book cover features the Dreamweaver Stencils "Give Thanks Cornucopia" design (available in the USA only as a Thanksgiving holiday design), which was paste-embossed and glittered. A heavy sprinkling of various Stampendous Color Fragments was adhered to the cover as well for additional texture.

The page to the left has a wonderful photo of my great-grandmother, my grandmother, and her younger sister. I paste-embossed the Dreamweaver Leafless Tree on acetate. The back of the acetate panel has drops of Color Solutions Alcohol inks, more glitter, and a dictionary page for the background.

The next page to the left is a photo of all four generations...great-great-grandmother (who came over from Ireland), great grandmother, my Gran, and my mother as a young girl. I've stenciled this petite fern on the right, and added more Stampendous fragments, ivory self-adhesive lace
and some ink distressing.

This third page on the left is a portrait of my mother at the age of about seven. More of the petite fern stenciling, a scrap of an old song that I remember her playing on the piano and singing, and a sentiment that I love over a Dreamweaver Damask background created with spray mist.

There were a few other pages that I've added with poetry, images, and sentiments that touch my heart, and I'll probably continue to add more pages to this book. Hopefully my sons and their children will enjoy looking through my book of "heart", and treasure it as well.