
Showing posts with label Copic. Show all posts

Thursday, June 18, 2015

Dreamweaver Thursday: Wild and Wonderful

The Stampendous team have been traveling all over the wild world this week, posting our creations using the newly released from the "zoo" animal images. I've loved how easy it has been to mix in several Dreamweaver designs for a more uniquely wild project.

The card base was brown Core'dinations Essentials, partially machine-embossed with the Dreameaver Zebra pattern, and partially with the Leopard Spots backgrounds. Then these were sanded to reveal the design and rough things up a bit. The following layers were an orange panel machine-embossed with the Quatrafoil design, and brushed over the surface with Rich Cocoa Memento ink, and a stamped panel of Mixed Media Cardstock with the new Cling Pen Pattern Giraffe image which I'd colored and shaded with Copic Sketch Markers. The giraffe was stamped again on a sticky note, and cut out to create a mask. This was used to protect the colored image while I stamped the Cling Old World Map in Rich Cocoa twice over the panel. The edges were ink-distressed, and the panel was added to the layers. Finally, a die cut of the Dreamweaver Leafless Tree was inked and adhered, along with a die cut Leafy Branch, and a Nested Frame stamped with the Cling Better to Travel sentiment.


Grab your safari gear, and head over to those posting with the Dreamweaver Thursday lineup:

Stampendous Blog

To check out the other "Let's Go Wild" posts for today, start at the Stampendous blog HERE.


Friday, May 29, 2015

BLOOMIN' with Linnie Blooms Part Two


Welcome to the final hop day of our collaboration with Linnie Blooms! Have you had as much fun as we have? I doubt it...but you could! By the end of today's posts you should be hightailing it out to your nearest craft store or online store and buying up every bit of Linnie Blooms, Stampendous, and Dreamweaver product you've seen this week! Or maybe, just maybe...

YES!  There are prizes!! Three lucky winners will each win a set of Linnie Blooms Fabric Mini File Folders just like they provide for our team. Plus, you'll receive a Dreamweaver Stencil background, and our Vintage Press Perfectly Clear Stamps™ Set. You'll be creating Mixed Media fabric accents in no time! These winners have to have a U.S. mailing address (official rules here), but Aussie Fans - good news! The Stencil Specialists are sponsoring one Australian prize for this collaboration! You could win a Stampendous stamp, an LL sized Dreamweaver Stencil of your choice, a silicone buttons mould, and a Stampendous Embossing Powder (your color choice)... Wow!! Be sure to let us know you're from Australia in your comments!!

Here's what I've created for this fun hop:


Remember how on an earlier post of mine this week, I mentioned how many cool uses you can think of with these Linnie Blooms Canvas File Folders? This week I've done a greeting card, a portable doodling journal, and today...a gift card holder. The outside was painted with black acrylic paint, and when dry, was pasted in Dreamweaver Regular Embossing Paste with the little Bird on a Branch, and the Large Scales. When dry, the clean and dry stencils were replaced over the pasted surface, and inked with the Tsukineko® Splendor Circus palette and large and small stencil brushes. For the large scales section, I left the stencil on still, and stamped the Stampendous Cling Seed Background in Onyx VersaFine ink over the top. A die cut frame was cut from canvas, inked in green, and stamped with a sentiment from the Perfectly Clear Royal Heart Quotes. The back was stenciled with the same designs, but kept lighter and brighter.

 The inside was ink-stenciled with the Dreamweaver Zen Butterfly in deep periwinkle with the Bird on a Branch stenciled on one wing in black, and along the border with the Large Scales again. I created a mask for the butterfly with a sticky note in order to stamp the Seeds Background over the canvas, and the Cling Cosmos image. the petals were colored a bit, I added some doodling with my .7 Copic Black Multiliner. I cut a slit through the canvas, and adhered strips of May Arts ribbon over the edges to prevent fraying. This became a cute pocket for a giftcard. As before, I sewed another large heart  button on the tab to act as a closure, and added a couple of buttons inside for fun. I really think that this folder was my favorite for this week, but all were fun to create. What do you think? Don't forget to leave your comment below before visiting the rest of the team's bloomin' posts!


Wednesday, May 27, 2015

Stampendous Pop Ups, Puppies, and Pals

Squee overload this week on the Stampendous team posts. Between playing with the new Linnie Blooms products, and playing with our Stampendous Puppies and Pals, you might need a dose of insulin to battle the sweetness!

Following the directions on the Stampendous PopUp Dies, I created the base for my pop up card with blue Bazzill Basics  cardstock and Stampendous Mixed Media White cardstock. I die cut the edges with the fun edge dies that come with the Pop Up Die set, and there are rectangle and oval nesting frames in the same set. What an awesome deal!

My cute critters were stamped from the Playful Puppies Cling Stamp set and the Kitties set, and then colored, shaded and textured with my Copic Sketch Markers. The texture of the fluff on the brown puppy was created by wetting a piece of terrycloth with Copic blending solution, and applying it over the colored surfaces in small patches, and holding for a few seconds in between. So easy and effective. All of the parts and pieces were cut out with their matching die sets (sold separately), and attached to the various tabs on the pop up card. The sentiment came from the Perfectly Clear Life Words, stamped on layered die cut frames from the Pop Up set as mentioned above.


Here's a list of those puppies and pals posters for today:

Wednesday, May 20, 2015

Welcome to the Stampendous Picnic!

Have you had the chance to see all of the fun summery, yummy, picnic-y images that Stampendous has released this spring? You can view them all HERE. Meanwhile, here's what I have to share with you today:
If you followed along with us last week, you'll remember that we had a fabulous collaboration with Clear Scraps. For some reason, my befuddled mind thought that it was the same week as the Picnic week, so I created with both. Um, yeah. So, I'm posting with my Clear Scraps banner card today.

The base card is Bazzill Basics Dotted Swiss in white, stamped with the Cling Picnic Ants border, using Onyx VersaFine from Tsukineko®. I paste-embossed the Dreamweaver OpArt Checkerboard in red on a small section of the clear banner, and set this aside to dry.

Meanwhile, I stamped the Cling Lunch Line in Tuxedo Black Memento, and colored with Copic Sketch Markers. I added the Cling Life is a Picnic sentiment as well. I cut this to fit a portion of the clear banner, edged it with a red marker, and adhered it to the banner. This allowed me to adhere the banner to the card with pieces of foam tape to pop it up off of the card. Some little snippets of May Arts' ribbon were tied through the holes at the top.

Just think how fun it would be to string several of these near your favorite picnic place? Clearly genius.


Just like the ants, march yourself on over to these posts for more yummy fun:


Thursday, April 23, 2015

Dreamweaver: Showers of Showers-Week Four

Ever use the expression, "When it rains, it pours"? This does not have to be a bad thing, does it? For the month of April, the Dream Team are featuring "Showers of Showers" as our theme. As usual, we'd love for you to play along. Just link your creation on the Dream It Up! blog for a chance to win the stencil of your choice...bonus chances for incorporating Dreamweaver and/or Stampendous in your design. Here's what I'm showering you with this week...

So...maybe not precisely a shower card. More like a wedding card. However, I should get points for finally finding my creative mojo again...

This  card uses a base of Bazzill aqua cardstock, a second panel of it with a die cut opening, and machine-embossed with the Dreamweaver Large Damask stencil design. The Stampendous Wedding Couple was stamped and lightly colored with my Copic Sketch Markers. I brushed a bit of DecoArt DecoPage Matte medium, and sprinkled with Stampendous Crystal Micro Glitter. The Stampendous Cling Married Monograms image was stamped in black VersaFine from Tsukineko® and die cut with the Dreamweaver Oval Die. Punched holes at the ends were added for inserting white organza ribbon. All in all, a very simple card to reproduce, and could easily be used as the cover for an invite, or...surprise, surprise...a bridal shower!


For more showers of inspiration, visit the "B" team's posts listed here:

Wednesday, April 15, 2015

A Widdle Dream with Dreamweavers


The Stampendous team are really "Dreaming with a Little Dreamweaver" this week...showing off just how perfect Dreamweaver stencils are with Stampendous images...

One. Two. Three. AWWWWWWWWWW. Isn't this widdle House Mouse Designs® Bottle Bunny the cutest? Cute enough to not pile too much frou frou on top. Just stamped in Tuxedo Black Memento ink, colored with Copic Sketch Markers, wrapped in yummy pink silk ribbon from May Arts, with a tied on tag of the perfect sentiment. The perfect background was created by machine-embossing the Dreamweaver Large Scales stencil on Core'dinations Vintage cardstock, sanding the embossed areas, and swiping over them with Sea Breeze VersaMagic ink from Tsukineko.


Friday, March 20, 2015

Stampendous: Elegantly Eggy

Today is the finale of our Easter themed week over on the Stampendous blog. This is one of my favorite cards that I created for the October '14 catalog. I love playing with a bit of pointillism in my Copic coloring, especially when using my favorite colors. Aqua and yellow always make me think of my "Gran", and she'd have loved this card. The base is aqua cardstock from Bazzill Basics. The print is from Authentique, and has been run through my Big Shot with the Dreamweaver Quatrefoil stencil, and brushed over the surface with Cantaloupe Memento ink. The yummy ribbon is from May Arts (of course!) All of that is the frame to highlight this beautiful "Fabergé-style" Cling Fabulous Egg, with all of the intricacy of the originals, but far more
affordable!

There's still plenty of Easter inspiration to be found today! Just check out these EGGceptional team members:

Stampendous Blog

Amy Hurley-Purdie

Kristine Reynolds

Pam Hornschu

Amy Hurley-Purdie (2nd project)

Lea Kimmel

Janelle Stollfus


Thursday, March 19, 2015

Dreamweaver: Marching into Spring, Week Three

If you are here for my Woodware post, please scroll down, but nothing says that you can't have a bit of fun along the way...

Ready for fresh air, sunshine, new leaves, and flowers blooming? Well, the Dream Team is right there with you! Our challenge for the month of March is...coincidentally...Marching into Spring. Per usual, we'd love to have you play along with us, and link your own creations to the Inlinkz tool on the Dream It Up! blog, or at the bottom of this post. Play as many times as you'd like. Those of you who work Dreamweaver and/or Stampendous products into your projects receive bonus points, but everyone has an opportunity to be the winner who receives the stencil of their choice.

Here's my hint of Spring:

I thought I'd play with a "messy" watercolor look for today's post. In the past, when I've tried to watercolor through the stencils, the color runs underneath, and frustrated me. Then it dawned on me...why not go with that look, but outline the stencil afterwards. I kind of like the end result. I even added a bit of doodling/tangling over the design. The base was a piece of canvas-textured Core'dinations' cardstock in a natural color. The Stampendous Cling Music Score was stamped in black StazOn (to prevent bleeding when wet), and a bit of DecoArt® Media Acrylic in Titan Buff was lightly brushed over the background. The Dreamweaver Stylized Dahlia was taped over the panel, and watercolored, and set aside to dry. When dry, the clean stencil was replaced, and I used a Copic Multi-liner in .03 to trace the design and add some tangles. The card base was a gorgeous shade of cobalt Vintage Cardstock from Core'dinations which I'd run through my Big shot with the Dreamweaver Chevrons stencil, and sanded to reveal the design. A simple panel of green with a stamped sentiment from the Stampendous Perfectly Clear Friendly Phrases set, and a luscious bow from May Arts, and I'm loving the result! How about you?


The "A" team would love to share their interpretations of this theme:


Monday, March 16, 2015

Stampendous: Bunny Wuvs Cupcakes


Pammie wuvs cupcakes, too! And apparently, so does Stampendous! All of this week, the Stampendous team are featuring our newest Easter images, including this darling Easter Cupcake. Mine have been stamped, colored with Copic Sketch Markers, and cut out, to be popped up on top of a chartreuse panel stamped in black with the Cling Floral Tapestry Background, and of course, the perfect sentiment for this card from the Perfectly Clear Life Words. Sprinkles of Multi Crystal Glitter were added on top, and in typical Pammie fashion...pompoms for noses!


Be sure to follow the team all of this week for more Easter inspiration, and cute stuff! You can find the links here:

Stampendous Blog

Jennifer Dove

Kristine Reynolds

Pam Hornschu

Lea Kimmel

Jamie Martin


Tuesday, February 3, 2015

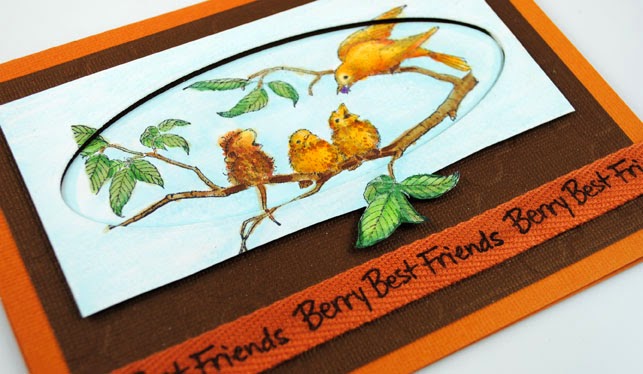
Stampendous: The Berry Besties!

The Stampendous team is celebrating love and friendship this week, and the selection from the catalog is astounding! I felt like playing with the House Mouse Designs® for this.

The Feeding Time image was colored with Copics. The panel was die cut using one of the Dreamweaver Oval Dies. The focal point oval was adhered to the brown cardstock panel that had been machine embossed with the Dreamweaver Quatrafoil background. The remainder of the die cut panel was popped up to add an additional frame to highlight the image. One of the sentiments from the Stampendous Perfectly Clear Beary Mice set was stamped with Onyx Versafine over a length of May Arts Twill ribbon, and adhered as a border.


If you are in the mood for creating Valentine cards, or simply love and friendship, you'll find more inspiration all of this week on the Stampendous Impressions blog. For today, you can visit the list below:

Stampendous Blog

Jamie Martin

Pam Hornschu

Debbie Cole

Jennifer Dove

Amy Hurley-Purdie

Lea Kimmel