Hope you're enjoying all the inspiration featuring Add a Little Dazzle Craft Metal Sheets and Stampendous Stamps and Essentials this week! We know you'd love to win some goodies to try yourself! If you missed the earlier posts, here are the links for you. MONDAY, TUESDAY, WEDNESDAY, THURSDAY
The team over at Add a Little Dazzle has created a special featuring the metals from this blog hop for those of you who have already realized you're going to need these products. You can find it here - Add A Little Dazzle Stampendous Hop Special.
Of course you might win some, too! We're giving away three prize packages this week for comments on the blogs. A nice package of Metal Sheets, Stamps and Cutting Dies!

Here's my creation for today:


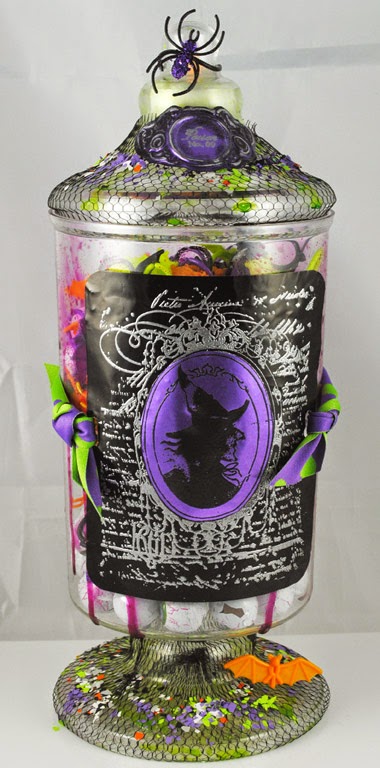
I had soooo much fun creating this apothecary jar! I have five of these jars that are on my shelf in my studio to display buttons, pompoms, rhinestones, flowers, etc., but I just had to steal one from the set. So now my flowers are in a Ziploc bag, lol. But
it was worth it!
I originally started to make a card featuring
Stampendous and the metal from
Add A Little Dazzle. I cut a panel of the black aluminum, and wiped the surface with talcum powder (Johnson &
Johnson to be exact). This acts as an anti-static medium before working with embossing powder or glitter on a staticky surface. I stamped and embossed in
silver the
Stampendous Mirror Mirror Cling Stamp, and stamped and embossed her in
black on a purple metal panel. I cut out that oval, and used a tool to smooth the metal out, which caused it to curve a bit. When I did it to the other panel, I realized this would be cool curved over a jar...so the mad
experiment continued! Bwhahahahaha!
I prepped the jar by spritzing the
outside with
irRESISTable Spray from Tsukineko in Lilac and New Sprout. It dripped down the sides and base, looking a bit gory...heeheehee. When dry, I cut slits in the sides of my Witch panel, and tied it around the jar with wonderful
May Arts reversible polka dot ribbon. I used foam tape to attach the purple witch oval. I wanted a label for the jar, so I used the
Poison Labels Perfectly Clear set, and stamped one of the ornate designs on the back of the purple metal scrap. I used some of my metalworking tools to manipulate the metal and emboss the stamped design into the front. I sanded and inked it a bit to age it before stamping and embossing in
silver the label...Poison No. 9.
I wanted to fill the jar with creepy stuff, and all I could find at my local Target store was some black net bags of spider and bat rings, and some bags of foil-wrapped chocolate balls that were printed to look like eyeballs. All of this was dumped into my jar, and then my eyes fell upon the black net bags! They were perfect to wrap around the lid and the base of the jar, giving it a webby feel. I dribbled some
Gem Tac from Beacon Adhesives over both, and sprinkled heavily with Lime, Purple, and Trick or Treat
Color Fragments. Oh, and I almost forgot, I adhered a flameless tealite inside the knob of the lid with
Quik Grip from Beacon Adhesives to create a candle-lit effect, as well as the metal-worked label on the outside. A bat and a spider made it onto the netting as well...they're tricky that way!
Remember to visit and leave a comment at each of the teams' links below:
P.S. If you click on a blog link and receive a notice that says, "this post is not here", or something similar, just click on the blog header or look for a link that says Home. That should take you to the home page of that blog and the correct post should be near the top. Thanks for your patience. Happy hopping!