Showing posts with label Tsukineko. Show all posts

Sunday, September 20, 2015

Tombow Hop Days Finale


We've been having a fun blog hop mixing Stampendous, Dreamweaver, and one of our favorite craft partners, Tombow, for the last few days. Today's the finale, but I have a distinct feeling that you'll be seeing more of Tombow's wonderful art products in the months to come from our team.

You know there will be prizes for this hop, so leave your kind comments as you go. Be sure to check previous days that you may have missed. All the rules and prizes, etc. will be found on the Stampendous Blog!

Tombow was generous (as usual) with each of us, and my new toys came in the form of their Recycled Colored Pencils. I was really surprised with these. I expected...ho hum...another set of pencils with so much wax in them that you can't get a good vibrant color, and can't layer color, and blend nicely. I was SOOOO wrong! Here's my project:

Check out the beautiful color on this darling House Mouse Carrying Mints image from Stampendous! You really feel like you can steal one of his mints from the pile! I added just a hint of Micro Crystal Glitter to them, but they were yummy all on their own.

The card base was created from a panel of Bazzill Dotted Swiss in white, to which I swiped some Tsukineko® Aegean Sea VersaMagic ink over the surface and around the edges.

I used the Dreamweaver Nested Frames Dies to cut the mat panels for the focal image, and ran them, as well as two more panels of red and green cardstock, through my Big Shot Pro with the Dreamweaver Christmas Borders Embossing Folder. These were all layered, and flipped to be opposite of the other. I swiped some VersaMagic Cloud White ink over the raised designs to highlight them.

Because the House Mouse Designs® image was too large for the die, I ended up with an extra mint, which I turned into a decorative button, and tied with twine over loops of May Art's Chevron Ribbon.
Don't forget to check out the other players links listed here, and in case there have been changes, double-check them on the Stampendous Blog as well! I hope you win, 'cuz you'll love playing with this great mix of Stampendous and Tombow product!


Thursday, September 3, 2015

We're All In with Dreamweaver All in Ones!


This week the Stampendous team have been sharing the newly-released "All in One" stamps for the fall and holiday season. Today, you may see a few of those mixed in with Dreamweaver backgrounds, along with Embossing Paste, etc., but for Dreamweaver Thursday, we'd also like to remind you that Dreamweaver by Stampendous has a great selection of "all in ones" as well.

My post today features, once again, the Season of Joy stencil, but this time I've paste-embossed the design in Matte Black. Once dry, I replaced the clean stencil over the surface, and daubed VersaMark ink over the surface to act as a fixative for the next step...applying beautiful mica Metallic F/X* powders in yummy colors like Sapphire, Wedgewood, Ivy Garden, Cocoa, Red Kimono, Goldfinch, Pewter, and Moonlight.

The top of the panel was torn, and VersaMark brushed over the edges before applying more Goldfinch over the edge. Sprinkles of Stampendous Shabby White Embossing Enamel was sprinkled over the panel, as well as the blue card base, and heated from underneath to melt into beautiful snowy magic.

Now, if you are thinking that the purpose of using an "all in one" image is to save time, you are totally correct. But nothing says that you can't created something extra special for that special someone in your life. Many of the stencil designs also come in an embossing folder for a super-quick "all in one". Just emboss the design into nice cardstock, brush with a soft ink (like Tsukineko's Gold or Silver Delicata), or if embossed into Core'dinations cardstock, just sand over the embossed areas to highlight the design, or ink through the stencil onto a richly colored cardstock, sprinkle with one of the Stampendous beautiful Fran•tagĂ© Embossing Enamels, and heat, or....well you get the picture...all in one!
Let's see how our other Dreamweaver Thursday posters interpret this challenge...


Pam Hornschu (you're here)


*Note: the Metallic F/X powders are not on the Stampendous website, however, they can be purchased through the site. Just add them into the comment section of your order. Or, you can purchase them at one of the local stores listed on the website, as well as the Stencil with Style site.

Thursday, July 23, 2015

Dreamweaver Thursday: Poinsettia Perfection


We are playing with poinsettias all this week, and I saved my favorite for today. I love this delicate Tall Poinsettia stencil from Dreamweaver. Use with Stampendous Micro Glitter in red and pink and green, with the crystal background, the effect is stunning. To offset it, I added a panel of the Dreamweaver Holiday Borders Embossing Folder on pink cardstock, brushed with Pearlescent Orchid Brilliance ink. The May Arts' ribbon is the finishing touch, along with a few Mark Richard's crystals.


Check out the rest of the Dreamweaver posts for today:

Friday, July 17, 2015

Christmas with Chameleon: Finale


 Today is our final day of the Chameleon/Stampendous week, but I can guarantee it won't be the last time we use these innovative pens! With the toner built right into the pen, you can create shading almost instantaneously, without having to haul around hundreds of markers. Perfect for on-the-go crafting! The Chameleon website has several videos demonstrating these pens HERE.

Here's what I've created for today's post:


How simple and effective is this holiday card? And not your everyday holiday colors, either. The new Stampendous Cling Candy Canes have been stamped on our Mixed Media White cardstock in Tuxedo Black Memento, and then colored and shaded with the Chameleon® markers. For extra highlights, I used a glue pen to apply a sprinkle of Crystal Micro Glitter over these sweet treats. A matting of coordinating Bazzill® cardstock colors, along with a luscious May Arts® silk ribbon bow, and this yummy greeting is done! On to the next!
The whole Stampendous team are showing off today! Leave them some love for a chance to win!

Wednesday, July 1, 2015

Under the Sea with Stampendous and Me!


Wouldn't this be fun? All the magic of a mermaid riding on a golden seahorse, through swirls of blue and green and branches of coral!

I tried to capture that feeling with this "window on the sea" card. I die cut a window on the card front, stamped the Cling Coral Tree with Black StazOn ink, and added sprinkles of Crushed Glass Glitter.

The inside was the Seahorse Ride image stamped with Tuxedo Black Memento, and colored with Chameleon Markers, on the Stampendous Mixed Media White cardstock.

The final touch was the Dreamweaver Nautilus, machine embossed on orange cardstock, brushed with ink, cut out and adhered to the front along with an ink stenciled oval of the Nautilus and the Cling Near the Sea sentiment from Stampendous.

For more inspiration, visit the Stampendous blog.

Thursday, June 18, 2015

Dreamweaver Thursday: Wild and Wonderful

The Stampendous team have been traveling all over the wild world this week, posting our creations using the newly released from the "zoo" animal images. I've loved how easy it has been to mix in several Dreamweaver designs for a more uniquely wild project.

The card base was brown Core'dinations Essentials, partially machine-embossed with the Dreameaver Zebra pattern, and partially with the Leopard Spots backgrounds. Then these were sanded to reveal the design and rough things up a bit. The following layers were an orange panel machine-embossed with the Quatrafoil design, and brushed over the surface with Rich Cocoa Memento ink, and a stamped panel of Mixed Media Cardstock with the new Cling Pen Pattern Giraffe image which I'd colored and shaded with Copic Sketch Markers. The giraffe was stamped again on a sticky note, and cut out to create a mask. This was used to protect the colored image while I stamped the Cling Old World Map in Rich Cocoa twice over the panel. The edges were ink-distressed, and the panel was added to the layers. Finally, a die cut of the Dreamweaver Leafless Tree was inked and adhered, along with a die cut Leafy Branch, and a Nested Frame stamped with the Cling Better to Travel sentiment.


Grab your safari gear, and head over to those posting with the Dreamweaver Thursday lineup:

Stampendous Blog

To check out the other "Let's Go Wild" posts for today, start at the Stampendous blog HERE.


Thursday, June 4, 2015

Dreamweaver Thursday: STENtangling...Doodling with Stencils!

This week, the Stampendous/Dreamweaver team are all about tangling and doodling with our images or stencil designs. The Dreamweaver open designs are perfect for STENtangling, as they give you a shape, that is divided into sections, for you to create your own patterns, or follow the patterns of others, including Dreamweaver's Zentangle master, Wayne Harlow, CZT.

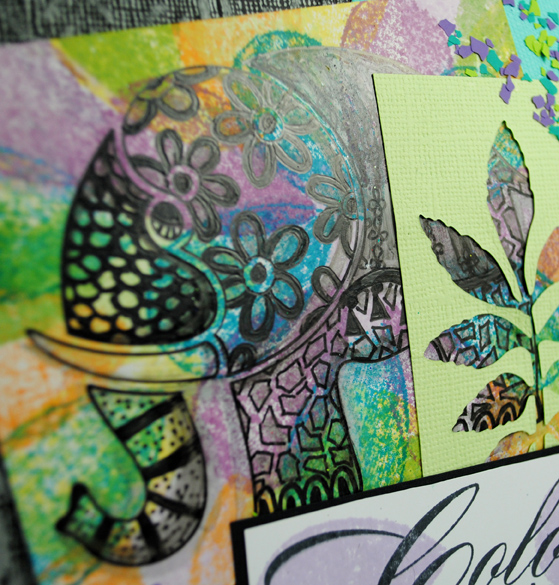
For my post today, I started out with the Open Elephant design, and doodled away inside the spaces using my Faber-Castell Pitt Pens. I love the look of Zentangle, and am in awe of those who do it well (like Wayne, and our own Louise Healy), but I'm really not good at it. My hand shakes a bit, so I can't get the patterns as precise as I would like. So, I doodle. My elephant went a bit hippy-dippy with my doodling, so I sort of "tie-dyed" him by using my teardrop shaped Memento ink pads to add happy colors over the surface, which makes the black doodling really pop.

The base of the card was Core'dinations Vintage gray cardstock, machine-embossed with the Dreamweaver Crusade background, and sanded to reveal the design. Layers were added with an aqua circle, a lime negative die cut using the DW Leafy Branch die, and finally an inked and colored sentiment from Stampendous...Cling Color Outside. Using a glue marker, I added sprinkles of my favorite Color Fragments in Hot Lime, Amethyst, and Teal.


Now let's go see what my fellow doodlers and tanglers are showing off today:

Pam Hornschu (you're here!)

Friday, May 29, 2015

BLOOMIN' with Linnie Blooms Part Two


Welcome to the final hop day of our collaboration with Linnie Blooms! Have you had as much fun as we have? I doubt it...but you could! By the end of today's posts you should be hightailing it out to your nearest craft store or online store and buying up every bit of Linnie Blooms, Stampendous, and Dreamweaver product you've seen this week! Or maybe, just maybe...

YES!  There are prizes!! Three lucky winners will each win a set of Linnie Blooms Fabric Mini File Folders just like they provide for our team. Plus, you'll receive a Dreamweaver Stencil background, and our Vintage Press Perfectly Clear Stamps™ Set. You'll be creating Mixed Media fabric accents in no time! These winners have to have a U.S. mailing address (official rules here), but Aussie Fans - good news! The Stencil Specialists are sponsoring one Australian prize for this collaboration! You could win a Stampendous stamp, an LL sized Dreamweaver Stencil of your choice, a silicone buttons mould, and a Stampendous Embossing Powder (your color choice)... Wow!! Be sure to let us know you're from Australia in your comments!!

Here's what I've created for this fun hop:


Remember how on an earlier post of mine this week, I mentioned how many cool uses you can think of with these Linnie Blooms Canvas File Folders? This week I've done a greeting card, a portable doodling journal, and today...a gift card holder. The outside was painted with black acrylic paint, and when dry, was pasted in Dreamweaver Regular Embossing Paste with the little Bird on a Branch, and the Large Scales. When dry, the clean and dry stencils were replaced over the pasted surface, and inked with the Tsukineko® Splendor Circus palette and large and small stencil brushes. For the large scales section, I left the stencil on still, and stamped the Stampendous Cling Seed Background in Onyx VersaFine ink over the top. A die cut frame was cut from canvas, inked in green, and stamped with a sentiment from the Perfectly Clear Royal Heart Quotes. The back was stenciled with the same designs, but kept lighter and brighter.

 The inside was ink-stenciled with the Dreamweaver Zen Butterfly in deep periwinkle with the Bird on a Branch stenciled on one wing in black, and along the border with the Large Scales again. I created a mask for the butterfly with a sticky note in order to stamp the Seeds Background over the canvas, and the Cling Cosmos image. the petals were colored a bit, I added some doodling with my .7 Copic Black Multiliner. I cut a slit through the canvas, and adhered strips of May Arts ribbon over the edges to prevent fraying. This became a cute pocket for a giftcard. As before, I sewed another large heart  button on the tab to act as a closure, and added a couple of buttons inside for fun. I really think that this folder was my favorite for this week, but all were fun to create. What do you think? Don't forget to leave your comment below before visiting the rest of the team's bloomin' posts!


Thursday, May 21, 2015

Dreamweaver Thursday: Cheerful Cherries for the Picnic

Yep. These are cheerful cherries. They are soaked in a nice red blend wine, so they're really happy! Great in a wine spritzer, over ice cream, or by themselves! Before I drank any, I thought I'd better decorate the jar and write my post. Lol.

The muslin topper was ink-stenciled with the Dreamweaver Opto Checkerboard four times with Majestic Blue VersaFine™ ink from Tsukineko®, and heat set with my heat tool. It was tied over the lid with a bit of polyester batting for added fluff and puff. A stenciled tag with the year of the "harvest" was created with the Dreamweaver Dual Alphabet Die and Leafy Branch Die, along with a bright "cherry" red button.

The front label was created with the complete Dreamweaver Cherries stencil design. The center was taped off while I stenciled the checkerboard around the edge. Then the outside border was taped off while I did the inside design. As this was a bit trickier to mask off, I used the Picasso tool to block areas while I inked the cherries separate from the leaves and branch with Satin Red and Mossy Green VersaFine. Then I placed the Dreamweaver Faux Cross Stitch Screen over the surface on the diagonal, and inked through it with Sepia VersaFine. I highly recommend that you purchase a good set of stencil brushes for projects like this. My favorites are the Dreamweaver ones in several sizes including the largest, and several small ones.

This was layered over red cardstock, and adhered to a wrap of blue burlap. Pretty cute, huh? I think this would be great at the Stampendous Picnic along with the piles of yummies, and the ants might have a harder time taking over the picnic. Hicc. Upp.

Here's the lineup for our Dreamweaver Thursday, but be sure to also visit the Picnic post on the Stampendous blog as well:


Wednesday, May 20, 2015

Welcome to the Stampendous Picnic!

Have you had the chance to see all of the fun summery, yummy, picnic-y images that Stampendous has released this spring? You can view them all HERE. Meanwhile, here's what I have to share with you today:

If you followed along with us last week, you'll remember that we had a fabulous collaboration with Clear Scraps. For some reason, my befuddled mind thought that it was the same week as the Picnic week, so I created with both. Um, yeah. So, I'm posting with my Clear Scraps banner card today.

The base card is Bazzill Basics Dotted Swiss in white, stamped with the Cling Picnic Ants border, using Onyx VersaFine from Tsukineko®. I paste-embossed the Dreamweaver OpArt Checkerboard in red on a small section of the clear banner, and set this aside to dry.

Meanwhile, I stamped the Cling Lunch Line in Tuxedo Black Memento, and colored with Copic Sketch Markers. I added the Cling Life is a Picnic sentiment as well. I cut this to fit a portion of the clear banner, edged it with a red marker, and adhered it to the banner. This allowed me to adhere the banner to the card with pieces of foam tape to pop it up off of the card. Some little snippets of May Arts' ribbon were tied through the holes at the top.

Just think how fun it would be to string several of these near your favorite picnic place? Clearly genius.


Just like the ants, march yourself on over to these posts for more yummy fun:


Friday, May 15, 2015

Stampendous and Clear Scraps: Clearly Creative Hop Day!


Welcome to the final day of the Stampendous/Clear Scraps hop week! Pour yourself a cuppa, and get ready for a clearly creative collaboration! Remember, there are three wonderful prize packages up for grabs. Just leave comments at each of the posts through the entire week for a chance to win. Prize rules can be found HERE.


I went a bit vintage for my project today...my inspiration being the Clear Scrap Deco Frame that I was given to play with. To give the frame some age, I applied Dreamweaver Color Solutions alcohol inks in Aspen Leaf and Creme Brulee to the back of the frame. The front of the frame was stamped with one of the images from the Stampendous' Natalie Kalbach Cling Studio Fiesta set and black StazOn ink. The template that comes with this stamp set is the profile of the man and woman, which I traced onto black cardstock, cut out, and ran through my Big Shot with the Dreamweaver Damask stencil. Some StazOn white ink was swiped over the embossed surface, and the silhouette was adhered to the top of an ink-distressed section of a music sheet. This was then cut to fit the opening and adhered to a piece of acetate cut slightly larger than the opening. I used Beacon Fast Finish as a decoupage medium to adhere the music section to the acetate. More was brushed over the top, and Stampendous Fran•tagĂ© Mica chips were sprinkled over the wet finish. This was set aside to dry. At this point I shifted my focus to my background.

I knew that I wanted to create a background that would make my framed couple the focal point. I started with a square piece of Bazzill BlackBoard, which I ink-stenciled with the white ink and the Dreamweaver Stripes stencil. A narrow panel of ivory cardstock was ink-stenciled with the Damask stencil again using Rich Cocoa and Peanut Brittle Memento inks from Tsukineko®. Velvet and lace ribbon from May Arts was adhered along the edges of this panel. Now I could put the rest of this together...

The acetate piece with the music and silhouette were adhered to the panel. The frame was popped up over the top using dimensional glue dots. To embellish the frame, I stamped the flower image from the Fiesta set multiple times on the scraps of music sheet, and spritzed them with Dreamweaver Memories Mists in Pale Ale and Mango Lemonade. I cut them, loosely following the line of the design, and curled and "smooshed" them  into layered flowers to adhere along the edges. Some May Arts plaid ribbon was looped and tied with a piece of twine and a vintage button to add to the frame. The same ribbon was wrapped around the handle of the wood frame. The final touch was two Dreamweaver die cut ovals layered, with the Stampendous Cling Mr. & Mrs. stamped in black ink. This too was popped up on the framed project. Oh, wait...I forgot the most important elements that I added...glued edges on the flowers with Stampendous Gold Crushed Glass Glitter for extra vintage charm.
 Here is where you leave me a charming comment before moving on the rest of the teams. If you've missed any of the previous days, start at the beginning with this post HERE.



Pam Hornschu (you're here)


Monday, May 4, 2015

Stampendous with Dreamweaver: Honoring the Brave

I created this two years ago in honor of America's Memorial Day, celebrated every year at the end of May. Here's what I wrote...

"In the USA, we honor the service men and women who have given their lives for our country in protection of our freedom and democracy, this time every year with Memorial Day. It's a time where families and friends get together for a relaxing celebration, and between bites of barbeque, fruit salad, and a couple of beers, we try to remember what this day is all about. Because others gave of themselves in the ultimate acts of bravery, we have the opportunity to enjoy the pleasures of picnics and parties. To some this may seem frivolous, but as the Bible tells us, "There's a time for laughter and a time for tears...", and Memorial Day is a mix of both.

I created a card in memory of these Americans, as a giant Thank You to them all. Featuring Dreamweaver's Bold Thank You and Star Swirl stencils, I did a marbled pasting of both, with a Joseph's Coat technique on the background panel. Something new which I only learned recently in conjunction with the Dreamweaver Teacher Certification* workshops that were taught last week in the Chicago, Illinois area.

I laid down inked stripes of Ladybug Red and Danube Blue Memento on glossy cardstock. Then I pasted the Star Swirls over the top in Translucent paste. When dry, I applied Galaxy Gold Brilliance ink over the entire surface, before using a damp paper towel to remove the ink from the pasted portions. These previously pasted portions resisted the ink, making it simple to wipe away. I used my heat tool to "set" the ink afterwards. The Thank You was marble pasted, allowed to dry, and cut out to pop up off of the card.

Happy Memorial Day to everyone! May all of us remember those who came before us, and work still to provide us with the opportunity for every celebration we have. This is a day of respect and remembrance."

The Stampendous team are honoring our home of the brave all of this week. Please follow along for some patriotic inspiration...

Wednesday, April 29, 2015

"KLIK" as a Wink or Jewelry in a Snap?


Klik Interchangeable Jewelry from Metal Complex is a fantastic new line of DIY accessory options. With two snap sizes and dozens of settings to snap your creations into, this terrific product is fun to play with for every level of crafter. There are tons of pre-made snaps so you can just “klik and go” to change up your look. But this week we’re playing with the Metal Complex Snap Bezel Blanks so we can craft our own masterpieces of wearable art. Along with this collaboration, we are working with Envirotex Jewelry Resin...an amazing product to easily make the jewelry of your creative dreams! 

Yes, there will be prizes...three random winners will receive a prize package that includes Klik Snap Bezel Blanks and jewelry components, a package of ETI Resin and a Stampendous Eclectic Perfectly Clear Stamp Set. To win one of these awesome prize packages, you need to comment on the Stampendous blog and that of each Stampendous designer in the list provided below. Eligible winners are those comments that provide a valid email and indicate a U.S. Mailing address. Here are the Stampendous Official Rules for all contests. Commenting will close Sunday, May 3rd and winners will be announced the afternoon of May 4th.

Here's what I've created for today:


I'm saving my more elaborate piece for my post on Friday, so be sure to check back. For today, I wanted to show how easy you can create a more masculine look with these products. The basic bracelet is a black leather wrap and snap, with three snap sections on it. The large bezel won't fit on this bracelet, but I wanted a larger focal piece. For the base, I die cut a 2 1/2" circle of clear polyshrink plastic. With black StazOn ink from Tsukineko®, I added the Natalie Kalbach Cling "Mish Mesh" circle design, as well as a couple of the Perfectly Clear Steampunk Gears, and finally my son, Bryan's, monogram using the Perfectly Clear Vintage Upper Case Alphabet. I carefully swiped a bit of talcum powder over the front and back to act as an anti-static medium, used my heat tool to shrink. As soon as the shrink process was complete, I placed a clean acrylic block over the top to flatten completely. I placed this piece balanced on top of a couple of pencils laid side by side, on top of my non-stick craft mat. Following the package directions, I mixed up a small amount of the Jewelry Resin, and poured it over the top of my disc until it domed on top, and dripped a bit over the edges. Then I sprinkled a few of the Stampendous "Trick or Treat" color fragments on the surface, and using the tip of a thin piece of wire, I pressed these under the surface of the resin. If you have a few bubbles, just blow softly over the top of the surface and they magically disappear! Once the resin was cured (12-24 hours), I adhered it to the top of a snap piece with some Beacon Quick Grip adhesive. Two more of the snaps were sponged with StazOn, and heated to set the ink, and two small orange eyelets were glued to the inside of the snap. Remember, you  can create multiple looks with these...just buy and create more snaps and designs!


Hop around and visit the posts for today: