Showing posts with label Christmas. Show all posts

Sunday, September 20, 2015

Tombow Hop Days Finale


We've been having a fun blog hop mixing Stampendous, Dreamweaver, and one of our favorite craft partners, Tombow, for the last few days. Today's the finale, but I have a distinct feeling that you'll be seeing more of Tombow's wonderful art products in the months to come from our team.

You know there will be prizes for this hop, so leave your kind comments as you go. Be sure to check previous days that you may have missed. All the rules and prizes, etc. will be found on the Stampendous Blog!

Tombow was generous (as usual) with each of us, and my new toys came in the form of their Recycled Colored Pencils. I was really surprised with these. I expected...ho hum...another set of pencils with so much wax in them that you can't get a good vibrant color, and can't layer color, and blend nicely. I was SOOOO wrong! Here's my project:

Check out the beautiful color on this darling House Mouse Carrying Mints image from Stampendous! You really feel like you can steal one of his mints from the pile! I added just a hint of Micro Crystal Glitter to them, but they were yummy all on their own.

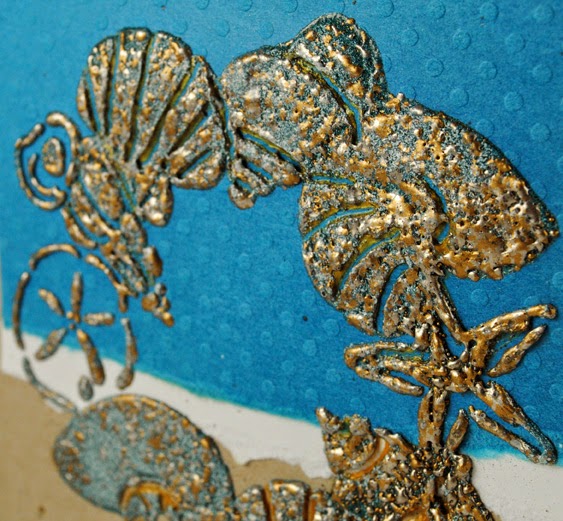
The card base was created from a panel of Bazzill Dotted Swiss in white, to which I swiped some Tsukineko® Aegean Sea VersaMagic ink over the surface and around the edges.

I used the Dreamweaver Nested Frames Dies to cut the mat panels for the focal image, and ran them, as well as two more panels of red and green cardstock, through my Big Shot Pro with the Dreamweaver Christmas Borders Embossing Folder. These were all layered, and flipped to be opposite of the other. I swiped some VersaMagic Cloud White ink over the raised designs to highlight them.

Because the House Mouse Designs® image was too large for the die, I ended up with an extra mint, which I turned into a decorative button, and tied with twine over loops of May Art's Chevron Ribbon.
Don't forget to check out the other players links listed here, and in case there have been changes, double-check them on the Stampendous Blog as well! I hope you win, 'cuz you'll love playing with this great mix of Stampendous and Tombow product!


Friday, September 11, 2015

"Popping Up" to Create Some Christmas Fun!

Have you learned a bazillion ways to Create Christmas with the new Jumbo Stamps and Dies from Stampendous? We have a few more for you today!


I've created a Pop Up Christmas card using the Pop Up Dies set. This enabled me to add more dimension and fun to the card. The images were stamped and die cut. I used the edge of my palette knife to dab some Dreamweaver Regular Embossing Paste along each layer of the tree. I sprinkled the wet paste heavily with Stampendous' new Sparkle Puff Embossing Powder, and heated the whole thing. Now it's puffy and sparkly and snowy! For the inside base I ink stenciled the Dreamweaver Holiday Greetings design. Then I paste-embossed just sentiment portion on contrasting cardstock, and sprinkled it with the Sparkle Puff as well. A stamped and die cut star was layered using green and glitter white cardstock from Core'dinations, and adhered to the very top pop up tab of my pretty plaid paper. I stamped words and ink distressed a section of flag trim with the Stampendous Perfectly Clear Joyful Phrases. All of the same images, sentiments, embossing powders, and stencils were used to decorate the front of the card as well. The Pop Up cards make such an impact and display for the holidays...or any time of the year.


More creative Christmas fun coming your way...


Thursday, September 10, 2015

Dreamweaver Thursday: Creating Christmas with Dreamweaver

Mixing up some fun for Dreamweaver Thursday by adding the new Stampendous Create Christmas stamp set and dies, and jazzing it up a bit with the Dreamweaver Christmas Borders Embossing Folder.

The large tree was stamped in black on Core'dinations White Glitter Silk cardstock, and die cut, along with one cardinal on red cardstock and die cut as well.

I ran a panel of Chalk Core blue from Core'dinations through my Big Shot pro machine with the Christmas Borders Embossing Folder, and used their sanding block to highlight the embossed design for my background pattern.

I swiped Cyan VersaColor ink from Tsukineko® over the inside of the same embossing folder, and placed the tree inside, and embossed this as well. This presses the ink into the surface, highlighting the embossed design.

I used one of the Joyful Phrases sentiments stamped on the card, matted the Chalk Core panel in white, and using a Cyan VersaColor cube, I colored the black and white Chevron ribbon from May Arts to match. This was adhered behind the tree. The final touch was the bright pop of my red cardinal.

Any of these new Jumbo designs can be stenciled or embossed with the Dreamweaver designs, either in stencil form or embossing folders. A quick way to create something special.


Here's some more Christmas creations featuring Dreamweaver by Stampendous:


Pam Hornschu (you're here)

Amy Hurley-Purdie

Wednesday, September 9, 2015

Create a Little Vintage Christmas


Here's a quickie post for this week's "Create Christmas" challenge on the Stampendous blog. If you follow both the Stampendous team and the Woodware UK team, you'll see this twice.

I used a basic manila tag which I ink-distressed with Vintage Sepia Versafine and Toffee Memento inks from Tsukineko. I stamped the crackle background from Andy Skinner's Cling Industrial set by Stampendous randomly around the edges. I ink-stenciled the Dreamweaver Large Flourish design using a large stencil brush. A sentiment from the Perfectly Clear Joyful Phrases set was stamped in Tuxedo Black Memento.

The tree from the Stampendous Cling Create Christmas set was stamped in black on green cardstock, and die cut with it's matching set of dies. Some ink-distressing was added before running it through my Big Shot Pro with the Large Flourish stencil. I swiped a bit of brown ink over it to highlight the embossed surface. I  cut off a portion of the tree before adhering it to the tag along with a tartan ribbon bow.

Who else is playing today?

Woodware: The Best Things Come in Threes


This was a fun challenge for this week! I had a mad bit of panic realizing that I needed to get these done in order to get the pictures off to Dorothy for the Woodware blog.  A Trio of Tags challenge sounds like a bit much to do quickly, but I seem to do my best work under pressure. Lol. I'll breathe later!

All three tags were created with a vintage and distressed look. (Works well when you're in a hurry as mistakes can instantly become a reason for more distressing.)


The first tag features the new Stampendous Create Christmas Jumbo Cling set, along with its matching set of dies. The tree was stamped on green and die cut. The tree was run through my embossing machine to emboss the Dreamweaver Large Flourish design into it. Brown ink was brushed over it and around the edges. Part of the tree was cut off on the side, and the tree was adhered to a tag which had been ink-distressed and ink-stenciled with the Flourish design as well. A stamped sentiment from the Stampendous Perfectly Clear Holiday Expressions, a hemp tie, self-adhesive lace, Card Candi, and a tartan ribbon bow finished off this tag.

Tag number two has a winter theme, create by a wash of pale blue-gray paint over a manila tag. The tag was run through my embossing machine with the Dreamweaver Christmas Borders Embossing Folder. The ClearSnap Denim Mixed Media inkpad was swiped over the embossed surface to highlight the design. A square of white canvas cardstock was washed with a bit of paint as well, and a  Stampendous Snowflakes die was used to punch out the opening. This square was popped up with foam tape about a square stamped with one of the Stampendous Holiday Expressions sentiments. Another piece of self-adhesive lace was added to this tag as well, and Mark Richard's Crystals were added to define the points of the snowflake. Finally, an organza ribbon tie was heat-crinkled slightly to add to the vintage look.
For the final tag, I used a kraft base tag, distressed around the edges with some brown and black inks. The Stampendous Cling Christmas Love was stamped in black. The bottom portion of the tag was covered in strips of Woodware's Self-Adhesive Damask ribbon, with a Red Fine Glitter covered panel of double-sided adhesive on red cardstock, which had been die cut with the Dreamweaver Holly die for the opening. Self-adhesive pearls were added as berries, and a hemp tie, tartan ribbon bow, and more Damask ribbon tape was added to embellish this tag.


Thursday, September 3, 2015

We're All In with Dreamweaver All in Ones!


This week the Stampendous team have been sharing the newly-released "All in One" stamps for the fall and holiday season. Today, you may see a few of those mixed in with Dreamweaver backgrounds, along with Embossing Paste, etc., but for Dreamweaver Thursday, we'd also like to remind you that Dreamweaver by Stampendous has a great selection of "all in ones" as well.

My post today features, once again, the Season of Joy stencil, but this time I've paste-embossed the design in Matte Black. Once dry, I replaced the clean stencil over the surface, and daubed VersaMark ink over the surface to act as a fixative for the next step...applying beautiful mica Metallic F/X* powders in yummy colors like Sapphire, Wedgewood, Ivy Garden, Cocoa, Red Kimono, Goldfinch, Pewter, and Moonlight.

The top of the panel was torn, and VersaMark brushed over the edges before applying more Goldfinch over the edge. Sprinkles of Stampendous Shabby White Embossing Enamel was sprinkled over the panel, as well as the blue card base, and heated from underneath to melt into beautiful snowy magic.

Now, if you are thinking that the purpose of using an "all in one" image is to save time, you are totally correct. But nothing says that you can't created something extra special for that special someone in your life. Many of the stencil designs also come in an embossing folder for a super-quick "all in one". Just emboss the design into nice cardstock, brush with a soft ink (like Tsukineko's Gold or Silver Delicata), or if embossed into Core'dinations cardstock, just sand over the embossed areas to highlight the design, or ink through the stencil onto a richly colored cardstock, sprinkle with one of the Stampendous beautiful Fran•tagé Embossing Enamels, and heat, or....well you get the picture...all in one!
Let's see how our other Dreamweaver Thursday posters interpret this challenge...


Pam Hornschu (you're here)


*Note: the Metallic F/X powders are not on the Stampendous website, however, they can be purchased through the site. Just add them into the comment section of your order. Or, you can purchase them at one of the local stores listed on the website, as well as the Stencil with Style site.

Thursday, July 30, 2015

Pretty in Paste: Day Four...Dreamweaver Thursday

Have you seen enough embossing paste yet? Of course not! Dreamweaver's Embossing Pastes are so versatile and high quality, that everything you create with them becomes a work of art.

My card today features the same step-by-step process as I demonstrated in my tutorial on Monday, only using different stencils.

The Dreamweaver Snowflakes background stencil was paste-embossed in Pearlescent paste on a slate blue card, sprinkled with the Stampendous Ice Blue Specialty Enamel, and heated until bubbly and set.

I used the Oval Ornaments Nesting Dies to create one ornament, which I paste-embossed the Southwest Snowflake design in Silver paste, sprinkled this with Silver Embossing Powder, and heated until bubbly and set.

Just a few rhinestone stickers, and a swirl of silver tinsel cord finished off this icy blue textural greeting card.

Check out these links from more of my pasty pals:

Stampendous Blog


Wednesday, July 29, 2015

Pretty in Paste: Day Three

k
Today's Pretty in Paste card features one of the Dreamweaver all-in-one designs...Season of Joy. The process is simple and effective:

1. Place stencil on panel of cardstock, and tape on all four sides with removable tape.
2. Place a large dab of Pearlescent Embossing Paste on edge of Paste Spreader using palette knife.
3. Place edge of spreader with paste at top of design. Hold spreader with your fingers splayed out over the curved handle, and pull the paste over the stencil in one smooth pass. If there are any gaps, dab a bit of paste in them with the tip of palette knife, and then use spreader to pass over surface once more.
4. Place excess paste back in jar. Wipe around the lip of jar with clean paper towel or rag, and seal.
5. Carefully remove tape from three sides, using the fourth as a hinge to lift the stencil up and off.
6. Immediately place stencil and tools in water to be cleaned when done.
7. Sprinkle wet paste with Stampendous Ice Blue Embossing Enamel, and heat until bubbly and set. Sprinkle a bit of Shabby White Embossing Enamel, and heat from underneath for a bit of "snow".
8. Mat the panel and adhere to card.


For more info, visit the Stampendous Blog.

Tuesday, July 28, 2015

Pretty in Paste: Day Two


I still love the look of this crackle-pasted stocking card for the holidays! Here's how it was made:

1) Tape down the Stocking stencil on black cardstock, and paste it with Matte Black Embossing Paste. Set aside to dry.
2) Meanwhile, fold Bazzill Dotted Swiss red cardstock to create card. Layer a black and light blue panel of cardstock together, and adhere to the card.
3) Paste over the top of dried black paste with Crackle Embossing Paste. Let dry.
4) Meanwhile, ink-stencil in black the Happy Holidays stencil on a scrap of light blue, and round corners.
5) When surface is dry and crackled, tape the stencil back over the top, and using the Tsukineko Splendor inkpad as your palette, along with medium and large stencil brushes, ink color over the background, the cuff, and the heel and toes areas. Heat set ink a bit.
6) Continue to ink your design elements (Antler Snowflake and Christmas Borders), and heat set these as well.
7) Use the large Stocking Die to cut out your stocking, and adhere it to the black panel on your card, except at the top. Insert sentiment into the top of stocking.
8) Embellish with May Arts polka dot ribbon, velvet ric rac, and a sparkle pompom (trim a bit off of the back to help adhere to the flat surface.
Here's a link to a step-by-step tutorial on this technique by previous Stampendous/Dreamweaver team member, Cyndi Bundi, from the Paper Craft Planet blog.
For more inspiration, here's the lineup for today:


Friday, July 17, 2015

Christmas with Chameleon: Finale


 Today is our final day of the Chameleon/Stampendous week, but I can guarantee it won't be the last time we use these innovative pens! With the toner built right into the pen, you can create shading almost instantaneously, without having to haul around hundreds of markers. Perfect for on-the-go crafting! The Chameleon website has several videos demonstrating these pens HERE.

Here's what I've created for today's post:


How simple and effective is this holiday card? And not your everyday holiday colors, either. The new Stampendous Cling Candy Canes have been stamped on our Mixed Media White cardstock in Tuxedo Black Memento, and then colored and shaded with the Chameleon® markers. For extra highlights, I used a glue pen to apply a sprinkle of Crystal Micro Glitter over these sweet treats. A matting of coordinating Bazzill® cardstock colors, along with a luscious May Arts® silk ribbon bow, and this yummy greeting is done! On to the next!
The whole Stampendous team are showing off today! Leave them some love for a chance to win!

Friday, December 19, 2014

Stampendous: More Pen Patterns

It's just not the holidays without piles of sparkle, and the Stampendous Pen Pattern images are perfect for adding plenty of glitter!

The Pen Pattern Snowman was stamped with Tuxedo Black Memento ink on white cardstock, along with the Pen Pattern Waves. I used a Zig Glue Marker to adhere Stampendous Micro Glitter from the Spring Kit, in bright pink, lime, and aqua, and filled in other areas with Multi Crystal Micro Glitter...kind of like painting with glitter! The wave designs were cut in half and adhered from  both sides of the focal panel. "Joy" from the Holiday Wishes Clear Set was stamped on the card, and a bright pink pom pom was added to Snowy's hat 'cuz...you know me...love my pom poms!

Be sure to check out each day of this week's posting and links from the Stampendous blog, and play along with our challenge. You can find all the details HERE.


Thursday, December 18, 2014

Dreamweaver: Quick and Thick

In a flurry of a hurry? This month the Dream Team are all about the Quick and Cute...whether that be cards, gifts, wrapping, or tags...we have sleigh-loads of ideas! Play along by posting your creations using the Inlinkz tool on the Dream It Up! blog, for a chance to win the stencil of your choice, and a possible bonus stencil for using Dreamweaver products in your Quick and Cute project! Here's what fun I've been up to this week:

As we've finally been getting some "chillier" weather in SoCal, I thought my post today should conjure up thoughts of warm and sunny beaches, just to keep myself confused! I am so in love with the new Dreamweaver Shell Wreath...appropriate for Christmas, yes, but appropriate for those who just love the beach. I made this card for a friend who loves all things beachy, along with an ornament using the same stencil. However, I'll post the ornament another time as it is fairly simple, but very involved and, therefore, does not fall into the "Quick and Cute" category for this month. Now, you're looking at this card and thinking that this card is quite involved as well. Nope. Not really. Here's what I did...

First I created a panel from teal Dotted Swiss, plain white, and kraft cardstocks, with the teal and white edge torn to mimic the shoreline against the sand. Then I went on to paste-emboss the wreath on this panel in Metallic Gold, as well as the Mele Kalikimaka (Hawaiian for Merry Christmas) sentiment on the kraft card base. The sentiment was set aside near a small fan to dry.

Meanwhile, I poured a good portion of Stampendous Aged Teal Embossing Enamel on top of the wet paste. I used my heat tool to melt the enamel, and in the process puff up the paste as well. As a side benefit, the paste is pretty much dry now...and looks gorgeous! Chunky, metallic, and elegant, but more importantly...quick and easy. A great "conveyer belt" type of card to do in multiples, and gather in all the ooohs and aaaahs that will be coming your way.


I'd love to receive a comment from you before you head on to the rest of the "A" team:


Wednesday, December 17, 2014

Stampendous: Pen Patterns are Positively Picturesque!

This week the Stampendous team are having a joyful time playing with the Pen Pattern images! They are all so cute, as you can see HERE! One of my faves is this darling Pen Pattern Penguin. Most of the Pen Pattern images are so fun to color, but sometimes you just want to complete a card in a hurry. So, I just stamped him three times on white cardstock with Paris Dusk Memento ink. The first one was on a square panel, with rounded corners. The second one required being cut out around the head, wings, and gift, and adhered over top of the previous one with dimensional tape. The final one was just the scarf, brim, and wings, and adhered on top of the other two. White glue was brushed over the gift ribbon and the fluffy brim, and Medium Multi Crystal Glitter added for sparkle. I added a tinsel pompom as well. (Just a tip...snip a portion of the fluff off the back of the pompom to adhere flat.)

The dark blue panel was machine embossed with my Dreamweaver Christmas Borders Embossing Folder. A few messages from the Stampendous Perfectly Clear Holiday Words were stamped in the blue ink on white cardstock together, and die cut with the Dreamweaver Nesting Frames, and adhered to the card. More messages were stamped inside.


We always love when you share your creations with us, either by emailing them to Stampendous, or posting on the Stampendous Facebook page. If you'd like more info on playing with the monthly challenges, click HERE.

Head over to the Stampendous blog to see who else is playing today, and check back there again tomorrow!

Thursday, December 11, 2014

Dreamweaver: Cute, Cute, Cute!

Here for the Stampendous/Art Anthology hop? Please scroll down, and enjoy the view as you go!

In a flurry of a hurry? This month the Dream Team are all about the Quick and Cute...whether that be cards, gifts, wrapping, or tags...we have sleigh-loads of ideas! Play along by posting your creations using the Inlinkz tool on the Dream It Up! blog, for a chance to win the stencil of your choice, and a possible bonus stencil for using Dreamweaver products in your Quick and Cute project! Here's what fun I've been up to this week:

This card is a perfect example of why it occasionally okay to leave a mess on your workspace. I've been working with copious amounts of glitter lately, some of it being rather chunky. So, after I ran my panel of Core'dinations Chalk Core cardstock through my Big Shot with the Dreamweaver Heart Ornaments stencil, there were some additions in the sanding process. Using the Core'dinations sanding tool over the embossed image revealed the stencil design in chalky white which is very cool. However, it also revealed areas where there were bits of glitter underneath. Ordinarily this would not  be something you would want, but in this case, it created the perfect snowy impression!

As far as being quick and cute, the panel takes about a minute to complete before adhering it to the Dotted Swiss card with Beacon Zip Dry, and adding a scrap of May Arts ribbon and ric rac with a quickly stamped tag from Stampendous' Holiday Words set.


I'd love to receive a comment from you before you head on to the rest of the "B" team:


An InLinkz Link-up