Showing posts with label Core'dinations. Show all posts

Thursday, September 17, 2015

Cool Products, Cool Techniques, More Fun with Tombow

https://www.youtube.com/watch?v=Qb01fGtd0FE

As we approach our exciting hops days with Tombow, we're hoping to get YOU as excited as we are! So we're sharing a very interesting and cool technique that artist Marie Browning has been teaching with Tombow products for a few years now...called, "Zero Drawing". I've shared Fran Seiford's tutorial above on her mix of Dreamweaver stencils with this technique. This is something Marie has done for several years as she and Dreamweaver's original owner, Lynell Harlow are friends, and had collaborated on this before. 
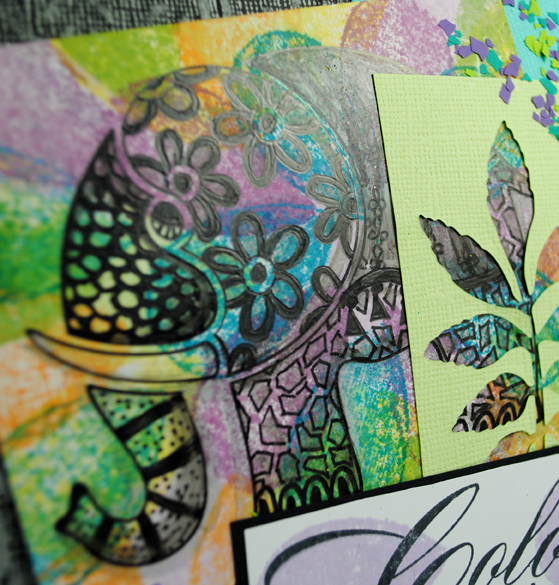
My version of this technique features the Dreamweaver Corner Flowers stencil. As shown in the video, I've sanded my Tombow Graphite Pencil a bit to create some "dust", and pounced this over my chosen paper (Canson textured). Placing the stencil on top, and taping it down with removable tape, I began to "Zero out", or erase the areas of the design using Tombow's Mono Zero and Non PVC Mono eraser. You can also use a kneadable eraser, as Fran demonstrates in the video, however I couldn't find mine, so I went with what Tombow so kindly provided for us.
Once I had erased the design areas, I stamped the Cling Dance in the Rain image in black ink on the panel. I loved the look of the pattern on her dress, so I only erased the pattern from her back and arms. Thinking that this very "grayscale" look need a pop, I used my Tombow Recycled Color Pencils to color the flower and her shoes in red, and added a bit of outlining with the black pencil.

For the card base, I used a panel of Core'dinations cardstock which I machine-embossed with the Corner Flowers stencil, and sanded to reveal the design. Once again, I added the pop of red to a flower, and outlined it as well. The focal panel was matted in red, and a black and white chevron ribbon from May Arts was the finishing touch.

I can hardly wait to see how my team members have been playing with these products. Let's go see...


Friday, September 11, 2015

"Popping Up" to Create Some Christmas Fun!

Have you learned a bazillion ways to Create Christmas with the new Jumbo Stamps and Dies from Stampendous? We have a few more for you today!


I've created a Pop Up Christmas card using the Pop Up Dies set. This enabled me to add more dimension and fun to the card. The images were stamped and die cut. I used the edge of my palette knife to dab some Dreamweaver Regular Embossing Paste along each layer of the tree. I sprinkled the wet paste heavily with Stampendous' new Sparkle Puff Embossing Powder, and heated the whole thing. Now it's puffy and sparkly and snowy! For the inside base I ink stenciled the Dreamweaver Holiday Greetings design. Then I paste-embossed just sentiment portion on contrasting cardstock, and sprinkled it with the Sparkle Puff as well. A stamped and die cut star was layered using green and glitter white cardstock from Core'dinations, and adhered to the very top pop up tab of my pretty plaid paper. I stamped words and ink distressed a section of flag trim with the Stampendous Perfectly Clear Joyful Phrases. All of the same images, sentiments, embossing powders, and stencils were used to decorate the front of the card as well. The Pop Up cards make such an impact and display for the holidays...or any time of the year.


More creative Christmas fun coming your way...


Wednesday, August 26, 2015

"Let it Go" and "Build a Snowman" with Stampendous

The Stampendous team have been building snowmen all this week, featuring this fun Perfectly Clear Build a Snowman set. For my post today, I created an entire snow family in a pop up card. Easy to accomplish by using the Stampendous Pop Up Die Set. Think how cool it would be to create your own family of snow people. You could even personalize them to sent out to family and friends.

My snow family are dressed in matching plaid 'cuz i love plaid, almost as much as I love pompoms...which, you notice, adorn each hat!
 
I've die cut a few Stampendous snowflakes from the same Core'dinations Glitter cardstock as the card base, and added some extra sparkle with the Fran•tagĂ© Spoonful of Snow. This product has a holiday-perfect mix of Chunky White Embossing Powder, Shave Ice, Crystal Glitter, etc.


Check out some more snow friends at the links below:

Pam Hornschu (you're here)

Friday, August 21, 2015

Dreamweaver Double Days Finale!

For my post today, I thought I'd give you a double-dose of the Corner Flowers stencil done with two techniques...

This first card uses the Letter Press technique. The stencil was sprayed with Memories Mist Diet Cola. The white cardstock panel had been previously misted with Mango Lemonade and Pink Lemonade, and now was placed facedown on top of the sprayed stencil. The rubber embossing mat and two clear plates were placed on top before running all through my Big Shot Pro (any embossing machine will do). The dark ink transfers, and impresses into the panel, with only the color showing through the flower design. I used Card Candi in polka dots as the embellishment for a bit of whimsy.


For this card, I ran a panel of Core'dinations Black Magic with a pink core through my embossing machine, but this time the panel was placed upside down over the stencil so that the portion that was embossed was the negative portion of the design. When sanded, the flowers remain black, but the background shows a distressed and textured version of the negative space. A few crystals, a sentiment tag, and a sheer dotted ribbon from May Arts, and you have a simply spectacular card!
Check out the posts for the rest of the team today, to double your fun!

Pam Hornschu (you're here)

Thursday, June 18, 2015

Dreamweaver Thursday: Wild and Wonderful

The Stampendous team have been traveling all over the wild world this week, posting our creations using the newly released from the "zoo" animal images. I've loved how easy it has been to mix in several Dreamweaver designs for a more uniquely wild project.

The card base was brown Core'dinations Essentials, partially machine-embossed with the Dreameaver Zebra pattern, and partially with the Leopard Spots backgrounds. Then these were sanded to reveal the design and rough things up a bit. The following layers were an orange panel machine-embossed with the Quatrafoil design, and brushed over the surface with Rich Cocoa Memento ink, and a stamped panel of Mixed Media Cardstock with the new Cling Pen Pattern Giraffe image which I'd colored and shaded with Copic Sketch Markers. The giraffe was stamped again on a sticky note, and cut out to create a mask. This was used to protect the colored image while I stamped the Cling Old World Map in Rich Cocoa twice over the panel. The edges were ink-distressed, and the panel was added to the layers. Finally, a die cut of the Dreamweaver Leafless Tree was inked and adhered, along with a die cut Leafy Branch, and a Nested Frame stamped with the Cling Better to Travel sentiment.


Grab your safari gear, and head over to those posting with the Dreamweaver Thursday lineup:

Stampendous Blog

To check out the other "Let's Go Wild" posts for today, start at the Stampendous blog HERE.


Thursday, June 4, 2015

Dreamweaver Thursday: STENtangling...Doodling with Stencils!

This week, the Stampendous/Dreamweaver team are all about tangling and doodling with our images or stencil designs. The Dreamweaver open designs are perfect for STENtangling, as they give you a shape, that is divided into sections, for you to create your own patterns, or follow the patterns of others, including Dreamweaver's Zentangle master, Wayne Harlow, CZT.

For my post today, I started out with the Open Elephant design, and doodled away inside the spaces using my Faber-Castell Pitt Pens. I love the look of Zentangle, and am in awe of those who do it well (like Wayne, and our own Louise Healy), but I'm really not good at it. My hand shakes a bit, so I can't get the patterns as precise as I would like. So, I doodle. My elephant went a bit hippy-dippy with my doodling, so I sort of "tie-dyed" him by using my teardrop shaped Memento ink pads to add happy colors over the surface, which makes the black doodling really pop.

The base of the card was Core'dinations Vintage gray cardstock, machine-embossed with the Dreamweaver Crusade background, and sanded to reveal the design. Layers were added with an aqua circle, a lime negative die cut using the DW Leafy Branch die, and finally an inked and colored sentiment from Stampendous...Cling Color Outside. Using a glue marker, I added sprinkles of my favorite Color Fragments in Hot Lime, Amethyst, and Teal.


Now let's go see what my fellow doodlers and tanglers are showing off today:

Pam Hornschu (you're here!)

Thursday, May 7, 2015

Patriotic Panache with Dreamweaver and Stampendous

Who doesn't love fireworks? They are definitely associated with 4th of July in the United States, and other national holidays around the world. My post today features the Dreamweaver Fireworks Embossing Folder, machine-embossed into Core'dinations Vintage cardstock in, of course, red and white and blue. Each section was sanded to reveal the design. If you do three full size panels, and cut them in threes, you now have the supplies to create three complete cards. The finishing touch? A layered banner stamped with portions of the Stampendous Perfectly Clear Happy Greetings and the Vintage Lower Case Alphabet.

Here's a link list to those of the new Stampendous/Dreameaver team who are posting today:

Pam Hornschu (you're here)

Wednesday, April 15, 2015

A Widdle Dream with Dreamweavers


The Stampendous team are really "Dreaming with a Little Dreamweaver" this week...showing off just how perfect Dreamweaver stencils are with Stampendous images...

One. Two. Three. AWWWWWWWWWW. Isn't this widdle House Mouse Designs® Bottle Bunny the cutest? Cute enough to not pile too much frou frou on top. Just stamped in Tuxedo Black Memento ink, colored with Copic Sketch Markers, wrapped in yummy pink silk ribbon from May Arts, with a tied on tag of the perfect sentiment. The perfect background was created by machine-embossing the Dreamweaver Large Scales stencil on Core'dinations Vintage cardstock, sanding the embossed areas, and swiping over them with Sea Breeze VersaMagic ink from Tsukineko.


Monday, March 23, 2015

Stampendous: Spellbinder's Quarterly Hop 2015 #1

We’re excited, once again, to be partnering with the folks over at Spellbinders for a Spring mini blog hop! As Spellbinders design partners this year, we’ve been blessed to use many of their exciting products, and we know their design team is enjoying the Stampendous products we sent for their use! Monday, Tuesday, and Wednesday this week our Design Team will be sharing fun projects they’ve made with the Spellbinders products we’ve received.  Wednesday we’ll be a featured company on their blog and two of our designers will be posting tutorials for you focused on the newest Spellbinders products.

PRIZES

Here at Stampendous we’ve got some mystery Spellbinders dies up for grabs along with some fantastic Stampendous cling rubber so be sure to comment on our blog posts and those of our designers for the three days. See our Official Rules for eligibility and more. Comment deadline is Thursday, March 26th, and winners will be announced Friday, March 27, 2015.
Spellbinders has fantastic prize packages from all of their partners to give away each day, so be sure to visit their blog and use their contest entry tool to enter each day (one entry per day, per person). See the Spellbinders Blog for rules and a list Product Partner companies.

Here's something fun from me:

I really wanted to create a jewelry piece for this occasion. Unfortunately, I rejoined the Stampendous team after all the wonderful base pieces from Spellbinder had been passed out to the  team. However, I did receive a handful of fun dies...

Using the "Dragon Delight" set, I die cut three of the dragonflies from chipboard, and adhered them together for more substance. I applied VersaMark ink over the surface with a fingertip dauber, and poured on some Stampendous Aged Teal Embossing Enamel. This was heated until molten, sprinkled with more and heated again...in all three or four layers of the EE. Then I inked the fishnet-patterned background image from Nathalie Kalbach's "Studio Wired" set of grunge stamps with VersaMark, reheated the surface, and pressed the stamp onto the molten surface. This was allowed to cool before removing the stamp, and the result was this awesomely textured surface. The only additions were three small teal crystals pressed into the re-warmed surface, a thin bit of gold wire wrapped around the head to create curled antennae, and a pin-back adhered to the back with Quick Grip by Beacon Adhesives. Now I wanted this to really be the focal piece, so I created a card to display it on.

I created an easel card loosely following team member, Kristine Reynolds, tutorial HERE, using Core'dinations Vintage and Essentials cardstock, both of which were sanded a bit around the edges. The flat panel on the bottom of the card, was paste-embossed with Dreamweaver Gold Embossing Paste with the Chevron stencil. More of the Aged Teal EE was poured over the wet paste, and all of this was heated until bubbly and dry...more great texture and shimmer!

I cut a square of Mark Richard's linen fabric, frayed the edges, and stamped more of Nathalie Kalbach's images with Toffee and Deep Lagoon VersaFine ink by Tsukineko over the square. This was adhered to the card front with 3L Tape Runner (a wet adhesive would just ooze through the fabric and be seen). I cut two banner strips from scrap and stamped them in black with the Stampendous Cling Grunge Happy Birthday, and adhered these to the right side of the card.

Finally, I used the Richard Garay Celebrations "Sweet Treats" Die set from Spellbinder to cut the cool tag which has a notch at the top to wrap around a bow on a package...in this case, the natural burlap ribbon from May Arts. I punched two holes for the pin-back to slip through, and attached my beautiful pin. NOW it gets the recognition that it deserves! You know you've created a successful gift if you'd love to receive it yourself!


Here are today's links for those playing:

Stampendous Blog


Pam Hornschu


Jamie Martin


Spellbinders Blog

Thursday, March 19, 2015

Dreamweaver: Marching into Spring, Week Three

If you are here for my Woodware post, please scroll down, but nothing says that you can't have a bit of fun along the way...

Ready for fresh air, sunshine, new leaves, and flowers blooming? Well, the Dream Team is right there with you! Our challenge for the month of March is...coincidentally...Marching into Spring. Per usual, we'd love to have you play along with us, and link your own creations to the Inlinkz tool on the Dream It Up! blog, or at the bottom of this post. Play as many times as you'd like. Those of you who work Dreamweaver and/or Stampendous products into your projects receive bonus points, but everyone has an opportunity to be the winner who receives the stencil of their choice.

Here's my hint of Spring:

I thought I'd play with a "messy" watercolor look for today's post. In the past, when I've tried to watercolor through the stencils, the color runs underneath, and frustrated me. Then it dawned on me...why not go with that look, but outline the stencil afterwards. I kind of like the end result. I even added a bit of doodling/tangling over the design. The base was a piece of canvas-textured Core'dinations' cardstock in a natural color. The Stampendous Cling Music Score was stamped in black StazOn (to prevent bleeding when wet), and a bit of DecoArt® Media Acrylic in Titan Buff was lightly brushed over the background. The Dreamweaver Stylized Dahlia was taped over the panel, and watercolored, and set aside to dry. When dry, the clean stencil was replaced, and I used a Copic Multi-liner in .03 to trace the design and add some tangles. The card base was a gorgeous shade of cobalt Vintage Cardstock from Core'dinations which I'd run through my Big shot with the Dreamweaver Chevrons stencil, and sanded to reveal the design. A simple panel of green with a stamped sentiment from the Stampendous Perfectly Clear Friendly Phrases set, and a luscious bow from May Arts, and I'm loving the result! How about you?


The "A" team would love to share their interpretations of this theme:


Wednesday, February 18, 2015

Stampendous: Here Kitty Kitty!


I LOVE KITTIES!!! I have two of my own, and have pretty much always had cats. Therefore, this week's kitty challenge on the Stampendous Impressions blog was right up my alley cat...I mean...alley.

Today's kitty is the Cling Feline Fun, and this one thinks that he's going to make friends with the butterflies. He and the orange butterfly have been colored with Copics (as seen at left), as well as the daisies. The  butterfly and the daisies are from the Perfectly Clear Daisy Thanks set. The Core'dinations Vintage cardstock was sanded a bit prior to stamping to lighten up the areas where the flowers would be placed to allow them to be colored. A sprinkling of Hunter Green and Hot Lime Color Fragments were added for more texture. The Perfectly Clear "Life Words" sentiment has been stamped on a die cut scrap of white cardstock cut from the Dreamweaver Nested Frames Die set.


If you're feline curious about the team's kitty creations, slink on over to the Stampendous blog!

Tuesday, January 27, 2015

Stampendous: Dreaming of Flowers

Being up to your armpits in snow is the perfect time to dream! Wouldn't you love to trade places with this darling Gruffy Bear from House Mouse Designs®? Warm, sunny day. Green grass. Charming sunflower stalks. Ahhhhhh.

Gruffy has been stamped in Tuxedo Black Memento, and colored with Copic markers. This focal panel has then been adhered over an orange card, which has the Black Eyed Susans ink-stenciled using a dark orange pigment pad by Tsukineko, with a large stencil brush from Dreamweaver. The other panel is a section of Core'dinations Chalk Core in yellow, machine-embossed with the Dreamweaver Hexagons stencil before being sanded to reveal the yellow core.

The sentiment is one of the many appropriate for all House Mouse Designs® images, the Perfectly Clear Berry Nice Sayings set from Stampendous.


Stampendous is having a bit of a floral celebration all of this week, so if you've missed any so far, be sure to  check the Stampendous blog.

Thursday, December 11, 2014

Dreamweaver: Cute, Cute, Cute!

Here for the Stampendous/Art Anthology hop? Please scroll down, and enjoy the view as you go!

In a flurry of a hurry? This month the Dream Team are all about the Quick and Cute...whether that be cards, gifts, wrapping, or tags...we have sleigh-loads of ideas! Play along by posting your creations using the Inlinkz tool on the Dream It Up! blog, for a chance to win the stencil of your choice, and a possible bonus stencil for using Dreamweaver products in your Quick and Cute project! Here's what fun I've been up to this week:

This card is a perfect example of why it occasionally okay to leave a mess on your workspace. I've been working with copious amounts of glitter lately, some of it being rather chunky. So, after I ran my panel of Core'dinations Chalk Core cardstock through my Big Shot with the Dreamweaver Heart Ornaments stencil, there were some additions in the sanding process. Using the Core'dinations sanding tool over the embossed image revealed the stencil design in chalky white which is very cool. However, it also revealed areas where there were bits of glitter underneath. Ordinarily this would not  be something you would want, but in this case, it created the perfect snowy impression!

As far as being quick and cute, the panel takes about a minute to complete before adhering it to the Dotted Swiss card with Beacon Zip Dry, and adding a scrap of May Arts ribbon and ric rac with a quickly stamped tag from Stampendous' Holiday Words set.


I'd love to receive a comment from you before you head on to the rest of the "B" team:


An InLinkz Link-up

Wednesday, December 10, 2014

Stampendous and Art Anthology: Sprayin' and Playin'


Everyone knows that Mixed Media is the HUGE thing in the art world right now, and Stampendous has been happily mixing it up as well. For the next three days, we're also mixing it up with Art Anthology, with their amazing line of Dimensional Paints and water-based Colorations Spray Mists. Follow us December 10 - 12, leaving comments along the way, for a chance to win the awesome products featured in the banner above. For more details, check the Stampendous blog.

Here's my two-for-one card that I created for today's post:

Yes, two-for-one as it is a great greeting card for Christmas, but Santa can be also used as a handmade ornament on the recipient's Christmas tree! The Stampendous Jumbo Cling Santa's List was stamped and embossed in black on white chipboard, before having his snazzy suit painted with Art Anthology Stone Effects Dimensional Paint in Brick. These paints have a matte finish, add so much texture, and almost give the impression of velvet. Art Anthology also has a line of Velvet Dimensional Paints, with texture and shimmer which would have been perfect for this as well.

As a  contrast to the red, I painted the Cotton Velvet Dimensional Paint, daubing it really, over Santa's beard and suit trim. I covered this with Stampendous Multi Medium Crystal Glitter for the great sparkle that you expect during the holidays. Once the paint dried, I colored and shaded the remaining portions, and cut him out. A hole was punched at the top to loop a bit of red tinsel cord. The card base was Core'dinations cardstock over a kraft card. The white glittery panel was stamped and embossed with one of the sentiments from the Stampendous Christmas Wishes Perfectly Clear set. I applied a few dabs of Beacon FabriTac adhesive where the tag would  be adhered,  but let it dry slightly before placing Santa on top. This allows him to be removed and used as an ornament.


Let me know what you think of my happy Santa card, before hopping to the next on the list:

Stampendous Blog

Jamie Martin

Pam Hornschu (you're here)

Art Anthology Blog

(Please note: the Art Anthology team will be posting frequently throughout the days, so be sure to keep checking back for more fun inspiration!)

Don't forget...the Stampendous December blog challenge info can be found and linked to HERE