Thursday, April 30, 2015

A Dream Team Finale, and a New Beginning

 Sigh...

It's been five years since my first year as a Dream Team member, and a wonderful five years they've been. Every member we've had on our team has either stayed or moved on to other creative endeavors, but have remained an integral part of Dreamweaver, and good friends. Lynell became the sister I never had, and I see no reason for that to change as we move forward. I wish her and Wayne the best of everything in the future as they continue to be creative on a less stressful level, and as they welcome the birth of their first grandchild in the upcoming weeks. The Dream Team will also move on in other creative directions, and many of them have been selected to be a part of the Stampendous/Dreamweaver team along with me. We will continue to post on Thursdays, along with many of the regular Stampendous team members, so you'll have quite the variety of inspiration and tips at your disposal.

For my post today, I thought I'd start by sharing my very first card that I posted as part of this wonderful team. Simply featuring a machine-embossed Sand Dollar, and an ink-stenciled Petals Background border, it still works as a card for any occasion...


For this month's "Showers of Showers" theme, I'm once again posting this card from 2011. Kind of perfect...closing one door, and opening another. This card featured the Birds on Branches Paste Embossed in Matte Black on white cardstock, and adhered inside. A piece of acetate was paste-embossed in Translucent with the Rain stencil, and sprinkled with Stampendous Ultra Fine Crystal Glitter, and adhered behind a die cut opening. A die-cut black frame for the window, along with an inset of black framed and machine-embossed Tole Heart, a bit of ruffle and a fancy brad fastener, were the finishing touches.


I hope that you'll continue to follow all of us as we open our respective doors to all the creativity that lays in store.

Cindy Groh 
Jamie Martin

If you haven't already, be sure to join us on the Dreamweaver Stencils' Face Book page, the Dreamweaver Stencils' Enthusiasts page, Pinterest, as well as the Stampendous Facebook page, website, and Pinterest. We've only just begun...

Wednesday, April 29, 2015

"KLIK" as a Wink or Jewelry in a Snap?


Klik Interchangeable Jewelry from Metal Complex is a fantastic new line of DIY accessory options. With two snap sizes and dozens of settings to snap your creations into, this terrific product is fun to play with for every level of crafter. There are tons of pre-made snaps so you can just “klik and go” to change up your look. But this week we’re playing with the Metal Complex Snap Bezel Blanks so we can craft our own masterpieces of wearable art. Along with this collaboration, we are working with Envirotex Jewelry Resin...an amazing product to easily make the jewelry of your creative dreams! 

Yes, there will be prizes...three random winners will receive a prize package that includes Klik Snap Bezel Blanks and jewelry components, a package of ETI Resin and a Stampendous Eclectic Perfectly Clear Stamp Set. To win one of these awesome prize packages, you need to comment on the Stampendous blog and that of each Stampendous designer in the list provided below. Eligible winners are those comments that provide a valid email and indicate a U.S. Mailing address. Here are the Stampendous Official Rules for all contests. Commenting will close Sunday, May 3rd and winners will be announced the afternoon of May 4th.

Here's what I've created for today:


I'm saving my more elaborate piece for my post on Friday, so be sure to check back. For today, I wanted to show how easy you can create a more masculine look with these products. The basic bracelet is a black leather wrap and snap, with three snap sections on it. The large bezel won't fit on this bracelet, but I wanted a larger focal piece. For the base, I die cut a 2 1/2" circle of clear polyshrink plastic. With black StazOn ink from Tsukineko®, I added the Natalie Kalbach Cling "Mish Mesh" circle design, as well as a couple of the Perfectly Clear Steampunk Gears, and finally my son, Bryan's, monogram using the Perfectly Clear Vintage Upper Case Alphabet. I carefully swiped a bit of talcum powder over the front and back to act as an anti-static medium, used my heat tool to shrink. As soon as the shrink process was complete, I placed a clean acrylic block over the top to flatten completely. I placed this piece balanced on top of a couple of pencils laid side by side, on top of my non-stick craft mat. Following the package directions, I mixed up a small amount of the Jewelry Resin, and poured it over the top of my disc until it domed on top, and dripped a bit over the edges. Then I sprinkled a few of the Stampendous "Trick or Treat" color fragments on the surface, and using the tip of a thin piece of wire, I pressed these under the surface of the resin. If you have a few bubbles, just blow softly over the top of the surface and they magically disappear! Once the resin was cured (12-24 hours), I adhered it to the top of a snap piece with some Beacon Quick Grip adhesive. Two more of the snaps were sponged with StazOn, and heated to set the ink, and two small orange eyelets were glued to the inside of the snap. Remember, you  can create multiple looks with these...just buy and create more snaps and designs!


Hop around and visit the posts for today:


Thursday, April 23, 2015

Dreamweaver: Showers of Showers-Week Four

Ever use the expression, "When it rains, it pours"? This does not have to be a bad thing, does it? For the month of April, the Dream Team are featuring "Showers of Showers" as our theme. As usual, we'd love for you to play along. Just link your creation on the Dream It Up! blog for a chance to win the stencil of your choice...bonus chances for incorporating Dreamweaver and/or Stampendous in your design. Here's what I'm showering you with this week...

So...maybe not precisely a shower card. More like a wedding card. However, I should get points for finally finding my creative mojo again...

This  card uses a base of Bazzill aqua cardstock, a second panel of it with a die cut opening, and machine-embossed with the Dreamweaver Large Damask stencil design. The Stampendous Wedding Couple was stamped and lightly colored with my Copic Sketch Markers. I brushed a bit of DecoArt DecoPage Matte medium, and sprinkled with Stampendous Crystal Micro Glitter. The Stampendous Cling Married Monograms image was stamped in black VersaFine from Tsukineko® and die cut with the Dreamweaver Oval Die. Punched holes at the ends were added for inserting white organza ribbon. All in all, a very simple card to reproduce, and could easily be used as the cover for an invite, or...surprise, surprise...a bridal shower!


For more showers of inspiration, visit the "B" team's posts listed here:

Wednesday, April 22, 2015

KITTEN Around with Stampendous


I'm not kitten you, Stampendous has the cutest felines you've ever seen! Including the Cling Feline Curious featured here, wanting to join in on the lemonade party along with the Cling House Mouse Designs® Share a Sip image. A couple of the Hummingbird Dies and matching stamps flew in for the event as well. Using the Stampendous Pop Up Die set, there is so much fun dimension to highlight each cute image and the bright Authentique papers to go with. Just in case you are low on patterned papers, remember...you can always create your own. The light blue panels were stamped with the Cling Floral Tapestry in VersaMark ink and embossed with White Embossing Powder. A stamped birthday sentiment and fluffy silk bow from May Arts were the finishing touches.


Remember, the team are playing with kitties all of this week, so be sure to follow the links from the Stampendous blog! Here are those that are playing today:

Friday, April 17, 2015

Going Vintage with Stampendous and Dreamweaver

I'm really loving all the opportunities now to mix my Dreamweaver designs in with the Stampendous line of products. This card features the new Dreamweaver Chunky Art Tools (only the fountain pen), ink stenciled over the top of an ivory cardstock panel stamped with the Vintage Letter image. Plenty of ink and manual distressing was added for the vintage effect that I was going for. I love the combination of the navy blue Bazzill Dotted Swiss cardstock against the marbled ivory. The Stampendous Cling Elegant Scroll was stamped in dark blue ink over both panels. Sprinkles of Aged Gold Embossing Enamel were heated from underneath to melt randomly over the card. I used a VersaMark marker to add ink to the fountain pen and covered those areas in the gold as well.Going

For more visual inspiration with mixing Stampendous and Dreamweaver, be sure to visit the rest of the teams links:


Thursday, April 16, 2015

Refreshing Showers for an Oldie-but-Goodie

I apologize, but I'm posting another oldie-but-goodie for this month's "Showers of Showers" challenge. I'm still a bit mentally and physically challenged from the auto accident I was in three weeks ago. This one was always a favorite of mine. It was one of the first times that I used a stencil as if it was a stamp. Yes, that's correct. The panel of decorative paper on the side was "stamped" by inking the Dreamweaver Umbrella background stencil itself with black pigment ink, and pressing it onto the paper. The inked surface was embossed with Stampendous Midnight Black Embossing Powder just as if you'd stamped the image.

The focal panel was first machine embossed with the Umbrella stencil, and then paste-embossed over the top with Translucent Embossing Paste through the Rain background stencil. While this was drying, I traced the Umbrella stencil onto more decorative paper, cut out the sections, and paper pieced them over the umbrella on the focal panel. I added some "stitch" lines with a fine point Micron pen. A polka dot ribbon and bright pink pompoms were the final additions, along with the Glossy White paste-embossed sentiment from the Rain Combo stencil.

Here's the "A" list of players for this week. Don't forget to play along with the challenge, and link your creations to the inlinkz at the bottom of this post, or on the Dream It Up! blog!

An InLinkz Link-up

Wednesday, April 15, 2015

A Widdle Dream with Dreamweavers


The Stampendous team are really "Dreaming with a Little Dreamweaver" this week...showing off just how perfect Dreamweaver stencils are with Stampendous images...

One. Two. Three. AWWWWWWWWWW. Isn't this widdle House Mouse Designs® Bottle Bunny the cutest? Cute enough to not pile too much frou frou on top. Just stamped in Tuxedo Black Memento ink, colored with Copic Sketch Markers, wrapped in yummy pink silk ribbon from May Arts, with a tied on tag of the perfect sentiment. The perfect background was created by machine-embossing the Dreamweaver Large Scales stencil on Core'dinations Vintage cardstock, sanding the embossed areas, and swiping over them with Sea Breeze VersaMagic ink from Tsukineko.


Thursday, April 9, 2015

Dreamweaver Showers of Showers: Week Two

Ever use the expression, "When it rains, it pours"? This does not have to be a bad thing, does it? For the month of April, the Dream Team are featuring "Showers of Showers" as our theme. As usual, we'd love for you to play along. Just link your creation on the Dream It Up! blog for a chance to win the stencil of your choice...bonus chances for incorporating Dreamweaver and/or Stampendous in your design. Here's what I'm showering you with this week...

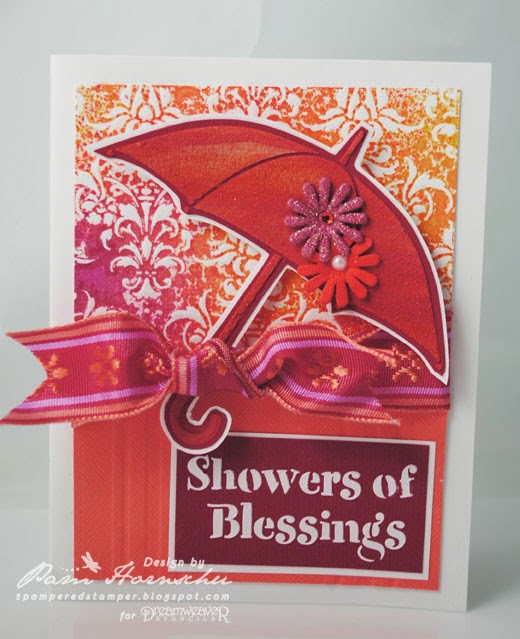
Some of you may recognize this card, as I've posted it before. I was recently in a bad car accident, so my level of strength for creating in my studio is a bit low. Though I was scared half to death, I do feel that I have "showers of blessings". I'm still alive. My son is still alive and doing better than I. My arms and legs work just fine. And I'm fortunate enough to be blessed by so many friends, family, and followers who love me, and have been concerned with my well-being through all of this.

This card was created with a Sludge Paste technique by pasting the Dreamweaver Umbrella with a mix of both yellow and red embossing pastes, achieve an almost marbled look in the paste. The umbrella was cut out and adhered over a panel of the Damask stencil with an ink-press technique. Two or three shades of spray mists (Strawberry Daiquiri, Mango Lemonade, and Pink Lemonade) were spritzed over the stencil. The cardstock was placed on the inked surface, and then run through the embossing machine to transfer the inked design and press it into the surface. Another panel of coral cardstock was run through the machine with the Stripes stencil to just add an embossed design. The finishing touches were a pasted sentiment from the Dreamweaver Rain Words, some sparkly flowers, and pretty ribbon.


For a shower of inspiration, please visit the blogs of the "B" team:


Wednesday, April 8, 2015

Musically Inclined with Stampendous and Dreamweaver

Acoustically speaking, the Stampendous team are really enjoying their musical creations this week. My feature card was a cooperative creation. I handed the Acoustic Sounds image and my Copic Sketch markers to my son, Bryan for him to stamp and color that particular panel. He really enjoyed mimicking the wood grain, attempting to match the color variations to his own acoustic guitar. I added some Memento Toffee ink around the edges of the panel, and sprinkled a bit of Stampendous Spoonful of Rust encrusting mix around the edges before heating to melt.

The kraft card base was ink distressed. A panel of Core'dinations Chalk Core was machine embossed with the Dreamweaver Waves and Dots stencil, sanded, and brushed with the Toffee ink for a cohesive and grungy look. A scrap of guitar music was distressed and added, along with a handcut guitar "pick" tucked into an actual wrap of guitar string wire. The sentiments added were from the Perfectly Clear Happy Greetings set. A perfect masculine card for your guitar "hero".


Remember, the rest of the team are musically inclined this week as well! Just follow them from the links on the Stampendous blog.