Showing posts with label Ranger. Show all posts

Thursday, October 2, 2014

Dreamweaver: A Happy HallowThanksMas Challenge!

Can you tell that sometimes Dream Team's "Fearless Leader", Pam Hornschu, has a hard time deciding on monthly challenges? Since the team will be taking turns all month with the Smeared and Smudged 31 Days of Halloween, and we are doing a Christmas collaboration with Stampendous and Core'dinations the 13th - 17th, the confusion should be understandable. Therefore...happy HallowThanksMas! As usual, we'd love for you to play along with the challenge and link your creations to the Inlinkz tool on the Dream It Up! blog. Just in case you are wondering...NO, YOU DO NOT NEED TO POST SOMETHING WITH ALL THREE HOLIDAYS ON IT! However, you get bonus points for actually using Dreamweaver stencils and product on your creations! And bonus points might actually earn you an extra stencil as our monthly winner...just sayin'!

Here's my creation for today:


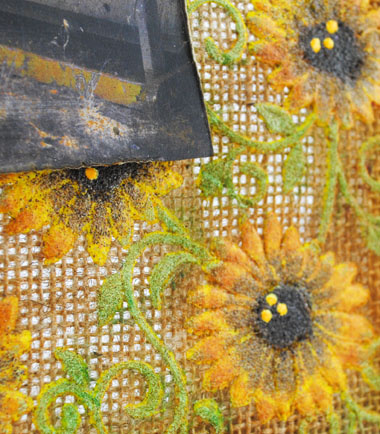
Playing with one of two new fall leaf stencils from Dreamweaver...the Maple Leaf. I mixed a "sludge paste" of regular white paste in a little cup, with a few drops of Ranger/Wendy Vecchi's Archival Reinkers. Her inspired colors are awesome to work with, and mix into the paste beautifully, without thinning the paste. Because I wanted the look of the leaf Potting Soil, Dandelion, Red Geranium, and a tiny bit at the end of Fern Green. I barely mixed these colors as I really did not want to create mud. The end result was just what I was hoping for, and still of a consistency that I could "sculpt" slightly with my palette knife. I pasted this on piece of DCWV Gauze Paper. When dry, I cut it out using the Dreamweaver Nested Frames, and matted it on a green frame as well. I used the new Dual Alphabet Dies to cut letters for the word "fall" from the same gauze paper, and adhered these over the Hexagon embossed green panel, along with a stamped "happy" from a Stampendous clear set. A little ink-distressing, some fun plaid paper, and a stick finished off this fun Fall card!
changing several colors, I had added a couple of drops each of the

Remember to visit the rest of the team, as well as our guest designer, as confusion takes rein...could be interesting!


Thursday, May 15, 2014

Dreamweaver's Flora and Fauna Challenge Goes Under the Sea

Welcome to the merry month of May! The Dream Team are challenging you this month to a "Flora and Fauna" theme! Considering most of the Dreamweaver designs incorporate both of these in the huge variety of stencils, you should have no problem playing along with our challenge this month! As usual, link your creations at the end of the Dream It Up! blog post, or at the end of our posts where it says, "Add Your Link".

My flora and fauna are going under the sea this week...

I created a beautiful inked background using Memories Mists on glossy cardstock with a bit of water spray for movement. The Open Fish design was traced with Sakura Micron pens in .01 and .05, with "Sten-tangling" added, before covering the fish in Glossy Accents and tiny, clear holeless beads. The tiny beads add to the watery effect. Using portions of the Leafless Tree Die in black cardstock as coral, and some soft ink-stenciling of its matching stencil design, I was able to create dimension as well. One of my favorite parts of this design is that the beads cover a multitude of errors in my "Sten-tangling", so no one needs to know that my lines were less than perfect...unless YOU tell them!

For the love of flora and fauna, visit the rest of the "A" team this week, and leave some sweet comments:


Thursday, November 7, 2013

Dreamweaver Stencils: Festively Distressed with Ranger Hop!


Ready to be festively distressed once again? The Dream Team have been playing with Ranger's Distress Paints, and are ready to inspire you to be distressed as well...paint distressed that is! Dreamweaver Stencils are the perfect choice to mix with all things festively distressed, as nothing shows off color and texture better than great designs. By following our hop and leaving love along the way, you have the opportunity to win a great prize package including five Ranger Distress Paints and five Dreamweaver Stencils! Here's the lineup for today, including our November Guest Designer:


This is also our first posting day featuring our new monthly challenge, "Holiday Celebrations", and for the entire month we will be demonstrating ways to use Beacon Adhesives' entire line of products with Dreamweaver to create special projects in home decor and gifts of love. Here's mine:


I purchased a plaque made from a slice of black slate at a local craft store, and adhered a torn sheet of music with Beacon Fast Finish over the surface. When dry, I used the dabber bottle of Ranger's Tim Holtz Distress Paint in Broken China over the surface as a wash, with some softer swipes of Frayed Burlap around the edges to soften them. When dry, I paste-embossed the Dreamweaver Season of Joy in white and covered it with ultra fine crystal glitter. Once dry, I added a sculpted paste "snowbank" at the bottom and covered it with chunkier glitter. I had purchased a small tree, and applied Picket Fence Distress Paint over the branches, and sprinkled more glitter. (Notice a sparkly theme going here?) I trimmed the back of the tree to make it fit against the plaque better. A skinny strip of music was distressed with more paint and wrapped around the tree before adhering to the plaque with Beacon FabriTac. A few crystals on the star, a luscious bow from May Arts was almost the finale...but no, I had to add paste to a pine cone with, yes, more glitter!


Thursday, July 11, 2013

Dreamweaver Stencils: Summertime Sand and Sun!


Welcome to the second week of the Dreamweaver Stencils' July challenge..."Summertime, Sparklers, and S'more"! We covered the sparkler portion pretty well last week, but there's lots of summertime left. I'm playing in the sand once again, and using Ranger Distress Powders* for the gritty look and feel of sand. The panel on the left features the Scales stencil, and the focal panel features the Sandcastle stencil. Both were created using the double-glitter technique, but with the powders instead of glitter. Here's the process:

1) Peel backing from panel of double-sided mounting paper, and adhere to cardstock panel.
2) Remove backing from DSMP on front.
3) Rub back of stencil with Hawaiian Coconut Soap (this is the best soap for this process, and smells like the beach!). Brush away any hanging soap crumbs, and carefully place stencil on adhesive paper. Use a section of the backing to press stencil on to adhesive surface. Don't touch with fingers as this could prevent the powders from sticking to the adhesive later.
4) For the Scales panel, I just water-falled the powders in stripes of colors. For the Sandcastle, be more careful in placement, or use a small spoon or diagonally cut straw end to apply powders. Rub the powders in for good coverage. Brush away excess.
5) Place panels face down, and pull panel off of stencil, keeping stencil on flat surface to prevent bending.
6) Pour contrasting color of powder over panels. Flick off excess. Heat with heat tool to melt.

For the Summer panel, I rubbed acetate with talcum powder to prevent static cling. I ink-stenciled with Versamark, applied the Distress Powders*, and heated carefully. You can then use a damp towel to wipe away powder residue.

In case you're not quite ready to wipe the sand from your toes, I suggest you visit the blogs of our "B" team for their summer fun creations, and leave some extra love for our guest designer, Wendy Price!


We'd love for you to play along with our monthly challenges! Just link your creation on the linkytool on the Dream It Up! blog, or email pics to lynell@dreamweaverstencils.com, for a random chance to win the monthly prize. Be sure to like us on Facebook as well!
*Ranger Distress Powder color used:  Broken China, Shabby Shutters, Vintage Photo, and Walnut Stain


Thursday, June 27, 2013

Dreamweaver Stencils and Ranger's Stickles Dry Glitter...We Just Sparkle Together!


The Dream Team has a big day today! Not only are we into week three of our Pinterest Inspired challenge, we are also playing with Ranger's Stickles Dry Glitter in the mix! We've had so much fun playing with jars of sparkly goodness, that we want to share the fun with two lucky crafters!

 
Just visit everyone on the list below, and leave comments for everyone. Two winners* will be randomly selected and announced Thursday, July 4th...what a great day for a celebration! Each prize package includes a mix of five Ranger Stickles Dry Glitter, a mix of six Dreamweaver Stencils, and jar of Dreamweaver Translucent Paste, and a Palette Knife for spreading. If you want to add to the fun, play along with our Pinterest challenge and link your own creation to the linkytool on the Dream It Up! blog before July 1st for a chance to win this month's stencil prize. Here's the list of sparkly-Pinteresting players:


Now, let me share my creation with you!


Such a happy color!
You can find my Pinterest  inspiration piece for this project HERE. I love the look of colored glass, glowing from an inner light...in this case, a flameless votive candle. My creation began its life as a Starbuck's Frappuccino bottle, which if you check out Pinterest, is a frequent inspiration for others. I pasted the Dreamweaver Black-eyed Susans stencil in Translucent paste over a couple of acetate sheets. Once dry, I used Q-tip precision applicators to apply Dreamweaver Color Solutions to the designs. I used a glue marker to apply the adhesive that would adhere the Ranger Stickles Dry Glitter to the back side of the panels. These panels can be curled up and tucked inside the bottle, along with some Dew Drops (or glass marbles), and a flameless votive light. I die cut a portion of the panel for the circle on the lid, and completed the look with a Ranger Stickle Dry Glitter embellished paper flower, and gorgeous May Arts ribbons (which by the way, were spritzed with Memories Mists ink through the flower stencil). Quick, easy, and cheap...the perfect housewarming or hostess gift. If you are on Pinterest, and you'd like to follow Dreamweaver, you can view our board HERE, and you can pin your own Dreamweaver creations HERE. If you'd like to follow my creations on Pinterest, you'll find it HERE.

Completed panel ready for inserting

Thursday, June 20, 2013

Dreamweaver Stencils: Hang Around for the Fun!

I have been having so much fun with the Dreamweaver Pinterest-inspired challenge this month! I'm thinking that I may just continue challenging myself for one day each week. I love Pinterest, and I can kind of justify the amount of time I spend "pinning", with the fact that my work involves staying on top of trends. One trend lately, is organizing and decorating your closet to suit your own personality. No more ugly shoe boxes and no more boring hangers!

I found several Pins for decoupaging on wood hangers, but the one at the left was my favorite. At first, I thought, "Darn. I just got rid of all my old wood hangers when we moved." And then I was wandering through TJ Maxx (love that store!), and found these awesome turquoise painted wood hangers on clearance for $2! Wow. Five hangers for $2, and my favorite color as well!
I sanded and distressed them a bit. Then I daubed some Ranger White Acrylic Paint Dabber where I intended to place the flowers. I used the Stylized Dahlia stencil with Memento inks on tissue paper. The tissue makes it easy to wrap around objects. I used my favorite decoupage medium...and no, it's not the one that everyone thinks of first...I use Beacon's Fast Finish Decoupage Medium. It is somewhat thin, so I put it in a cup and brush it over the surface to wet it. Then place the tissue pieces on the wet surface and brush more of the medium over it until is smooth and completely covered before setting it aside to dry...which doesn't take long! Maybe 10-15 minutes depending on how much the tissue is soaked. When dry, I used the Small Cathedral Window stencil with Memento Teal Zeal and a stencil brush to add the background details. You could leave it at that, but I did brush another coat of the Beacon Fast Finish over the entire hanger for a little extra shine. Of course, I couldn't just stop there! I added a May Arts Chevron striped ribbon bow, tied with twine and a fun button to the hanger.


Just think of all the fun Dreamweaver designs that could be used to decorate these hangers. They could even be personalized with the Monogram stencils, or the alphabet stencils. They could be a wonderful gift for a bride and her bridesmaids on the big day for those gorgeous dresses (in which case, I would definitely recommend adding that extra coat of the medium so no ink would rub off!)

So, obviously these could be used as garment hangers, duh! But what about a ribbon holder for all those scraps of luscious May Arts ribbon? Check out the picture below! Yep. Think I'm going to need to create some more hangers for all of my ribbon!

 Let's go check out what wonderful inspired pieces the rest of the team have created this week, as well as our amazing guest designer for June, Jennifer Dove! Leave some love for everyone, and then get working on your own Pinterest-inspired pieces. Link your creations to the linkytool on the Dream It Up! blog for an opportunity to win the prize for this month, as well as having your project featured on the Dream It Up! blog and the Dreamweaver Stencils Facebook page. Here's the roll call this week:


If you'd like to view my complete tutorial on this project, please visit Paper Craft Planet!

Tuesday, January 29, 2013

Tutu Much Fun


This week I was on the calendar to provide a project tutorial for 3D Tuesday on Paper Craft Planet. I used this opportunity to finally play with one of my new Stampendous faves...Cling Tutu Toad. Isn't she toadally darling? I had some other fun ingredients to add to the mix, provided by some fab companies...Beacon Adhesives, Ranger, DIY Bangles, etc. I chose to use my wood bangle in a more unique way, and created a hanging nightlight for the little ballerina in all of us. A small flameless tea light was inserted through a hole drilled in the bottom (thanks, Hubs!), so she could be "in the spotlight". For more details on this project, with step-by-step instructions and pics, please visit the Planet Blog.

Have a toadally awesome day!

Thursday, November 8, 2012

The Festively Distressed Finale!


We've now had four weeks of festively distressed fun playing with the Ranger/Tim Holtz Distress Powders along with our wonderful line of Dreamweaver Stencils and products. Huge thanks to Tim Holtz and the fab people at Ranger for sharing these four collaborative weeks with us, and providing the yummy shades of Distress Powders for us to create with. We've been inspired by the process, and we hope you have, too!

If you haven't won one of the prize packages yet, you still have one more opportunity this week as the set below is up for grabs to a random commenter on one of the Dream Team blogs.


If you've been following along each week, you've seen some gorgeous creations with these stencils and powders, so you should be all fired up to get distressed! If you've missed the first three weeks, check them out once you've made the rounds today:

 
My festively distressed project for this week is this:


Well...actually...it's NOT my project. My life is topsy-turvy right now while I try to move from one location to another. So...Lynell took pity on my and shared one of her creations with me for my post this week. Not particularly CAS and not particularly HOLIDAYS (but we can consider it a "thanks"giving card right?), but definitely a wonderful tribute to the collaboration between Dreamweaver and Tim Holtz Distress Powders. Who wouldn't want this gorgeous thank you card ANY time of the year?

Lynell's card features the Gingko Bough stencil design done with the Double Glitter technique, but using the Distress Powders in place of glitter, and of course heating to melt them to their more textural and weathered beauty. Various shades of the powders were used to created all the detail, and the sentiment was paste-embossed on the side, covered in more powder, and heated for even more visual interest. 

Don't forget to leave me some love before hopping to the rest of the Dream Team blogs:


Please remember to continue to follow the team through the Dream It Up! blog as we bravely go where no stenciler has gone before, to like us on our Facebook page, and to learn from our fabulous weekly Thursday Tutorials on Paper Craft Planet as well.

Thursday, November 1, 2012

Still Festively Distressed...Week Three


Still feeling festive? We hope so! Dreamweaver and Ranger still have two weeks left of our Festively Distressed collaboration, and we are full of distressing ideas...Tim Holtz' Distress Powder ideas, that is. Mixed with our fabulous line of stencil designs and exciting products, your creativity will know no bounds! If you missed the first two weeks, start HERE and HERE! And if you missed Tim's intro to our four week extravaganza, click HERE!

For our postings this week and next, we are offering you the opportunity to win one of two prize packages, perfectly coordinated for your holiday crafting. Simply leave a comment on each of our Dream Team's posts, and YOU could be one of two randomly selected winners!


The Dream Team have been challenged for the month of November to create something CAS (clean and simple) for the holidays. The extra challenge is mixing the Distress Powders in for the collaboration with Ranger. Think that it's possible? Well...let's see...

Here's what I came up with:
 

Those of you who really know me, know that CAS is not my norm, but I tried...really I tried! Actually, the entire line of Ranger/Tim Holtz Distress products makes it remarkably easy to create simply, if not cleanly. Mixed with the Dreamweaver Stencils, the end result is something that appears to have taken hours to create instead of minutes.

Using a kraft bag from my local big box craft store (buy them in bunches for extra savings!), and a shaped paper mache ornament/tag, I began by swiping Distress Stain in Picket Fence over the surface...perfect for the white-washed look. Then I swiped some Adirondack Acrylic Dabber in Silver for added shimmer.

The Joy stencil, along with the Antler, Southwest, and Crystal snowflake designs from Dreamweaver, were all ink-stenciled with embossing ink, and embossed with Tim Holtz Distress Powder in Faded Jeans. The rougher texture of his powders is perfect with the weathered and white-washed look of my base pieces.

Several drops of Ranger Ice Stickles in Silver Ice added just the perfect amount of sparkle to my semi-CAS bag and tag for the holidays.
 
So tell me what you think in your comment below before heading over to the rest of the Dream Team posts:

The Ranger blog is offering another amazing prize opportunity, just for playing along with the Ranger/Tim Holtz Distress Powders and Dreamweaver Stencils and linking your creation on the Ranger blog. You can find more details HERE.

We hope that you have been inspired by our creations, and will continue to follow the Dream Team through the Dream It Up! blog as well as to like us on our Facebook page. We really encourage you to play along with our monthly challenges for more prize opportunities and creative fun!

Thursday, October 25, 2012

Festively Distressed For Fall, Week Two


Welcome back to week two of our amazing collaboration between Ranger's Tim Holtz line of Distress Powders, and our beautiful Dreamweaver Stencils & Products! If you missed last week's event, start HERE.

Last week, we were totally blown away by the awesome response we received from those of you who hopped over from Tim Holtz's blog and the Ranger blog to check us out! We've been doing the "happy dance" ever since! Hopefully, you will continue to check us out, especially over the next few weeks as we continue our play-time in Tim's sandbox. (It is rather an appropriate metaphor considering the cool texture of his Distress Powders.)

Apparently, Tim and the wonderful people at Ranger were also excited by the response, and they've decided to "up the ante" in the form of an additional prize package(s) which will include TWELVE Distress Powders each, and a handful of Dreamweaver Stencils to go with! Wow! Just one teeny-tiny detail...to win one of these packages from their blog, you need to create something with Tim Holtz's Distress Powders and Dreamweaver Stencils and attach it to the inlinkz on the Ranger blog. Winners will be selected randomly. For more details, head over to the Ranger blog.

Once again, this week we are offering another fall prize package as shown here. Just leave us all some love as you visit, for an opportunity to be the one random winner we select. Curious as to who won from last week? It could be YOU! Visit the Dream It Up! blog for the announcement of the lucky commenter.


Here is what I had created for this week:


 And, oh boy, did I have fun with this one! I'd had this burlap canvas from Canvas Corp that I'd picked up a while back at my local craft store, and decided that this was the perfect time to use it.

I paste-embossed the Dreamweaver Black-Eyed Susan with Matte Yellow Paste onto the burlap, which was easier than I thought it would be as the matte pastes are thicker and less likely to ooze through. I placed an acrylic stamping block behind the frame for a more solid surface to work with.

While the paste was wet, I carefully sprinkled the various colors of the Tim Holtz Distress Powders in the appropriate locations. (Tip: cut the end of a drinking straw at a diagonal to work as a scoop for more precise placement.) I used Walnut Stain for the centers, Brushed Corduroy for shading, and Old Paper for the vines and leaves. I applied my heat tool to melt the Distress Powders, and to dry the paste more quickly. The paste tends to bubble up, but will settle down again. Be careful with the heat tool, as the burlap will burn a bit...not catch on fire, just get brown...which I liked the look of, so I continued to do it deliberately.

I also placed the Dreamweaver Hexagons stencil over the burlap, and sprayed Adirondack Color Wash in Butterscotch to add to the aged feel. My May Arts mesh bow was also spritzed. I wanted to add a photo to this, which was probably the hardest part of the project! Lol. I did find this pic that I had photographed at Lynell's parents' house, so I played with Photoshop to change the color, printed it, distressed it, and spritzed more Butterscotch through the Hexagons stencil again. The hexagon shape came into play with the punched and stenciled "relax". An ordinary wood clothes pin was distressed and brushed with Adirondack Acrylic Dauber in Lettuce, with an old button to finish it up.


Aren't you excited to see what's next? Check out the Dream Team players for today:


You already know where to find Ranger's/Tim Holtz' products, but if you are having difficulty finding Dreamweaver, encourage your local stamp/paper-craft store to carry the line of fabulous stencil designs, pastes, and other products to mix with all of your stash of Tim's crafty goodness. You can also purchase our products on-line at Stencil with Style.

We'd love to see you come back regularly and play along with our monthly challenges (and more opportunities to win stencils) by linking your creations to the mr. linky on the Dream It Up! blog, or emailing pics of your creations to lynell@dreamweaverstencils.com. Since you're on the computer already, head on over and like us on Facebook as well. Just another location for dreamy and distressed inspiration!

Thursday, April 26, 2012

A Little Birdy Told Me...About the Dreamweaver Challenge


 Feeling the love of the Dreamweaver Stencil's "May Flowers" challenge this month? We are down to the final week in this challenge, so I really wanted to provide a happy project to encourage more to play along with us...like YOU!

Ever have a creative idea in your head, that amazingly turns out just the way you planned? This project was mine. I had bought several of these darling unfinished wood birdhouses at JoAnn's for $1 each. They are about 5" tall and 4" wide, the perfect size to have a little fun with...and I did. I broke out a few of my Ranger products...Adirondack Paint Daubers In White and Pool, Claudine Helmuth Studio Acrylic Paint in Yellow Pastel, and Enamel Accents in White. Those Paint Daubers are soooo awesome! Great way to paint items without breaking out all the messy supplies. Here is what I did:

1) I daubed, swiped, and brushed on the Pool and Pastel Yellow paints.
2) I "white washed" over the surface by dry-brushing white paint over the surface.
3) I distressed the edges with a sanding block.
4) Using the Black Eyed Susans stencil from Dreamweaver Stencils, I taped it onto the flat side of the roof with removable tape. I stenciled the design with the Pastel Yellow, pouncing off excess paint before pouncing paint into the design in an up and down motion, to avoid getting paint under the stencil bridges.
5) I wanted to stencil the Bird Words onto the front of the house, but let's face it, the design of the house was not going to let that happen. So, here is what I did...I stenciled the words onto a piece of thin tissue paper. I traced the outline of the house and the heart opening, and cut out the piece of tissue. Then I coated the front with Beacon Adhesives Fast Finish Decoupage, placed the tissue on top,  and brushed more decoupage over the top.
6) I added little white dots of Enamel Accents to the roof.
7) Some ribbons and Prima flowers with a glitter brad were the finishing touch.

Remember we want YOU to play along with us with our challenges. Break out those floral stencils, etc., and create something only YOU can. Either link your creation to the Mr. Linky on the Dream It Up! blog, or email a picture of your creation to Lynell@dreamweaverstencils.com. We love it when you play along, so we post your creations on the Dream It Up! blog, as well as the Dreamweaver Stencils' Facebook Page (have you LIKED us yet?). Even better, this month TWO people have the opportunity to win one set of these two stencil designs:


For more inspiration, take a wander through the Dream Team's fabulous creations: