Showing posts with label holiday. Show all posts

Tuesday, December 23, 2014

Feeling Tangled?


Entering that last minute zone of holiday insanity? Whatever you do, "Don't get your tinsel in a tangle"! I thought I'd post this cute and amusing framed mantra for this week, featuring the Stampendous Cling Tangled Tinsel sentiment, stamped and highlighted with a bit of Stampendous purple Micro Glitter. The focal panel was matted with mirror lime, white, and black cardstock, with a larger mat of Core'dinations' textured cardstock.

The frame was one of those cheap $1 frames from Michaels which I gave one coat of black acrylic paint,
and when dry the edges were sanded a bit. I had picked up a bag of these glitter-covered styrofoam balls there as well, so I used an old serrated-blade knife to cut some in half and adhere them to the frame with Beacon Zip Dry as bright spots of color. Hope this is an extra bit of inspiration and laughter to round off the season!

Remember, the Stampendous team have been posting soothing inspirational creations for you this week. Pull up to your computer with a spiked or unspiked mug of cocoa, and enjoy the small bit of time to yourself.

Don't forget to squeeze in some time before January to post a creation for the December challenge. You can find the info HERE.

Happy holidays!

Thursday, December 4, 2014

Woodware: Sketch 40 and Pretty in Pink

If you are here for the Dreamweaver post, please scroll down, but enjoy this along the way!

The Woodware team are playing with Sketch 40 this week, and you can check out the other creations by heading over to the Woodware blog. Apparently, I was in a pink mood for this challenge, and most likely this card will go to someone with more feminine inclinations for obvious reasons. Lol. I used the Clear Magic Nordic Dove and Branch set, embossing the elements in Stampendous Shabby Pink Embossing Enamel. Sparkly tulle, sheer pink ribbon, and pink crystals are enough to make your teeth hurt from over-sweetness, but that's the direction my creative brain wanted to go this week. Who knows what it will want to do next week? Check back and see!

Thursday, September 18, 2014

Dreamweaver: Power Pasting for the Holidays!

Where did the summer go? Kids are back in school, with all the insanity that goes with it, vacations are a not-so-distant memory, and it is once again time to get busy with the important things in life...crafting for the holidays! Yay! All of September the Dream Team will be featuring all the new goodies we have for the "Most wonderful time of the year", the fall and winter holiday season. New stencil designs, new dies, and...brand new, soon-to-be-released embossing folders featuring some of our top-selling designs, all to be found on-line through the Stencil with Style web-site, or your local papercrafting store.

Here's my holiday inspiration for this week:

This card features our new Chevron background stencil, embossed in Glossy Red paste on a white cardstock panel. Over the top is a red panel with the Ornament Joy stencil paste-embossed in Glossy White. So simple. The perfect design for "power pasting"! "What's that?", you say? Here's a short tutorial:

Supplies: Paste, stencils, palette knife, spreader, removable tape
Place one strip tape on one edge, then...
second strip back to back to create hinge.
Tape on remaining sides over cardstock.
Use palette knife to place paste on edge of spreader the same width as stencil.
Pull paste across with one motion at slight angle. Fill holes if necessary, and make a second pass to remove excess.
Lift stencil away using hinge-piece. Place new panel underneath, and continue.
You can get 4-5 panels before needing to stop and clean your tools.

Once your panels are dry, just layer them and embellish!
Be sure to leave some love for our "A" Team, as well as our wonderful guest designer for September! Remember to link your  creations on the Dream It Up! blog for a chance to win the monthly prize. Got questions? Join the Dreamweaver Stencils Enthusiasts Facebook group for great ideas, tips, inspiration, and fun!

Wednesday, September 17, 2014

Woodware: Froufrou For the Holidays!

The Woodware team is breaking into Grandma's attic for this post! Our challenge is using lace, ribbon, and pearls...so much fun! My card features the Clear Magic Nutcracker image with comes with some lovely snowflake designs. I used a mottled ivory cardstock, which I aged a bit with ColorBox Graphic 45 Venetian Lace ink. I stamped the Nutcracker in black ink on the card front, as well as a couple of sheets of the Cardmaker Christmas Post 8 X 8 paper pad that I keep using for everything! I stamped one more in white ink on one of the black patterned sheets. Then I decided how I wanted to dress my Nutcracker, and proceeded to cut out the various pieces and adhere them. I swiped a bit of white ink over him just to wash him out a bit. Now for the froufrou! I gave him a nice layer of Stampendous White Flock for his hair, beard, and mustache. He received a nice smattering of adhesive pearls on his jacket and hat. Now that he was all dressed up for the occasion, I stamped and embossed in white a few of the snowflakes from the set, and added adhesive pearls in their centers. I finished off the card with top and bottom borders of natural cotton ribbon and ivory cotton self-adhesive lace...all of which got a ink smudging to keep in the vintage feel.

Tuesday, September 16, 2014

Stampendous: Adding a Bit of Holiday Dazzle!

Blog_header_add_a_little_dazzle
This week we're playing with the wonderful Add a Little Dazzle Craft Metal Sheets and all of our terrific Stampendous products. We hope you're enjoying the inspiration so far! If you missed yesterday's post, here's a link for you. MONDAY The team over at Add a Little Dazzle has created a special featuring the metals from this blog hop for those of you who have already realized you're going to need these products. You can find it here - Add A Little Dazzle Stampendous Hop Special. Of course you might win some, too! We're giving away three prize packages this week for comments on the blogs. A nice package of Metal Sheets, Stamps and Cutting Dies!

Prize Package from Add a Little Dazzle

Here's my creation for today:


My little holiday gift box is a base of unfinished wood box from the local big box store for one dollar, which I've swiped Tsukineko Toffee VersaFine ink over, and sealed with a brushed coat of Beacon Fast Finish Decoupage medium. During the very few minutes this took to dry, I quickly stamped out the Stampendous Cardinal Elements onto thin white tissue paper. I tore around the edges before decoupaging it onto my box. Do this by brushing one coat of the Fast Finish onto the box, and while wet, place the tissue as desired. Then brush more of the medium over the top and let dry.

Meanwhile, I stamped the image again onto a piece of the gold-color of aluminum from Add a Little Dazzle with Tsukineko Jet Black StazOn ink. The only portion I wished to work with now was the bird. I used some of my metalwork tools...a paper stump to begin manipulating the metal over a piece of suede, then a teflon-tipped tool to define the stamped design more, and a ball-tipped stylus to push the metal some more, creating more indented areas. I turned it over, and from the back on the hard surface of my desk, I traced the outside again with the Teflon tool to refine a bit more. I used a cotton swab with isopropyl alcohol to remove color from the areas that I intended to add color to. I used a sponged with some Black StazOn refill ink to push black color into the surface, and quickly used a damp paper towel to wipe away the excess, going for an antiqued look. Then I placed drops of Dreamweaver Stencils' Color Solutions Alcohol Inks in Winter Red and Mojito Green to fill in the indented design work and set it aside to dry. Once I cut it out, I smoothed the edges with a sanding block before adhering it to the box that I'd decorated. Embellished with a lush May Arts ribbon bow, a stained wood button, a twig with a sprinkling of Stampendous Shaved Ice, my gift box was ready to fill with whatever treat I chose...in this case, leftover candy canes from last year! Lol. Hey, I had to add something for the photograph!

We love to hop and here are today’s featured blogs with Stampendous and Add A Little Dazzle

Stampendous

Lea Kimmel

Add a Little Dazzle

Pam Hornschu

Cathy Parlitsis

Vicki Dutcher

Kate Capper

Amy Hurley-Purdie

PS. If you get to a blog and it says something like "that post isn't here", just click on the blog header or look for a link that says Home near the top. That will take you to the blog home, and the blog hop post should be somewhere near the top. Thanks for your patience!

Thursday, September 11, 2014

Dreamweaver Stencils: Being Positive and Negative for the Holidays!

Where did the summer go? Kids are back in school, with all the insanity that goes with it, vacations are a not-so-distant memory, and it is once again time to get busy with the important things in life...crafting for the holidays! Yay! All of September the Dream Team will be featuring all the new goodies we have for the "Most wonderful time of the year", the fall and winter holiday season. New stencil designs, new dies, and...brand new, soon-to-be-released embossing folders featuring some of our top-selling designs, all to be found on-line through the Stencil with Style web-site, or your local papercrafting store.

Here's my holiday inspiration for this week:

Here I am again featuring the positive and the negative in my design-work. Rather than being a glass-half-full-or-empty type of person, I think I use both! Dreamweaver has just released a new Chevron background which I used to paste-emboss in Glossy Black a full panel on red cardstock. I used the also-new Oval Ornament Nesting Dies that have matching stencil designs to purchase separately. The larger size was perfect to be the focal point of this card, as well as the one below. I just love when I can knock out two cards with half the effort! The Happy Holiday sentiment on this card is new as well, and is a perfect bold statement for my card. Nothing frou frou about this card or the one below, just crisp, graphic design.

Obviously, this second card incorporates the Chevron panel with the cut out as a window to the small Happy Holidays sentiment, embossed in Glossy Red Paste with Stampendous Red Micro Glitter on top. The panel has been popped up with foam tape for more dimension, and both cards feature a black and white May Arts ribbon embellishment.

We'd love to see your holiday creations for the month of September, so link them up on the Inlinkz tool on the Dream It Up! blog for a chance to win the stencil of your choice! Meanwhile, here's more inspiration from the "B" Team as well as our Guest Designer for September:


Friday, September 5, 2014

Woodware UK: Canvassing for Creativity

This week's challenge for the Woodware team strained my brain a bit, and I'm not sure why. We've all been working with the Canvas Cloth, an awesome product...perfect for painting, stamping, stenciling, and stitching on. All week I've been watching the rest of the team's posts, waiting for some inspiration to hit. I've had the cloth sitting on my island in the middle of my studio as a constant reminder while I've had ideas stewing in my head. Finally, this morning, the light bulb went on! A holiday door hanging! Perfect. And no sewing necessary, which is a good thing as my sewing machine is in dire need of being cleaned, oiled, and adjusted from lack of use.

I decided that I would use one of Woodware's wood dowels (which I covered in red ink and clear embossing powder, and then dipped the ends into Stampendous Aged Gold Embossing Enamel for more pizazz.) The length of the dowel is 6 inches (15 cm), which meant that my canvas needed to be 5 inches in width. I chose the Dreamweaver stencils that I wanted to use (Holiday Greetings, Holly Flourish, Christmas Borderss) and laid them out for measuring space of design. I added a few extra inches in length to create the banner effect that I wanted.
I wanted to have the look of cross stitch, without the work (duh!), so I pulled out my handy Dreamweaver Screen, taped it down on the canvas, and using a large stencil brush, added an antique-y looking color (Clearsnap Mixed Media ink in Vintage) over the entire panel, moving the screen as necessary. Then I placed the Holiday Greetings stencil as desired, taped it down over the top of the screen, and started adding the color to the leaves and berries (Mixed Media Schoolhouse Red and Mossy Green, with a bit of Leather Brown). You notice that the  berries are tiny, and fairly close to the leaves. This makes it tricky...unless of course you have in your possession the awesome Picasso tool from Dreamweaver. It looks a bit odd in shape, with sharp corners and rounded scallops, and inside little open lines and several sizes of circles. The purpose is to use this to mask off where you don't want ink, while you add the ink that you do want. For instance, on the berries, just place the appropriate circle size over the berry, ink your smallest stencil brush, and rouge the color into that space, and move onto the next. Easy!

Following the same process, I completed the Holly Flourish design at the top and bottom of the panel, as well as one section of the Christmas Borders. I used that large brush again to add more ink-distressing around the edges and over the canvas. Now I was ready for the finishing touches!

I added two strips of Woodware Self-adhesive White Lace, several Card Candis in Holly Berries, inked the bottom edge with Clearsnap Gold ColorBox ink, and embossed the edge with Stampendous Aged Gold Embossing Enamel...the perfect amount of bling while keeping the vintage feel. For a bit of whimsy, I added striped string bows with tiny Woodware Jingle Bells. I cut two slits at the top of the hanging to insert Tartan ribbon through, and tied this in bows around the dowel for hanging.

This hanging would really be a lovely gift or craft sale item, and is easy enough to do in multiples. Handmade is heartmade, after all!



Friday, August 15, 2014

Dreamweaver and Woodware: Christmas in August-Day Six


Yes! It's been that time of year again! The time when we inspire crafters on both sides of the "pond" with a mix of both Dreamweaver and Woodware UK* products for the holidays! Six days, SIX, of beautiful, elegant, merry, cute, artsy, and craftsy projects to have you heading out to your local stores or internet sites to buy these goodies immediately!


Of course, there have been prizes as well. Three prize packages will be given to three commenters during this week's posts on the team's blogs, including five stencils and one nested die set. You can have an opportunity to win these goodies by leaving some holiday sweetness for each team member posting each day, to be one of the three winners for the week. Here are the team members that are inspiring you today:

Kristine Reynolds
Jamie Martin
Pam Hornschu
Louise Healy 
Alison Heikkila
Debs Frost 
Lyn Bernatovich
Lynn Mercurio
Lea Kimmel
Gill Wilson
Laura Drahozal 
Dorothy Adam


Here's my creation: 

Feel the need for a cuppa? How about twenty-four? That's what I have for today! I created a Christmas Advent garland using Dreamweaver's newly-released Teacup Nesting Dies. Twenty-four large cups die cut from chipboard, and twenty-four large cups from Cardworks Christmas Post papers, with a few solid colors mixed in. All of the solid colors have been ink-stenciled using Clearsnap Mixed Media ink in Jasmine White with Dreamweaver's Line of Christmas Trees, Village, or Christmas Borders stencils. Some of the patterned cups also were ink-stenciled with green ink. Each paper die cut cup was adhered to a chipboard cup on the edges, with a slight gap to allow for tucking in some little advent treats...tea bags (okay, those of you in the UK...don't judge me on the brand of tea. The packages were the right colors!) and tiny chocolates. Other suggestions could be gift certificates or cards, little notes, lotto tickets, candy canes, the thin packets of flavored coffees, etc. The Advent numbers were die cut with the newly-released Dreamweaver Dual Alphabet/number set, and each of these were adhered to the tiny die cut teacups tied to each larger one with natural hemp cord. All of the cups were then tied onto a length of thick, jute cord, which was also tied to a long bundle of twig/branches that I had saved off of my birch tree in the front yard. Some happy plaid and tartan ribbons added more homey color, and the finished result was a perfect decoration for my mantle in a few months. Each of these teacups would make a wonderful tree ornament, a tag for a gift, or the front of a card for most any occasion, with a gift card tucked inside.
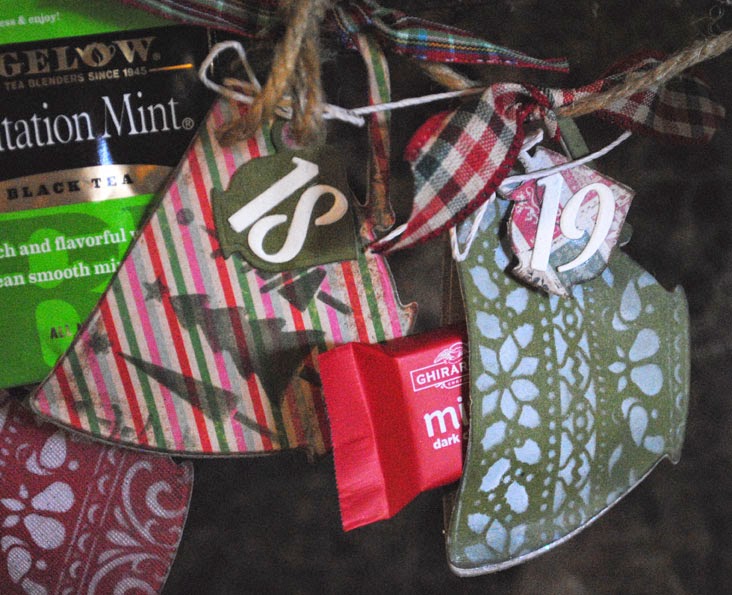
The Advent garland concept could be done just as easily with Dreamweaver's newly-released Nested Stocking and/or Nested Ornaments dies. The possibilities are endless!


*For a stockist near you contact Woodware Craft Collection in the UK and Notions Marketing in the USA.

Thursday, December 5, 2013

Dreamweaver Stencils: In a Hurry for the Holidays?

Welcome to the countdown to Christmas with Dreamweaver! The entire month of December our challenge is "Holidays in a Hurry". Every year November through December seem to fly by even more quickly. It's almost as though Rudolph has a red laser pointer for a nose, and Santa has a turbo in the sleigh! Well, we're here to help you out with that!

My holiday-in-a-hurry card features the Dreamweaver Swirly Tree pasted in Glossy White. I highly recommend following the "power pasting" technique to create multiples quickly:

1. Create "handle" with back to back tape
2. Add "hinge" of tape at bottom
3. Tape sides

4. Pasting the first panel
5. Remove side pieces. Lift handle up. Remove panel.
6. Insert next panel and repeat. Clean stencil every 4-5 pastings.

Pasted on a fun patterned paper, matted with a contrasting color, makes for super-speed assembly. The sentiment is the new Joyeux Noel stencil, also power-pasted with a small mix of white paste and Blueberry Shake Memories Mists for color. Add some bling with a few crystal rhinestones for a more special feel that the recipients will assume to took days to complete.

The "A" team is up this week for more quick ideas. Take a look...