Showing posts with label Clearsnap. Show all posts

Wednesday, March 25, 2015

Texturize It With Stampendous, Dreamweaver, and Woodware UK: Day Three


We have a different sort of collaboration for you!


This week we’re going to celebrate with the awesome Woodware Design Team and the Dreamweaver Stencils Dream Team all of the the great Stampendous and Dreamweaver Stencils products that Woodware makes available to the UK market. This is good news for our crafty friends in the UK because we’ll be offering prizes and our UK friends are eligible to win!! We’ll be offering three prizes in the UK and three in the US. Each prize package will consist of Nathalie Kalbach’s terrific Grunge Mixed Media Cling Rubber Stamp Sets and the beautiful Zen Butterfly Dreamweaver Stencil! Both products are ideal for adding texture and backgrounds to your projects!
Deadline to comment is Sunday, March 29th, Pacific Time. Winners will be picked using random.org and announced Tuesday, March 31st, in the afternoon.
And that’s our theme!! Making Texture. We hope you’ll enjoy the wonderful inspiration that three talented teams will bring you this week! Be sure to visit all the blog links listed and leave your comments! Each comment will count as an entry towards one of the terrific prize packages.

Here's what I've created for today:

Yes, it's another banner today! Following pretty much the same process as the one that I posted on Monday...

The pre-gessoed side of the half sheet of canvas pad was watermark inked through the Dreamweaver Spiral Dots stencil randomly over the surface before being embossed with Stampendous White Embossing Powder. This melted EP acts as a resist against the Clearsnap Mixed Media inks (Vintage, Leather, Barn Door) that were swiped over the surface. Using a palette knife, some Dreamweaver Matte Black Embossing Paste was spread over one section and set aside to dry.

Meanwhile, a strip of Mark Richard's Linen Fabric pad was frayed around the edges, and stamped with the Leather ink and the Stampendous Cling Life is Art image, along with some random distressing.

Once the paste was dry, I swiped a bit of talcum powder over the canvas as an anti-static medium for the next step. I paste-embossed the Dreamweaver Feather stencil in Copper Embossing Paste, and sprinkled liberally with Aged Black and Aged Copper Embossing Enamel. This was heated until bubbly and textured, with lots of shimmer! Now the linen strip could be adhered, along with a couple of bits of Ribbon Tape from Woodware. A wooden dowel and been prepped with black paint, and was attached by wrapping strips of the Ribbon Tape over it and attaching it to the canvas. A bit more of the Aged Black and Copper were sprinkled over the canvas, and heated from underneath for more texture. 


Here's the links to the designers that are playing today:

Stampendous Blog


Amy Hurley-Purdie


Jamie Martin


Asia King


Wendy Price


Woodware Craft Collection Blog


Pam Hornschu


Dreamweaver Stencils Blog


Cindy Groh


Louise Healy

Tuesday, March 24, 2015

Texturize It With Stampendous, Dreamweaver, and Woodware UK: Day Two


We have a different sort of collaboration for you!


This week we’re going to celebrate with the awesome Woodware Design Team and the Dreamweaver Stencils Dream Team all of the the great Stampendous and Dreamweaver Stencils products that Woodware makes available to the UK market. This is good news for our crafty friends in the UK because we’ll be offering prizes and our UK friends are eligible to win!! We’ll be offering three prizes in the UK and three in the US. Each prize package will consist of Nathalie Kalbach’s terrific Grunge Mixed Media Cling Rubber Stamp Sets and the beautiful Zen Butterfly Dreamweaver Stencil! Both products are ideal for adding texture and backgrounds to your projects!
Deadline to comment is Sunday, March 29th, Pacific Time. Winners will be picked using random.org and announced Tuesday, March 31st, in the afternoon.
And that’s our theme!! Making Texture. We hope you’ll enjoy the wonderful inspiration that three talented teams will bring you this week! Be sure to visit all the blog links listed and leave your comments! Each comment will count as an entry towards one of the terrific prize packages.

Here's what I've created for today:

No butterflies today! Today we're going on a textural adventure under the sea...

The focal panel was created using a panel of Bazzill chipboard in white. Several tube acrylics were squeezed onto my Stampendous Creative Palette and brayered a bit to swirl at bit. The panel was placed face down on the wet ink, and pulled up immediately. Pulling up creates the wrinkly-looking lines through the paint for a very cool texture. Once the panel was dry, a few of Nathalie Kalbach's Grunge Kaffee Klatsch images from Stampendous were stamped over the surface in Colorbox Chalk inks (Deep Lagoon, Iced Jade, Aquamarine). The Dreamweaver Jellyfish stencil was ink-stenciled with black Surfacez ink. A bit of talcum powder was wiped over the surface as an anti-static medium before paste-embossing in Metallic Gold the Jellyfish again over the top. Steel Blue and Fresh Green Crushed Glass Glitter from Stampendous were sprinkled on the molten surface and lightly pressed in (CAREFUL! It will be warm!)

Now for the base of this project. I used a 12 X 12 piece of Bazzill Chipboard in black. I stamped a few of Nathalie's images again, some I embossed in Aged Gold Embossing Enamel, some embossed in black, and some stamped in white or gold ink. Extra sprinklings of the Aged Gold were tossed about, and heated from underneath. The focal panel was adhered to the base. Finally, I die cut the words from the Dreamweaver Dual Alphabet, inked them halfway with watermark ink, and embossed the portions in Aged Black or Aged Marine Embossing Enamel. These were then adhered to the "canvas".


Here's the links to the designers that are playing today:

Stampendous Blog


Pam Hornschu


Woodware Craft Collection Blog


Jane Gill


Dreamweaver Stencils Blog


Gill Wilson

Monday, September 29, 2014

Woodware: Sketch 38 Playtime


I had fun with Woodware's Sketch 38, using one of my favorite techniques, in my favorite colors, and using a favorite stencil, die, and background stamp! The background "Many Christmases" stamp from Woodware's Jane Gill was stamped in Versamark ink on a white panel, and embossed in Stampendous White EP. Then I took a selection of Clearsnap ColorBox Chalk inks in French Blue, Pastel Lime, Aquamarine, Ice Jade, and Blue Lagoon, and stamped blocks of the pads overlapping. You can then take a paper towel or rag and wipe the ink off the embossing as it resists the ink. I did an extra panel as well, but inked the Dreamweaver Antler Snowflake and embossed it for the resist. I used the Dreamweaver Nested Ornaments die to cut out the shape, and matted it with lime green mirrorboard before adhering it with foam squares over a corrugated strip of the mirrorboard, along with the sheer dotted bow and a crystal.


Wednesday, September 17, 2014

Woodware: Froufrou For the Holidays!

The Woodware team is breaking into Grandma's attic for this post! Our challenge is using lace, ribbon, and pearls...so much fun! My card features the Clear Magic Nutcracker image with comes with some lovely snowflake designs. I used a mottled ivory cardstock, which I aged a bit with ColorBox Graphic 45 Venetian Lace ink. I stamped the Nutcracker in black ink on the card front, as well as a couple of sheets of the Cardmaker Christmas Post 8 X 8 paper pad that I keep using for everything! I stamped one more in white ink on one of the black patterned sheets. Then I decided how I wanted to dress my Nutcracker, and proceeded to cut out the various pieces and adhere them. I swiped a bit of white ink over him just to wash him out a bit. Now for the froufrou! I gave him a nice layer of Stampendous White Flock for his hair, beard, and mustache. He received a nice smattering of adhesive pearls on his jacket and hat. Now that he was all dressed up for the occasion, I stamped and embossed in white a few of the snowflakes from the set, and added adhesive pearls in their centers. I finished off the card with top and bottom borders of natural cotton ribbon and ivory cotton self-adhesive lace...all of which got a ink smudging to keep in the vintage feel.

Friday, September 5, 2014

Woodware UK: Canvassing for Creativity

This week's challenge for the Woodware team strained my brain a bit, and I'm not sure why. We've all been working with the Canvas Cloth, an awesome product...perfect for painting, stamping, stenciling, and stitching on. All week I've been watching the rest of the team's posts, waiting for some inspiration to hit. I've had the cloth sitting on my island in the middle of my studio as a constant reminder while I've had ideas stewing in my head. Finally, this morning, the light bulb went on! A holiday door hanging! Perfect. And no sewing necessary, which is a good thing as my sewing machine is in dire need of being cleaned, oiled, and adjusted from lack of use.

I decided that I would use one of Woodware's wood dowels (which I covered in red ink and clear embossing powder, and then dipped the ends into Stampendous Aged Gold Embossing Enamel for more pizazz.) The length of the dowel is 6 inches (15 cm), which meant that my canvas needed to be 5 inches in width. I chose the Dreamweaver stencils that I wanted to use (Holiday Greetings, Holly Flourish, Christmas Borderss) and laid them out for measuring space of design. I added a few extra inches in length to create the banner effect that I wanted.
I wanted to have the look of cross stitch, without the work (duh!), so I pulled out my handy Dreamweaver Screen, taped it down on the canvas, and using a large stencil brush, added an antique-y looking color (Clearsnap Mixed Media ink in Vintage) over the entire panel, moving the screen as necessary. Then I placed the Holiday Greetings stencil as desired, taped it down over the top of the screen, and started adding the color to the leaves and berries (Mixed Media Schoolhouse Red and Mossy Green, with a bit of Leather Brown). You notice that the  berries are tiny, and fairly close to the leaves. This makes it tricky...unless of course you have in your possession the awesome Picasso tool from Dreamweaver. It looks a bit odd in shape, with sharp corners and rounded scallops, and inside little open lines and several sizes of circles. The purpose is to use this to mask off where you don't want ink, while you add the ink that you do want. For instance, on the berries, just place the appropriate circle size over the berry, ink your smallest stencil brush, and rouge the color into that space, and move onto the next. Easy!

Following the same process, I completed the Holly Flourish design at the top and bottom of the panel, as well as one section of the Christmas Borders. I used that large brush again to add more ink-distressing around the edges and over the canvas. Now I was ready for the finishing touches!

I added two strips of Woodware Self-adhesive White Lace, several Card Candis in Holly Berries, inked the bottom edge with Clearsnap Gold ColorBox ink, and embossed the edge with Stampendous Aged Gold Embossing Enamel...the perfect amount of bling while keeping the vintage feel. For a bit of whimsy, I added striped string bows with tiny Woodware Jingle Bells. I cut two slits at the top of the hanging to insert Tartan ribbon through, and tied this in bows around the dowel for hanging.

This hanging would really be a lovely gift or craft sale item, and is easy enough to do in multiples. Handmade is heartmade, after all!


Friday, August 15, 2014

Dreamweaver and Woodware: Christmas in August-Day Six


Yes! It's been that time of year again! The time when we inspire crafters on both sides of the "pond" with a mix of both Dreamweaver and Woodware UK* products for the holidays! Six days, SIX, of beautiful, elegant, merry, cute, artsy, and craftsy projects to have you heading out to your local stores or internet sites to buy these goodies immediately!


Of course, there have been prizes as well. Three prize packages will be given to three commenters during this week's posts on the team's blogs, including five stencils and one nested die set. You can have an opportunity to win these goodies by leaving some holiday sweetness for each team member posting each day, to be one of the three winners for the week. Here are the team members that are inspiring you today:

Kristine Reynolds
Jamie Martin
Pam Hornschu
Louise Healy 
Alison Heikkila
Debs Frost 
Lyn Bernatovich
Lynn Mercurio
Lea Kimmel
Gill Wilson
Laura Drahozal 
Dorothy Adam


Here's my creation: 

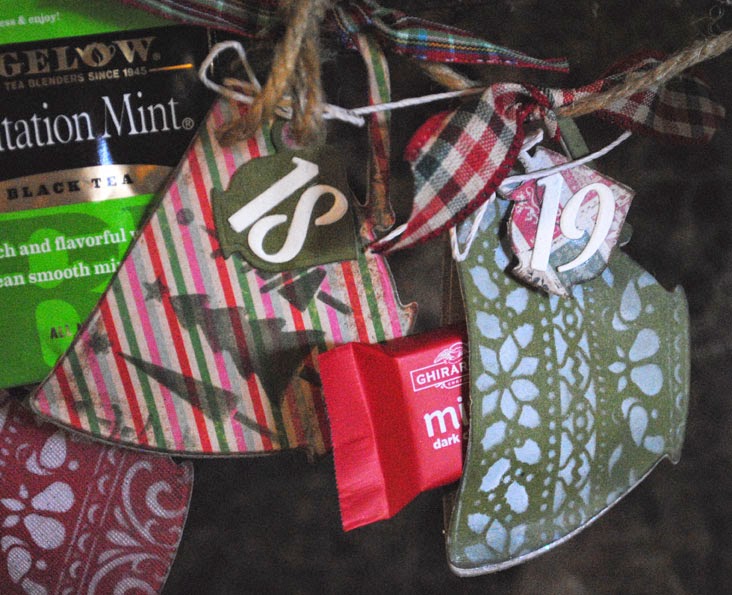
Feel the need for a cuppa? How about twenty-four? That's what I have for today! I created a Christmas Advent garland using Dreamweaver's newly-released Teacup Nesting Dies. Twenty-four large cups die cut from chipboard, and twenty-four large cups from Cardworks Christmas Post papers, with a few solid colors mixed in. All of the solid colors have been ink-stenciled using Clearsnap Mixed Media ink in Jasmine White with Dreamweaver's Line of Christmas Trees, Village, or Christmas Borders stencils. Some of the patterned cups also were ink-stenciled with green ink. Each paper die cut cup was adhered to a chipboard cup on the edges, with a slight gap to allow for tucking in some little advent treats...tea bags (okay, those of you in the UK...don't judge me on the brand of tea. The packages were the right colors!) and tiny chocolates. Other suggestions could be gift certificates or cards, little notes, lotto tickets, candy canes, the thin packets of flavored coffees, etc. The Advent numbers were die cut with the newly-released Dreamweaver Dual Alphabet/number set, and each of these were adhered to the tiny die cut teacups tied to each larger one with natural hemp cord. All of the cups were then tied onto a length of thick, jute cord, which was also tied to a long bundle of twig/branches that I had saved off of my birch tree in the front yard. Some happy plaid and tartan ribbons added more homey color, and the finished result was a perfect decoration for my mantle in a few months. Each of these teacups would make a wonderful tree ornament, a tag for a gift, or the front of a card for most any occasion, with a gift card tucked inside.
The Advent garland concept could be done just as easily with Dreamweaver's newly-released Nested Stocking and/or Nested Ornaments dies. The possibilities are endless!


*For a stockist near you contact Woodware Craft Collection in the UK and Notions Marketing in the USA.

Tuesday, May 20, 2014

Woodware Father's Day Gifts All Tied Up


Once again, Woodware has me hopping. This week, we have been challenged to create a gift for Father's Day. As with Mother's Day, this happy day falls earlier in the year in the UK than in the US, so I was unprepared. However, I have step by step directions to demonstrate that you, too, can be on time for this prestigious occasion. All you need are a cheap cotton tie from Primark (try Wal-Mart in the USA), and the supplies shown below: 

Dreamweaver Cathedral Window, Electric Guitar, Guitar Words, Clearsnap Mixed Media Ink, Sakura Micron Pen

Tape down guitar stencil. Tap red ink through stencil using stencil brush until saturated. Remove stencil and apply heat tool to set ink.
Tape down Cathedral Window over tie, and ink stencil with white ink over background area only. Heat set as above.
Place guitar stencil over design again, and trace outline with Micron Pen.

Ink stencil the selected guitar words randomly over tie. Heat set once again.
See??? Wasn't that simple? And you KNOW that Dad will be off to the offices on Monday, proudly displaying his one-of-a-kind, hand-made-with-love tie to all those jealous barristers! No, you say??? Okay, well maybe just around the house watching aging rock gods on the telly.

Need more Father's Day inspiration? Check the Woodware blog daily all this week!

Tuesday, April 24, 2012

Woodware Uk/Clearsnap Blog Hop

We're having a blog hop!!!

Welcome to the
Woodware and Clearsnap
Spring Gifts Blog Hop!!!

Whether you're getting ready for Mother's Day (US), graduation season, or just because, these gifts ideas can be made with a few Clearsnap inks, Rollagraph Stamp Wheels, and Woodware Craft Collection Clear Stamps. All week long we'll be sharing inspiring gift ideas on our blogs here:


I had so much fun playing with the Clearsnap products for my Woodware UK project! I took an ordinary unfinished wood frame, and made it extra-ordinary! I used Mandarin Ancient Page Re-inker and a sponge to color the base...works perfectly as a wood stain. I stamped the Clearsnap Rollagraph "Faux Postal" with the deepest color from the ColorBox Fluid Chalk Ink Queue "Sand Dunes". Unfortunately, my rolling wasn't as perfectly straight as I would have like, so I disguised it a bit...I used my Frost White ColorBox Pigment pad directly to swipe a "white-washed" look over the surface. To emphasize this further, I sprinkled on Stampendous White Embossing Powder, brushed away the excess (leaving convenient brush strokes), and heated this. Now my fun Rollagraph images aren't as prominent as I would like, sooooo...I stamp-rolled onto tissue paper with Chestnut Roan ColorBox Fluid Chalk in Cat's Eye. I love how the colors work together! I cut each section or "stamp" out and decoupaged them onto the frame with Beacon Adhesive's Fast Finish Decoupage. Love this product! Goes on thin, dries clear, and fast! I also decoupaged one of the tissue "stamps" onto a square Canvas Corp mini canvas. When dry, this became my framed focal point. I still felt like the project needed just one more thing, know what I mean? I broke out my Metallique Copper Card Candi and adhered them around the edge to mimic upholstery tacks. I love how they look on this!


Head on over to the Clear Snap Blog  and the Woodware UK blog to see what they've created today!! And don't forget to follow Clearsnap  on twitter and Facebook and you will find Woodware on Twitter and Facebook too.

Happy Hopping!