Thursday, October 30, 2014

Dreamweaver: A Final Happy HallowThanksMas to You!


With five Thursdays this October, the Dream Team have enjoyed playing with our "Happy HallowThanksMas" challenge.  I thought that I'd squeeze one more Halloween card in for this year...

This card features our "Great Pumpkin" stencil, which I've paper-pieced from scraps left over from some of my favorite paper (not even sure that it's still available) over a machine-embossed panel. Everything has been distressed, and a very simple sentiment of Idea-ology Chit Chat from Tim Holtz completed this very simple card.

Remember to visit the entire Dream Team for more inspiration:

Wednesday, October 29, 2014

Woodware: Sketch 39 For a Hoppy Birthday


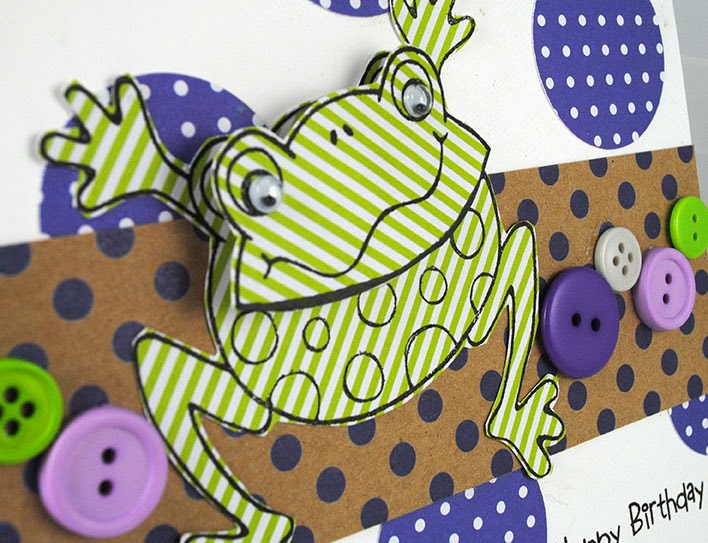
Welcome to the sketch 39 challenge for Woodware. I chose to turn it on it's side as I was determined to incorporate this cute Hoppy Frog image designed by Francoisé Read for Woodware. I think the circles in the design add to the "hoppy" effect, so I used Woodware circle punches with patterned paper and added them randomly in the background. My band across the center was also patterned paper (by the way, this  card is a great way to use up scrap paper), and added a border of buttons across the center, continuing the circle theme. The frog was stamped on striped paper twice, and cut out. A whole frog was adhered to the card, and a head portion adhered with the Action Wobble spring between the layers. Of course, I had to add "googley" eyes, and one of the cute sentiments from this stamp set.

We hope you'll take time to play along with the challenge, and link your own creations to the Woodware blog. Head over there for more details!


Stampendous: OWL Wish You a Happy Birthday!

This week on the Stampendous blog, the team are OWL posting their own creations with the various owl images that Stampendous carries. I chose to use the Literary Owl, 'cuz he's a bit bookish like I am. I even used a portion of a dictionary page for this occasion. The owl has been stamped on Core'dinations tan cardstock and distressed. A panel of Graphic 45 paper for the background, and I found a chipboard key to add as well. The tricky part was finding a sentiment to fit on the key! This skinny birthday message from the new Perfectly Clear Royal Heart Quotes was perfect! The end result is a masculine birthday card that OWL most likely be giving to my hubby sometime in the future.

Head over to the Stampendous blog to see WHOOOO else is playing today!


Tuesday, October 28, 2014

31 Days of Halloween with Smeared and Smudged - Day 28


The Dream Team are dipping their fingers into all things spooky, creepy, and scary, as we play along with the Smeared and Smudged 31 Days of Halloween. The team will be taking turns to fill the quota of 31 days on the Dream It Up! blog, and posting on their own blogs as well. Be sure to leave them lots of love as this is truly a challenge for many of them! Here is my post for today:

I'm finishing up this month long Halloween celebration by going out in a box...a Cosmo Cricket Blackboard Photo Box, that is. No photos in this one, just some fun Halloween cards from this past month. Each have been designed to fit this box so that a fun portion of the design shows through the window.

I paste-embossed in Matte Black the Dreamweaver Stone Wall over the box and lid, breaking it up a bit as I went, and smearing extra paste around the edges. When dry, I brushed on some Metallic F/X powders and white ink to highlight the stones. I also paste-embossed the Romantic Rose so that it trailed up the sides of the stone wall. When dry, I ink-stenciled color from the Tsukineko Splendor pad.

A stamped and cut out set of headstones from the Stampendous Tomb Elements was adhered with 3D foam tape.

The Smeared and Smudged site is offering prizes each day of the month by a long list of sponsors...Dreamweaver being one of them, but we are also offering one stencil to one lucky commenter on the Dream It Up! blog each day of the month! So, leave your comment below before heading over the Smeared and Smudged blog to view all of the other creepiness!  

Saturday, October 25, 2014

Dreamweaver: 31 Days of Halloween with Smeared and Smudged - Day 25


The Dream Team are dipping their fingers into all things spooky, creepy, and scary, as we play along with the Smeared and Smudged 31 Days of Halloween. The team will be taking turns to fill the quota of 31 days on the Dream It Up! blog, and posting on their own blogs as well. Be sure to leave them lots of love as this is truly a challenge for many of them! Here is my post for today:

 Today's card features the large Tapestry/Damask stencil machine-embossed on Core'dinations cardstock, and sanded to reveal the gray core as the base. The large focal panel is the Mirror Mirror image from Stampendous, stamped in black on white cardstock, and ink and edge distressed. The center of the mirror is the witch profile, but just to channel my inner Disney Haunted Mansion leanings, I embossed in white the Dreamweaver Cameo on Core'dinations vellum, framed in black, and popped up over the top. If you look carefully, you'll see the pretty cameo profile, with the witch silhouette underneath. Bwahahahahaha. To add to the ambiance, the Dreamweaver Bats and the Raven were cut from paper stamped in black using the Stampendous Ornate Border. More ink-distressing, and red rhinestones, a strip of May Arts Chevron ribbon, and the card had the eerie feel that I was aiming for.


The Smeared and Smudged site is offering prizes each day of the month by a long list of sponsors...Dreamweaver being one of them, but we are also offering one stencil to one lucky commenter on the Dream It Up! blog each day of the month! So, leave your comment below before heading over the Smeared and Smudged blog to view all of the other creepiness! 

Friday, October 24, 2014

Stampendous and HHH Enterprises Jewelry: A CRYPTic Pendant from Beyond

HHH Enterprises Jewelry pieces were quite a nice surprise for me. I hadn't seen them before, but loved all of the possibilities that my busy brain was thinking of! My favorite in my batch of goodies from them, was this cool box with the glass door on it. I instantly wanted to do something creepy for Halloween...sort of CRYPTic, if you know what I mean.

My first step was to place several drops of Beacon Fast Finish Decoupage into the box, enough to cover the bottom. I sprinkled Stampendous Purple Micro Glitter over the wet surface, and set it aside to dry about five minutes. (There's a reason they call this stuff FAST Finish!) While that was drying, I stamped the Cling Tomb Elements image with Tuxedo Black Memento on white tissue paper. I turned the piece over and colored the skeleton on the back with a Pentel White Paint Marker. This kept the skeleton standing out, and the tissue disappearing into the background. I added a few more drops of Fast Finish over the glitter layer, placed the tissue piece on top, and added a few more drops, pressing slightly to smooth the tissue piece. This, too, was set aside to dry for a few minutes. Meanwhile, I found a long bead chain in the same color as the metal on the box, an old rusty safety pin (which I brushed a sealer over), and a couple of charms ( a frog and a snake) that I had stashed away. Both were antiqued a bit by daubing some Black StazOn ink over the surface, and heating with a heat tool. I brushed a bit of glue over each and covered this in green Micro Glitter. Finally, I added a couple more drops of Fast Finish just at the bottom of the box, and sprinkled with Stampendous Trick or Treat Color Fragments for more texture and dimension. A couple of tiny glowing green crystals were added for eyes, and I hand-painted a spider web in the corner of the glass door with Copic white and a fine brush.

Be sure to follow the rest of the Stampendous team that are posting for this event by heading to the Stampendous blog. To purchase the HHH Enterprises products seen here, visit their website HERE. To purchase Stampendous product, visit your local retailer, or online HERE.


Thursday, October 23, 2014

Woodware: A Winter White Wonderland for Christmas

This week the Woodware team are dreaming of a white Christmas. Living in Southern California doesn't provide much opportunity for this, but I can pretend...

My card features a white panel, machine-embossed with the new Dreamweaver Quatrefoil background, and then inked through with Versamark, and embossed with Stampendous Crystal Embossing Powder. Over the top is another white panel with the new Dreamweaver Nested Ornament Diese cut from it, and then run through my embossing machine with the Dreamweaver Christmas Borders Embossing Folder. This was adhered with dimensional foam adhesive squares to pop it away from the background. A sheer polka dot ribbon bow was added, along with Mark Richards Crystal strips for added bling. All in all, this card is very simple to recreate in multiples, and easily changed with many of the Dreamweaver backgrounds and dies...and even in non-white!

Dreamweaver: Simply Splendid Spares

Occasionally, it is a great idea to have some simple cards on hand, perfect for those occasions that just "pop" up...birthdays, sympathy, get well, thinking of you, etc. Today's card would be perfect for any of those occasions, as well as the "Thanks" portion of our Dreamweaver challenge this month...Happy HallowThanksMas!

Using a simple background color such as the soft sage as my card base, I then used a contrasting chocolate brown panel to die cut my Leafy Branch. I used the Dreamweaver Deckle Edge Rectangle and the long Friend stencil, to emboss a frame and sentiment on this panel. Using a large stencil brush, and Tsukineko's Gold Delicata ink, I striéd over the surface top to bottom, and side to side, just catching the raised surface with the gold ink.

I marked the area where the leaf window would be placed on the card base, and using the gold inkpad, I directly inked that surface. I added sprinkles of Stampendous Aged Copper, Mica, and Fresh Green Crushed Glass Glitter over the ink, and heated from underneath until all of the elements were encrusted together.

The brown panel was wrapped with hemp cord, and adhered with foam tape over the card base, allowing all that texture and sparkle to shine from underneath. This card ended up as a birthday card for a friend of my husband, but would work equally well as an everyday card, or Thanksgiving wish. Cut down in size, it could make a great design for place cards at the holiday dinner table.
There is still one more week with the Happy HallowThanksMas challenge for YOU to play along as well. Just link your creations to the Inlinkz tool at the bottom of this post, or on the Dream It Up! blog. Meanwhile, for more inspiration, here is our "B" team:


Friday, October 17, 2014

Woodware: Textured Traditions

IF YOU ARE HERE FOR THE DREAMWEAVER/STAMPENDOUS/CORE'DINATIONS CHRISTMAS HOP, PLEASE SCROLL DOWN. 
HAPPY HOPPING!


I love that the Dreamweaver Ornate Tree and Holiday Borders match each other in design, and now there is even a Holiday Borders Embossing Folder from Dreamweaver! This card was done "old-school" though...the front panel was paste-embossed in Glossy Red Embossing Paste with Stampendous Red Embossing Powder over the top, and heated until bubbly and textured. The same technique was done on the Holiday Borders panel, but with Copper Paste and Aged Copper Embossing Enamel over the top. The result is a bit shimmery, a bit rough. A few crystals added for bling, and a soft ribbon bow completes this very traditional card...which happens to be this week's challenge on the Woodware blog! Come play along!


Dreamweaver/Stampendous/Core'dinations: SANDY Claus is Coming to Town - Finale!


SANDY Claus is Coming to Town!

Yes...SANDY Claus! All of this week, the Stampendous and Dreamweaver teams are playing with a mix of their products, along with some wonderful, SAND-ABLE papers from Core'dinations. Join us as we sand our way to the "core" of all things Christmas and the Holiday season. Of course, there will be prizes, and we give away the best...this time with a mix of fun Core'dinations products as well. To be one of three prize package winners, follow the posted link lists each day, leave a comment, and winners will be selected from these comments at the beginning of next week. Here is what you might win:


Here's what I'm showing off today:

What a jolly way to end this week's hop...with Santa! Specifically the Stampendous Cling Santa Reins, stamped in Tuxedo Black Memento ink from Tsukineko, and colored with Copic markers. I added some Dreamweaver Regular Embossing Paste over his beard, hat, and cuffs, and "fluffed" it a bit with the tip of a palette knife. A generous pour of Stampendous Multi Crystal Glitter over the surface, and pressed in slightly to adhere, gives him the sparkle that he deserves. The card base is a great textured piece of Core'dinations cardstock. On top of this is a white cardstock panel paste-embossed in Glossy Red using the Dreamweaver Chevron stencil design.  A die cut Holly Swirl from Dreamweaver, and a die cut Snowflake from Stampendous, layered with a May Arts ribbon knot finish off this card.


Leave a comment for me, and head to the next on the list:

Dreamweaver:
Pam Hornschu*
*On Stampendous team as well

Core'dinations:
(will not be posting on their company blog, but individual posts only)
Tami Mayberry

Head on over to the Stampendous blog for links to their posts:

Dreamweaver: Smudged and Smeared's 31 Days of Halloween-Day Seventeen

The Dream Team are dipping their fingers into all things spooky, creepy, and scary, as we play along with the Smeared and Smudged 31 Days of Halloween. The team will be taking turns to fill the quota of 31 days on the Dream It Up! blog, and posting on their own blogs as well. Be sure to leave them lots of love as this is truly a challenge for many of them! Here is my post for today:

It is great when you can use a item in your craft stash for more than just the obvious usage...case in point, this Lock and Key Stencil. Perfect for Valentines, Weddings, and Anniversaries, right? But why not the lock and key to a crypt or a dungeon or a haunted house? All it takes is a change in color scheme to blood red and raven black, with plenty of ink and tool distressing. The design itself was paste-embossed in Gold and sprinkled with Aged Gold Embossing Enamel from Stampendous. While the paste was still wet, it was heated with a heat tool until bubbling, creating the antiqued chunky metal appearance. Smears of red embossing powder over the panel, and swipes of foggy white pigment ink adds to the creepy feel. The item that cinches that is the "Enter if You Dare" sentiment from the Stampendous Tricky Words clear set.

The Smeared and Smudged site is offering prizes each day of the month by a long list of sponsors...Dreamweaver being one of them, but we are also offering one stencil to one lucky commenter on the Dream It Up! blog each day of the month! So, leave your comment below before heading over to the Smeared and Smudged blog to view all of the other creepiness!

Thursday, October 16, 2014

Dreamweaver/Stampendous/Core'dinations: SANDY Claus is Coming to Town - Day Four


SANDY Claus is Coming to Town!

Yes...SANDY Claus! All of this week, the Stampendous and Dreamweaver teams are playing with a mix of their products, along with some wonderful, SAND-ABLE papers from Core'dinations. Join us as we sand our way to the "core" of all things Christmas and the Holiday season. Of course, there will be prizes, and we give away the best...this time with a mix of fun Core'dinations products as well. To be one of three prize package winners, follow the posted link lists each day, leave a comment, and winners will be selected from these comments at the beginning of next week. Here is what you might win:


Here's what I'm showing off today:

Okay. I am officially in love with Stampendous' new "Spoonful of Snow"! A pre-mix of chunky white embossing powder, crystal glitters, and Shaved Ice, all in its own container to scoop over any pigment or watermark ink. Just heat and watch the magic happen! In the case of my card today, I had paste-embossed the Dreamweaver Mittens in regular white paste, and poured the "Snow" over the surface. I pressed it into the paste a bit, and let it sit a few minutes before heating it. The paste puffs a bit, the glitters and embossing powder meld, and the shave ice adds the most iridescent bits of color you've ever seen!

The base of my card is Core'dinations Essentials cardstock in teal and aqua, which has been machine-embossed with the new Dreamweaver Holiday Borders Embossing Folder, sanded, cut in panels, and adhered to the card front. The large snowflake is from a new set of dies from Stampendous which matches a set of Snowflakes stamps. I used the largest die as my base for this fun Winter Wonderland sentiment, stamped with Versamark and embossed in Aqua Embossing Powder.


Leave a comment for me, and head to the next on the list:

Dreamweaver:
Pam Hornschu*
Alison Heikkila
*On Stampendous team as well

Core'dinations:
(will not be posting on their company blog, but individual posts only)


Head on over to the Stampendous blog for links to their posts:


Wednesday, October 15, 2014

Dreamweaver/Stampendous/Core'dinations: SANDY Claus is Coming to Town - Day Three


SANDY Claus is Coming to Town!

Yes...SANDY Claus! All of this week, the Stampendous and Dreamweaver teams are playing with a mix of their products, along with some wonderful, SAND-ABLE papers from Core'dinations. Join us as we sand our way to the "core" of all things Christmas and the Holiday season. Of course, there will be prizes, and we give away the best...this time with a mix of fun Core'dinations products as well. To be one of three prize package winners, follow the posted link lists each day, leave a comment, and winners will be selected from these comments at the beginning of next week. Here is what you might win:


Here's what I'm showing off today:

"Twas the night before Christmas, and all through the house, not a creature was stirring, not even a MOUSE"! But, who wouldn't love this little House Mouse® Design stirring, or tucked in their Christmas stocking? Especially since little Maxwell brings a message of JOY (from the new Dreamweaver Dual Alphabet Die set) when you pull him up and out. Maxwell has been colored with Copics, is wearing a hat cut from the same Core'dinations Glitter Silk cardstock as the Dreamweaver Die Cut Stocking. A slit at the top of the stocking allows the pull-tab to slide all the way down inside the layers of the card. A trim of pompoms from May Arts is added to the stocking, and a sparkle pompom to his little Santa hat. The sentiment at the base of the card is from the Stampendous Cling Jumbo Dear Santa set, embossed in white. For this card, no sanding was done to the Core'dinations papers, as they are beautiful all on their own.


Leave a comment for me, and head to the next on the list:

Dreamweaver:
Pam Hornschu*
*On Stampendous team as well

Core'dinations:
(will not be posting on their company blog, but individual posts only)
Joann Jamieson

Head on over to the Stampendous blog for links to their posts:


Tuesday, October 14, 2014

Dreamweaver/Stampendous/Core'dinations: SANDY Claus is Coming to Town - Day Two


SANDY Claus is Coming to Town!

Yes...SANDY Claus! All of this week, the Stampendous and Dreamweaver teams are playing with a mix of their products, along with some wonderful, SAND-ABLE papers from Core'dinations. Join us as we sand our way to the "core" of all things Christmas and the Holiday season. Of course, there will be prizes, and we give away the best...this time with a mix of fun Core'dinations products as well. To be one of three prize package winners, follow the posted link lists each day, leave a comment, and winners will be selected from these comments at the beginning of next week. Here is what you might win:


Here's what I'm showing off today:

My card today is all about family. All the love and joy of having a large family together for the holidays...I miss that. Child-like wonder listening to Mom play Christmas carols on the piano, with Dad singing slightly off-key. Grandparents and cousins visiting from afar. My brother running around with a Santa hat on. A fire in the fireplace reflecting firelight off of the ornaments on the tree. And the yearly Christmas tradition of my brother and I decorating (and eating) gingerbread boys with my Gran, while wearing brand new Christmassy pajamas.


It was quite simple to conjure up those feelings again while playing with the Dreamweaver Ornate Tree...machine-embossed on Core-dinations signature cardstock, sanded, and ink-stenciled over the top  before adding the shine of Stampendous Clear Embossing Powder. The sentiment panel was a Dreamweaver Embossing Folder used with more Core paper, and sanded to reveal the old carol, and add a bit of aged love.

The final touch, the Stampendous Christmas Train stamped, colored a bit, and sanded before being cut out to wrap around the base of the tree with a sprinkle of Color Fragments for more texture, all layered and adhered on a aqua Core'dinations cardstock base.


Leave a comment for me, and head to the next on the list:

Dreamweaver:
Pam Hornschu* 
*On Stampendous team as well

Core'dinations:
(will not be posting on their company blog, but individual posts only)
Gini Cagle

Head on over to the Stampendous blog for links to their posts: