Thursday, December 26, 2013

Dreamweaver Stencils: The Perfect Little Black Dress

Are you ready to party the new year in? Needing that perfect little black dress for the occasion? Maybe one with just the perfect extra sparkle? If only it was as simple as pasting it!

My party invite/greeting celebrates that slinky little black dress, and can be remade for any occasion! For mine, I paste-embossed the Sun Dress in Matte Black, and using the edge of my palette knife, I "sculpted" the paste for extra texture. It's hard to tell in the pictures, but the end result looks like a haute couture crinkled silk. I added some diagonal bands of wonderful Art Glitter, and some rhinestone crystals for bling!

The background of the card includes pasted sections of the Flourishes stencil, and a machine-embossed sentiment finishes the look for the evening. Five. Four. Three. Two. One...Happy New Year! Celebrate with the "B" team this week as we finish off our Holidays in a Hurry challenge:


Thursday, December 19, 2013

Dreamweaver Stencils: Hurry Up! It's Cold Outside!

The Dream Team is still in Holidays in a Hurry mode, and my post today is a quick and inexpensive gift idea. Who doesn't enjoy having some fun gloves and mittens through the winter?

If you'd rather, you could do several of these and clothes-pin them to a string as a winter garland, maybe with some bits of greenery and faux snow on them! Here's the basic deets:

I bought a can of Simply Spray fabric paint at my local big box craft store. I had purchased the glove shaper/dryer in the Target Dollar Spot last year, but you can find them HERE. The mittens can be found everywhere for around $1 a pair in plenty of fun colors. For the Norwegian sweater look I was going for, I used the Dreamweaver Christmas Borders stencil. Here's the steps:

1. Place the glove on the shaper. On the back (what will be the palm), pull any loose fabric and clip it.
2. Spray the back of the stencil with stencil adhesive for a close seal against the fabric. Mask off the other areas with sticky notes.
3. Shake the paint can for a couple of minutes. Practice spraying on a paper towel. You'll begin off of your project and end the spray off of the project. I recommend using gloves.
4. Spray across the stencil about 6-8 inches away until covered. Place paper towel over surface and press down. This pushes the paint into the fabric, and removes  the drippy portions from your stencil.
5. Move your stencil to spray the other areas, being careful to
mask off previously sprayed areas.
6. Repeat with the other glove. Set aside to dry, or use blow dryer (not your heat tool!), to dry quicker and set the paint.
7. When dry, decorate with ribbon, buttons, trim, etc. I used some awesome Houndstooth ribbon from May Arts for my snazzy pink gloves. If you would rather not have to sew these items on, you can use Beacon FabriTac instead...works perfectly!
Note: According to the package directions, you are supposed to be able to wash these painted items in your machine and even dry them on a low setting. Personally, I haven't tried yet, but I think I would hand wash and lay flat to dry.
Need some more ideas for quick, last minute projects and cards? Check out the "A" team:

Sunday, December 15, 2013

Woodware UK: Wishing You Luck

The Woodware UK team is switching gears this week...no holiday/Christmas creations. This week we're wishing for a bit of luck...whether it be by a gamble, a new event, or preparing way in advance for a leprechaun visit.

I thought that I'd go with a card wishing good luck for a new home. Such an exciting time in any individual or family's life, and it's always appreciated when you show that you understand their excitement by sending a card (with maybe a gift card for shopping included).

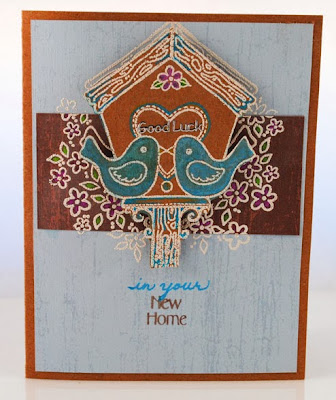
 I chose to use this darling design by Francoisé Read for Woodware, "Love Birds". I embossed the image in white embossing powder on a scrap of kraft cardstock, as well as over the top of my layers of paper panels. I added more color with Sakura Gelly Roll pens, and layered the bird house with foam tape atop the card.

The sentiment was created by applying Peel Off Small Text in silver to the heart on the house, and stamping "New Home" from the clear stamp set. Then it was up to me to hand write the "in your" with a Gelly Roll pen. When you haven't quite got the perfect sentiment in your crafty stash, it's nice to have a smooth-flowing ink to do it yourself!

The next two weeks the individuals on our team will be taking a holiday, but there will be some wonderful samples to whet your appetite for new designs in January! So, be sure to squeeze in some time with the Woodware blog, and leave comments on your favorites!

Meanwhile, from me to you...have a very happy Christmas and a lucky new year!


Thursday, December 12, 2013

Dreamweaver Stencils: Naughty or Nice? You Decide...


Did you know that it is Opposite Day? Well, in the land of Pam it is. You see, the Dream Team is supposed to be posting creations for "Holidays in a Hurry"...nice, quick projects that you can whip out in under 30 minutes...in mass quantities. But I really wanted to post my gingerbread house that I created using Dreamweaver stencils and paste...lots of paste. And glitter. If you "hurry" over to your local craft store that carries Dreamweaver, and then over to IKEA (yes, IKEA), then YOU, too, can create one for yourself...in about a week, unless you use real icing. Then it's two weeks. Here's what you'll need:

•IKEA Gingerbread house kit
•Dreamweaver Regular White Paste (large)
•Dreamweaver Translucent and Red Pastes
•Dreamweaver Scales, Stone Wall, and Hawaii Quilt Combo stencils
•Stampendous Microfine and Fine Crystal Glitters
•Clearsnap Mixed Media inks
•acetate sheets
•palette knife and spreader
•Beacon QuickGrip Adhesive
•Krylon Clear Finish Satin
•base (I used a slate plaque from Michael's)
•flameless tea lights
•patience (difficult to find right now, most of the stores are out)


 Here's what I did:

1.  I sprayed all of the pieces with clear finish and let dry.
2.  I flipped the roof pieces over and pasted the Scales stencil on the back as they were the flattest. Then I immediately poured both types of glitter over all and gently patted into the paste.
3.  While the roof panels dried, I pasted the Stone Wall design onto the reversed chimney pieces with red paste.
4.  I broke out several colors of Clearsnap Mixed Media inks, and stenciled the walls with the Stone Wall design using a dauber and a mix of colors. Heat set ink with a heat tool.
5.  I painted red paste around the window frames and the door and set that aside to dry.
6.  I selected one design from the Hawaii Quilt Combo, and pasted six of them in Translucent paste onto the acetate, and sprinkled microfine glitter over the wet surface. And set this aside to dry.
7.  Cut out the dry windows and adhere on the back sides of the walls with Quik Grip.


8.  Here is the "fun" part. Begin adhering the walls together by placing a bead of Quik Grip and paste between each seam. Paste alone will not hold this on its own. You'll need to prop everything in place as it dries, with whatever items you have laying around on your workspace. Paste jars work well for this. A man would built a special jig for just such an occasion. A woman will improvise. Yes, I realize that this sounds sexist. It's a gingerbread house not a skyscraper for Pete's sake...or Petra's sake.
9.  Glue and paste only one roof panel to the house. This is so you can turn your little flameless lights on and off without having to destroy your house.
10. Prop the other roof piece on more paste jars. Using Translucent paste and a palette knife, apply small globs to the edge of roof pieces and pull down slightly to lengthen, creating icicles. Let dry.
11. Using palette knife, apply piles of snow around the base of your house, and sprinkle with more glitter. Add paste to the edges of all pieces to mimic the icing that normal people use on their gingerbread houses. I'm not normal. I never claimed to be. That is why I'm making this house. That is also why YOU are considering making one as well.
12. I stuck ordinary straight pins into the wall of the back side of the house to prop the second roof piece onto while lit up and garnering "oohs" and "aahs" from everyone, or as a nice sharp object for your dog to bite into when he decides your gingerbread house smells like food. You might want to place your house on a really high pedestal to avoid just such an eventuality.


In the long run, I really enjoyed making this project. I'm hoping that I can pack it up carefully and bring it out again next year. Maybe even create a different one next year. Once I began, I realized that Dreamweaver has so many products and designs for creating whatever your heart desires...even if it is not in a "hurry".

Hopefully, I'm the only cheater this week. Let's go see what our "B" team has created:


Monday, December 9, 2013

Woodware UK: A Little Bird Told Me That It's Sketch Challenge Time!


It's sketch challenge time again with the Woodware girls! Number 29 seems basic, which is why it is so much fun. So many ways to go with it.

I chose to use a background of papers from the Christmas Post 8 X 8 square pad adhered to my kraft card base (the red with green dots is a scrap from MME). I added some faux "stitching" with a Sakura Micron pen around each panel for a more homey feel.

The focal panel is a sweet design by Francoisé for Woodware called "Little Christmas Bird". It just screams for coloring, which I did, with markers in a variety of colors for shading and highlighting. The extra pop comes from a Sakura White Gel pen as dots, snow, and highlights. The final addition was a few matching Card Candi down the edge of the right panel.

Now it's your turn! Create something fabulous with this sketch and follow the directions on the Woodware blog for your opportunity to win something fun!


Thursday, December 5, 2013

Dreamweaver Stencils: In a Hurry for the Holidays?

Welcome to the countdown to Christmas with Dreamweaver! The entire month of December our challenge is "Holidays in a Hurry". Every year November through December seem to fly by even more quickly. It's almost as though Rudolph has a red laser pointer for a nose, and Santa has a turbo in the sleigh! Well, we're here to help you out with that!

My holiday-in-a-hurry card features the Dreamweaver Swirly Tree pasted in Glossy White. I highly recommend following the "power pasting" technique to create multiples quickly:

1. Create "handle" with back to back tape
2. Add "hinge" of tape at bottom
3. Tape sides

4. Pasting the first panel
5. Remove side pieces. Lift handle up. Remove panel.
6. Insert next panel and repeat. Clean stencil every 4-5 pastings.

Pasted on a fun patterned paper, matted with a contrasting color, makes for super-speed assembly. The sentiment is the new Joyeux Noel stencil, also power-pasted with a small mix of white paste and Blueberry Shake Memories Mists for color. Add some bling with a few crystal rhinestones for a more special feel that the recipients will assume to took days to complete.

The "A" team is up this week for more quick ideas. Take a look...


Tuesday, December 3, 2013

Woodware UK: Skip the Spot of Tea...We're Having Coffee and Cream!

I just love when a team challenge is loose enough to play with in many directions. This week's challenge for the Woodware UK team is "Coffee and Cream"...to be taken literally or as a colorway. I decided to go with the latter.

Matted with a java cardstock and a die cut sentiment to match, mounted on a card created from color core cardstock, embossed with the Dreamweaver Damask design and sanded to reveal the core, this card is a layered dessert of coffees and creams in color.

The focal panel features the Dreamweaver Poinsettia design using the "Double Glitter" technique, but with Copper glitter from Stampendous (adding a hint of pumpkin spice to my latte!), and speckled and creamy Aged Ivory Stampendous Embossing Enamel for the petals/leaves and the Season's Greetings sentiment looks as though it has flecks of vanilla bean within it's frothy cream.

A few dewdrops covered in Stampendous chocolatey glitter to match the Embellishment Pin, and a yummy bow, and this color story rocks this theme! Hmmm. I suddenly have the urge for a cup of Joe...

Oh, don't forget to check out how the rest of the team serves up this unique challenge at the Woodware blog!


Thursday, November 28, 2013

Dreamweaver Stencils: Creating a Holiday Celebration


Our final week of the Dreamweaver November challenge...Holiday Celebrations, also know as, Anything But A Card! I have had so much fun creating projects for the Dream It Up! Blog as well as my own (except today...Lynell created her own this week!). I love to make cards, but I really enjoy making dimensional items for the home and for gifts.

Today's project is one of my favorites, and one of the most simple. I had purchased this rusted tin star hanging for 75% off at JoAnn's last year after Christmas, and still had it stashed away waiting the perfect project. I created a template of the triangular sections of the star, and used that to cut out portions of Tim Holtz's Kraft Core cardstock from Core'dinations. I had run each panel through my Big Shot machine with a selection of Dreamweaver stencils...Snowflake Background, Damask, Stripes/Plaid, and the Christmas Borders. I went over each panel with a sanding block to reveal the "core" color of the embossed areas. All of these pieces were adhered to the star with Beacon Zip Dry adhesive (my go-to-glue for most projects involving paper).

I also die cut Spellbinder Label dies from the panels, and paste embossed in copper the Noel stencil, each letter having it's own die piece. While the paste dried, I used Ranger Adirondack Copper Dabber and Distress Walnut Stain to color the plaque before adhering a strip of frayed burlap with Beacon FabriTac, and finally each letter segment.

Per usual, some yummy May Arts ribbon provided the finishing touch! The Dream Team hopes that you've been inspired to create your own Holiday Celebrations projects, and link pictures to the linkytool on the Dream It Up! blog for a chance to win the stencil of your choice. You have until the 30th to post your creation! Click on "comments" below and leave some love before moving on to the rest of our very creative ladies, and our uber-talented guest designer:


Wednesday, November 27, 2013

Woodware UK: A Quick Peek at Some Quick Cards

Looking for some quick and fun cards to create for the holidays? This week is precisely the week to "peek" in over on the Woodware blog, as this week is dedicated to quick cards.

My card features the Stampendous Perfectly Clear Snowy Short Stack...a fun set of mix and match parts and pieces of holiday icons. All that I did was stamp their heads and their feet and color them with markers. A fun plaid paper is adhered only on the edges to provide a punched pocket for a gift card, and simply decorated with rick rack and a sweet sentiment.

Have fun creating your own quick cards, and share them with the Woodware blog.


Thursday, November 21, 2013

Dreamweaver Stencils: A "Beacon" of Light Using Beacon Adhesives!


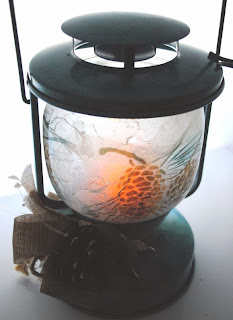
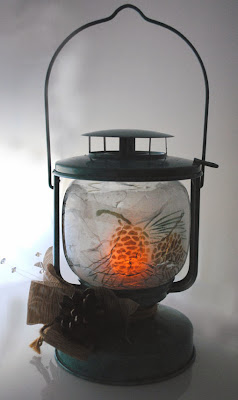
Last week, Louise Healy's post made me smile. With the two of us, our minds are always thinking alike! She had created this awesome lantern where she'd paste-embossed the Pine Cone stencil on the sides. I had to smile as I'd finished this lantern recently using the same stencil, and a totally different technique. So...if you'd love to create a lantern as decor for the holidays, or a wonderful gift, you now have two suggestions to go with.

I used a small lantern from IKEA (under $5) which stands about 8" tall. The lid comes off so that you can remove the glass globe on the inside. Using various Dreamweaver Color Solutions Alcohol Inks (Noble Fir, Aquarius, and Iceberg) and felt applicator pads (and gloves on my hands!), I applied layers of color so that the end result was a polished stone look.

I stenciled the Pine Cones on tissue paper using Memento inks, and tore out the images. I brushed Beacon Fast Finish Decoupage medium over the inside of the globe, and layered in pieces of the tissue, trying to keep the designed portions as smooth as possible. I brushed another coat over the tissue surface, and set it aside to dry (the name of the product tells you how long you'll wait). The tissue creates a soft glow inside with the addition of a flameless tea light.

The whole project comes together with the addition of a jute wrapping around the base, and a double bow created from textured May Arts ribbon. Oh, and a real pine cone adhered with Beacon FabriTac!

 I have been so excited each week to see the Dream Team's creations this month, as well as our amazingly talented home decor expert and guest designer, Linda Neff. What have they done this week?

Friday, November 15, 2013

Woodware UK: Paper Piecing a Perfect Present!


We're paper-piecing for our Woodware challenge this week! Anyone who follows my blog, knows that I love to do paper-piecing, especially with my Dreamweaver Stencils. Their more open designs lend themselves perfectly to this technique, and the large Open Owl is perfect for this. I created a small gifty for teachers, students, kids, friends. By folding a long strip of border punched cardstock, and creating a hill and valley fold in the center, it is easy to tuck a small treat bag inside, staple both at the top, and cover with a folded topper.

For the owl, I machine embossed the image onto white cardstock. Then I traced all of the pieces onto patterned paper, cut them out, and adhered them over the embossed areas. I used a circle cutter for most of the opening, and a craft knife for the rest. A little ink distressing, some fun buttons for eyes, and textured ribbon were all the embellishment needed. The topper was stamped using the Stampendous Retro Alphabet set, but really any sentiment could be added for the occasion, or personalize using the alphabet to create the name.

For more fun paper-piecing projects, visit the Woodware blog, and our very creative team!


Thursday, November 14, 2013

Dreamweaver Holiday Celebrations...Want Something to WINE About?

The Dream Team have been getting sticky lately...sticky with great products from Beacon Adhesives! As a thank you to them, we're featuring their products all of the month of November, along with our Holiday Celebrations challenge and our Guest Designer, Linda Neff!

I've created a fun gift basket for wine, sparkling cider, olive oil, gourmet vinegars, etc. My hubby and I have several good friends that enjoy sharing a great bottle of wine...or two! I purchased the basket at a Home Goods store (love shopping there!) for $2.99! I had some burlap on a roll from the local craft store, so I used the Dreamweaver Grape Cluster by paste-embossing in regular paste in two sections to cover the front and back. I pasted each twice, allowing the first to dry before slightly overlapping the first pasting to increase the size of the clusters. When dry, I replaced the clean stencil over the design, and using stencil brushes I added color with Tsukineko Memento
inks. For an additional bit of shading, I added some touches of Copic marker. When dry, I brushed over the surface with a light coating of Beacon Fast Finish to set the color. Then I added some highlights of a few grapes with drops of Glossy Accents from Ranger. I applied Beacon FabriTac to the basket staves and wrapped and adhered my burlap cover.

Using the same inks, I stenciled the design on a matching tag, adding the sentiment "Merci" over the top. Some wonderful May Arts ribbon in this luscious two color iridescent makes the perfect bow.


I wonder what my fellow designers have been up to this week? Hmmm, let's go check on the "B" team and our wonderful guest designer: