Stampendous has just released in January a new line of stencil designs by our own Fran Seiford! Six sets of "Stencil Duos", each with two stencils (as the name implies), one of which is an open design, and the other is a patterned design. Designed to work together in layers, or apart, they provide a huge variety of applications to everyday use. Even better, they come with a fine-line black doodling pen, to create your own designs inside the open stencil or the pattern, and with a set of cards to immediately begin your creativity as soon as you pop these out of the package!
The set that I'm featuring for today is the "Balloon Duo", and I simply LOVE the pattern that goes with it.
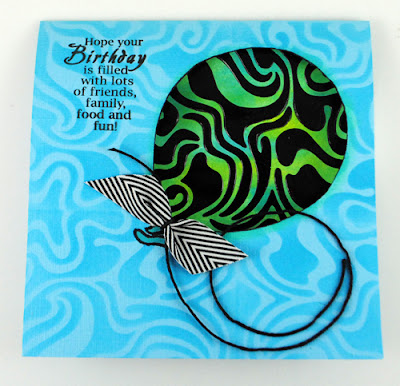
 I created a tent-fold card using My Colors Cardstock in Madras Blue. I ink-stenciled the front of the card by repeating the pattern design over the front using a large stencil brush with Electric Blue Radiant Neon ink from Tsukineko®.
I placed the open balloon stencil over the top, and traced inside of it with a pencil. Using a craft knife and mat, I carefully cut along the lines to remove the balloon, leaving an open window. I stamped the sentiment in black ink from the Perfectly Clear Birthday Assortment set.
Now the real fun starts...
Using a wet Creative Palette Rectangle, I squirted on a few drops of Radiant Neon re-inkers in the Electric Blue and Green. I used a brayer to mix the colors slightly. I had some precut panels of Mixed Media White cardstock at the ready, which I swiped across the inky surface, getting as many panels as possible, spritzing with water in between, and even brayering the ink onto some of the cards. They were all set aside to dry, and the brayer and palette were cleaned in mild soapy water and rinsed.
I selected one of the dry panels, and placed the pattern stencil on top, taping on all four sides with removable tape. I placed a large dab of Dreamweaver Glossy Black Paste on the edge of my Paste Spreader with my palette knife, and proceeded to spread it across the prepared stencil at a 45˚ angle. If necessary, you can swipe across again to remove all of the excess paste, which you'll use your palette knife to place back into your jar. Clean the edge of the jar, and put the lid on tightly. Carefully remove the tape from three sides, using the fourth as a hinge to protect your pasting as you lift away the stencil to be cleaned immediately. Set the panel aside to dry approximately 30-50 minutes.
Once dry, the panel was adhered inside the card to be seen through the "window". A May Arts Chevron ribbon and black cord were tied and adhered to the card with a bit of Zip Dry from Beacon Adhesives®.
Can't get enough of these new "Stencil Duos"? Either can we! Check out whose playing today:
Pam Hornschu (you're here)


6 comments:
Love the look of this. The colors are great.
How clever in the design of the balloon and with fabulous color! Thank you for sharing today!
WOW! I swear I saw the balloon floating in the breeze! LOVE the pattern on the balloon and background! It really gives the feel of movement! So cool!! TFS!
HOw beautiful!!!
Wow.. Just wow.. I love this.. I have to get these stencils. Not that I could do as well as the design team, but it would sure be fun trying! ♥♥♥
That is so pretty! I love how you did the background to match.
Post a Comment