Thursday, August 29, 2013

Woodware UK: A Fun Card with Fun Folds


This week is Fun Folds week with the Woodware UK team. I kept this fairly simple as special folds tend to confuse me a bit. I did find a great tutorial for this step card on Paper Craft Planet.

For my version, I used some Dotted Swiss cardstock in blueberry, and used a matching spray ink to created the spray stenciled Dreamweaver Houndstooth pattern panel and matching squares, and a different trick for the guitar panel. For the Electric Guitar, I sprayed the ink onto the stencil itself, and transferred the ink onto a white cardstock panel...very similar to letterpress. I added this fun sentiment from Woodware, "Growing Old", as it is very similar to an expression that my husband uses, "Maturity is highly overrated".

Dreamweaver Stencils: Final Christmas in August is Smokin' Hot!


Wow! We had five Thursdays in the month of August, so I had to scramble to come up with a fifth post for Christmas in August. I pulled out this card that I created in 2011 with the Stockings by the Fire stencil from Dreamweaver. I had machine-embossed the design on ivory cardstock, and swiped Vintage Photo Distress Ink over the embossed surface to highlight it. I paper-pieced the stockings, and distressed them with ink, along with the edges of the card. Cut baker's twine, brads, and an epoxy sticker finished off this fun card, which is so simple to make in multiples. I suggest you Pin this to your "gotta make for the holidays" board!

Since today is the final day of the month, it's a bit late to play along with the August challenge, but I'll give you a secret hint for the September challenge...it features the season before Christmas! Now you have an early start to playing along for September. Plus, we have some additional fun through the month of September...a month long collaboration with Art Glitter and their über-creative gals, and a hop week with the team from Quietfire Design! Whew! Oh, and you know there will be extra prizes for these events...so stayed tuned! Meanwhile, here are our volunteer teammates with their final Christmas in August presentations:


Friday, August 23, 2013

Woodware UK: In Touch With Our Girly Side!


The Woodware UK team are going really girly this week, so I've pulled out one of my most girly cards, and a personal favorite. Featuring the Dreamweaver Cameo, Houndstooth, and Fleur de Lis stencils...I created something traditional and yet, non-traditional. On the black cardstock panel, I paste-embossed in Glossy White the Houndstooth background. On a bright pink scalloped die piece, I machine embossed the Fleur de Lis for added texture, and matted this off to the side in black. On a piece of black aluminum, I machine-embossed the Cameo stencil, and sanded off the color from the embossed areas. The sweet sentiment comes from the Stampendous Hey There Cupcake Perfectly Clear set, stamped in Onyx Versafine on a banner die cut. For the added feminine bling, a few pink crystals were added for her necklace. I hope you've had fun this week, being in touch with your feminine and frilly side, and are ready for the challenge for next week..."Fun with Folds"!


Thursday, August 22, 2013

Christmas in August: One Cool Card!


Did you have fun last week with our Dreamweaver/Woodware UK collaboration? Were you one of the winners? Check the Dream It Up! blog to find out!

Meanwhile, we're still creating with our Christmas in August challenge, and we're hoping that we provided enough inspiration for you last week to break out your stencils and play along with us for a chance to win the stencil of your choice. There is no judging, we select randomly, so don't sell yourself short...play along! Link your creation to the linkytool on the Dream It Up! blog.

My card today features the brand new Leafless Tree DIE! How exciting! We love our new dies that match three of our stencil designs, and we're planning on more! Email us with your favorite design ideas at lynell@dreamweaverstencils.com.

This card is also a tutorial on Paper Craft Planet on Monday (yes, there is another DW tutorial today as usual), so you can head over there to get the info. Meanwhile, here's the products:

Dreamweaver Leafless Tree stencil and die • Dreamweaver Glossy Red Paste • Dreamweaver Double-sided Mounting Paper • Stampendous Multi UF Crystal Glitter and Red Jewel Glitter • spray adhesive • white and light blue cardstock • vellum • brad fastener
 Our "B" team is posting today, so check out the fabulosity!


Saturday, August 17, 2013

Dreamweaver and Woodware UK: Christmas in August...the Tradition Continues, Day Six


Welcome to the grand finale of the annual Dreamweaver and Woodware Christmas in August extravaganza week! Monday through Saturday we've been knocking your Christmas stockings off with fun and inspirational ideas for the upcoming holidays. All that you need to do is hop back and forth across the "pond" on each day, oohing and aaahhhing as you go, and leaving us plenty of holiday love. In return, you'll be entered to randomly win one prize package for a UK commenter, and a second prize package for a US commenter, featuring products distributed in the UK by Woodware...including Dreamweaver and Stampendous!

Prize includes four stencils, one die, and two stamps, selection may vary.


Here's what I've created for today:


No cheating today! I made sure that I had the time to create this cutie! I've always loved House Mouse images, and I'm so excited that Stampendous is the manufacturer on these little guys, and that Woodware UK will be carrying them as well!

Once again I've had the opportunity to combine two of my favorite companies, Dreamweaver and Stampendous. This House Mouse image is "Berrying Gifts", which I've stamped in black, and colored and blended with markers. Then I placed the Dreamweaver Snow Splatter stencil over the top, and paste-embossed with Regular White Embossing Paste, and sprinkled Stampendous Fine Crystal glitter over the wet paste and set it aside to dry.

Meanwhile, I also paste-embossed in white the Dreamweaver Pine Cones stencil on clear acetate, and heaped more crystal glitter over the surface. While both pasted items were drying, I worked on the card base...a large square white card, with a layer of created plaid over the top. I actually had this panel sitting in my "kibbles and bits" basket...where I save the pieces that were too good to throw away. The panel was created by inking the Plaid/Stripes stencil with Blue Lagoon ColorBox Chalk Ink and running it through my Big Shot with the cardstock panel. (Warning! Do not EVER run the Plaid/Stripes stencil through any machine with the "stripes" going crossways, they should always enter the machine parallel with the sides of the platform!) After the blue bands were created, I cleaned the stencil, and inked once again with Yellow Cadmium ColorBox Chalk Ink. Remember...the stencil goes in parallel, so it is the paper that must turn 90° before being placed on the stencil, and running it through the machine to create the plaid. By the way...you do know how to do the proper sandwich for stencils in these machines, don't you? Just in case...

     1) base platform, 2) stencil, 3) paper, 4) rubber embossing mat, 5) TWO clear plates!

When the pasted sections were dry, everything was layered, and the acetate sheet folded over the top of the card, and held in place with bright red brad fasteners. For a little more dimension, I added a drop of Glossy Accents on each berry.


Now's the time for you to leave a comment and move on to the next designer for today:

Friday, August 16, 2013

Dreamweaver and Woodware UK: Christmas in August...the Tradition Continues, Day Five


Welcome to the annual Dreamweaver and Woodware Christmas in August extravaganza week! Monday through Saturday we will be knocking your Christmas stockings off with fun and inspirational ideas for the upcoming holidays. All that you need to do is hop back and forth across the "pond" on each day, oohing and aaahhhing as you go, and leaving us plenty of holiday love. In return, you'll be entered to randomly win one prize package for a UK commenter, and a second prize package for a US commenter, featuring products distributed in the UK by Woodware...including Dreamweaver and Stampendous!

Prize includes four stencils, one die, and two stamps, selection may vary.


Here's what I've created for today:


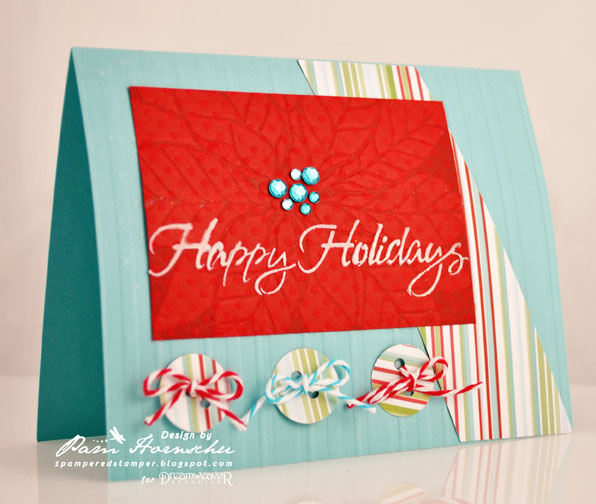
I have to admit...I cheated a bit on today's post. I created this card a couple of years ago for a sketch challenge, but it was always on of my favorites...so here it is again! This is a fun and easy card to create in multiples. Here's how I made it:
1) Machine emboss the Stripes stencil on the light blue card.
2) Angle cut a patterned cardstock and adhere.
3) Ink the Poinsettia stencil with a red ink slightly darker than the cardstock panel, and machine emboss.
4) Paste-emboss Happy Holidays on red panel with White Embossing Paste. Let dry. Adhere to card.
5) Punch circles of patterned paper. Punch "button holes".
6) Tie striped twine through each "button" and make bows. Adhere to card.
7) Embellish poinsettia with crystals.

So simple that it's no wonder I'm posting this card again!

Now's the time for you to leave a comment and move on to the next designer for today:


Thursday, August 15, 2013

Dreamweaver and Woodware UK: Christmas in August...the Tradition Continues, Day Four


Welcome to the annual Dreamweaver and Woodware Christmas in August extravaganza week! Monday through Saturday we will be knocking your Christmas stockings off with fun and inspirational ideas for the upcoming holidays. All that you need to do is hop back and forth across the "pond" on each day, oohing and aaahhhing as you go, and leaving us plenty of holiday love. In return, you'll be entered to randomly win one prize package for a UK commenter, and a second prize package for a US commenter, featuring products distributed in the UK by Woodware...including Dreamweaver and Stampendous!

Prize includes four stencils, one die, and two stamps, selection may vary.


Here's what I've created:

Now, here is a unique take on color for Christmas! Bright pink and black! Using the Ornate Christmas tree, I machine-embossed the design on pieces of pink and silver aluminum, and paste embossed in Glossy Black on the pink cardstock. The stencil was place over the top of the pink aluminum to sand away the color from the embossed surface, and then black StazOn ink was applied to the sanded areas. The various completed panels were cut out and layered on the black card, and depending on how many panels you create, you can have multiple variations. A ribbon bow, a sparkle pompom, and Decorative Pin, and a sentiment completes the card.


Now's the time for you to leave a comment and move on to the next designer for today: