
Showing posts with label #RadiantNeons. Show all posts

Thursday, April 14, 2016

A Stampendous, Dreamweaver, and Graphic 45 Voyage

STM_G45_banner 

I hope you've hopped aboard our Voyage Beneath the Sea each day this week! We've had a whale of a good time playing with all of our Stampendous and Dreamweaver ocean-themed products mixed with Graphic 45's wonderful collection of papers. Remember to leave comments on all posts this week for the chance to win one of three whopping prize packages. Details can be found on the Stampendous Impressions blog.

Here's what I'm sharing for today...


I've created a window on the world beneath the sea, which includes a bit of unexpected ocean delights like mermaids and steampunk octopi! There are two sides to this sea world...the first featuring a large worded image and teal paper from Graphic 45, along with stamped, colored, and die cut shells from the Stampendous Cling Seashells collection.


On this panel is also a Matte Black Embossing-pasted "Oi Oi" fish, which has been covered in Stampendous Aged Teal Embossing Enamel, and the same paste for the Dreamweaver "Under the Sea" stencil design.


There is also an acetate insert on which the sea weed stencil/template from the stamp set was used to paste-emboss the design with a mix of Dreamweaver Pearlescent Paste with Tsukineko® Radiant Neon green and blue re-inkers. Once pasted, these panels were covered in clear glass tiny beads.


On the second side, I've used the panel of paper featuring the Graphic 45 mermaid, on which I've paste-embossed in black the Dreamweaver Jellyfish and Sea Turtle. These have been covered in Aged Teal and Aged Hunter EE and heated as well, along with a sprinkle of Aged Black speckles.

 
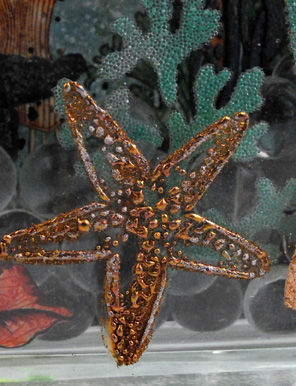
This side also has a panel of the same pasted seaweed, and the glass on the outside has been paste-embossed with the Dreamweaver Starfish, Small Scallop, and the Nautilus design. All of these used Metallic Gold Embossing Paste, and Aged Ochre EE on the first two, and a bit of Aged Gold and Rose Gold Embossing Enamel on the nautilus.

 
 
I used Beacon Adhesives' Dazzle Tac to adhere the double-sided panel to the center of the glass block (Pittsburgh Corning®). On either side of the panel, clear glass marbles were added for the bubble effect, and to keep everything in place.


Here's the rest of the crew on board for today...


Friday, February 19, 2016

The Faces of Mixed Media


Today is the finale of this week's challenge featuring the faces of Stampendous. All of this week, I've shown several ways to look at the Cling Beauty Face image. Originally, this image came packaged as a complete set with masks and templates, and blossoms, which sold out quickly and has now become simply the face image now. This provides you with the opportunity to use the wide variety of floral and mixed media images from Stampendous to enhance YOUR Beauty creation. Meanwhile, I'll share with you the process of my mixed media canvas.

I started with a pre-gessoed twelve inch square canvas, which I painted with black acrylic paint. When dry, I used a palette knife to apply Dreamweaver Crackle Paste in a fairly thin layer, and set it aside to dry.


Meanwhile, I tore a page from a dictionary, and painted a light coat of gesso over it, focusing on heavier coverage where I intended to place the face. When dry, I stamped the Cling Beauty Face with Tuxedo Black Memento ink, and smudged Tsukineko Radiant Neon Blue, Green, and Pink inks on the facial features. Using the mask/template that came with her originally, I masked off her face while stamping the blossoms in black, ink-stenciling the Dreamweaver Big Dots in Neon Yellow, and stamped and embossed in black the Cling Follow Your Art. This panel was torn around the edges, and set aside temporarily.


I stamped the Cling Seed Packet background on a section of white tissue paper. The songbird was stamped in black, and inked with Neon Green ink. This was torn around the edges as well.

I shifted gears back to the now dry and crackled canvas. Using the Neon inks and large stencil brushes, I color blocked sections of the canvas. On the green section, I paste-embossed in Glossy White the Dreamweaver Black Eyed Susans. When this was dry, I brushed Fast Finish by Beacon Adhesives® brushed over the surfaces that I would be decoupaging. The tissue panel was placed on its wet surface, and the face panel was placed on the wet surface designed for it. More Fast Finish was brushed over the tops of these panels.

Using black ink and stencil brushes, I inked the centers of the Susans, dots in the centers of the blossoms, some soft inking through the Big Dots stencil in the bottom panel, and finally inked heavily through the Dreamweaver Leafy Branch stencil. A die cut of the this same design along with layered paper flowers (which started as white, but I colored with the Neon inks) were adhered over the Susans' panel. Using a large stencil brush, areas were ink-distressed in black ink as well. The final touch was to doodle border lines using a black Pitt Pen.