Showing posts with label #Beaconadhesives. Show all posts

Friday, June 24, 2016

Gifts from the Sea


Today is my birthday, and there is no place I'd rather be for it than the seaside, which I fully plan to be (as I'm writing this post). I love all of the treasures of the sea, so I created this mixed media bottle of shells and sand using oodles of fun products from Stampendous and their crafty partners.

First of all, I mixed a bit of Dreamweaver Pearlescent and Translucent Pastes on my craft mat, and brushed the surface of the bottle with this, leaving space for the seahorse to be added. A heavy sprinkling (more like coating) of Teal Micro Glitter was added over the wet paste, and the bottle was set aside to dry.


I taped the Seahorse stencil to the bottle, and pasted it in Metallic Gold. While wet, the paste was sprinkled with Stampendous' Golden Sand Embossing Enamel, and heated it until puffy and set. I followed a similar process on the sides of the bottle with the Waves and Dots stencil, and embossed with Aged Teal Embossing Enamel. Little bits of sprinkles were added to the warmed bottle and melted to mimic bubbles, etc. A bit of Regular Embossing Paste was added to the bottom edge of the bottle, sprinkled with more Golden Sand, and heated for more dimension.


Now comes the really fun part! I adhered some May Arts® webby ribbon, an Aged Teal embossed starfish, some gold tinsel, shells which I embossed in gold, around the neck of the bottle with Beacon Quick Grip adhesive.


I brushed a bit of Beacon® Fast Finish™ over the surface, and sprinkled it with Teal Color Fragments, and adhered a flat glass marble using the Quick Grip again.


To "top this off", I used an interesting wine cork which I inked a bit on, and embossed partly in the Aged Teal EE. I had a cool shanked button for the top, so I dug a small indentation in the cork, and Quick Gripped that frosted button onto the top. This was just the kind of project that I loooooove to make! How about some more seaside inspiration? Here you go...
You can find all the details on the Stampendous! Impressions blog.

Thursday, June 23, 2016

By the Seaside Mini Canvases


Three mini canvases to brighten up your decor for the summer! All created using Dreamweaver stencils by Stampendous (Sea Turtle, Sandcastle, and OiOi Fish) with Matte Black Embossing Paste, and Aged Spice and Golden Sand embossing enamels.


The base of each canvas was painted with a mixture of Dreamweaver Pearlescent Paste and Translucent Paste and sprinkled with Color Fragments.


I love the chunky sides on these canvases!


Each canvas also features one of the sentiments from the new Perfectly Clear Ocean Wisdom stamp set, which has been doodled around for more substance.


A bit of Beacon® Fast Finish was brushed over the surface and sprinkled with Stampendous Teal Micro Glitter.


Make these as gifts, or as a fun addition to the beach cottage in your dreams! But wait, there's more. Visit my teammates posts on the link list from the Stampendous Impressions blog.

Wednesday, June 22, 2016

Collecting Seashells by the Sea Shore


Yes. I'm a collector. I collect feathers, driftwood, sea glass, rocks ('cuz hey, my dad was a geologist!), and a lot of seashells! Apparently, for just such an occasion as this!


I love to add nature to my projects, and this one features it all. However, the basis for all this was the new Cling Rubber Seashells set of stamps from Stampendous, and their matching dies. I created this tray/wall hanging using a small painted tray from the Target Dollar section (actually was $3), which I white-washed with some thinned white DecoArt® acrylic paint. I added a heavier coat to the slats inside the tray.


I stamped several of the shells on tissue paper with Tuxedo Black Memento ink, and colored them with Copic Sketch Markers. The shells were then die cut, and decoupaged onto the slats with Beacon® Fast Finish™...my favorite "go to" for decoupage. I white-washed a bit over the shells, brushed more Fast Finish on, and sprinkled Stampendous Color Fragments over the wet surface.


Now I pulled out my nature collection, and began to adhere rocks, shells, sticks, feathers, and Color Fragments, to the inside, along with my favorite May Arts® web ribbon in teal, using Beacon® Quick Grip™. Using a die cut (Fitted Frames) piece of teal blue cardstock, I swiped a bit of white paint in the center, and when dry, I stamped one of the great Perfectly Clear Ocean Wisdom Sentiments on my "sign" before adhering it to a piece of driftwood. I used a couple more pieces of driftwood, wrapped in the rope handles of the tray, and tied with twine to create the handles for the tray/wall hanging.


Finally, for a bit more visual "weight" in the upper left corner, I stamped shells on a piece of May Arts® Cotton Ribbon, tied it in a bow, adding more web, a button, and a tiny twine bow.


Pour yourself a nice glass of lemonside, and imagine yourself at the seaside while you visit the rest of the team players for today...
You can find the links on the Stampendous! Impression blog.

Thursday, April 28, 2016

Mixing it Up With Nathalie Kalbach by Stampendous


BLOG TEMPLATE

This week sharing the new foam stamp sets from Nathalie Kalbach 's n*Studio for Stampendous has been some awesome mixed up fun! If you've missed any of the posts from our team and Nathalie's team, head back to the Stampendous Impressions blog post from day one for all the details and links! After this week you'll definitely want to add these images to your "MUST HAVE" list (not your wish list)! Want a chance to win a prize package of them? Here's the info...

We are mixing it up for three commenters during the hop. Each prize package includes all three of Nathalie Kalbach’s Foam, Cling Rubber and Stencil Stamp sets. But WAIT! This is open to everyone!
Comment on each blog post at Stampendous and that of each designer’s post on the hop this week. We’ll announce winners on Monday May 2nd.


Here's what I'm sharing today...


Featuring the new Bird Foam Stamp, Cling Rubber, and Stencil set, I broke out a long canvas to work on (7 X 14 inch), and covered it in a mix of DecoArt Fluid Payne's Gray and Titanium White. And let it dry. Remember the lime green paint leftover from yesterday's project? Obviously it saw some use here with the leaf background stencil that comes in the set.


I used both the foam bird and the cling rubber bird, and stamped them using the Payne's Gray paint, which I'd applied to the stamps with a section of round sponge. The rubber image was a two layer process...stamping the back side of the foam stamp (which is totally smooth for a background shape) in white paint, letting it dry, and stamping in the gray paint over the top with the rubber stamp.


Portions of the foam stamp bird were highlighted with a bit of white paint, along with white dots on the bright green leaves.


I was happy with the contrast and pop of color on my canvas, but wanted a bit more texture. So, I mixed a bit of the gray paint in with a large dab of Dreamweaver Glossy White Embossing Paste. I spread this through portions of the Dreamweaver Graduated Dot stencil randomly over sections of the canvas. I love the look of the tone on tone texture that only adds to the design and detracts from nothing. To finish off this piece, I adhered twigs as if the birds were perched on branches, using Quick Grip from Beacon Adhesives in small dots under the portions of the twigs that touch the canvas. It works perfectly!


This project was simple and so much fun, that I know I'll be doing more like this, and some with the other sets designed by Nathalie. Like how about a long frame going horizontal with the Cityscape set? Hmmm. Check out who else is posting today if you haven't already!


Thursday, April 14, 2016

A Stampendous, Dreamweaver, and Graphic 45 Voyage

STM_G45_banner 

I hope you've hopped aboard our Voyage Beneath the Sea each day this week! We've had a whale of a good time playing with all of our Stampendous and Dreamweaver ocean-themed products mixed with Graphic 45's wonderful collection of papers. Remember to leave comments on all posts this week for the chance to win one of three whopping prize packages. Details can be found on the Stampendous Impressions blog.

Here's what I'm sharing for today...


I've created a window on the world beneath the sea, which includes a bit of unexpected ocean delights like mermaids and steampunk octopi! There are two sides to this sea world...the first featuring a large worded image and teal paper from Graphic 45, along with stamped, colored, and die cut shells from the Stampendous Cling Seashells collection.


On this panel is also a Matte Black Embossing-pasted "Oi Oi" fish, which has been covered in Stampendous Aged Teal Embossing Enamel, and the same paste for the Dreamweaver "Under the Sea" stencil design.


There is also an acetate insert on which the sea weed stencil/template from the stamp set was used to paste-emboss the design with a mix of Dreamweaver Pearlescent Paste with Tsukineko® Radiant Neon green and blue re-inkers. Once pasted, these panels were covered in clear glass tiny beads.


On the second side, I've used the panel of paper featuring the Graphic 45 mermaid, on which I've paste-embossed in black the Dreamweaver Jellyfish and Sea Turtle. These have been covered in Aged Teal and Aged Hunter EE and heated as well, along with a sprinkle of Aged Black speckles.

 
This side also has a panel of the same pasted seaweed, and the glass on the outside has been paste-embossed with the Dreamweaver Starfish, Small Scallop, and the Nautilus design. All of these used Metallic Gold Embossing Paste, and Aged Ochre EE on the first two, and a bit of Aged Gold and Rose Gold Embossing Enamel on the nautilus.


I used Beacon Adhesives' Dazzle Tac to adhere the double-sided panel to the center of the glass block (Pittsburgh Corning®). On either side of the panel, clear glass marbles were added for the bubble effect, and to keep everything in place.


Here's the rest of the crew on board for today...


Friday, February 19, 2016

The Faces of Mixed Media


Today is the finale of this week's challenge featuring the faces of Stampendous. All of this week, I've shown several ways to look at the Cling Beauty Face image. Originally, this image came packaged as a complete set with masks and templates, and blossoms, which sold out quickly and has now become simply the face image now. This provides you with the opportunity to use the wide variety of floral and mixed media images from Stampendous to enhance YOUR Beauty creation. Meanwhile, I'll share with you the process of my mixed media canvas.

I started with a pre-gessoed twelve inch square canvas, which I painted with black acrylic paint. When dry, I used a palette knife to apply Dreamweaver Crackle Paste in a fairly thin layer, and set it aside to dry.


Meanwhile, I tore a page from a dictionary, and painted a light coat of gesso over it, focusing on heavier coverage where I intended to place the face. When dry, I stamped the Cling Beauty Face with Tuxedo Black Memento ink, and smudged Tsukineko Radiant Neon Blue, Green, and Pink inks on the facial features. Using the mask/template that came with her originally, I masked off her face while stamping the blossoms in black, ink-stenciling the Dreamweaver Big Dots in Neon Yellow, and stamped and embossed in black the Cling Follow Your Art. This panel was torn around the edges, and set aside temporarily.


I stamped the Cling Seed Packet background on a section of white tissue paper. The songbird was stamped in black, and inked with Neon Green ink. This was torn around the edges as well.

I shifted gears back to the now dry and crackled canvas. Using the Neon inks and large stencil brushes, I color blocked sections of the canvas. On the green section, I paste-embossed in Glossy White the Dreamweaver Black Eyed Susans. When this was dry, I brushed Fast Finish by Beacon Adhesives® brushed over the surfaces that I would be decoupaging. The tissue panel was placed on its wet surface, and the face panel was placed on the wet surface designed for it. More Fast Finish was brushed over the tops of these panels.

Using black ink and stencil brushes, I inked the centers of the Susans, dots in the centers of the blossoms, some soft inking through the Big Dots stencil in the bottom panel, and finally inked heavily through the Dreamweaver Leafy Branch stencil. A die cut of the this same design along with layered paper flowers (which started as white, but I colored with the Neon inks) were adhered over the Susans' panel. Using a large stencil brush, areas were ink-distressed in black ink as well. The final touch was to doodle border lines using a black Pitt Pen.

Wednesday, February 3, 2016

Up, Up, and Away with New Stampendous Stencil Duos!


Stampendous has just released in January a new line of stencil designs by our own Fran Seiford! Six sets of "Stencil Duos", each with two stencils (as the name implies), one of which is an open design, and the other is a patterned design. Designed to work together in layers, or apart, they provide a huge variety of applications to everyday use. Even better, they come with a fine-line black doodling pen, to create your own designs inside the open stencil or the pattern, and with a set of cards to immediately begin your creativity as soon as you pop these out of the package!

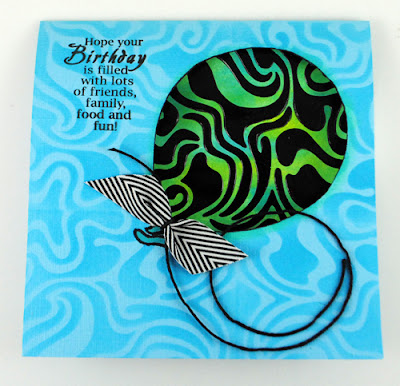
The set that I'm featuring for today is the "Balloon Duo", and I simply LOVE the pattern that goes with it.
I created a tent-fold card using My Colors Cardstock in Madras Blue. I ink-stenciled the front of the card by repeating the pattern design over the front using a large stencil brush with Electric Blue Radiant Neon ink from Tsukineko®.

I placed the open balloon stencil over the top, and traced inside of it with a pencil. Using a craft knife and mat, I carefully cut along the lines to remove the balloon, leaving an open window. I stamped the sentiment in black ink from the Perfectly Clear Birthday Assortment set.

Now the real fun starts...

Using a wet Creative Palette Rectangle, I squirted on a few drops of Radiant Neon re-inkers in the Electric Blue and Green. I used a brayer to mix the colors slightly. I had some precut panels of Mixed Media White cardstock at the ready, which I swiped across the inky surface, getting as many panels as possible, spritzing with water in between, and even brayering the ink onto some of the cards. They were all set aside to dry, and the brayer and palette were cleaned in mild soapy water and rinsed.

I selected one of the dry panels, and placed the pattern stencil on top, taping on all four sides with removable tape. I placed a large dab of Dreamweaver Glossy Black Paste on the edge of my Paste Spreader with my palette knife, and proceeded to spread it across the prepared stencil at a 45˚ angle. If necessary, you can swipe across again to remove all of the excess paste, which you'll use your palette knife to place back into your jar. Clean the edge of the jar, and put the lid on tightly. Carefully remove the tape from three sides, using the fourth as a hinge to protect your pasting as you lift away the stencil to be cleaned immediately. Set the panel aside to dry approximately 30-50 minutes.

Once dry, the panel was adhered inside the card to be seen through the "window". A May Arts Chevron ribbon and black cord were tied and adhered to the card with a bit of Zip Dry from Beacon Adhesives®.

Can't get enough of these new "Stencil Duos"? Either can we! Check out whose playing today:

Pam Hornschu (you're here)

Friday, January 8, 2016

Mixing the Media with Stampendous and Imagine Crafts!

STM_IC_blog banner

Does your stamping and stenciling "Go to eleven"*? After this week it sure will! All this week the Stampendous/Dreamweaver team are "amping" up their projects with products from Imagine Crafts®...specifically the new Radiant Neon Amplify inks, and their counterpart, the Radiant Neon inks. The first are wonderful colors that soften and grow when heated, adding incredible dimension to all your creations! You can learn about them HERE. And the second are a brighter, more vivid version of the colors. 

As usual there will be fantastic prizes as shown below. All you need to do is visit the Stampendous Blog each day this week, following the links, and leaving comments about what YOU love best! 
See Official Contest Rules for details.


Here is what I've created using the Radiant Neon inks along with the Stampendous Round Creative Palette, and "The Look" Cling Rubber Stamp Set, and one of my favorite sentiments from Stampendous..."Color Outside the Lines". Oh, and bright Color Fragments as well.


The base canvas is a 12 inch pre-gessoed one. I started by squirting Electric Pink, Coral, Orange, and Yellow Radiant Neon inks onto the surface of my ROUND Creative Palette. (If you have one, and it's not been used yet, soak it in warm water for several minutes before using.) I sprayed the surface with a bit of water (using one of my handy-dandy Spatter/Spray bottles from Stampendous), and let the colors swirl a bit. Then I placed the canvas on the surface of the Creative Palette, pressing from behind, but NOT moving it, to transfer all the color and the round shape to the canvas. This was set aside to dry for a while, and encouraged to dry faster with quick passes of a heat tool over the surface. Once dry, I stamped the "bubble wrap" image that comes with the palette randomly over the canvas with Rich Cocoa Memento ink, and stamped the sentiment as well.


Meanwhile, I took a page of poetry from an old (and beat up book), and lightly brushed over it with a bit of thinned gesso. You notice that parts of the poetry can be seen through the image, yes? When dry, I stamped the main image in Rich Cocoa Memento ink by Tsukineko®, and broke out my alcohol markers to color and shade as desired. The image was torn around the edge and ink-distressed before adhering to the canvas with Fast Finish Decoupage medium from Beacon Adhesives®. I love this product, and use it A LOT! It's thin, and is easy to lay down a coat on the surface before placing the item to be decoupaged onto the wet surface, and brushing on another coat. If you want extra shine, brush on more coats, but just one is perfect in this case, and dries SO FAST! I brushed more on the canvas, and sprinkled liberally with the Stampendous Color Fragments in the "Party" colors, which perfectly match the colors of the Radiant Neon inks.


The flower was created by stamping the floral images from the stamp set on a clear piece of mold-able plastic and cutting them out. I added the Radiant Neon inks on back, and heated each piece to make it mold-able, creating ruffles and dimension in the flowers and leaves. All were layered and adhered together and to the canvas using Beacon Adhesives "Quick Grip".


Go check out how "bright" the rest of the team can be, after leaving me a comment, please!