Monday, February 9, 2015

Stampendous Challenges You With a Flourish!

Looking for a gift idea with a bit of a flourish? This portfolio is the perfect one for you, and for the females on your gifty list. For that matter, with a change-up of colors and images, would make a great masculine gift as well!

Using a mix of Stampendous images, Die Cuts, and Fran•tagé accessories, each item from the outside cover, to the inside pockets, to the simple notes and envelope sets is created with a pretty and cohesive feel.

The papers are predominantly Authentique "Harmony" 12 X 12, cut and folded to create the portfolio. The top flap was created using the scalloped die from Stampendous' new Popup Die set. While flat, several flourishes from the new Cling Filigree Set were stamped in VersaMark and embossed with elements from the Encrusted Jewel Kit in purple. A hummingbird was die cut from chipboard, covered in VersaMark and jewel encrusted as well before being adhered to the flap with a craft glue dot. A Velcro Dot set was adhered under the flap and to the folder underneath as a closure.

The notes were simply stamped in Memento inks, with hummingbirds die cut from more Authentique paper. The notes are perfect for everyday use...birthday, get well, thinking of you, etc. Change them up to suit yourself or your recipient.

Be sure to visit the Stampendous blog for a list to those who are posting with this challenge.

Friday, February 6, 2015

Stampendous: Mad 4 U With Dreamweaver, Too!

Feeling MADLY in love...or just MAD? Either way, the Stampendous team has some great inspirations for you this week. I chose to go a bit edgy and goth on this one. Sometimes you just have to change things up a bit...even for Valentine's Day!

I used a large panel of Core'dinations red cardstock for the background, which I ran through my Big Shot with the Dreamweaver Crusade Background, and sanded to show off the design.

The Stampendous Cling Gothic Heart was stamped in black and embossed in Aged Black Embossing Enamel on a square of mirror cardstock. A bit of blood red Micro Glitter was added in splotches by means of a glue marker.

The background panel was stamped in Onyx Versafine and embossed in Aged Black twice with the Cling Kiss image. A rhinestone was adhered to one, and a jumpring inserted on the other.

Using the Dreamweaver Dual Alphabet Dies, I added my unique sentiment to complete my bit of madness.


Need more inspiration? Follow these links:

Stampendous Blog

Pam Hornschu

Lea Kimmel

Kristine Reynolds

Amy Hurley-Purdie (Thursday Post)

Thursday, February 5, 2015

Dreamweaver: Frilly and Fabulous for February!

Break out the frou frou! For the month of February, the Dream Team are going Frilly and Fabulous! Vintage, retro, or modern, adding extra charm with fun Fran•tagé products from Stampendous, ribbons and lace from May Arts, buttons, crystals, charms, or even creating your own dimensional decor! A snippet or a pile, whatever your creative heart desires! Remember to link your creations using the Inlinkz tool on the Dream It Up! blog for a chance to win the stencil of your choice! Bonus points for using Dreamweaver and/or Stampendous product in your work of heart.

Here's what I've been playing with:

To me, Frilly and Fabulous does not necessarily mean pile on every bit of embellishments that you own. Since I want the beautiful Dreamweaver Heart Whimsey to be my focal point, I wanted it to stand out, even on top of a band of red and white gingham ribbon! The design was paste-embossed in Glossy Red on a strip of acetate, and popped up slightly by means of tiny strips of foam adhesive tape placed behind the opaque elements. The background of the card was machine-embossed using the Crusade Background stencil for a nice texture. The gingham band as well as the ribbon bow are both part of the luscious products from May Arts that I'm ALWAYS playing with! To finish the card, I added tiny stamped messages from the Perfectly Clear Royal Heart Quotes from Stampendous...one of them having been stamped on a large flat brad fastener.

It's quite obvious that this card would make a wonderful Valentine, but would be equally perfect for a summer outdoorsy wedding.


For more frilly fun, visit the "A" team:


Tuesday, February 3, 2015

Woodware: Challenged by Francoisé

Françoise Read loves to play with Sakura pens, and who can blame her? There is a HUGE selection of them available through Woodware. She shared with me a tip about using the Gelly Roll Glaze pens to "watercolor" your images. Just add some of the glaze color, and use a wet paintbrush or Waterbrush to move the ink for shading and dimension. For my card, I did a bit of that with various shades of the Glaze and the Star Pens, to feature the new Dreamweaver Sailing Ship stencil design. I extended out the wave pattern a ways as well. To add some clouds, I used a sponge dauber with some gray ink and created clouds by means of the Dreamweaver Picasso tool. The torn focal panel was matted in red cardstock, and adhered to a textured blue card. More of the blue provided nice contrast for the sailors knot tied in Hemp Cord and wrapped around it. A banner/flag was added with the sentiment from the Perfectly Clear Stampendous Birthday Assortment set.

I'm anxious to see how the rest of the team plays with Françoise challenge...aren't you? Let's check it out on the Woodware blog.


Stampendous: The Berry Besties!

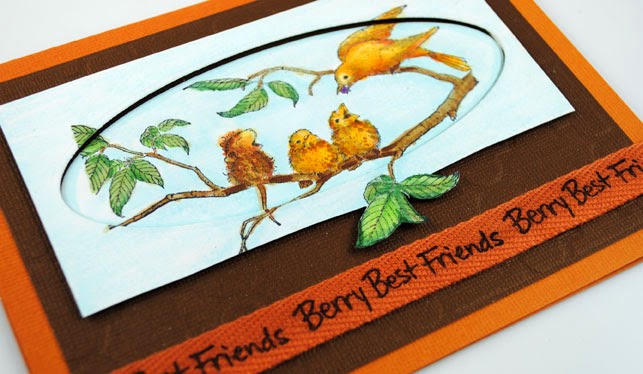
The Stampendous team is celebrating love and friendship this week, and the selection from the catalog is astounding! I felt like playing with the House Mouse Designs® for this.

The Feeding Time image was colored with Copics. The panel was die cut using one of the Dreamweaver Oval Dies. The focal point oval was adhered to the brown cardstock panel that had been machine embossed with the Dreamweaver Quatrafoil background. The remainder of the die cut panel was popped up to add an additional frame to highlight the image. One of the sentiments from the Stampendous Perfectly Clear Beary Mice set was stamped with Onyx Versafine over a length of May Arts Twill ribbon, and adhered as a border.


If you are in the mood for creating Valentine cards, or simply love and friendship, you'll find more inspiration all of this week on the Stampendous Impressions blog. For today, you can visit the list below:

Stampendous Blog

Jamie Martin

Pam Hornschu

Debbie Cole

Jennifer Dove

Amy Hurley-Purdie

Lea Kimmel


Thursday, January 29, 2015

Dreamweaver: Backgrounds for Birthdays

We are well into the beginning of a new year, and in honor of that, our monthly challenge for January has been Birthday Wishes. We'd love for you to play along with us, and link your creations to the Inlinkz tool at the bottom of this post, or on the Dream It Up! blog, for a chance to win the stencil of your choice...and remember, using Dreamweaver products gets you bonus points towards an extra stencil!

Here's my birthday wish for this week:

Creating your own patterned paper is so simple when you have Dreamweaver stencils! The purple panel was completed in opposite techniques...on the bottom, Memories Mists Grape was sprayed through the Dogwood Pattern stencil, and in an effort to not waste the ink sitting on the stencil, the top portion of the panel was placed on the wet stencil to transfer the ink. The Dreamweaver Apron Die was cut from the center to be used on another card, but I didn't want to waste the rest of my beautiful background. So I sprayed through the Leopard Spots stencil with Mango Lemonade Memories Mist onto a square of yellow cardstock. Once the corners were rounded, I placed the yellow panel behind the negative cut portion of the purple panel, and adhered both to my white card. I finished off this birthday card with a sentiment stamped in purple on a corrugated banner piece, added a May Arts' ribbon bow, buttons, and ric rac. What a fun card for any female...friend, mother, sister, aunt, or grandmother.

For more birthday ideas, check out the team links below:


Wednesday, January 28, 2015

Woodware: Hopping Along for Easter

This year seems to just be hopping along. Already we are thinking about Easter, and spring flowers, bunnies, and eggs. The Woodware team have been challenged this week to create an "Easter Delight". Mine is something fun that I made for the Dreamweaver team a couple years of ago, and is still one of my faves.

The base is double-sided yellow/orange cardstock, with the top flap only being 3 inches in order to reveal the inside panel. Aqua cardstock was machine embossed with the Dreamweaver Stripes/Plaid stencil, and paste-embossed with the Hoppy Easter sentiment and the small bunny in Regular White Paste. The top flap has a fun patterned paper panel, and a trim of green pompom fringe.

Now, the focal point. I used the Dreamweaver Open Egg stencil as a template to cut the egg shape. I "air-brushed" it using markers and one of those kid's air brush gadgets. Then I paste-embossed in white the Tall Daffodils and, when dry, colored them, as well as the bunny's ears, and inside sentiment, with the markers as well. The egg was adhered to a piece of larger white cardstock, and scallop-edged scissors used to create the pretty edge. I adhered the egg to the flap of the card with dimensional squares.

Now that I've left you dreaming of spring in the middle of winter, I'd like to remind you to visit the Woodware blog each day this week for more Easter Delights!