Showing posts with label Dreamweaver Stencils Holiday. Show all posts

Sunday, December 18, 2011

Stencils and Shaving Cream?

Today's post features some super simple cards that I created with a fun technique that I was playing with using Dreamweaver Stencils and the new Color Solutions alcohol inks. These new inks are highly saturated in color which leaves you the opportunity to have your color as in-you-face or subtle as you would like, depending on much you thin it out using the Color Solutions' Thinner/Cleaner. In the case of this technique, I used none of the thinner as the ink diluted slightly with the process. Have you ever done the "Shaving Cream Technique"? This creates a marbled effect on glossy cardstock (actually, any cardstock). I started by piling up shaving cream foam into a shallow pan (use the cheap stuff without moisturizers, and not gel...I usually buy the Barbisol brand). Place a few drops of the Color Solution inks over the foam, and use a chopstick or similar item to gently stir the color slightly, not necessarily blending. You want a pattern of colors in the foam. Now, normally, this is where you would place your cardstock down onto the foam, pull it away, and use a piece of cardboard, or an expired credit card, to scrape the excess off the card, leaving the color behind. This is where I tried something different. I used the foam as I would the Dreamweaver Stencils' embossing paste. I taped the Antler Snowflake* stencil to the cardstock using removable tape all around. Then I spread the foam across the stencil* with a palette knife, removing the excess, and removed the stencil*. I set aside the stenciled card to dry. When dry, I buffed off the film left behind, which left just the stenciled image with the swirls of color. The colors that I used for this process were the Iceberg Blue, Blue Velvet, and Citron. Since I had done some panels of cardstock with the swirl as well, I cut these into strips for borders on my cards, added a punched border, a machine-embossed Antler Snowflake* square, a Class A' Peel sentiment, and a few rhinestones for bling.

*For the set of cards, I also used the Gothic Snowflake, the Crystal Snowflake, and the Southwest Snowflake.

Thursday, December 8, 2011

A Mish Mash of Holiday Stenciling

Since the Dream Team has a free week once again, I thought that I would showcase and handful of similar cards. These cards were all done using Dreamweaver Stencil's new holiday releases this year. They feature the Nativity and the Isaiah scripture background in various techniques. For the first card, I stenciled the scripture  background, ran it through the Big Shot with the Cathedral Window stencil for texture, and inked around the edges. This was adhered to the card. The Rejoice stencil was ink-stenciled, curled and inked before adding to the card. The focal piece is the Nativity which I first paste-embossed in black...let dry...Crackle pasted it...let dry...and stenciled antique colors of inks over the top.
The second card features the Nativity distress-foiled (crumple the foil before adhering), plus a collaged background of the Fleur de Lis embossed on metallic cardstock, the Holly Flourish and the Angel stencils inked on the background. The sentiment is the reverse portion of the Peace portion of the Comfort Words stencil foiled.
The third card features the Nativity once again, foiled once again, but a combination of gold and copper foils. The background was once again ink-stenciled and distressed around the edges. The sentiment is the foil piece that created the reverse for the second card.
These cards are a great example of how you can pull out several stencils and products to mix and match...never wasting any of the bits and pieces as you go! Check out what the rest of the team have done with their free week, as well as the Dream It Up! blog...oh, and while you're there, link your own creation!


Thursday, December 1, 2011

Dream Schemes Colorway...Feeling Frosty

Have you finished making all the holiday cards that you need to send this year? Yeah. Me neither. So, that's why for this week's Dreamweaver Stencils' Dream Scheme Colorway Challenge to use turquoise and silver, my thoughts immediately went to snowflakes and finishing some more cards. Since I wanted to do multiples, I kept it pretty simple. The first and third cards in the photo above, were paste-embossed in silver with the  Antler Snowflake stencil. On the first one, the sentiment was also paste-embossed. This one was kept CAS...only a few rhinestone embellishments were added. The third card was run through my hot laminator with the Stampee Turquoise Foil over it for the shiny snowflake. I used the leftover carrier from this foiled piece to cover a piece of silver cardstock for the negative image of the snowflake to be foiled. This square was covered in Versamark ink and embossed with Stampee Stuck on You Bonding Powder before running through the laminator. This panel was layered with glitter cardstock and mounted on a glitter card. All the cards were from the DCWV Winter Box of 
 Cards...great colors, several with glitter. The center card also has the addition of partially punched snowflakes on the edges. Both the second and third cards have the Merry Winter sentiment embossed on silver cardstock, and the rhinestone embellishments as well as the first. See what the other girls have done this week in turquoise and silver, as well as the Dream It Up! blog. By the time you are done, you should be all fired up to finish (or start) your Christmas cards! Link one or more up to the Dream It Up! blog for all of us to see.


Thursday, November 10, 2011

Dreaming Ornate and Gorgeous!


We have a Dream Team free week, so I'm taking the opportunity to post one of my favorite cards that I designed for the July Holiday release of Dreamweaver Stencils. The "Christmas Tree" stencil has an almost Icelandic sweater motif design which I love. The stencil was placed on a panel of deep blue cardstock, taped down around the edges, and using the new Paste Spreader, I applied Silver Embossing Paste over the image. Removing the tape and the stencil (be sure to clean right away!), I left the paste to dry. Once dry, I placed a panel of Stampee Holographic Foil over the image face up, and placed this inside a folded piece of printing paper. Then the whole "sandwich" was run through my hot laminator to adhere the foil to the paste. It is hard to tell in the photos, but this left a holographic shimmer over the surface that is unbelievably cool. You'll just need to try it for yourself! I added some lavender rhinestones, adhered the panel to a lavender card which I'd wrapped with yummy ribbon and a bow. Such a gorgeous card. However, if I were to mail it, I think it would have to go in a box, but the shipping cost would be worth it. Imagine the look on the receiver's face when they open this card and compare it against the boxed cards that they received from everyone else. Hmmm? 'Nuff said.
Have you seen the post from Dreamweaver Stencils about the new Design Team call? You can get all the info HERE! This provides you with a great opportunity to play with all the Dreamweaver Stencil products and techniques while showing off your own creative style. Don't forget to check out the rest of the Dream Team's projects this week:


Thursday, October 27, 2011

Dreamweaver Stencils' Sketch #11-With a "Cool" Technique


This week the Dream Team is playing with a sketch created by Kim as seen at left. Since I have been coming down with some type of lovely flu, I decided to keep my version really simple. The three back panels were run through the Big Shot, with the Snowflakes Background and the Snowsplatter, doing the ink transfer technique of spritzing the ink on the stencil, placing the cardstock panel on top, followed by the embossing mat and two platens. I created a "witches brew" of ink to spritz...mixing the brand new, fabulous, Color Solutions alcohol inks from Dreamweaver Stencils, with some of the Thinner solution, and some of the Iridescent Memories Mists inks in one of those handy-dandy Mini Misters from Ranger. The combo created a beautiful, shimmery, aqua color...love, love, love. I used some glitter paper for the back panel as well as the mat around the focal point square...the Crystal Snowflake. For this, I embossed it in the machine, and then spray-stenciled the snowflake. I added a sweet sentiment from Lizzie Anne Designs (Gourmet Rubber Stamps) from their new "Season's Greetings" set, and some baker's twine and aqua rhinestones. I'm curious to see what the rest of the team has created this week with Kim's sketch, as well as Kim, herself! Come on...let's go take a look. Have some fun yourself, and link it to the Mr. Linky on the Dream It Up! blog. Feeling particularly creative? Get ready for some big news regarding a new design team call for Dreamweaver Stencils!

Thursday, September 8, 2011

A HOLIDAY CARD NO ONE CAN RESIST!


 Looking for that simple idea for a holiday card this year? Something suitable for everyone on your list? This is the card. Simple, elegant, colorful, and easy to make in large quantities.  Here are the steps:

1) Cut and fold silver cardstock to create card base.
2) Run panel of white cardstock through embossing machine with Dreamweaver Stencils' Cathedral Window, and adhere to card.
3) Use Jumbo Dauber to apply Versamark ink through the Open Bird stencil on watercolor paper panel.
4) Apply Clear Embossing Powder and heat to emboss.
5) Spritz panel with Blueberry Shake, Turquoise, and Iridescent Memories Mists at an angle, and let run off. Set aside to dry. The embossed area will resist the inks.
6) Mask off extra expressions of Comfort Words stencil, and paste-emboss "peace" in Silver Embossing Paste on panel. Set aside to dry.
7) Adhere panel to card.

Were you a winner on the Dreamweaver Stencils/Woodware UK hop last week? Check HERE!
Be sure to visit the rest of the Dream Team and see what they've been busy with for this free week!


Sunday, December 5, 2010

Sparkle Stocking


 It's no wonder that my entire house, car, cats, and clothing seem to be sparkling lately. I seem to be adding glitter to everything! Let's face it, the holidays ARE the Sparkle Season! This card is no exception to that rule. The Long Stocking was stenciled with white embossing paste onto a striped print paper and sprinkling heavily with  Crystal glitter before setting aside to dry. Meanwhile, I ran the dark green panel and the red panel through my Big Shot with the Diamonds and Large Dots stencils from Dreamweaver Stencils. A cute homespun plaid bow was tied to the the green panel with a jumbo sentiment brad added. Once the stocking was dry, it was cut out, shaded slightly with a light gray marker, and little pompoms were added for fun. In my opinion, all holiday projects should start with a pinch of tradition, a scoop of fun, and a lot of sparkle!
Pam

Long Stocking (LL499), Large Dot (LJ804), and Diamonds (LG618) from Dreamweaver Stencils
White Embossing Paste from Dreamweaver Stencils (DEP)
Multi Ultra-fine Crystal Glitter from Stampendous (GM220U)
Bazzill Cardstock, Me & My Big Ideas print
Jumbo Brad Sentiment (Queen & Co.)
ribbon (JoAnns)

Note: Be sure to check back on Thursday for the next Dreamweaver Stencil's Thursday Dream Scheme!

Thursday, December 2, 2010

Thursday Dream Schemes Sketch Challenge


 Week two of the Dreamweaver Stencil's Thursday "Dream Schemes". This week, Wendy Jordan designed our sketch. Be sure to hop over to her blog as well as the rest of our team of uber-talented ladies as listed at right, and then on over to the Dreamweaver Stencil's "Dream It Up!" site (in case you haven't already!), leaving some love along the way. Tons of inspiration to get you started, or continuing on the road to happy stencil-dom! My version of Wendy's sketch uses the "Christmas Lights Border" which I paste embossed in silver on a strip of black cardstock. Once dry, I added red and green paste over the lights. It's hard to tell in the photo, but just enough silver shows through the red and green to add nice shimmer. The process for doing this is:
1) Place stencil on cardstock and tape down around all sides with removable tape.
2) Apply silver paste with palette knife over stencil
 smoothly, removing excess. Carefully remove stencil immediately to clean in warm soapy water, and let pasted strip dry. (Approximately 30 minutes.)
3) Once dry, replace the stencil, and carefully apply the red and green paste over the lights with just the tip of the palette knife. Remove stencil to clean once again, and set the strip aside to dry again.

The same process was used to paste-emboss the sentiment. Once all was dry, the card was assembled, adding a silver border around the sentiment and along the strip. A fun plaid bow was the finishing touch. Be sure to play along with us each Thursday, and post your own creations for all to see with a link to the Dreamweaver Stencils blog.

"Christmas Lights Border" from Dreamweaver Stencils (LM280)
"Season's Greetings" from Dreamweaver Stencils (LS91)
Metallic Silver Paste (DSP), Glossy Red Paste (DGRP), and Glossy Green Paste (DGGP) from Dreamweaver Stencils
Coredinations and Bazzill cardstock
metallic silver and black linen cardstock
ribbon (Michael's)
palette knife from Dreamweaver Stencils (DPK)

Wednesday, December 1, 2010

Woo Hoo For Me, Number Three!

 My third article on Scrapbooking.com Magazine came out today, featuring these three cards that I created using Dreamweaver Stencils. The first, using the "Holly and Swirls" stencil, was created using the Copic Marker Airbrush System with Copic Sketch Markers. I added highlights over it with a gold pen. The second card, used the "Go Green" stencil, which I demonstrated in three ways...machine-embossed on the dark green panel, ink stenciled on the background white panel, and paste-embossed on the lighter green panel focusing on just one section of the stencil. The third card incorporates the beautiful "Christmas Script" stencil. For this I ink-stenciled the "Holly Flourish" stencil for the background, and paste-embossed in gold the "Christmas Script" on the red panel. The "Holly Flourish" overlaps onto the red panel. A little distressing around the edges,
 a metallic gold border, ribbons, and Dot Sparkler
 stickers finish this card off. This particular card may look familiar, as I have posted it before, but was asked to removed it from all online sources until this article was released. Be sure to check out the article for more info on the stories behind my creations.
Pam

"Holly and Swirls" Card:
"Holly and Swirls" stencil (LL3005)
Copic Airbrush System and markers
gold gel pen
Canson and Bazzill cardstock
ribbon from American Crafts
Three Inch Pins from Dreamweaver
Martha Stewart border punch

"Go Green" Card:
Go Green stencil (LX3000)
White Embossing Paste (DEP)
Pastel Lime ColorBox Chalk Ink
Big Shot Machine
Three Inch Pins from Dreamweaver
ribbon from American Crafts
beads

"Christmas Script" Card:
Christmas Script stencil (LL3009)
Metallic Gold Embossing Paste (DGP)
Bazzill, red linen, white, metallic gold cardstock
Red Class A' Peel Dot Sparklers from Stampendous (AC672HSR)
Olympia Green and Vintage Sepia Versafine ink from Tsukineko
Fiskar Border Punch
ribbon (Michael's)

Thursday, November 25, 2010

Dreamweaver Stencil's Thanksgiving Day Parade and Kick Off!


In honor of our Dreamweaver Stencil's Dream Team's very first Thursday Dream Schemes and Thanksgiving Day "Parade" of holiday inspiration, I decided to post this card featuring a parade of penguins. Our challenge this week from our fearless leader, Lynell, was to create a holiday card in non-traditional colors. This meant no red and green in any variety. So, I went with wintery white and blue, with the pop of black and some sparkle. For the background, I paste-embossed the Mosaic Swirls stencil over glitter paper for a frosty look. I paste-embossed in black matte the penguins on a white cardstock panel, and covered them in black glitter. When dry, I added soft color and shading with my Copic Sketch Markers. I cut around the end penguin for more of a feeling of movement, as if he were about to dive into those gorgeous swirls. The sentiment was paste-embossed in white and sprinkled with glitter on a corrugated panel of Bazzill Bling cardstock. For those of you who haven't tried paste-embossing with stencils, you are definitely going to have fun with this process. There are so many great colors to play with, and extra ways to embellish the paste...Dreamweaver's Metallic F/X for an iridescent shimmer, glitter, chalks, Paintstiks, inks, etc.
Steps:
1) Use removable tape to hold the stencil down.
2) Apply the paste across the stencil with a palette knife as if icing a cake, smoothing off the excess.
3) Carefully remove the stencil and immediately clean with warm soapy water.
4) Add glitter over the surface immediately if desired. Set aside to dry for approximately 15-20 minutes for matte finish pastes, or 1-2 hours for glossy finish.
5) When dry you can replace the stencil in order to precisely apply the Metallic F/X, chalks, inks, or paints.

"Merry Winter" from Dreamweaver Stencils (LM252)
"Penguins" from Dreamweaver Stencils (LL560)
"Mosaic Swirls" from Dreamweaver Stencils (LJ901)
White (DEP) and Matte Black (DMBP) Embossing Paste from Dreamweaver Stencils
Multi Ultra-fine Crystal Glitter (GM220U) and Black Ultra-fine Glitter (GM365U) from Stampendous
Copic Sketch Markers
glitter paper, black and white cardstock, Bazzill Bling blue cardstock
ribbon
double-sided foam adhesive
Be sure to follow the entire "parade" of amazing creativity by hopping to each of our talented team members as listed at right, and back to the Dreamweaver "Dream It Up!" blog. Remember to leave some sugar for each of us, and to hop back again each Thursday for our latest Dream Scheme!

Monday, November 22, 2010

Oh, Joy! A Dreamweaver's Announcement!


Oh, joy! This posting is an announcement of something new with the Dream Team at Dreamweaver Stencils. Starting on Thursday, the 25th, we will be posting as a team each week. We're calling it "Thursday's Dream Schemes". Since we are kicking it off this week, which also happens to fall on the Thanksgiving holiday, we are kicking it off in style with our own version of a "Thanksgiving Day Parade" of brand new holiday inspiration. If you haven't already started to create your holiday cards, tags, and projects, this can be your jumping off point. There will be oodles of great ideas for you. So be sure to join the parade on Thursday (after you eat too much and go into a tryptaphan coma, but before you plan your Black Friday insanity). There will be links to all the DT members so you can oooh and aaaah over all the yumminess.
For today's post, I created this card in frosty blues. I Nestie die cut a window in the panel to frame an acetate panel that I had stenciled "Joy" on using white embossing paste and glitter. The frame panel had been airbrushed with the Copic Airbrush System using several gorgeous shades of blue and lavender. I highlighted the snowflakes with my Quickie glue pen and more glitter. The lacy border at the bottom and the shimmery ribbon bow complete the look.
Pam

"Joy" from Dreamweaver Stencils (LL328)
"Snowflakes" from Dreamweaver Stencils (LJ819)
White Embossing Paste from Dreamweaver Stencils (DEP)
Multi Ultra-fine Crystal Glitter from Stampendous (GM220U)
Thermo Acetate from Stampendous (PC75)
Bazzill Cardstock
white cardstock
Fiskar Border Punch
Nestabilities Classic Ovals
ribbon (Offray)

Thursday, November 11, 2010

Printed Poinsettia Card

Here's another version using that great Poinsettia stencil from Dreamweaver's Stencils. This one uses the inking-the-stencil-first technique. In other words, apply the ink directly onto the stencil before running the stencil and (in this case) printed paper through the Big Shot. The ink settled in the nooks and crannies and provides an extra highlight to the embossed image. The sentiment and the background were also run through the Big Shot to emboss. So easy and looks great! A few rhinestones and ruffled sparkly ribbon for bling, and voila! One more holiday card completed! Woo hoo!
Pam

"Poinsettia" from Dreamweaver Stencils (LG700)
"Big Dots" from Dreamweaver Stencils (LJ804)
"Happy Holidays" from Dreamweaver Stencils (LS93)
Rocket Red Brilliance ink from Tsukineko
Bazzill cardstock
Pebbles in My Pocket-Tree House Collection "Merriment"
MME polka dot print
rhinestones (Kaiser)
Big Shot, corner rounder
ribbon (Michael's)
double-sided foam adhesive

Wednesday, November 3, 2010

Paste Embossing and Beyond


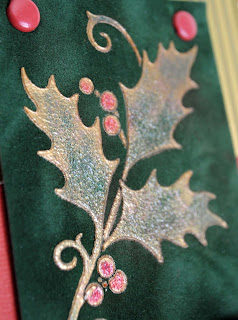
I love, love, love all the new release stencils from Dreamweaver Stencils for the holidays. This is one of my particular favorites, "Holly and Swirls". I have made so many cards with this one, some of which I've posted, and some that are out for publication. I stenciled with Embossing Paste for this one. The process goes like this: 1) Place the stencil on the surface to be stenciled (in this case, velveteen paper) and tape down around edges with removable tape. 2) Using a palette knife, apply the paste across the stencil kind of like icing on a cake. Don't press too hard as you go, or it will push the paste under the bridges of the stencil. 3) Go over the surface again to remove excess paste for a smooth surface. 4) Remove stencil carefully and immediately place in warm, soapy water to clean. 5) Set aside stenciled piece to dry. Drying time can vary depending on humidity, which paste is used (glossy and metallic take longer), and thickness of application. Usually somewhere between 30 minutes and 1 hour.  Now, for this card, once the paste was dry, I placed the stencil back over the surface and sponged some Versamark ink over the pasted surface. Then I sprinkled the berries with red embossing powder, heat set that, and sprinkled green over the leaves and heat set that...all very loosely as I still wanted the gold to show through. The stencil needs to be in place while you sprinkle the powders or they will get trapped in the fibers of the velveteen paper. I embellished the card with metallic gold cardstock run through the corrugator, lacy borders, and the sentiment which is another stencil run through the Big Shot with the gold cardstock. Happy holiday creating!
Pam

"Holly and Swirls" from Dreamweaver Stencils (LL305)
"Happy Holidays" from Dreamweaver Stencils (LS93)
Metallic Gold Embossing Paste from Dreamweaver Stencils (DGP)
Palette Knife from Dreamweaver Stencils (DPK)
Emerald PEARLustre Embossing Powder from Stampendous (EP217)
Rubelite PEARLustre Embossing Powder from Stampendous (EP233)
Versamark ink from Tsukineko
Bazzill Basics Maraschino cardstock
Paper Adventures Velveteen Paper, Metallic Gold cardstock
marbled ivory cardstock
Fiskar Border Punch
Marvy Corrugator
corner rounder, 1/16" hold punch
American Crafts brad fasteners
double sided foam adhesive
removable tape
Big Shot

Thursday, October 21, 2010

Dreamweaver/Paper Therapy Challenge-Stocking Surprise


 The Dreamweaver Stencil's Design Team in conjunction with our own Wendy Jordan's blog, "Paper Therapy", is challenging all of you to break out your Dreamweaver stencils and get creative. Post your own fun project on the Paper Therapy site and you could have the opportunity of winning FIVE FREE STENCILS! For more info, check out the Paper Therapy blog. For more inspiration, check out the rest of the design team listed at right. Here is mine:
Sometimes you just come up with a clever idea and this was one of mine. I love this "Long Stocking" stencil from Dreamweaver Stencils, and I wanted to experiment with paste-stenciling on velveteen paper. I was quite happy with the result, but then decided it needed something else...maybe a sentiment? Hmmm. Where would I put it? Not much room. Bing! (light bulb going on overhead)...I had it! What if I made a long skinny tag that could slide in and out of the stocking, 'cuz hey, aren't stockings supposed to have surprises? Fortunately, Dreamweaver also had this long sentiment that fit perfectly inside. The background of the card was ink-stenciled using Versamark ink with the "Diamonds" stencil. Some fun retro-inspired ribbon and tiny pompoms were added for whimsy. Yep. The mojo was definitely with me on this day!
Pam

"Long Stocking" (LL499), "Vertical Rejoice" (LS1001), and "Diamonds" (LG618) from Dreamweaver Stencils
Glossy Red embossing paste from Dreamweaver Stencils (DGRP)
black velveteen paper from Paper Adventures
Onyx Versafine and Versamark inks from Tsukineko
ribbon from American Crafts
eyelet, brad fastener, pompoms, satin ribbon