Showing posts with label #ChameleonPens. Show all posts

Friday, September 4, 2015

All in One...It's in the Bag!


Hasn't this week been so much fun? Don't you just LOVE the new "All in One" designs from Stampendous? Perfect for simplifying your cardmaking and giftgiving through the fall and winter holidays!

Here's a cute idea that will have your Halloween treat-giving/party-goodie-bag "in the bag". The Eek a Boo square image was simply stamped on our Mixed Media White cardstock, colored with my Chameleon* markers, cut out, adhered to a black square, and all of it distressed with a mix of white and gray inks.

A panel of black/kraft Chalk Core cardstock from Core'dinations was run through my embossing machine with my Dreamweaver Spider Web stencil, and sanded to reveal the design, before adhering to the kraft bag. At this point, I adhered the All in One square to the bag around the bottom and sides only, leaving it open at the top for a pocket. I stenciled black Stripes on a strip of purple cardstock, stamped some Halloween images from the Tricky Words Perfectly Clear set, created two folds for the strip to be adhered to the back of the bag, and slipped the other end into the pocket. 

Of course, I HAD to add a cute gingham taffeta bow and an orange stringy pompom from May Arts to finish it off...oh, and wiggle eyes. Hee hee.


There's more fun to be found with All in Ones on these team links:


*Be sure to check out the Chameleon Pens on their website HERE! And their Facebook page HERE.


Thursday, July 16, 2015

Dreamweaver Thursday: Christmas with Chameleon


All of this week, the Stampendous/Dreamweaver team have been showing off a fabulous new marker system...Chameleon Pens. These are so unique, and have a bit of a learning curve, especially when you're used to working with the various alcohol marker systems on the market. Once mastered, these are a great option, as you'll see when visiting the team's posts this week. Just an aside...Chameleon people...thank you so much for providing our team with complete sets of these markers, as well as the fabulous video tutorials found HERE.

Today's post features the House Mouse Designs® Mistletoe Bunnies, stamped on a panel of our Mixed Media cardstock, and colored and shaded with the Chameleon Markers. The colored panel was then covered with VersaMark ink, and coated with Stampendous Crystal Embossing Powder for a clear sparkle. Then the same panel was die cut with the Dreamweaver Oval Ornament die, matted in red, and adhered to the base card over a border of Christmassy ribbon.

As for the base card, the Dreamweaver Heart Ornaments stencil was paste-embossed in Translucent Paste, and covered with Stampendous Micro Crystal Glitter, and set aside to dry.


We have several team members playing along with the Stampendous and Chameleon products this week with a focus on Dreamweaver as well. Be sure to check them out and leave them some love:


Monday, July 13, 2015

Stampendous and Chameleon...a Colorful Christmas Combination


All of this week, the Stampendous/Dreamweaver team are showing off a fabulous new marker system...Chameleon Pens. These are so unique, and have a bit of a learning curve, especially when you're used to working with the various alcohol marker systems on the market. Once mastered, these are a great option, as you'll see when visiting the team's posts this week. Just an aside...Chameleon people...thank you so much for providing our team with complete sets of these markers, as well as the fabulous video tutorials found HERE. Be sure to check the Stampendous blog for info regarding the prizes to be won this week, and all the rules, etc. (Hint: leaving comments is a BIG rule!Lol.)

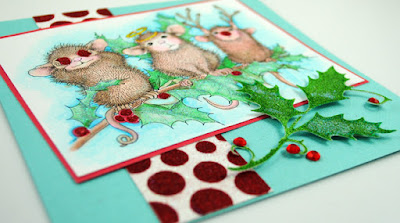
My card today features the new House Mouse Designs® Christmas Characters, stamped in Tuxedo Black Memento, and colored and shaded with my Chameleon markers. The mice are a perfect way to begin using these markers, as they are smaller images to work with, and easier to blend using their toner marker. These work well on the Stampendous Mixed Media cardstock as well. I embellished the panel by adding drops of glue and Stampendous Micro Red Glitter to the berries, and brushing glue over the leaves, and sprinkling them with Micro Crystal Glitter.

I created a border/accent strip using the Dreamweaver Spiral Dots stencil in the double glitter technique, with both the red and glitters used above, on the Dreamweaver Double-sided Mounting Paper. For a video tutorial on this technique, please visit our Dreamweaver by Stampendous YouTube channel, at THIS LINK.

The final touch, was a panel of that same sticky paper, covered in Stampendous Micro Green Glitter, and run through my Big Shot Pro with the Dreamweaver Holly Swirls die. More glue and glitter for the berries, and the die cut was popped up off of the card with bits of foam tape. (By the way, the negative portion of that die cut panel is being saved for another occasion.)


Be sure to visit these links for today's inspiration: