Wednesday, January 6, 2016

NEWLY RELEASED and Radiant!

STM_IC_blog banner

Does your stamping and stenciling "Go to eleven"*? After this week it sure will! All this week the Stampendous/Dreamweaver team are "amping" up their projects with products from Imagine Crafts®...specifically the new Radiant Neon Amplify inks, and their Radiant Neon counterparts. Wonderful colors that soften and grow when heated, adding incredible dimension to all your creations! You can learn about them HERE.

As usual there will be fantastic prizes as shown below. All you need to do is visit the Stampendous Blog each day this week, following the links, and leaving comments about what YOU love best! 
See Official Contest Rules for details.


My project today does not feature the Amplify inks, but you'll see an awesome project that I created with those tomorrow (no brag, just fact!), so be sure to visit again! The card below shows off the Radiant Neon inks in all their bright and happy color, and are perfect to use with the Stampendous Newly Released Stencil Duos designed by Fran Seiford. These come in sets that include two square metal stencils (same material as the Dreamweaver ones are made with), with one of them being an open design, and the other a pattern design, to be used separately or together. They also come with a black liner pen for adding your own tangles and doodles to the designs.

k
Electric Blue, Purple, and Green have been used to ink stencil Fran's NEWLY RELEASED Stencil Duo Gift on just the package portion on a white square panel. Here's how...

1. Place the pattern stencil over the white panel, and adhere with removable tape.
2. Place the open shape over the pattern, and tape as above. (This will mask off the area of the pattern that you won't want showing, but still color the design where you do want it.)
3. Use small stencil brushes to "rouge" (circular motion) the inks into the design. Use a Picasso tool to keep color out of the sections that will be different.


4. Remove stencils. Replace just the open stencil and trace around inside edges with the black lining pen included in the set. Remove stencil to clean.
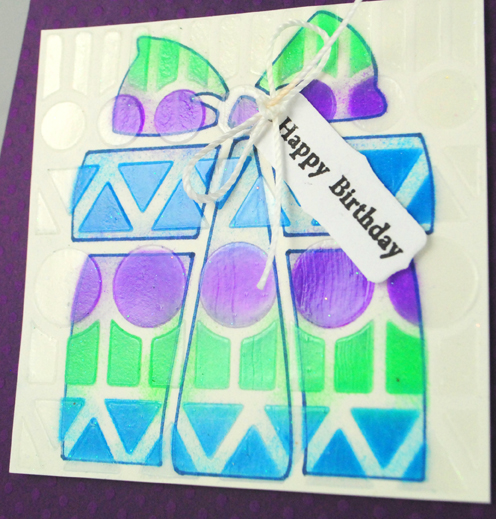
5. Replace pattern stencil only over square, and tape all sides. Spread Translucent Embossing Paste over surface, so that the colored pattern is shiny, and rest of the pattern is clear and shiny. Remove stencil to clean immediately, and set square aside to dry.
6. Adhere panel to card, and embellish as desired.


 For more radiantly bright ideas, check out our players for today...

Pam Hornschu (you're here)

*References a quote from "This is Spinal Tap: The Movie".

Thursday, December 31, 2015

Merry and Chilly

I love all things snowy and winter sparkly. Probably because I live in California, and see very little snow. For the holidays, I tend to decorate with a plethora of pine garland, with sparkly white fake snow on it, and pine cones, and plenty of snowflakes as well. So, you know that I just love this stencil from Dreamweaver called Heart Ornaments.

The entire design was paste-embossed in Regular Embossing Paste on a light blue panel, and set aside to dry. When dry, I replaced the stencil over the design and sponged ink over the surfaces. I created a "stencil" from a border punch of drips from acetate, and used that to mask off the hearts except where the "snow" would be pasted on. Dabs of more paste were added to the branch and needles, and sprinkled with Stampendous Multi Crystal Glitter.

Once dry again, the panel was matted in white and layered onto a red card, with the addition of a simple red bow. The sentiment was pasted similarly, and can be found on the Stencil with Style site HERE.

And that is how I play in the snow!


Visit the Stampendous Blog and these ladies for more frosty ideas:

Pam Hornschu


Wednesday, December 30, 2015

Chilly and Quick-Change Artist


Do any of you remember this little project that I did a little over a year ago for my guest bathroom? The walls in that bath are painted a beige/mocha color which was very popular until recently. Nowadays the "neutral d' jour" seems to be in the gray realm, which I really like. I. HATE. TO. PAINT! (Except on canvas.) So rather than paint the bathroom, I chose to find a way to bring in the gray in a way that will still coordinate with this light mocha color. I found a shower curtain with white, beige, blue-gray, and gray in it, along with patterned towels in those colors. The frame that I had purchased (above) is a slate-blue-gray color, with a beige linen matting. Originally I had decorated it with die cuts of the Dreamweaver Stylized Dahlia design from a pad of DCWV Gauze paper, layered. Great for the rest of the year, but not for the holidays, and especially not when we were having a holiday party. So...this is what I did...

I went with a vintagey winter theme with silver and gold and the blue-gray, lots of sparkle as you can see in the pictures above and below. I changed out the inserts of the frame with machine-embossed panels of Core'dinations cardstock in beige, sanded, and brushed with silver Delicata ink from Tsukineko®, paste-embossed Dreamweaver Antler Snowflakes on Stampendous die cut Snowflakes in gold paste and Gold Halo Glitter. The center panel was a soft blue-gray panel, paste-embossed in silver using the Dreamweaver Leafless Tree, and covered in Silver Halo Glitter. At the base was Versamark ink daubed on and covered with Stampendous Sparkle Puff Embossing Powder, and a sprinkling of Shabby Blue Embossing Enamel heated from underneath for "snow".

A super simple project, and so beautiful to see in person. Below is a pic of the opposite wall decorated in the same colors, with the same winter theme.


Bring a little winter into YOUR home, but in a way that is cozy and not cold. For more inspiration, visit the Stampendous Blog this week!


Thursday, December 24, 2015

It's Finally Christmas Eve!


I know that most of my regulars (and irregulars) are super busy today, but just in case you've finished wrapping, baking, visiting, and ELF watching, and finally have a moment for yourself, grab your peppermint mocha, pull up a seat, and view the team's posts for Dreamweaver Thursday.


I'm featuring my gingerbread house that I created two years ago, and stenciled. Yes, stenciled. I had purchased a pre-baked gingerbread house kit from IKEA, and went at it with everything in my stash of Dreamweaver products...which is a LOT!

Each wall was ink-stenciled using the Stone Wall stencil with Tuxedo Black and Rich Cocoa Memento inks. The chimney pieces were paste-embossed with a mix of Regular Embossing Paste and red acrylic paint. The leftover mix was painted over the window frames and the door.

The roof pieces were were paste-embossed with the Small Scales stencil design using Regular Embossing Paste, and covered with Multi Crystal Glitter Mix from Stampendous. The window "panes" were each paste-embossed with Translucent Paste using the Dreamweaver Hawaii Quilt Combo design. I added dabs of the same paste along the edges of the "eaves" for icicles. All items were set aside to dry overnight.


To adhere all of the pieces together, I used more of the Regular Embossing Paste, dabbed on with a palette knife, and covered with more glitter. I added a few dabs to the window sills as well, and bank of it around the base of the house. The entire house was adhered to a slate plaque that I had in my crafting stash, and just happened to be the perfect size. The roof pieces were pasted together at the top, but not attached to the house. Instead, I stuck straight pins through the top edge of the walls so that the roof/lid would rest on top, but I could still access the inside. I placed flame-less tealights inside for display purposed. Though this project looks good enough to eat, no one would want to, but it does smell nice and ginger-bready. After the holiday, I sprayed the outside with a satin finish to seal it for display in years to come

Check out how our team is "wrapping up Christmas" for today. Have a wonderful Christmas Eve and Christmas to those who celebrate, and a happy holidays to everyone!


Friday, December 18, 2015

Sing Joyfully with House Mouse Designs

These two wonders of the season are singing and playing their hearts out in celebration of the Lord, just as the Stampendous team have been doing all this week.

This darling House Mouse Designs® Joyful Noise was stamped in black Memento ink, and colored with Copic Sketch Markers. Beacon Adhesives' Tacky Glue was brushed over the robe and wings of our little "angel", and a bit on the berries before sprinkling with Micro Crystal Glitter. The sentiment from Joyful Phrases was stamped on the panel before matting it in blue, and adhering it to the red card base and the white glitter cardstock panel.

Check out the sweet inspiration from these ladies...

Thursday, December 17, 2015

Dreamweaver Thursday: Celebrating the Reason for the Season

You see those three wise men on camel-back being led by that beautiful star to the city shown below? They were being led there for a reason...and that reason was the birth of the child on which so many religions base their faith...and the reason for the Christmas season.

Over the years, people have incorporated their own beliefs and traditions into the celebration of what this child represented for all...HOPE.

The Stampendous/Dreamweaver team have been sharing their own thoughtful creations in this celebration, and for today, I'm sharing this piece that I made for the July 2015 Stampendous catalog.

The base is a 12 inch square Bazzill Board in black. VersaMark has been dabbed around the edges, and then sprinkled with Aged Gold Embossing Enamel before heating to add a shiny and textured bit of dimension.

Adhered to the top of this, is a panel of Bazzill black canvas cardstock, on which the side has been ink-stenciled with a large
stencil brush and VersaMark ink, before brushing Sapphire Metallic F/X mica powder over the surface, and adding a few self-adhesive crystals and a border strip of ribbon.

The final panel features the Dreamweaver Peace on Earth all-in-one stencil design, paste-embossed in Matte Black on the same black canvas cardstock. When dry, the stencil was place over the design again, inked with VersaMark, and brushed with Sapphire and Goldfinch mica powders, before being popped up with foam tape over the previous layers. The end result is a beautiful reminder to all that can be enjoyed each year.


For more inspiration for the reason for the season, please visit the team links below:


Pam Hornschu (you're here)

Wednesday, December 16, 2015

A Child is Born


Feeling the need to keep the "spirit" in Christmas? This is our blog challenge for this week, and there will truly be some amazing inspiration from our wonderful team.

My card features some perfect stencil designs from Dreamweaver by Stampendous. On the right side of the gray cardstock base, I've paste-embossed the Quatrafoil stencil in Metallic Silver. A pretty blue ribbon has been wrapped and tied around the card base, with the addition of a Dreamweaver Nested Frames die cut tag, stamped with one of the Perfectly Clear Joyful Phrases.

The focal panel is a beautiful blue Core'dinations cardstock square, machine-embossed with the Dreamweaver Prince of Peace design, and sanded to reveal the raised image. Finally, the Nativity stencil was paste-embossed in silver on the panel, and set aside to dry thoroughly. A piece of silver foil was placed on top, shiny side up, placed inside a folded piece of copy paper, and run through my laminator to adhere the foil to the pasted image. A bit of ink distressing was added around the edges of both the panel and the card to finish it off.

Please visit these blogs today...

Pam Hornschu